Week 3: Lab Automation & Opentrons Art
Part 1: Opentrons Agar Art - Biohazard Symbol
Design Concept
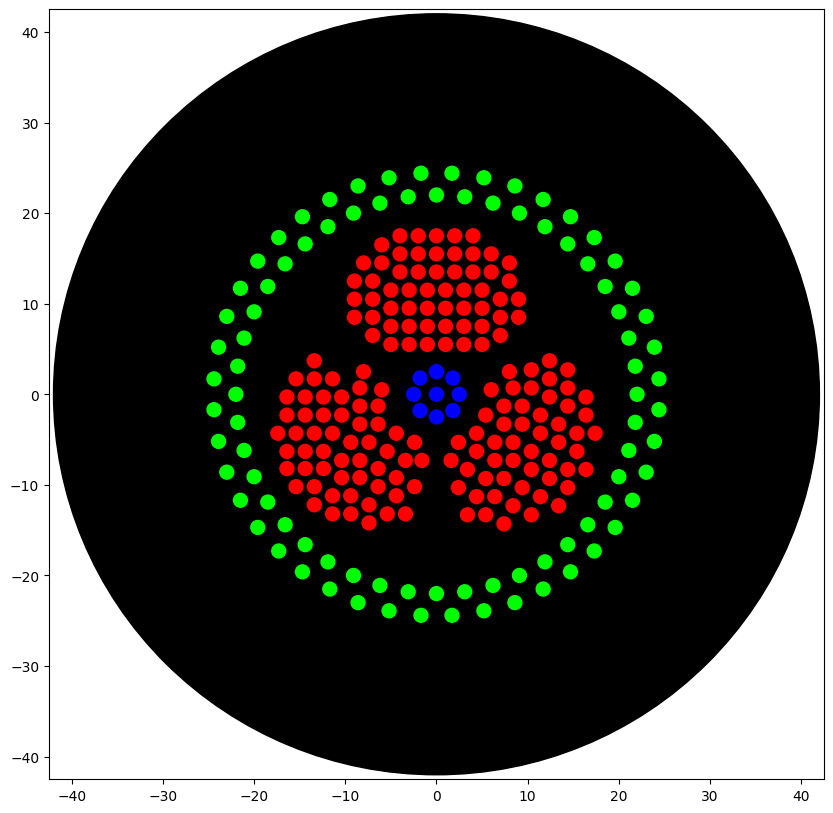
I conceptualised the biohazard symbol, which I thought of creating using parametric algorithms. I used the assistance of Claude (Anthropic) to generate the python code which I ran on Google Colab, in the copy provided by HTGAA. The results are shown below.
The artwork I conceptualised is a biohazard symbol rendered in fluorescent bacteria on black agar. I specifically chose this design because my final project focuses on engineering Bacillus subtilis to combat hospital-acquired infections (HAIs), which kill over 200,000 people annually in India alone.
Python Code
The complete Python script is embedded below and was also submitted via the course form. I used Claude (Anthropic) to help write the code, debug coordinate math and validate the Opentrons API calls, while I designed the concept, chose the geometry, and structured the protocol logic.
After running the above code, I ran the code shown below to visualise the image and it is provided below.
AI Usage Disclosure
I used Claude (Anthropic) to write the code for the biohazard geometry.
Part 2: Post-Lab Questions
Published Paper Utilizing Laboratory Automation for Novel Biological Applications
Paper: Semiautomated Production of Cell-Free Biosensors
Citation: Brown, D.M., Phillips, D.A., Garcia, D.C., et al. (2025). Semiautomated Production of Cell-Free Biosensors. ACS Synthetic Biology, 14(3), 979–986. DOI: 10.1021/acssynbio.4c00703
Affiliations: Northwestern University (Department of Chemical & Biological Engineering, Center for Synthetic Biology); U.S. Army DEVCOM Chemical Biological Center.
Summary
Brown et al. (2025) present the first systematic study comparing manual versus robot-assembled cell-free biosensor reactions, using the Opentrons OT-2 liquid handling robot to automate the assembly of cell-free gene expression (CFE) reactions across full 384-well plates.
Cell-free biosensors represent a powerful class of synthetic biology diagnostics: DNA-encoded genetic circuits are executed in cell-free transcription-translation (TX-TL) systems, freeze-dried for ambient storage and field distribution, then rehydrated at the point of use to detect target analytes via colorimetric or fluorescent output. Previous work - notably Pardee et al. (2016) demonstrating Zika virus detection using toehold switches in cell-free systems - established the diagnostic potential of this platform. However, manufacturing has remained a manual, low-throughput bottleneck that limits translation from proof-of-concept to deployable diagnostics.
Automation Platform and Workflow
The OT-2 performed semiautomated assembly of CFE reactions, handling precise nanoliter-to-microliter transfers of cell extract, energy buffer, DNA template, and water into each well of a 384-well plate. The team benchmarked two cell-free reporter systems:
- A constitutive LacZ colorimetric reporter (absorbance-based readout)
- A GFP fluorescent reporter (fluorescence-based readout)
For each system, reactions were assembled both manually and via OT-2, enabling direct comparison of precision, reproducibility, and biosensor performance. The culminating experiment deployed a complete 384-well fluoride riboswitch biosensor array - a genetically encoded sensor element that activates gene expression in the presence of fluoride ions - with every reaction assembled by the OT-2.
Key Findings
Semiautomated OT-2 assembly produced biosensor reactions with comparable or improved consistency relative to manual assembly, reducing the well-to-well coefficient of variation that plagues hand-pipetted plates and directly degrades diagnostic reliability.
A full 384-well fluoride riboswitch biosensor array was successfully built and functionally validated in a single automated run, demonstrating the feasibility of medium-throughput biosensor production on affordable hardware.
The study provides the field’s first rigorous benchmarking data for automated versus manual CFE biosensor manufacturing, systematically quantifying where robotic and manual assembly diverge in performance characteristics.
Why Automation Was Essential
Three factors render automation indispensable for this application. First, cell-free reactions are exquisitely sensitive to pipetting precision - small volumetric errors in extract or DNA template concentration produce disproportionately large signal variability, which is unacceptable for a diagnostic biosensor that must deliver a reliable binary answer. The OT-2’s reproducible liquid handling directly addresses this failure mode. Second, scaling from proof-of-concept to deployment requires manufacturing hundreds to thousands of biosensor reactions per batch; manual assembly of 384-well plates is tedious, error-prone, and fundamentally unscalable. Third, the low cost of the OT-2 (~$5,000–$10,000) means that academic laboratories, field-deployed diagnostic operations, and resource-limited clinical settings can adopt semiautomated manufacturing without the capital expenditure of biofoundry-grade liquid handlers such as the Hamilton STAR or Beckman Biomek platforms.
Relevance to My Final Project
This paper is directly relevant to my proposed work on autonomous antimicrobial surfaces for hospital-acquired infection prevention. My project design incorporates both the OT-2 (for lysostaphin zone-of-inhibition assays and serial dilutions) and the Ginkgo Nebula cloud laboratory (for high-throughput toehold switch screening using the Echo → Bravo → PHERAstar workflow). Brown et al. demonstrate precisely the principle that underpins my automation strategy: affordable liquid handling robots can achieve the precision and throughput required to screen synthetic biology constructs at a scale that manual methods cannot support, particularly for cell-free biosensor applications where reaction assembly variability is a primary performance bottleneck. Their validation of OT-2-assembled cell-free biosensor arrays provides direct precedent for my planned Week 11 toehold switch screening experiments on Nebula’s cell-free platform.
Reference: Brown, D.M., Phillips, D.A., Garcia, D.C., et al. (2025). Semiautomated Production of Cell-Free Biosensors. ACS Synthetic Biology, 14(3), 979–986. https://doi.org/10.1021/acssynbio.4c00703
Question 2 : Automation Plan for Final Project
My final project - an engineered Bacillus subtilis surface colonizer for hospital-acquired infection prevention - has two primary components that benefit from automation: antimicrobial peptide optimization and biosensor screening.
Automation Scale 1: OpenTrons OT-2 (Bench-Scale, London Node)
Goal: Serial dilution and zone-of-inhibition assays for lysostaphin antimicrobial activity.
Pseudocode:
This protocol generates a dose-response matrix: 6 lysostaphin variants × 7 concentrations × triplicate, with automated serial dilution ensuring precise and reproducible concentration gradients.
Automation Scale 2: Ginkgo Nebula Cloud Lab (High-Throughput)
Goal: Screen toehold switch biosensor library for mecA mRNA detection (connects to Week 11 biosensor module).
Nebula Workflow (RAC Plate Flow):
This cloud lab workflow screens 384 biosensor designs in a single automated run - something that would take months manually. The top-performing switches will be integrated into my B. subtilis chassis to create the sense-and-respond circuit for MRSA detection.
Why Two Scales Matter
The OpenTrons protocol handles the effector optimization (how well does lysostaphin kill S. aureus?), while the Nebula workflow handles the sensor optimization (how sensitively can we detect MRSA?). Together, they close the loop on both halves of the sense-and-respond system - all through automation.
Preliminary Computational Results: Toehold Switch Design for mecA
To validate the feasibility of my biosensor approach, I wrote a Python pipeline to computationally design toehold switch candidates targeting the mecA mRNA of S. aureus N315 (GenBank: D86934). The mecA gene encodes PBP2a, the penicillin-binding protein that confers methicillin resistance - making it the definitive genetic marker for MRSA.
Method
I implemented the Series B toehold switch architecture from Green et al. (2014) Cell 159:925-939, screening 89 candidate positions across the first 303 nucleotides of the mecA coding sequence. Each candidate was evaluated on six criteria: trigger GC content (ideal 35-55%), toehold GC content (ideal 25-50%), absence of homopolymer runs >4 nt, absence of internal AUG codons, estimated stem thermodynamic stability, and predicted ON/OFF ratio.
Key Results
- 89 candidates screened, of which 30 scored ≥ 10/12 (high-confidence)
- Best candidate: Position 234, targeting the region encoding the transpeptidase catalytic domain
- Trigger:
5'─AUAAAUACAGGAACUUCAGCAGCUGAUACAGGAGAU─3' - Trigger GC: 38.9% | Toehold GC: 41.7%
- No internal AUG codons
- Predicted ON/OFF ratio: 9.1×
- Maximum homopolymer: 3 nt (synthesis-compatible)
- Trigger:
- The position 150-260 region of mecA contains a cluster of high-scoring candidates, suggesting favorable mRNA secondary structure accessibility in this region
Significance
This computational screen identifies candidate toehold switches ready for experimental validation on Ginkgo Nebula during the Week 11 biosensor module. The top 10 designs can be synthesized by Twist Bioscience and screened in cell-free reactions using the cloud lab workflow described in my automation plan above.
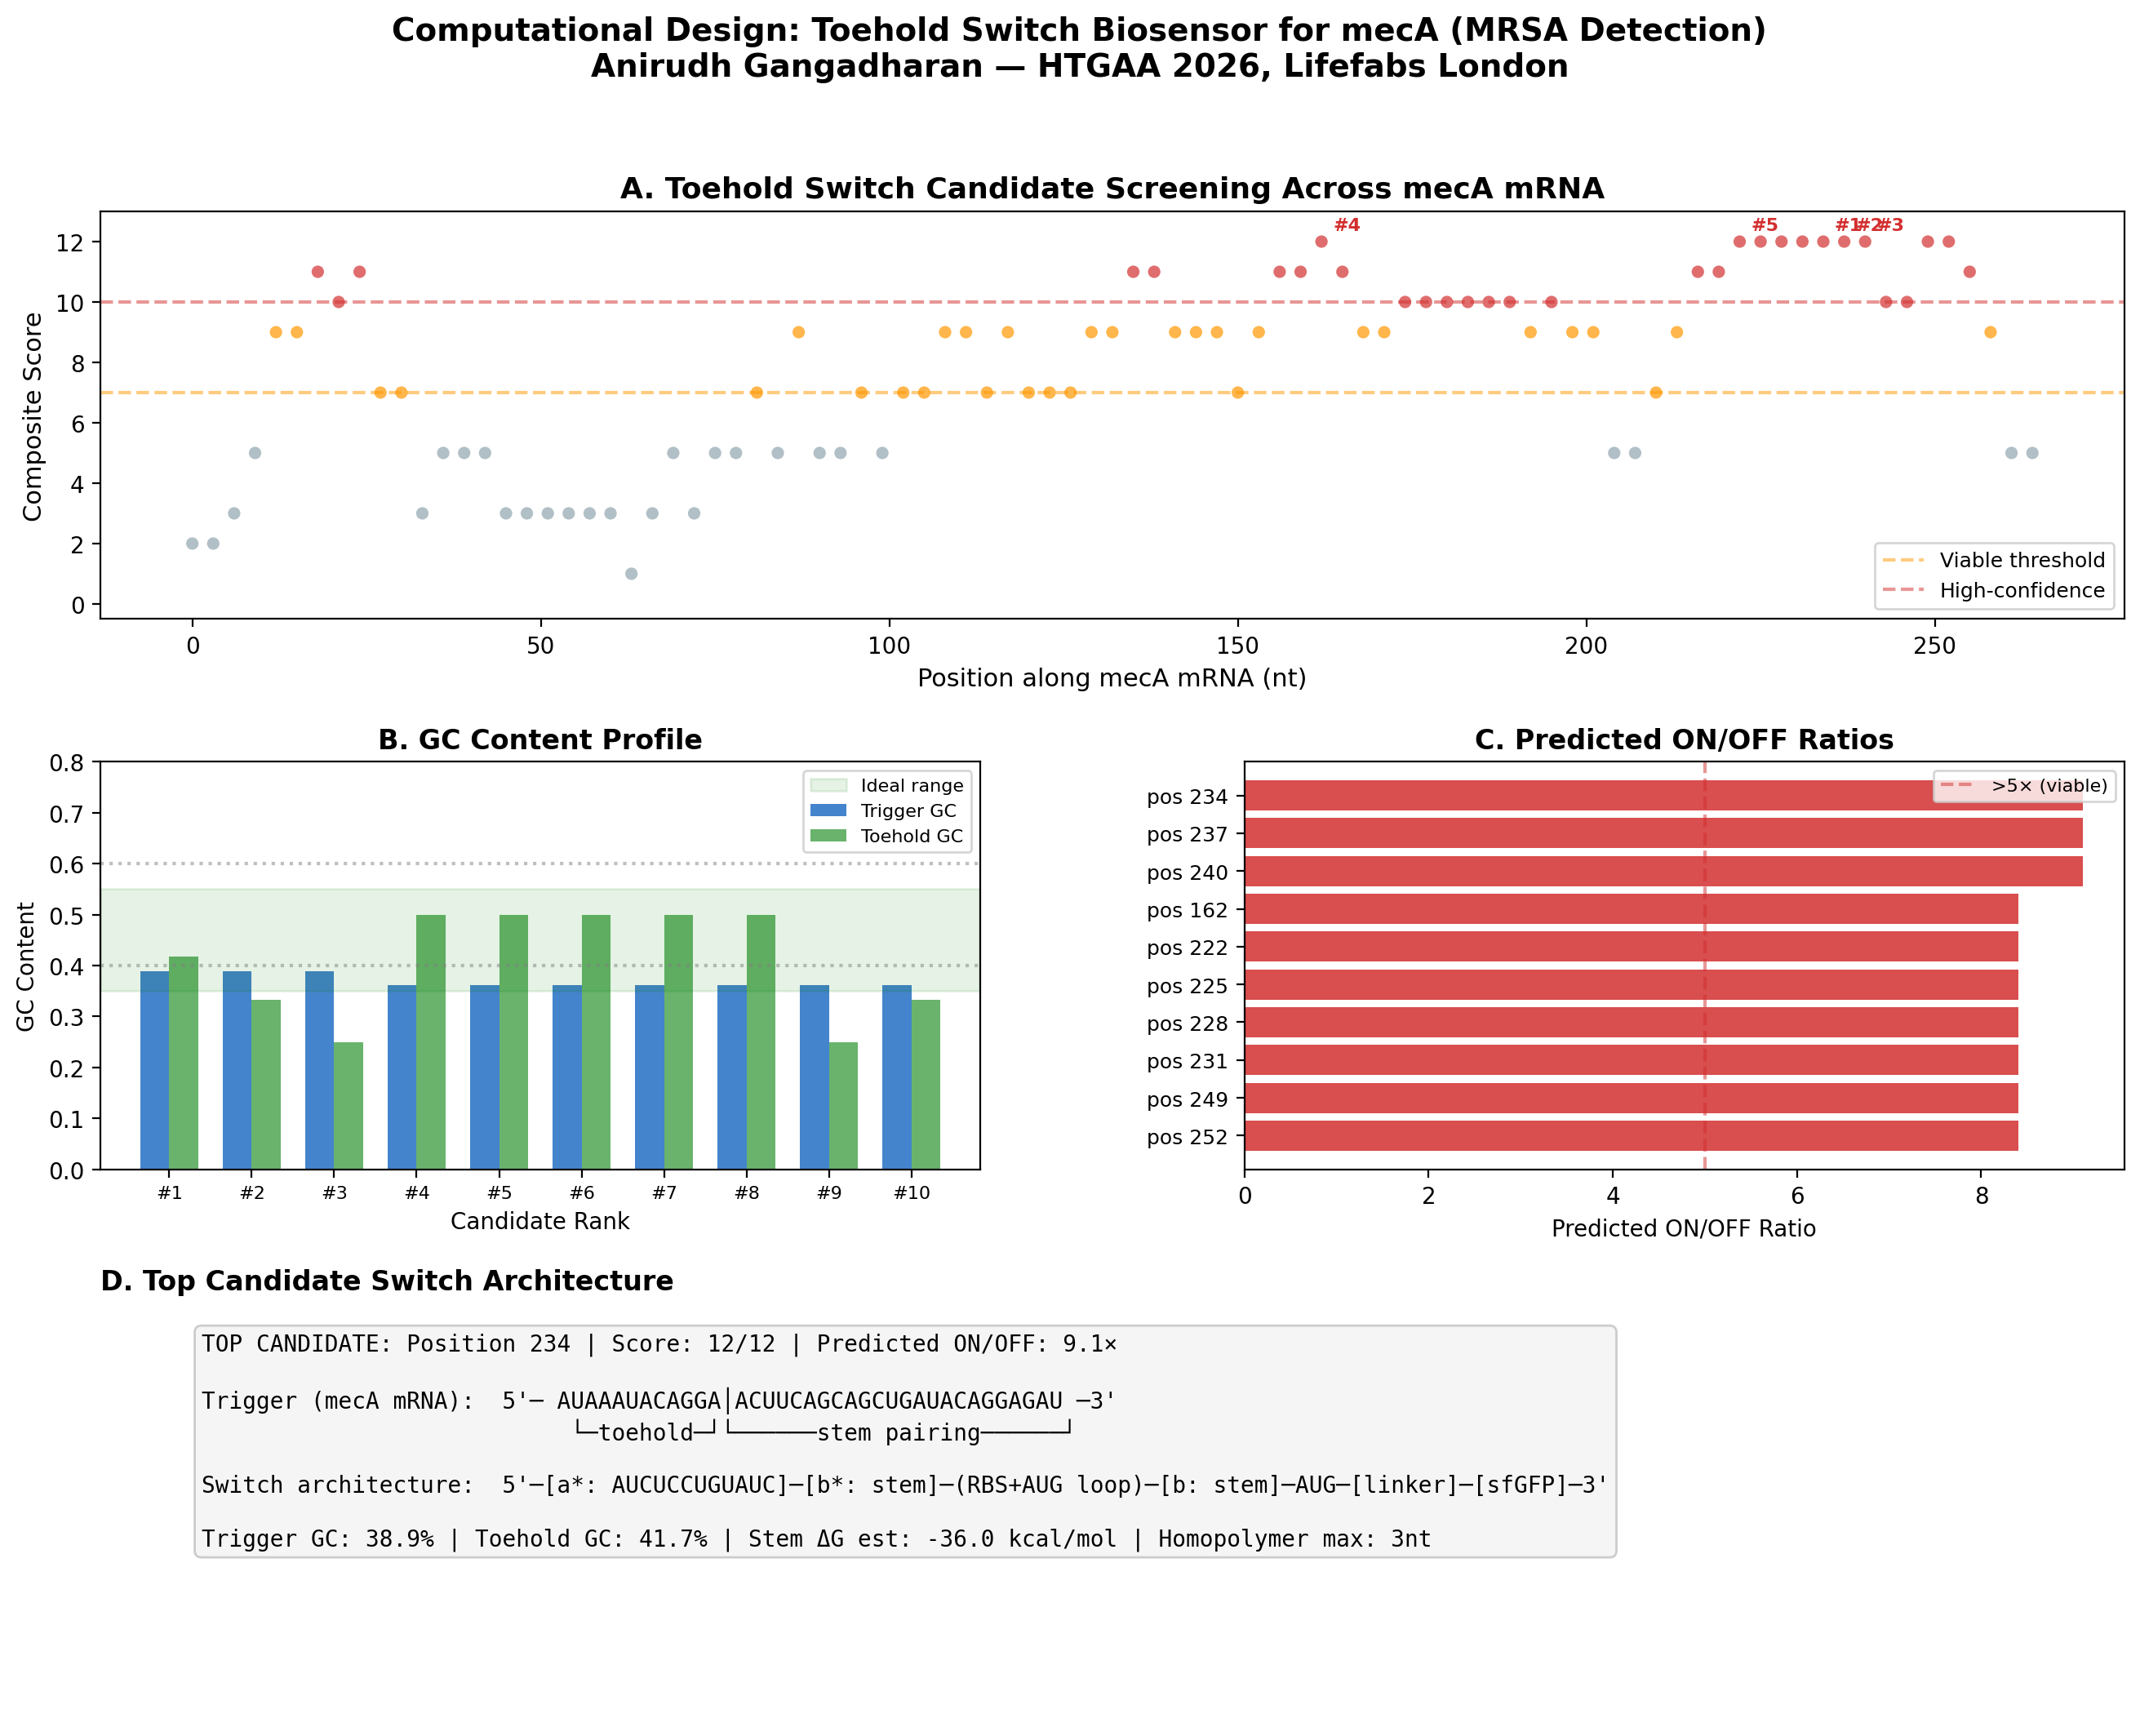
Figure: Computational screening of toehold switch biosensor candidates targeting mecA mRNA. (A) Composite score distribution across the mecA 5’ coding region. (B) GC content profiles of top 10 candidates. (C) Predicted ON/OFF ratios. (D) Architecture of the top-ranked candidate at position 234.
Next Steps
- Validate top 5 candidates with NUPACK (nupack.org) for full minimum free energy analysis
- BLAST trigger sequences against the complete S. aureus transcriptome to confirm specificity
- Order synthesis of top 10 switches from Twist Bioscience
- Screen in cell-free system on Ginkgo Nebula during Week 11 biosensor module
- Integrate the best-performing switch into the B. subtilis sense-and-respond chassis
The complete Python code and candidate data (JSON) are available in my documentation.
Part 3: Three Final Project Ideas
Idea 1 : Cell-Free Lysostaphin Optimization via AI-Guided DBTL on Nebula
What: Optimize recombinant lysostaphin expression in a cell-free protein synthesis system using automated Design-Build-Test-Learn cycles on Ginkgo Nebula’s cloud laboratory.
How: Codon-optimize lysostaphin variants for cell-free expression. Screen hundreds of reaction conditions (DNA concentration, Mg²⁺, temperature, incubation time) in parallel using Nebula’s RAC workflow: Echo acoustic transfer → Bravo master mix stamping → Inheco incubation → PHERAstar fluorescence readout. Validate top candidates via OpenTrons OT-2 serial dilution and zone-of-inhibition assays against S. aureus.
Expected output: Optimized cell-free lysostaphin expression protocol with quantified MIC data against clinical S. aureus isolates.
References: J. Hérisson, A. N. Hoang, A. El-Sawah, M. M. Khalil, J.-L. Faulon bioRxiv 2024.10.28.619828; doi: https://doi.org/10.1101/2024.10.28.619828
Idea 2 : Toehold Switch MRSA Detection Coupled to Antimicrobial Secretion in B. subtilis
What: Design RNA-based toehold switch biosensors targeting mecA mRNA (the methicillin resistance determinant) and integrate them with a T7 RNAP amplification cascade driving lysostaphin secretion in B. subtilis - creating an autonomous sense-and-kill genetic circuit.
How: Computationally screen toehold switch candidates across the mecA coding sequence using thermodynamic scoring (GC content, stem stability, predicted ON/OFF ratio). Validate top designs via cell-free screening on Nebula (Week 11 biosensor module). Integrate a two-stage amplification architecture: toehold switch → T7 RNA polymerase → T7 promoter → lysostaphin, converting weak linear signal into sharp sigmoidal response. Preliminary computational screen: 89 candidates evaluated, top candidate at position 234 with 9.1× predicted ON/OFF ratio.
Preliminary results (completed): I built a computational pipeline implementing the Series B toehold architecture and screened 89 candidate positions across the first 303 nt of mecA from S. aureus N315 (GenBank: D86934). 30 candidates scored ≥ 10/12 on a composite metric. Top candidate at position 234 (transpeptidase catalytic domain): 9.1× predicted ON/OFF ratio, 38.9% trigger GC, no internal AUG codons. These designs are ready for synthesis and experimental validation on Nebula.
Expected output: Validated toehold switch with >10-fold ON/OFF ratio + functional genetic circuit design for B. subtilis integration.
References: Valeri, J.A. et al. (2020). Sequence-to-function deep learning frameworks for engineered riboregulators. Nature Communications, 11, 5058. https://doi.org/10.1038/s41467-020-18676-2
Idea 3 : Deployable Living Antimicrobial Surface with Evolutionary Robustness for Resource-Limited Hospitals
What: Engineer a complete B. subtilis chassis that autonomously detects, reports, and kills antibiotic-resistant pathogens on hospital surfaces - designed for deployment across 25,000 Indian government hospitals where HAI rates exceed 30% in ICU settings.
How: Three integrated modules: (1) Sensing - multiplexed toehold switches detecting resistance markers for MRSA, VRE, and CRKP with T7 RNAP signal amplification; (2) Response - modular effector library (lysostaphin for MRSA, dispersin B for biofilms, Art-175 for Gram-negatives) with toxin-antitoxin addiction systems to enforce evolutionary stability; (3) Biocontainment - spo0A knockout (prevents sporulation) + synthetic amino acid auxotrophy; (4) Surveillance - MinION nanopore sequencing of the surface resistome to guide effector selection over time.
Expected output: Complete system design, computational modeling, and cell-free proof-of-concept for one sensor-effector pair. Deployable prototype targeting <$0.10/m² manufacturing cost.
References: Mehta, A., Rosenthal, V.D., Mehta, Y. et al. (2007). Device-associated nosocomial infection rates in intensive care units of seven Indian cities: Findings of the International Nosocomial Infection Control Consortium (INICC). Journal of Hospital Infection, 67(2), 168–174. https://doi.org/10.1016/j.jhin.2007.07.008