Week 6 HW: Genetic Circuits Part I
1. What are some components in the Phusion High-Fidelity PCR Master Mix and what is their purpose?
Phusion High-Fidelity PCR Master Mix contains most of the key ingredients needed for PCR, except the template DNA and primers. It is designed to make DNA amplification more accurate and easier to set up.
Some of the main components are:
- Phusion High-Fidelity DNA Polymerase – the enzyme that synthesizes new DNA strands.
- dNTPs – the nucleotide building blocks (A, T, G, and C) used to build the new DNA.
- MgCl₂ – provides magnesium ions, which are required for the polymerase to function.
- Reaction buffer – maintains the correct pH and salt conditions so the reaction can proceed efficiently.
Together, these components create the right environment for accurate and efficient PCR amplification.
2. What are some factors that determine primer annealing temperature during PCR?
The annealing temperature in PCR depends on how well the primers can bind to the target DNA sequence. If the temperature is too low, the primers might bind non-specifically. If it is too high, they may not bind properly at all. So overall, the annealing temperature is chosen to balance specificity and efficiency during PCR.
3. There are two methods from this class that create linear fragments of DNA: PCR, and restriction enzyme digests. Compare and contrast these two methods, both in terms of protocol as well as when one may be preferable to use over the other.
PCR works by amplifying a specific region of DNA using primers, DNA polymerase, dNTPs, and thermal cycling. The main advantage of PCR is that it is highly flexible. PCR is especially useful when I need a specific insert or when I only have a small amount of starting DNA.
Restriction enzyme digestion works by cutting DNA at specific recognition sites using restriction enzymes. Unlike PCR, it does not amplify DNA but cuts the DNA wherever those enzyme sites are present. This method is often easier and more straightforward if the plasmid or DNA sequence already contains the right restriction sites.
4. How can you ensure that the DNA sequences that you have digested and PCR-ed will be appropriate for Gibson cloning?
To make sure that the DNA fragments are appropriate for Gibson cloning, the main thing I need to check is whether they have the correct overlapping ends. Gibson Assembly works by joining DNA fragments that share homologous sequences at their ends, so the insert and the vector backbone need to have matching overlap regions. Usually, these overlaps are designed into the PCR primers so that the amplified insert already contains the right sequences for assembly. The plasmid backbone also needs to be linearized in a way that exposes the corresponding matching ends.
5. How does the plasmid DNA enter the E. coli cells during transformation?
Plasmid DNA enters E. coli cells when the cell membrane is temporarily made permeable during transformation. Normally, DNA cannot easily cross the bacterial membrane because of charge repulsion and the barrier created by the cell envelope.
In chemical transformation, the cells are made competent using salts such as calcium chloride, which helps the DNA interact more easily with the cell surface. A brief heat shock is then used to create temporary changes in membrane permeability, allowing the plasmid DNA to enter.
In electroporation, a short electrical pulse creates temporary pores in the membrane, and the DNA enters through those openings.
6. Describe another assembly method in detail (such as Golden Gate Assembly)
Gibson Assembly is a molecular cloning method that joins multiple DNA fragments in a single, isothermal reaction. Each fragment is designed with short overlapping ends, and a mix of enzymes, a 5′ exonuclease, DNA polymerase, and DNA ligase, works together to assemble them seamlessly. The exonuclease creates single-stranded overhangs, allowing complementary regions to anneal; the polymerase fills in gaps, and the ligase seals the nicks. This enables rapid and scarless construction of complex DNA constructs without the need for restriction enzymes.
Gibson Assembly — Construct Design in Benchling
I used Benchling’s Gibson Assembly tool with pSB1C3 as the expression vector. I chose pSB1C3 because it is the standard iGEM backbone used throughout this course, is high-copy, and worksreliably in E. coli, making it the most practical choice for expressingthe L-protein mutant.
The construct architecture I used was:
Anderson constitutive promoter BBa_J23106, followed by the Elowitz RBS
BBa_B0034, the mutant L-protein coding sequence, and the double terminator
BBa_B0015, all cloned into the pSB1C3 backbone. I built it as a
separate DNA sequence in Benchling, then concatenated them into a single
insert fragment per construct before attempting assembly.
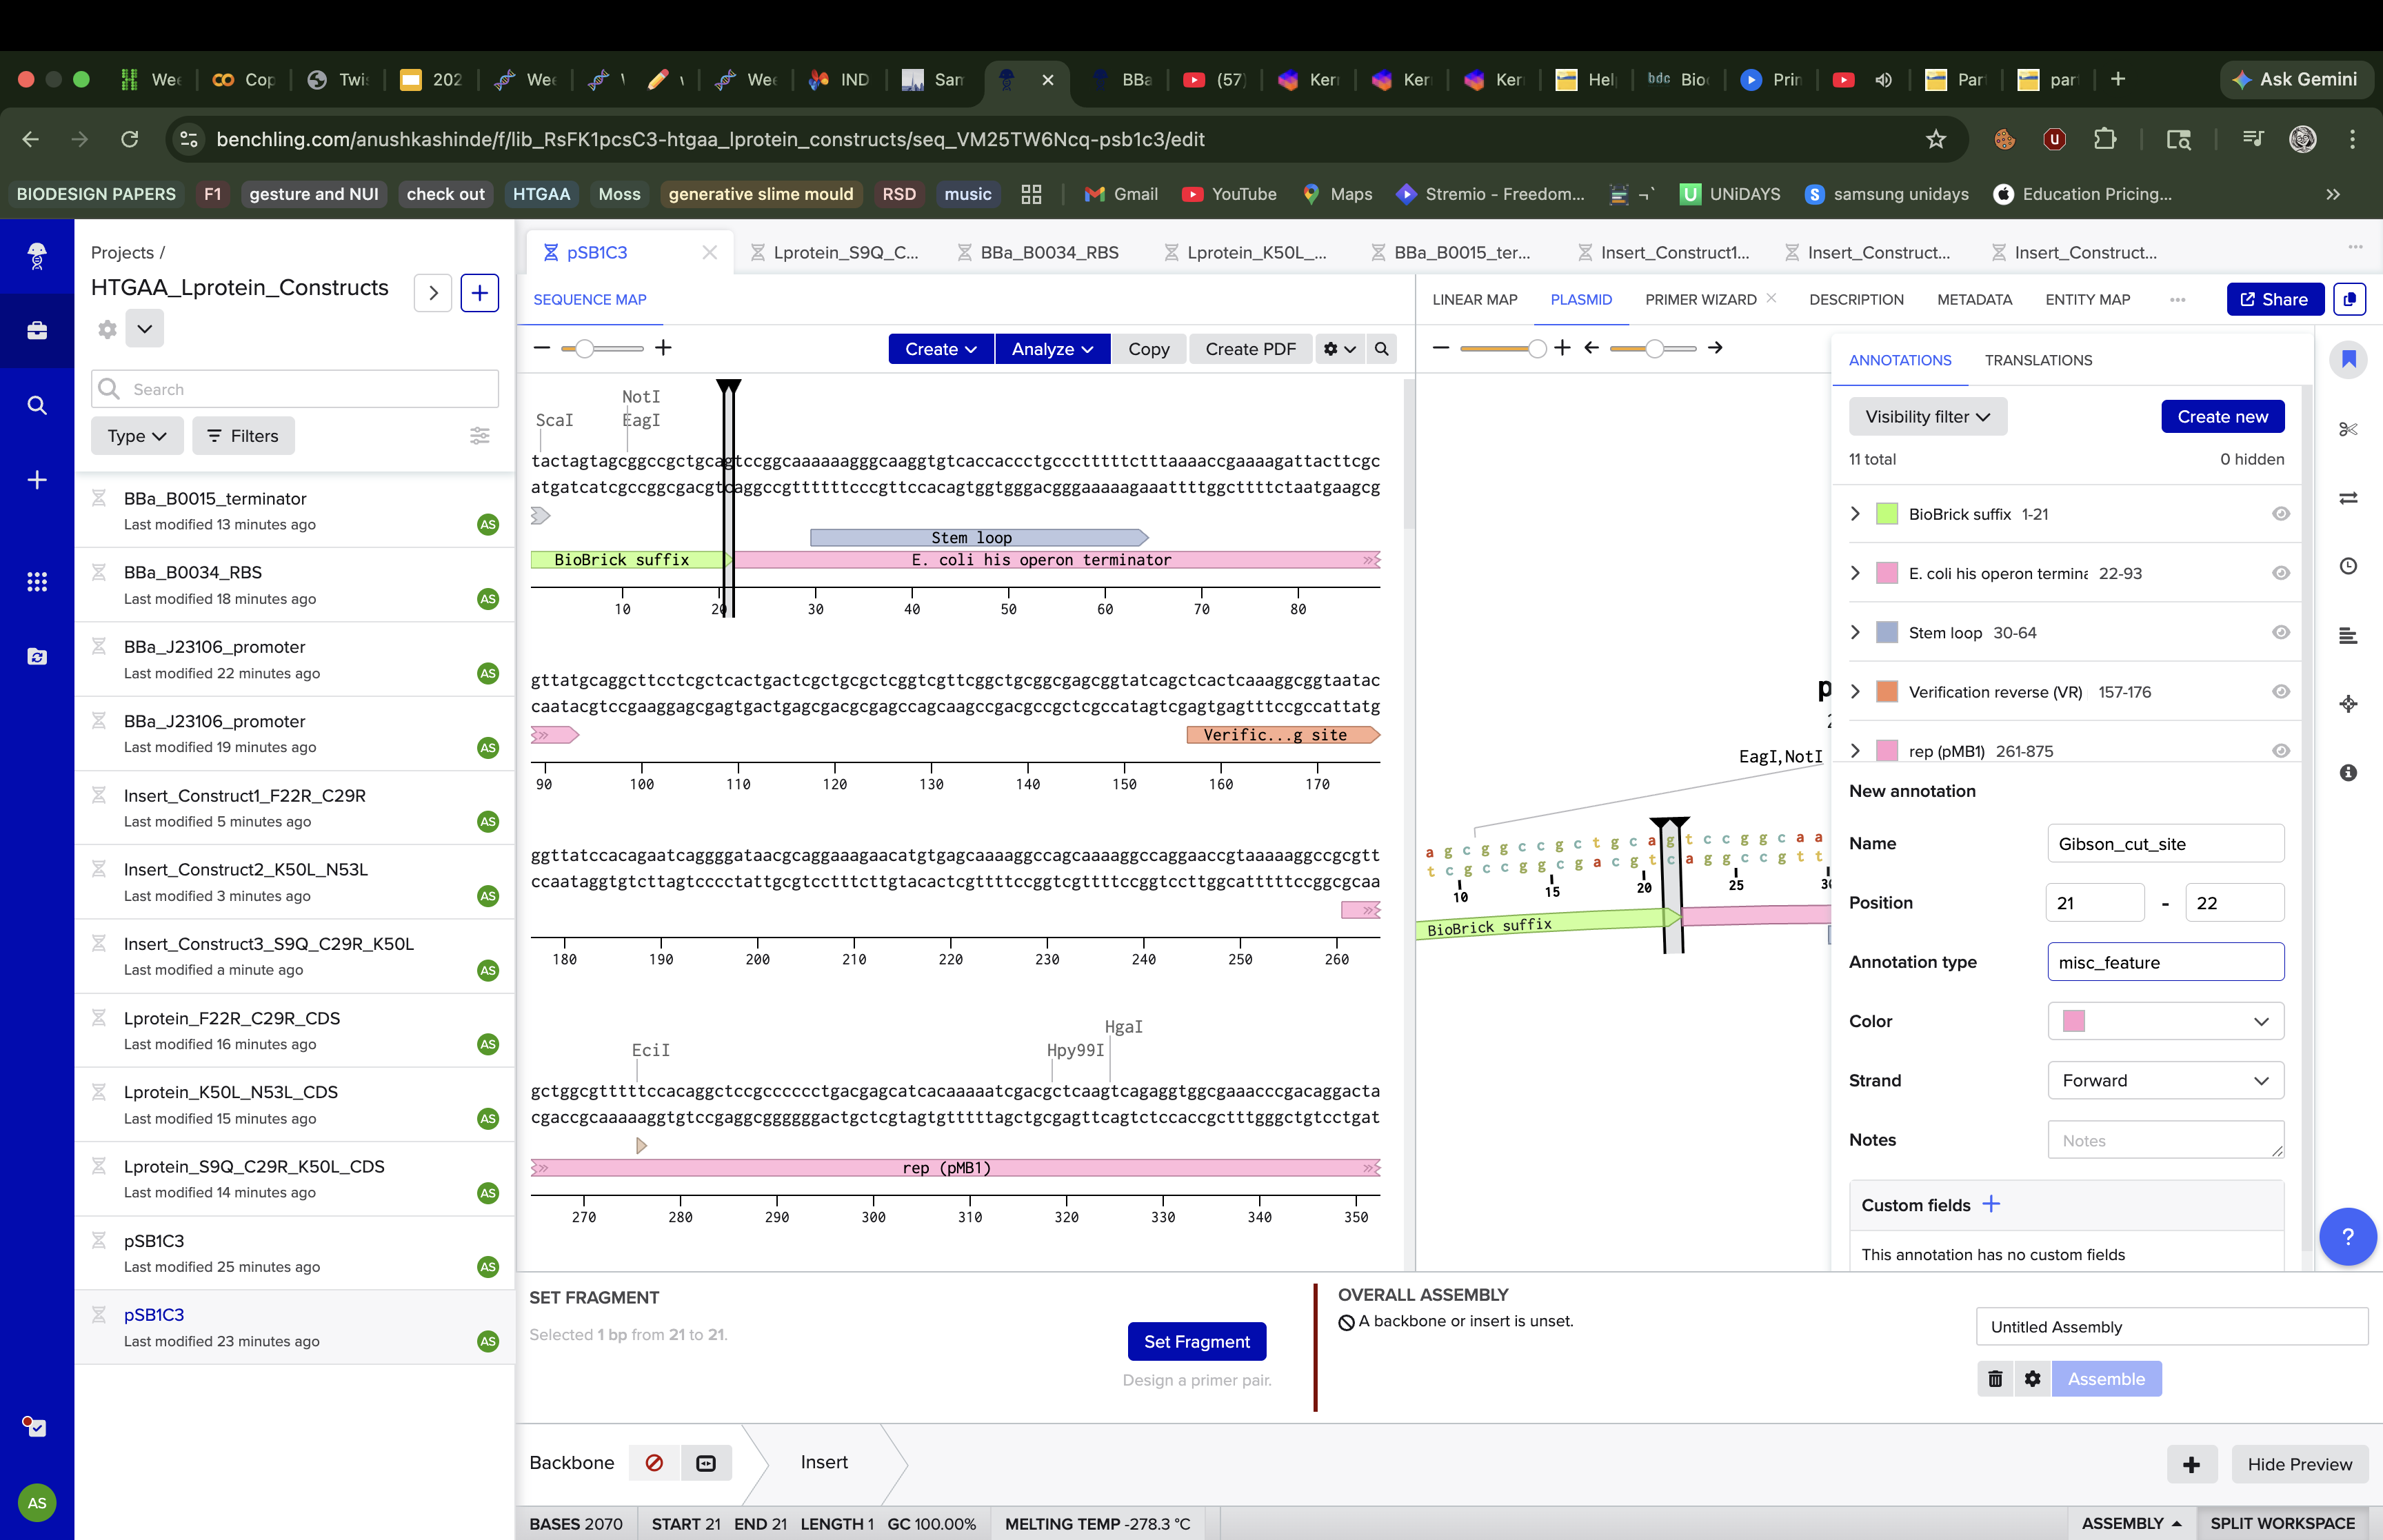
The assembly process was not straightforward. When I first tried using Benchling’s new Gibson Assembly tool, the vector slot showed a persistent orange dot indicating it couldn’t resolve the cut site on the circular pSB1C3 sequence.

I tried lowering the minimum Tm, widening the homology length range, increasing the Tm difference tolerance but the orange dot remained. After troubleshooting, I realised the issue was that Benchling’s newer assembly interface couldn’t automatically determine where to linearise an imported iGEM vector, likely because pSB1C3 lacks a standard cut site annotation that the tool expects.
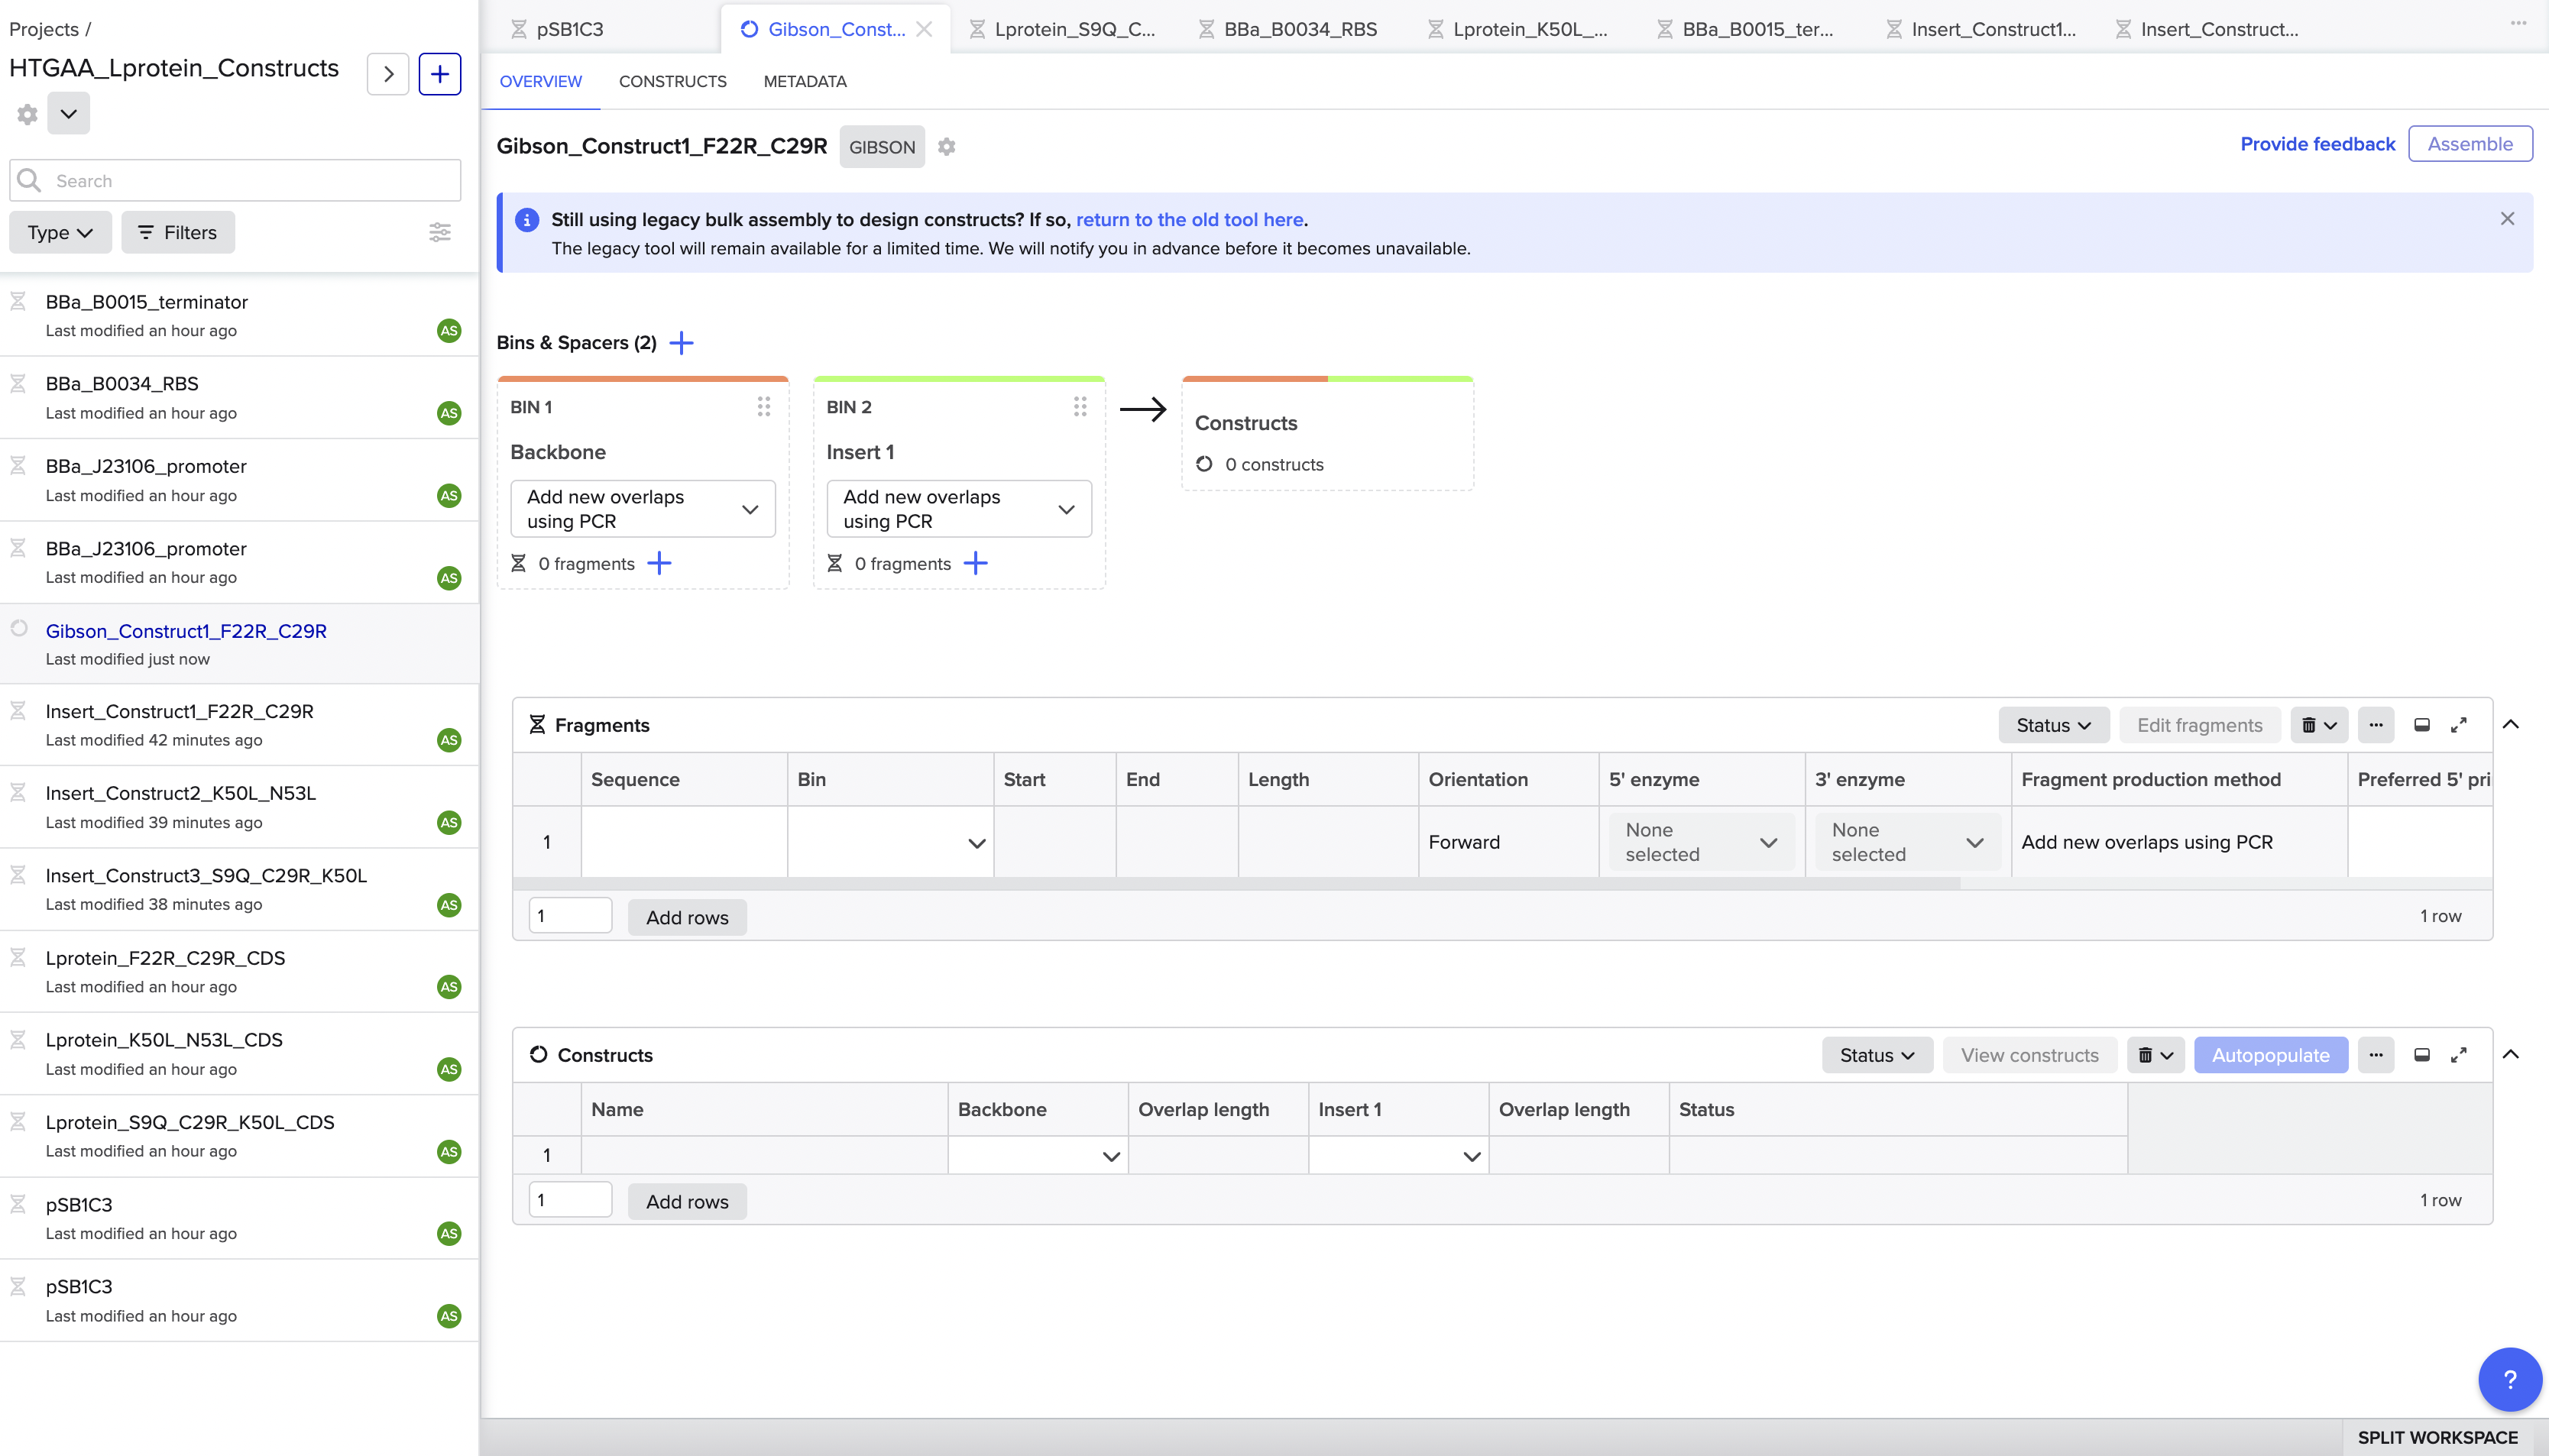
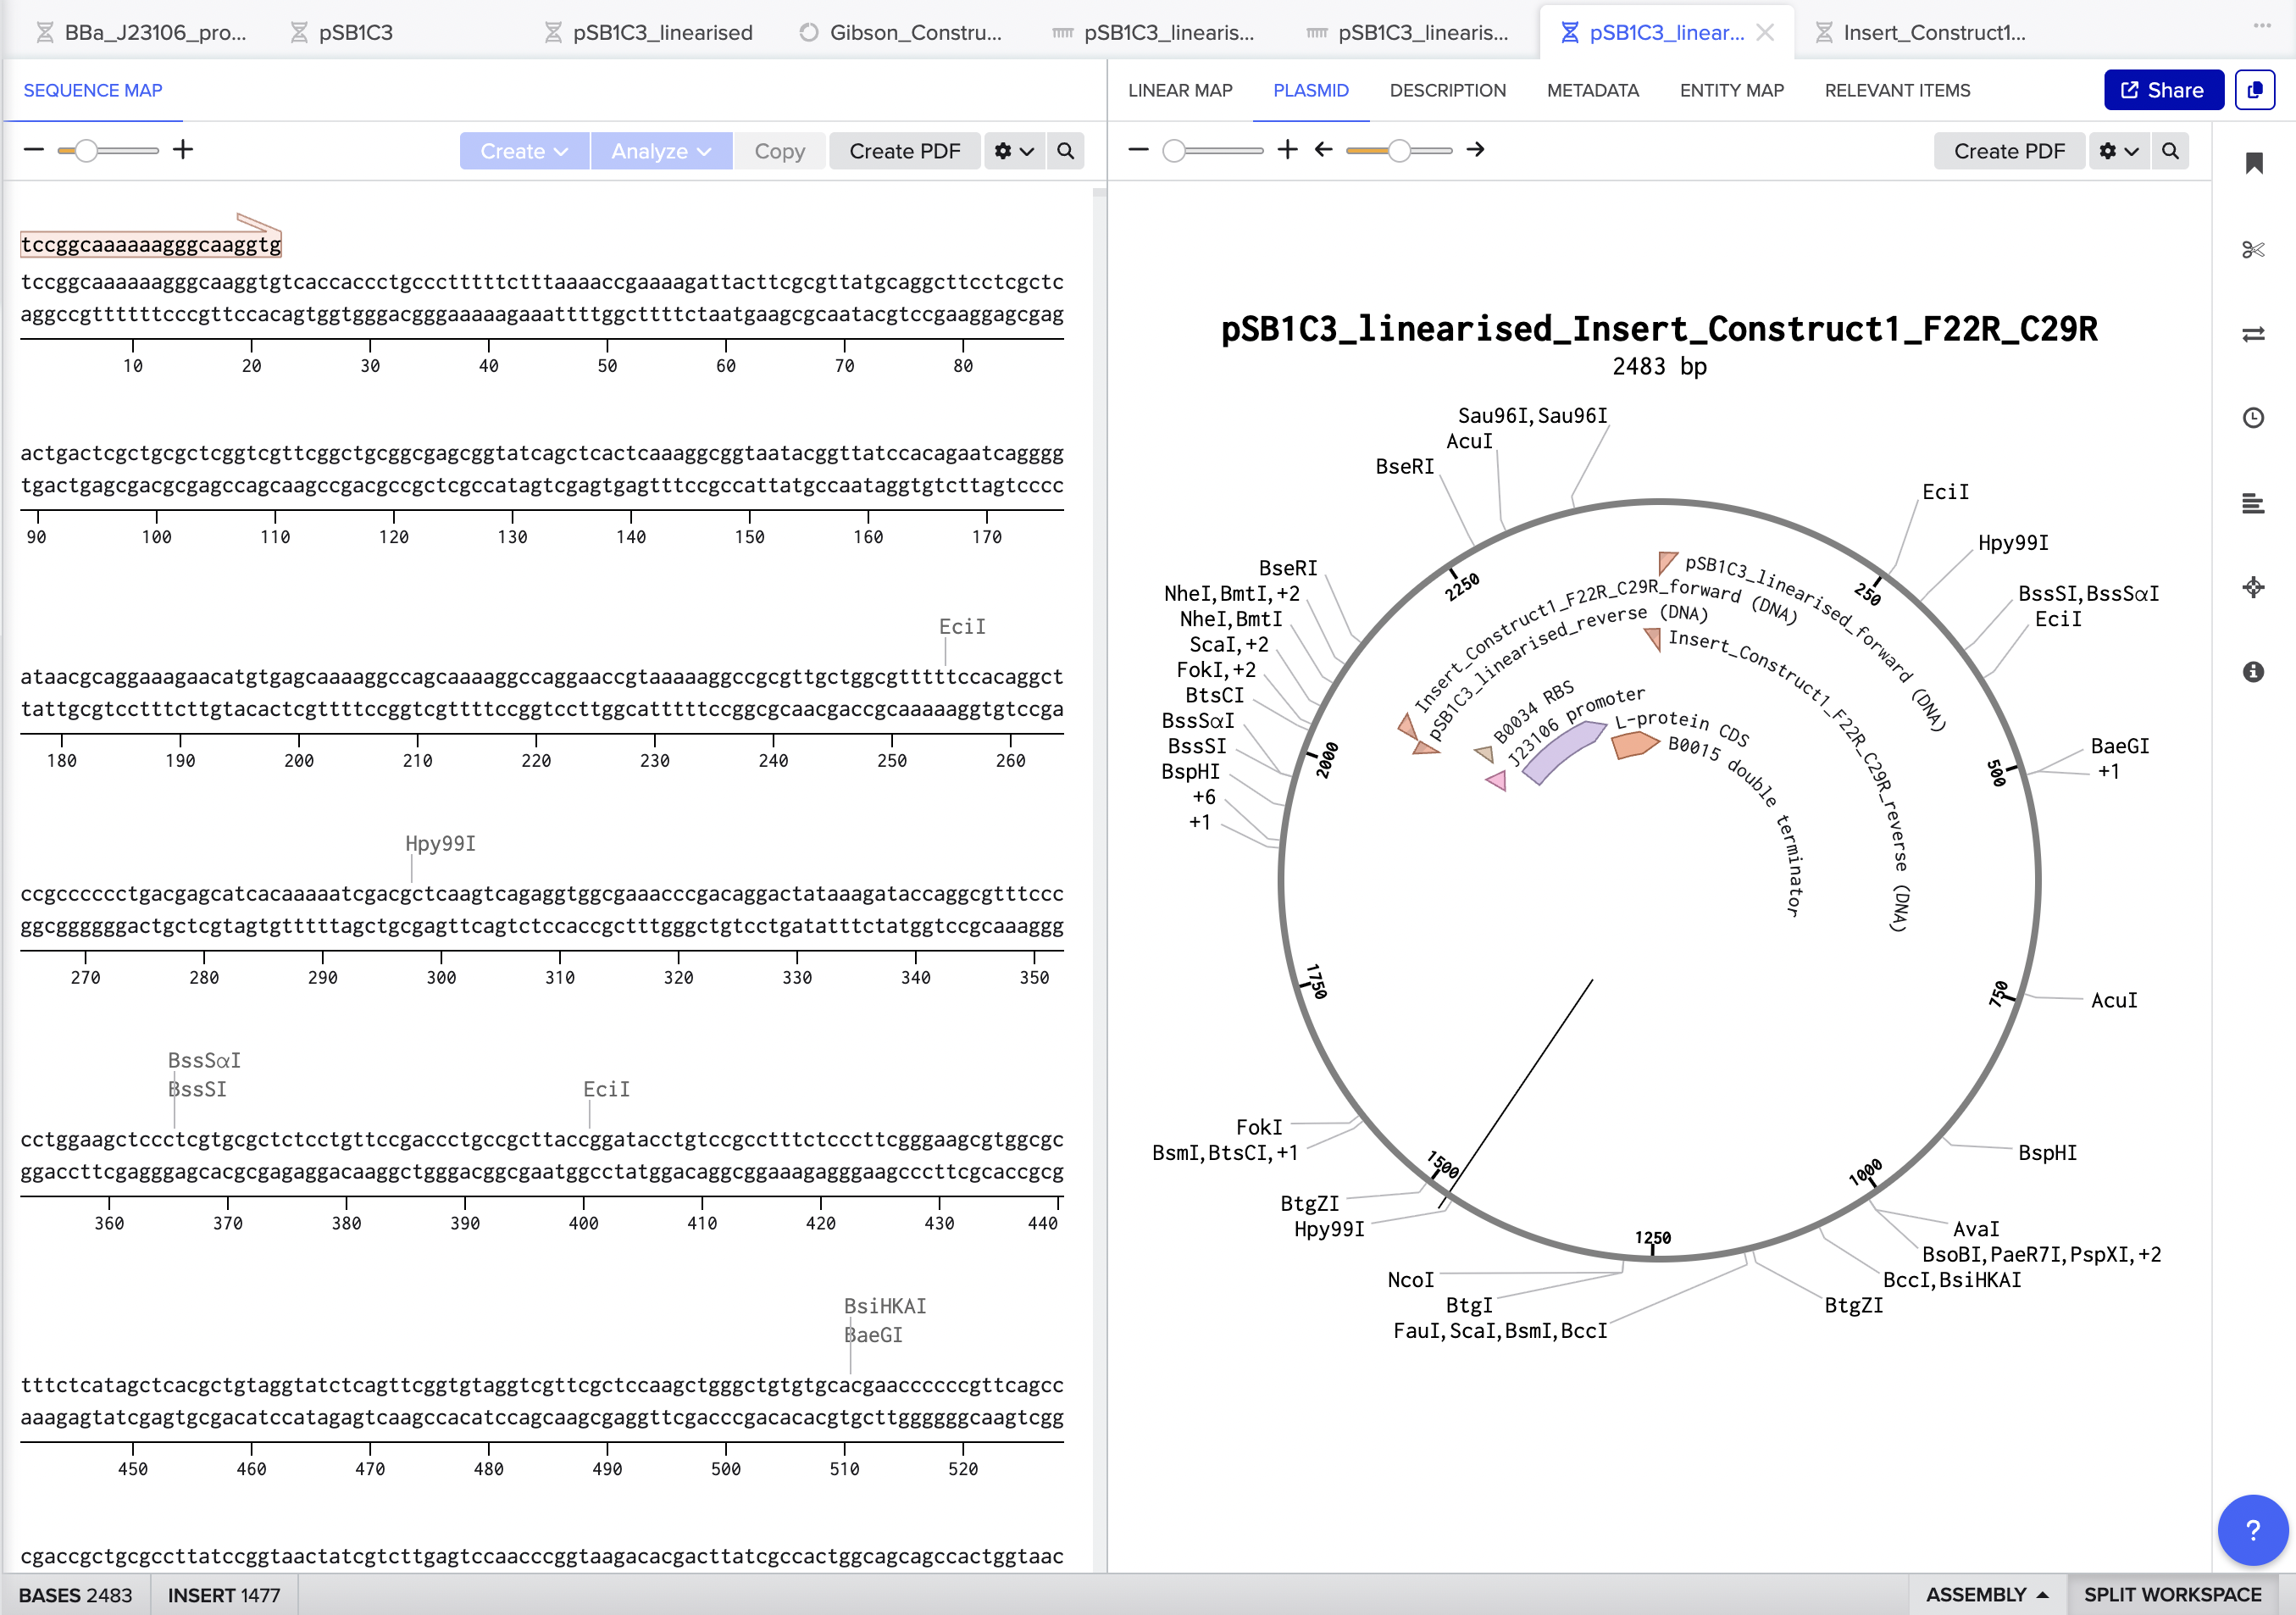
To navigate this, I switched to Benchling’s legacy assembly tool, which handles vector linearisation differently and gave me direct control over the cut position. I also manually created a linearised version of pSB1C3 by reorienting the sequence to start at position 22, effectively pre-cutting the vector at the BioBrick MCS insertion site between the BioBrick suffix and the his operon terminator. This bypassed the auto-detection issue entirely. Using the linearised vector with the legacy tool, the assembly ran successfully on the first attempt.
The final assembled plasmid for Construct 1 (F22R + C29R) came out at 2483 bp, with all four insert annotations J23106 promoter, B0034 RBS, L-protein CDS, and B0015 terminator correctly placed and visible in the circular map. Benchling also auto-designed all four Gibson primers (vector forward, vector reverse, insert forward, insert reverse) with appropriate overlapping tails for in vitro assembly.
Asimov Kernel
Bacterial Demo
I ran the bacterial demo in the repository on Asimov first
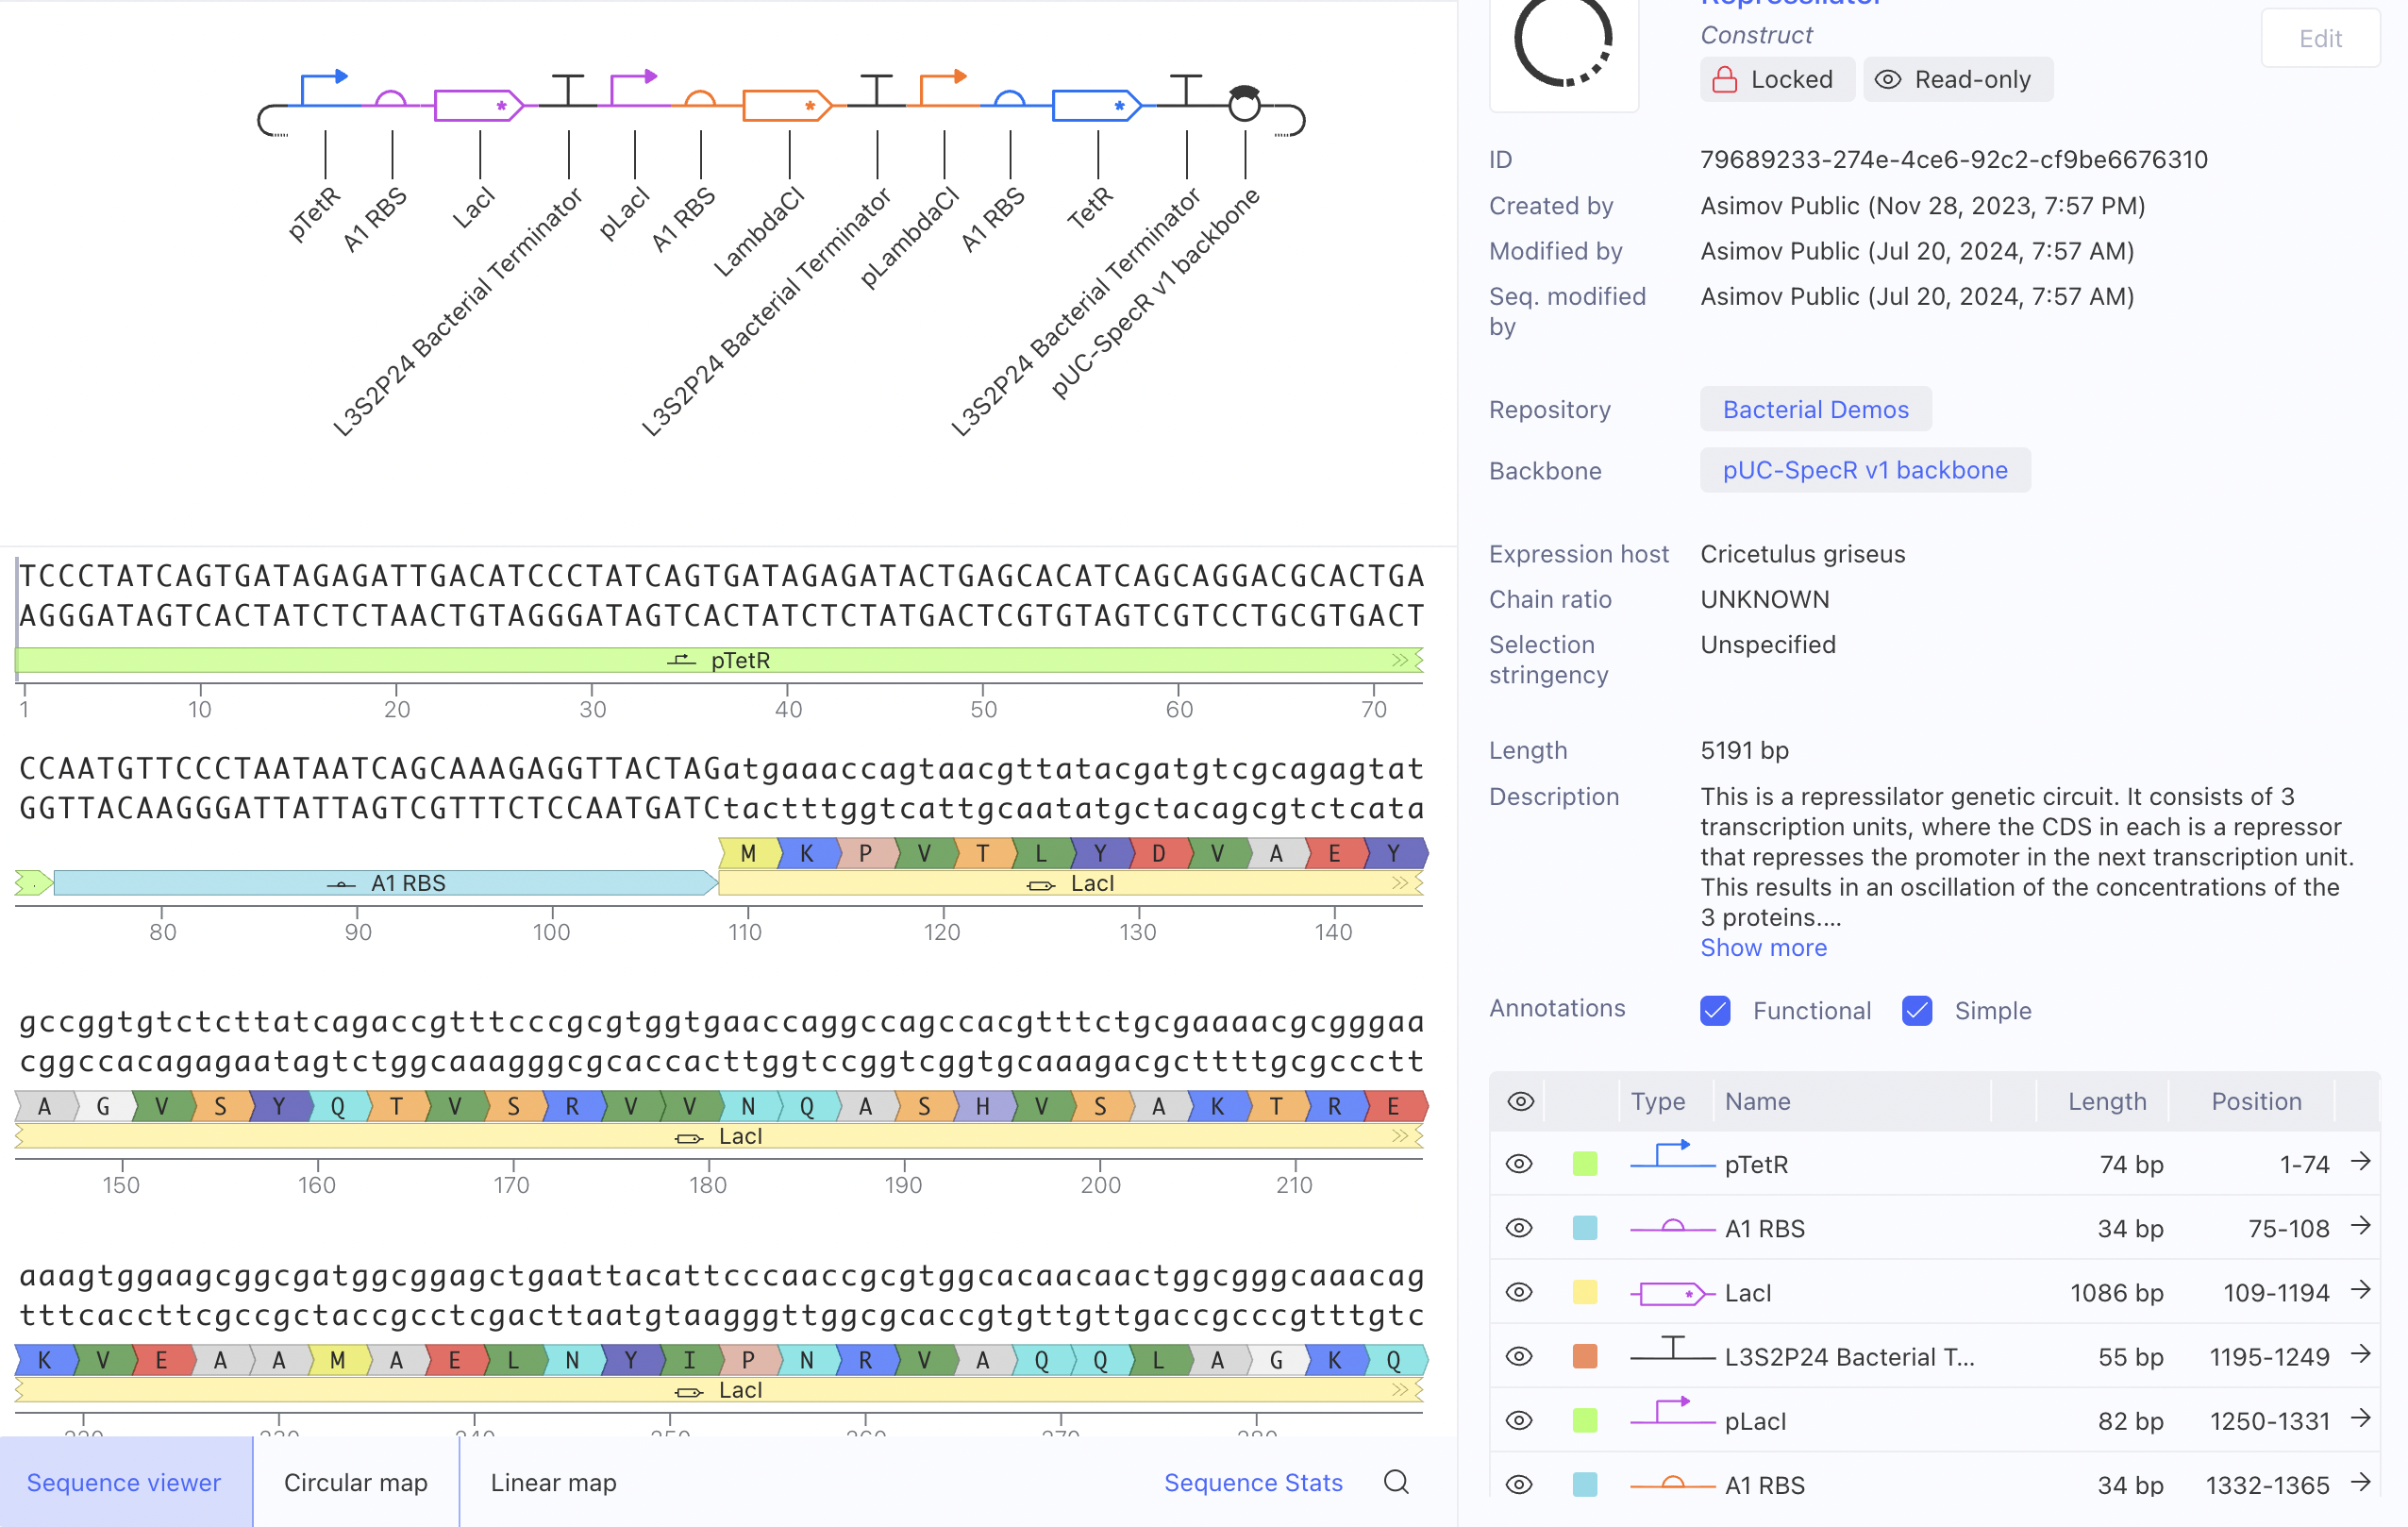
And then tried to recreate it using the given parts in the Characterizeed bacterial parts repository
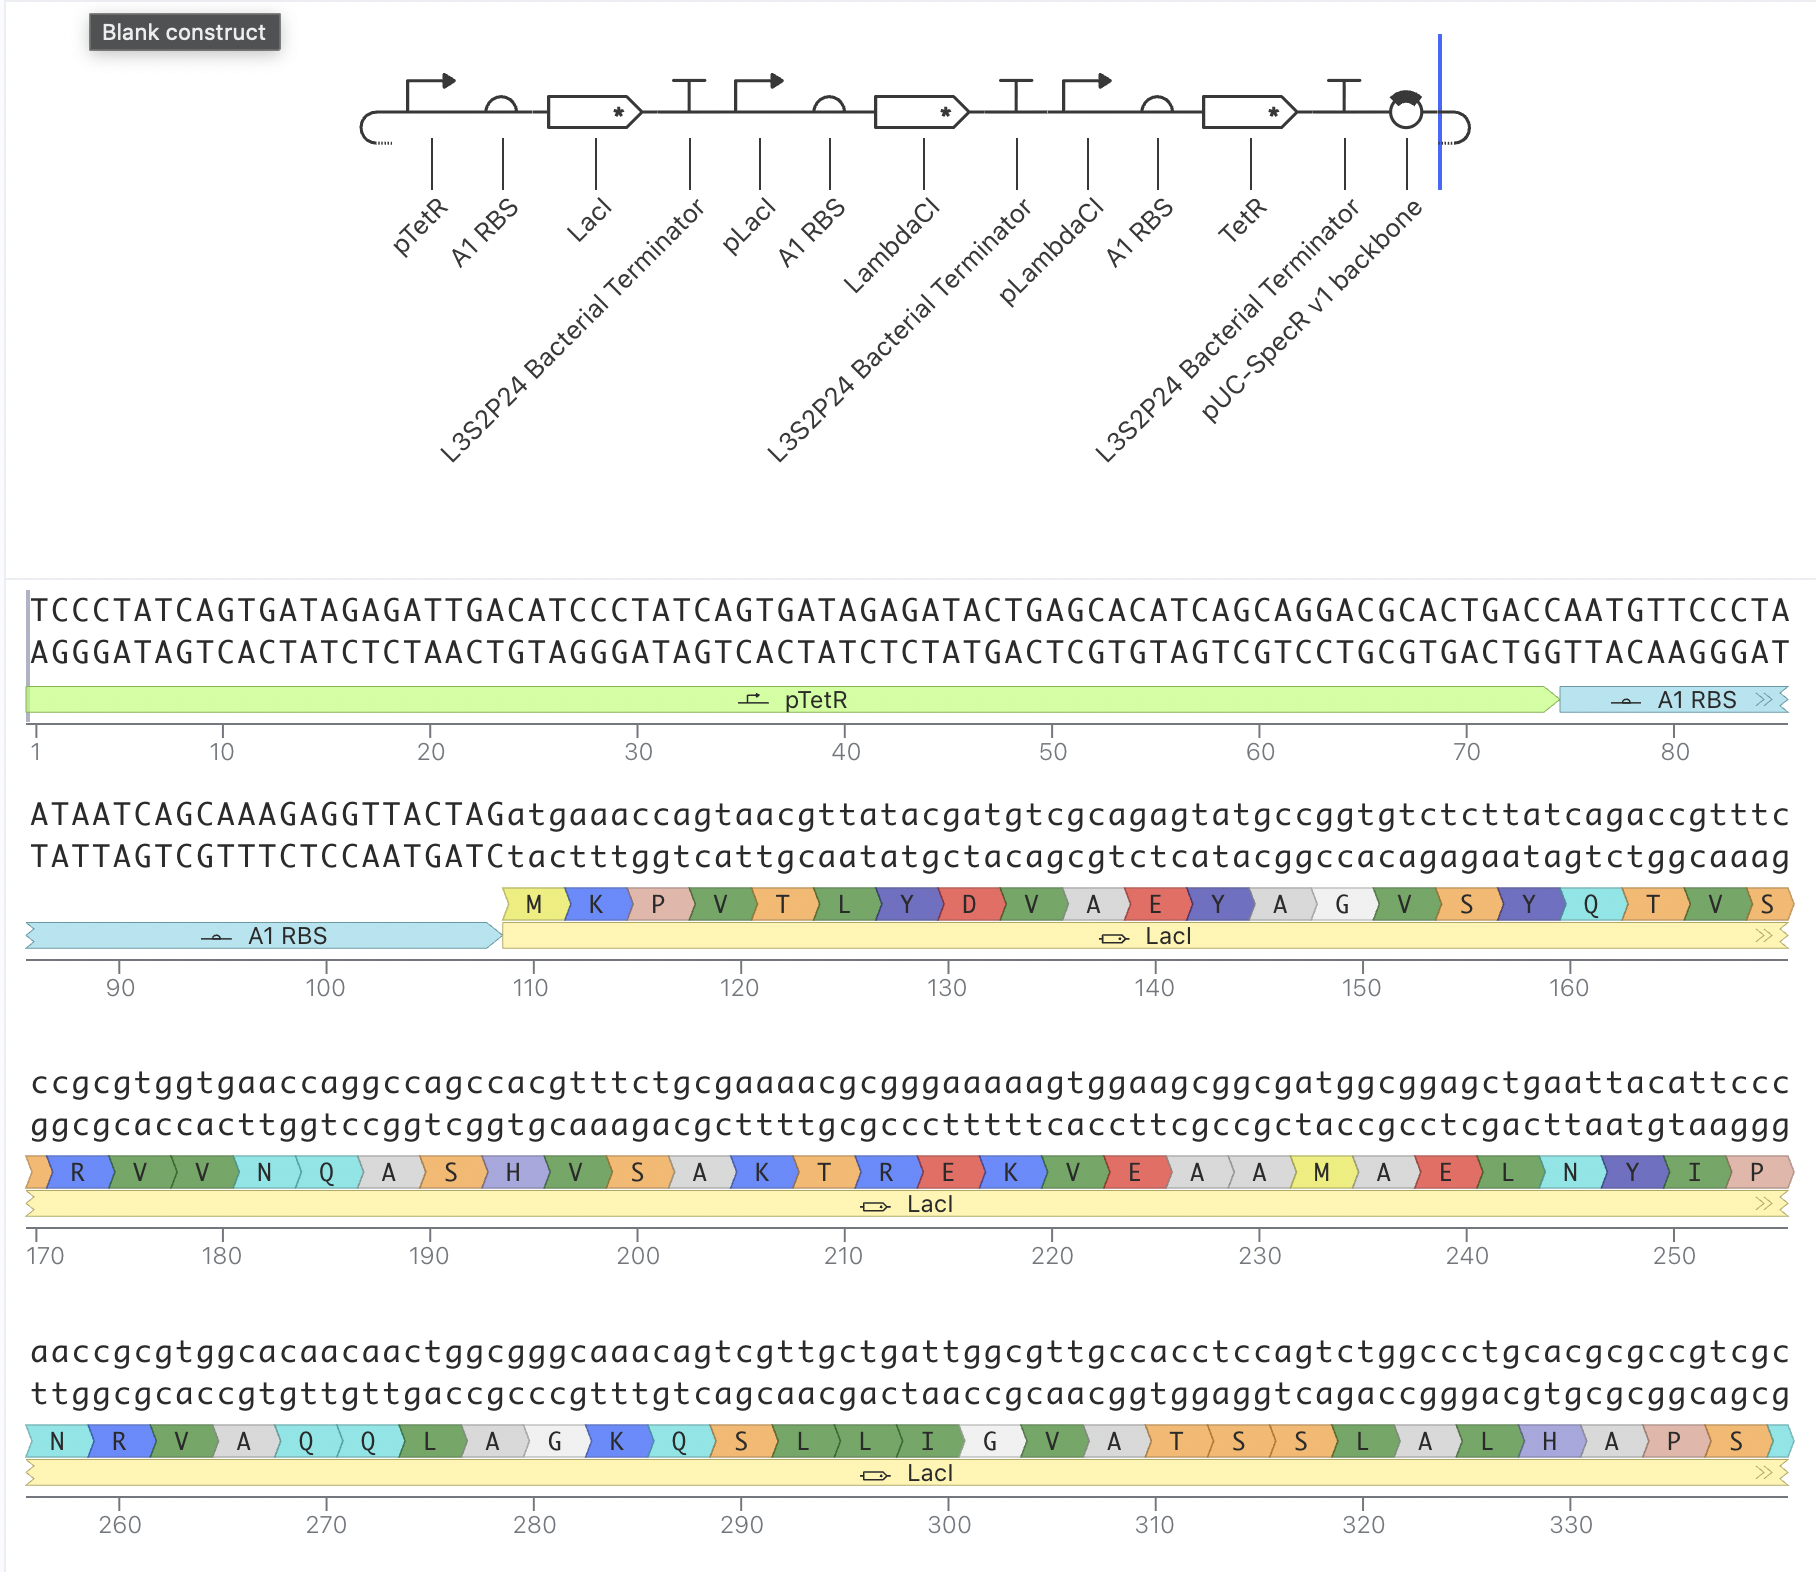
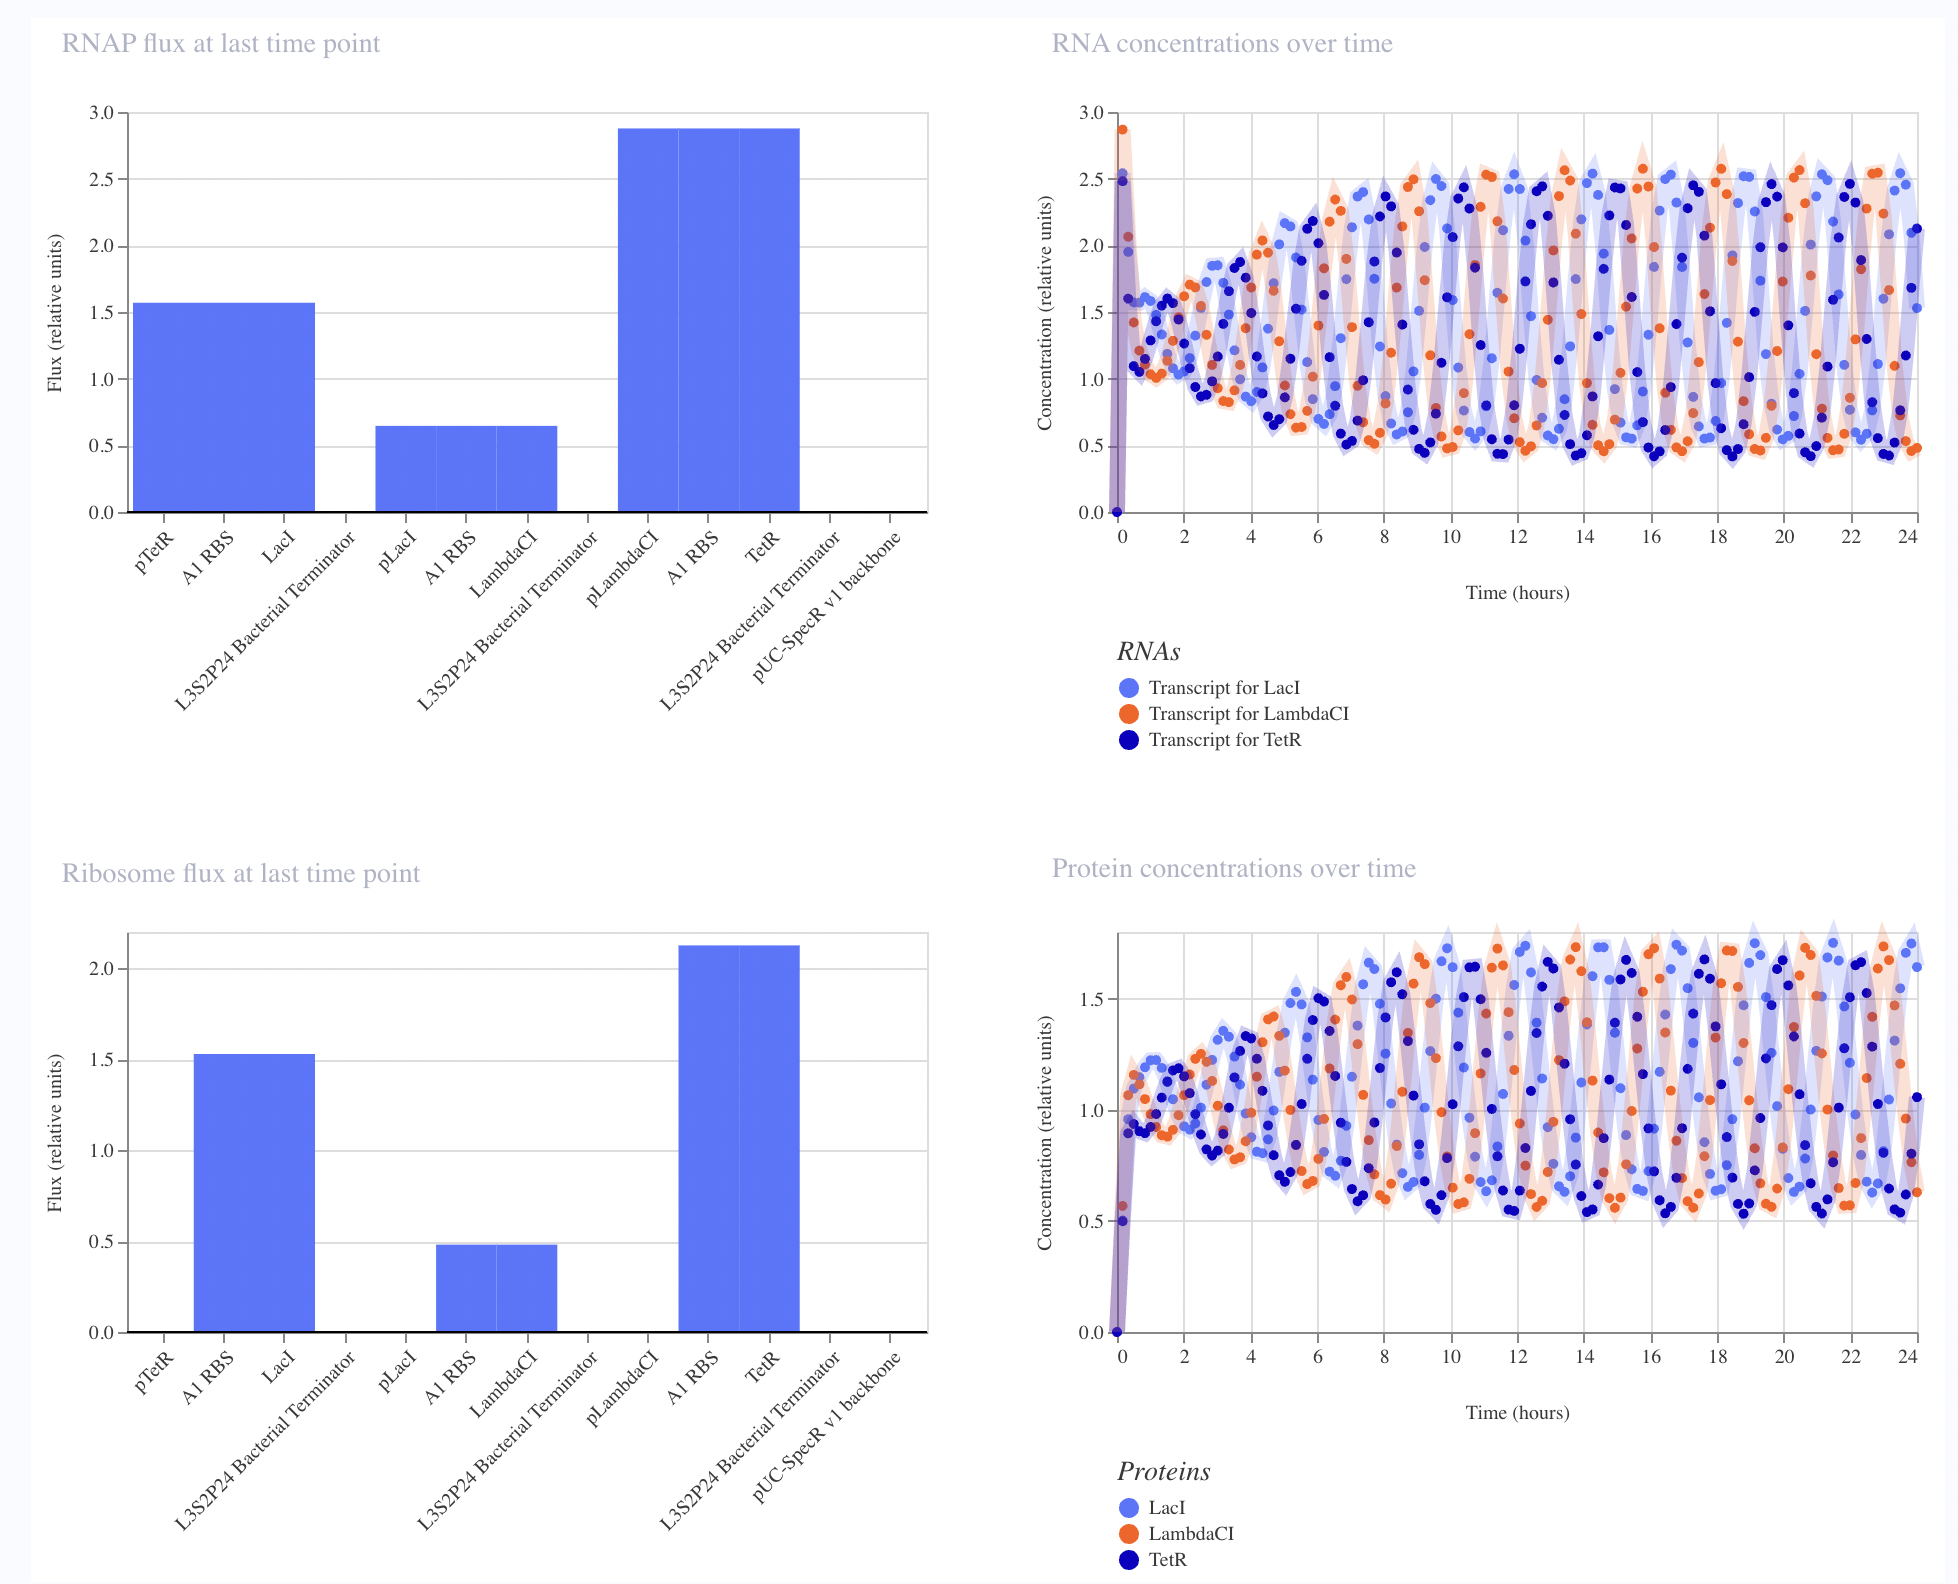
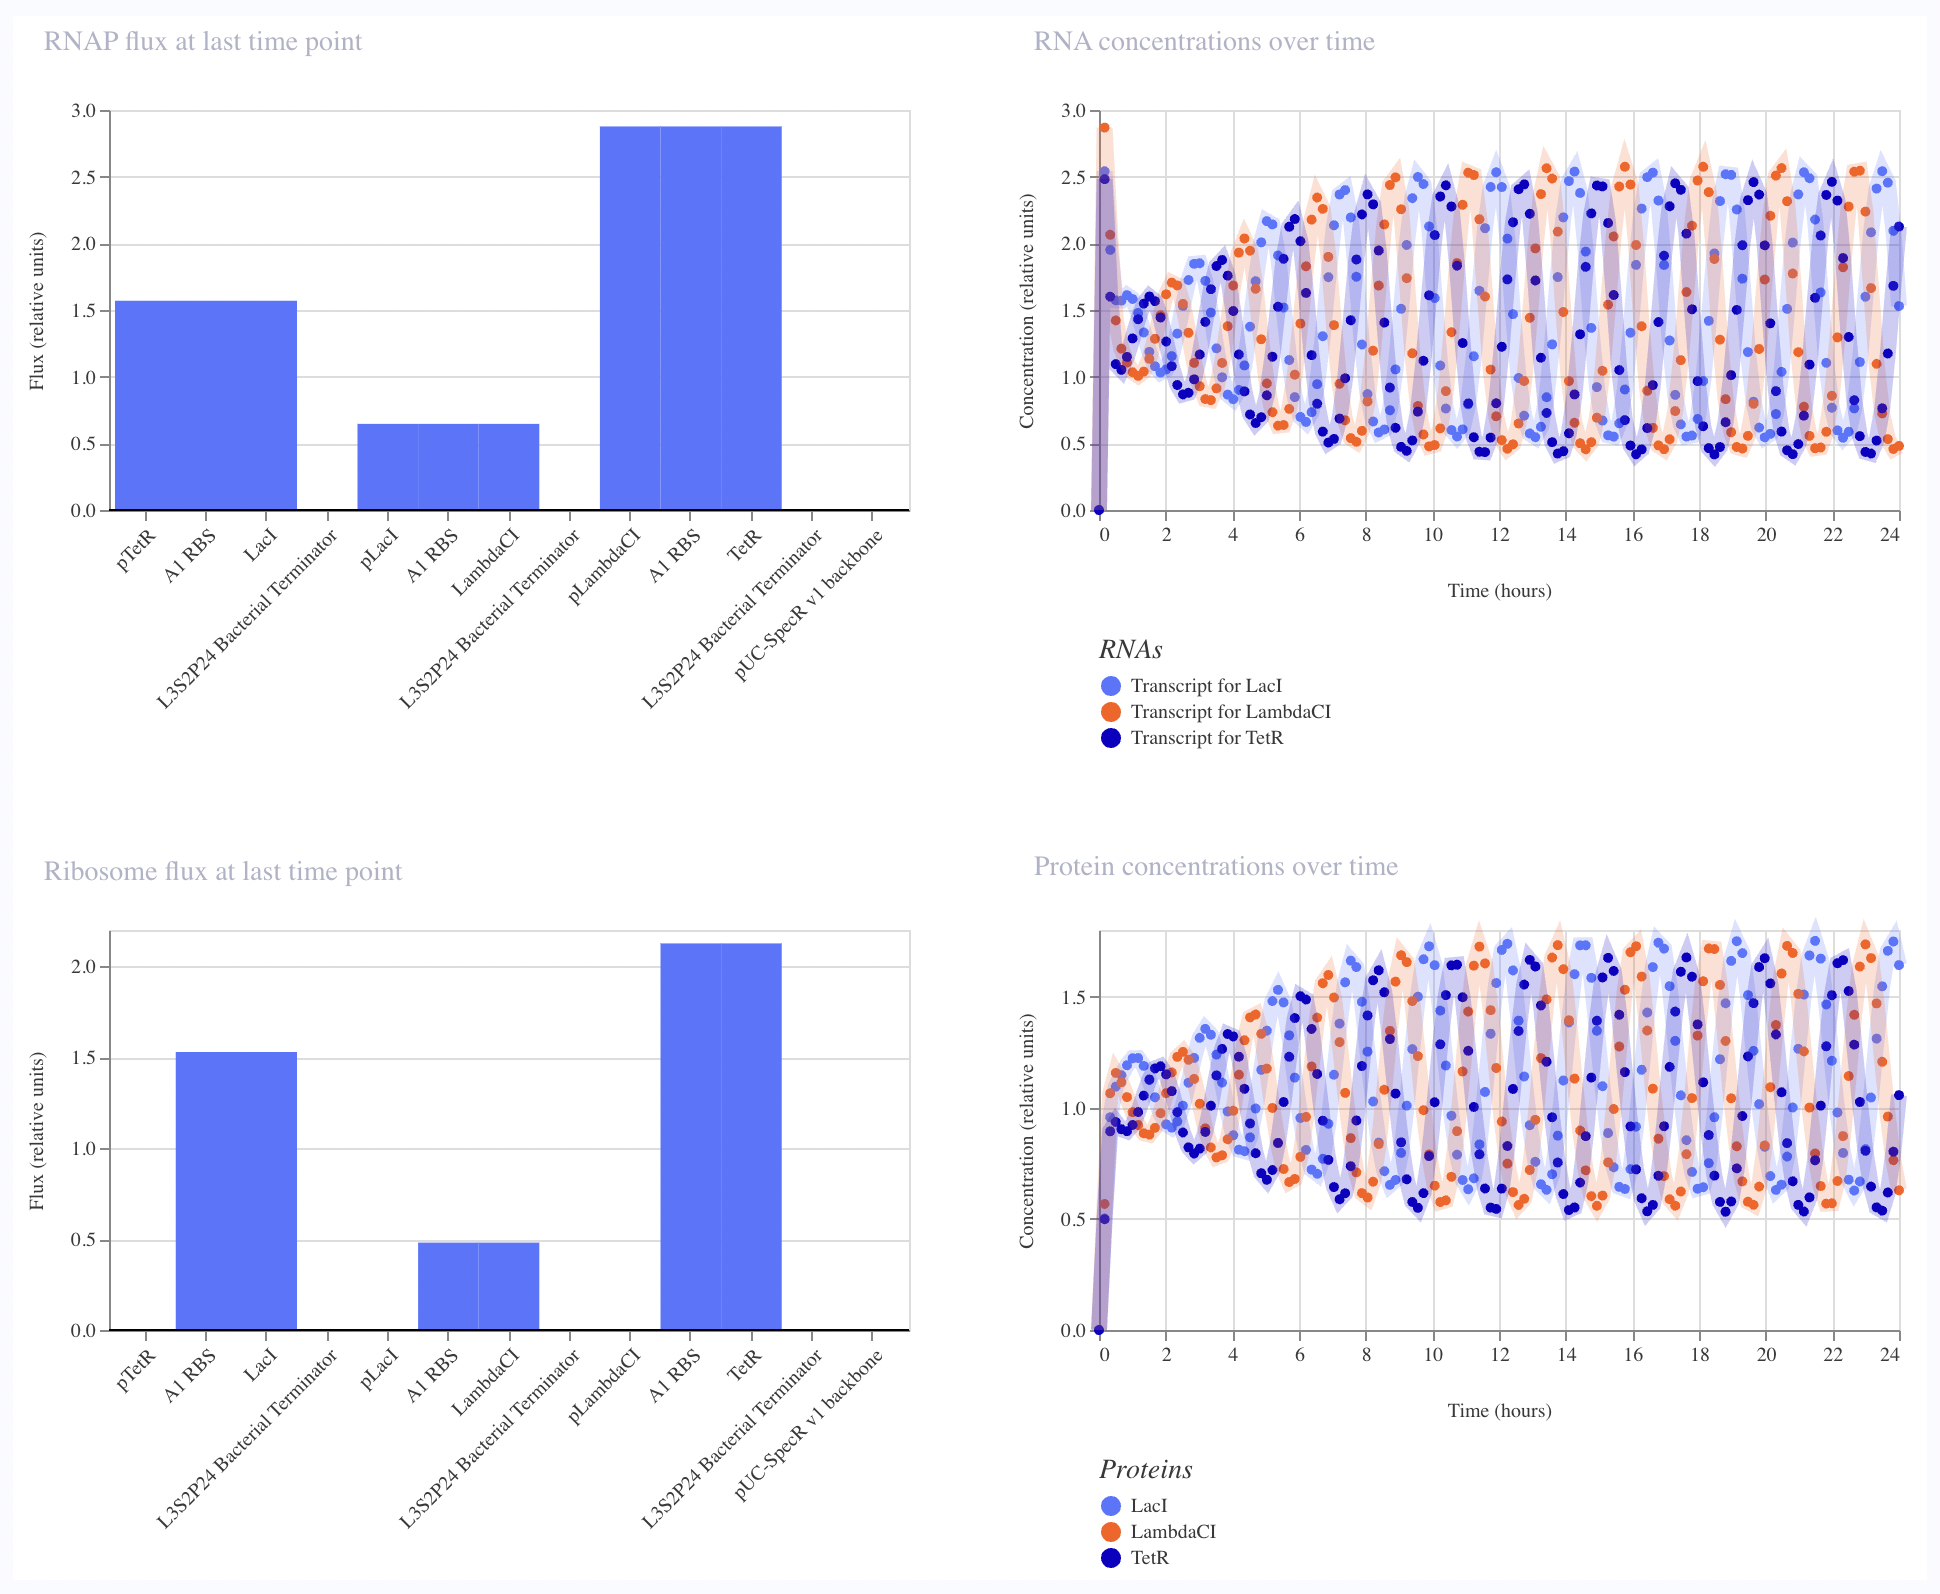
The recreated Repressilator appears to match the original very closely at the circuit-design and dynamical-behavior level. The topology is preserved, the annotated sequence structure is essentially the same, and the simulated outputs show the expected three-node oscillatory repression dynamics.
L-Protein Mutant Constructs
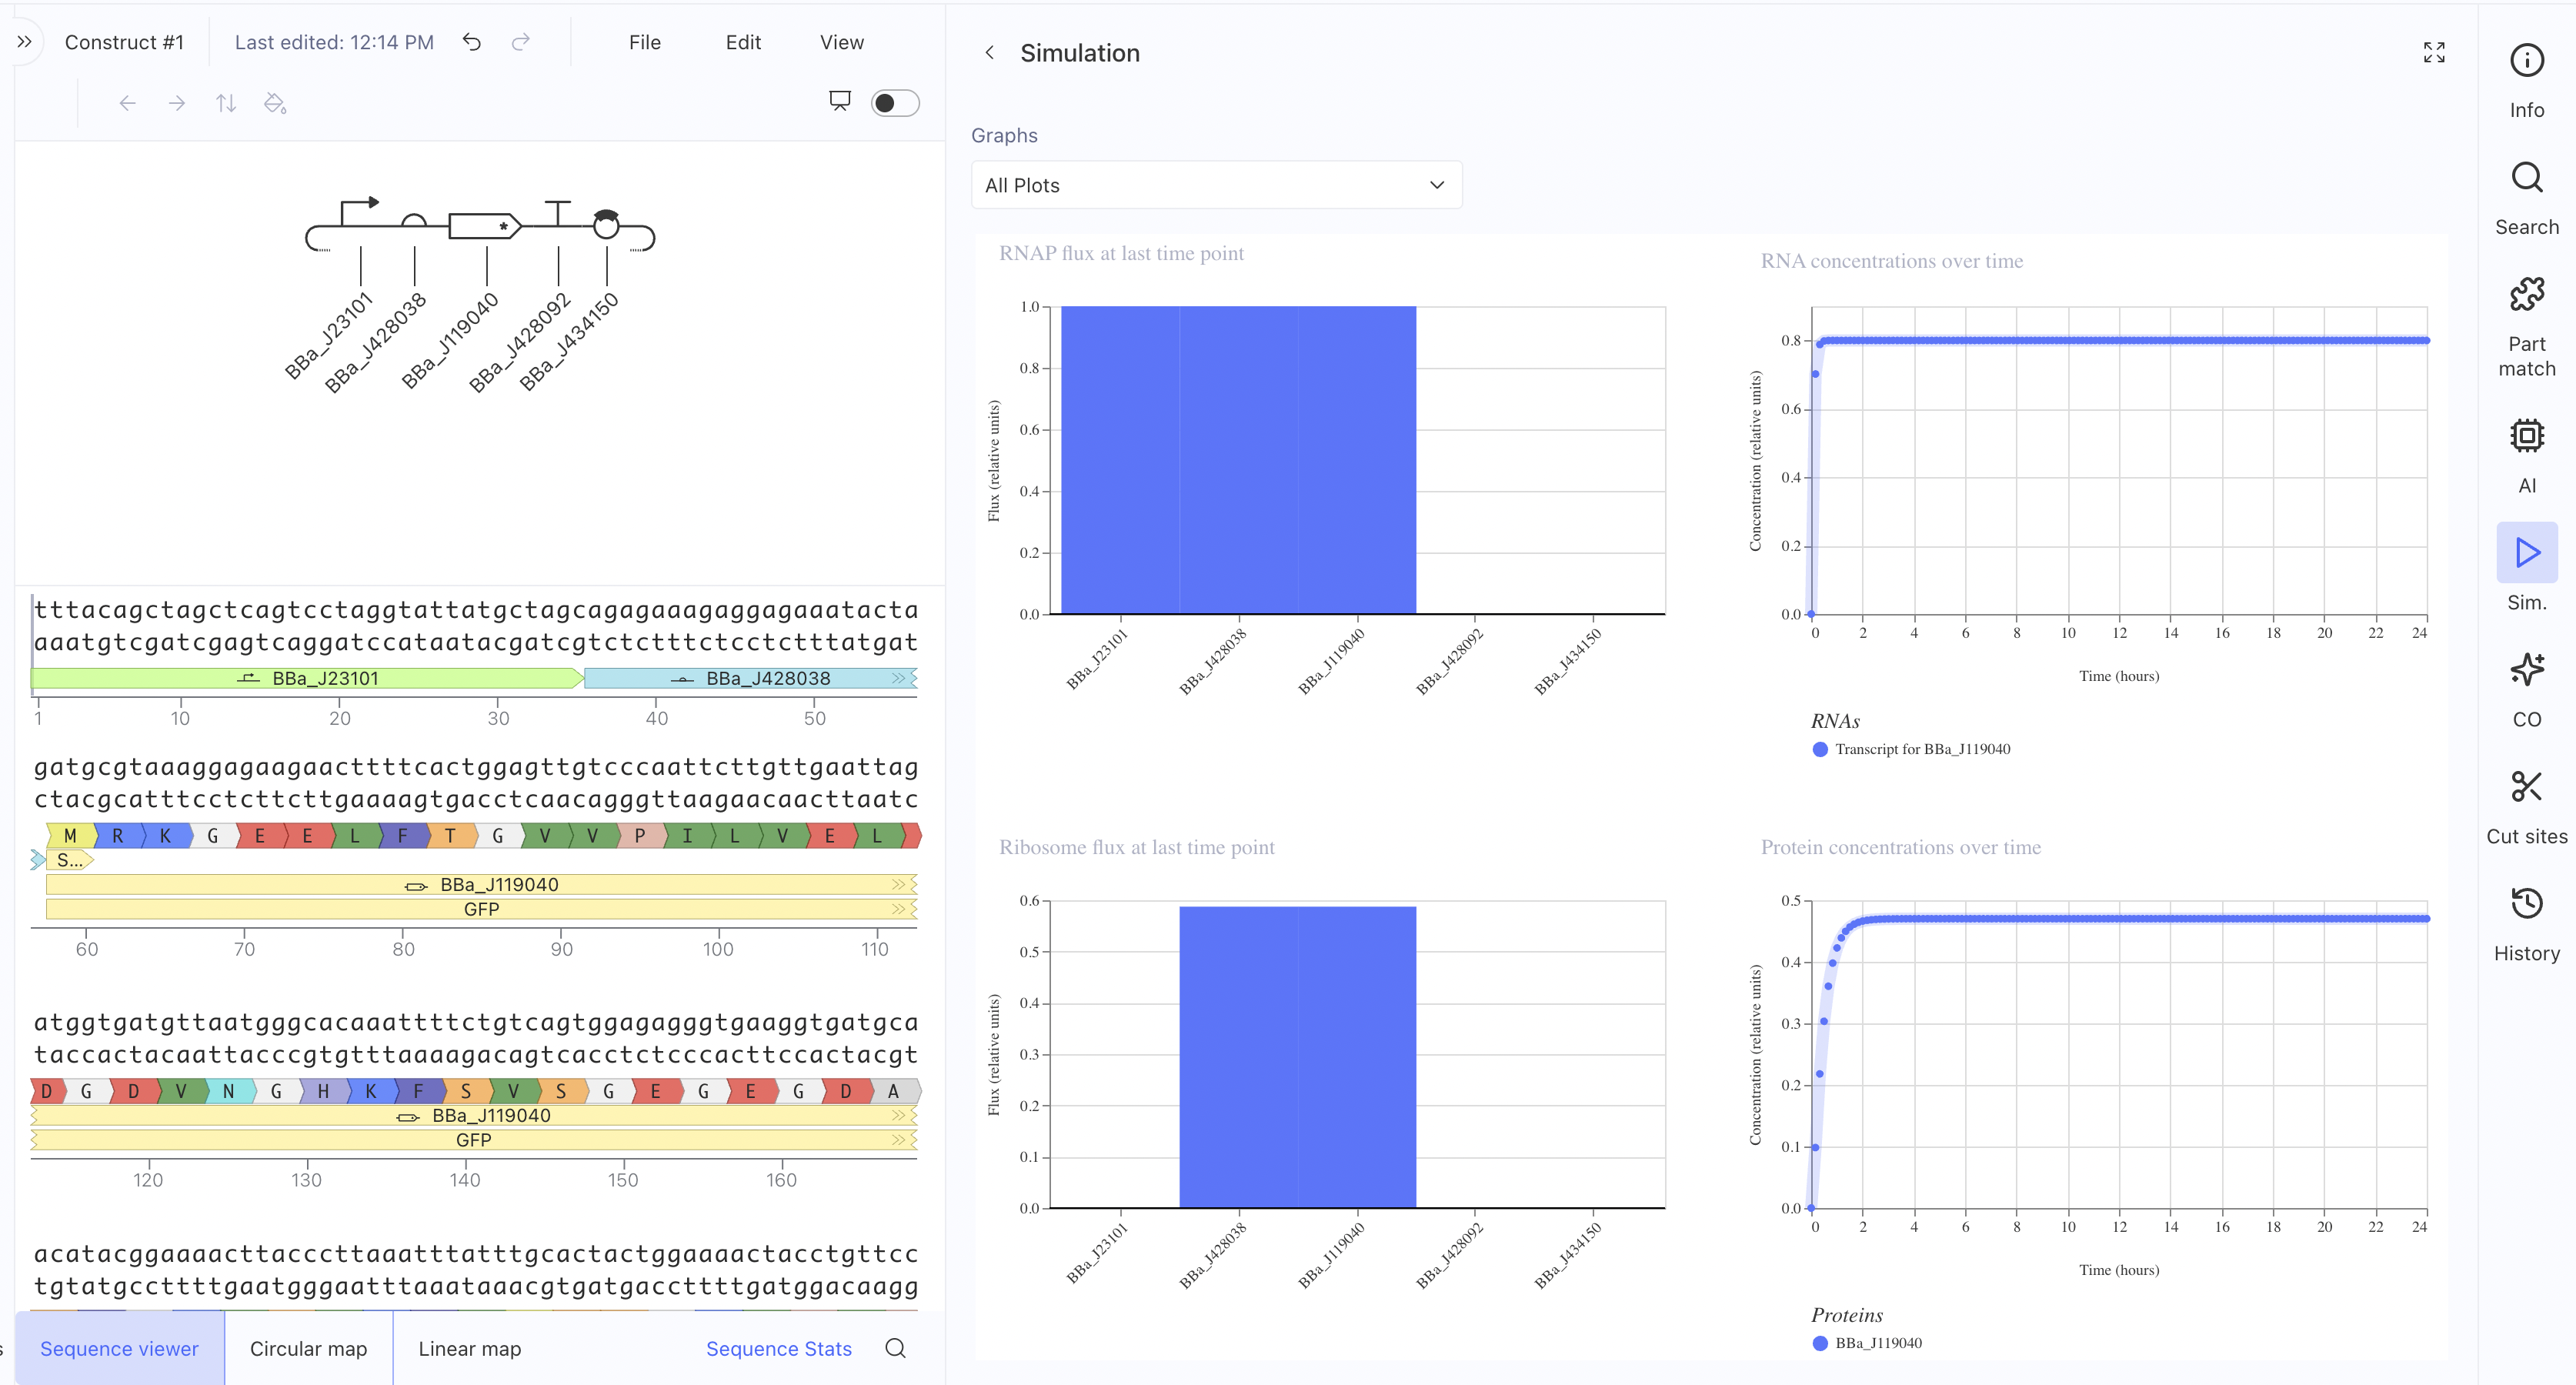
Construct 1: Constitutive GFP Expression Circuit
This is a simple constitutive expression circuit used as a reference
design to test the Kernel simulation environment.
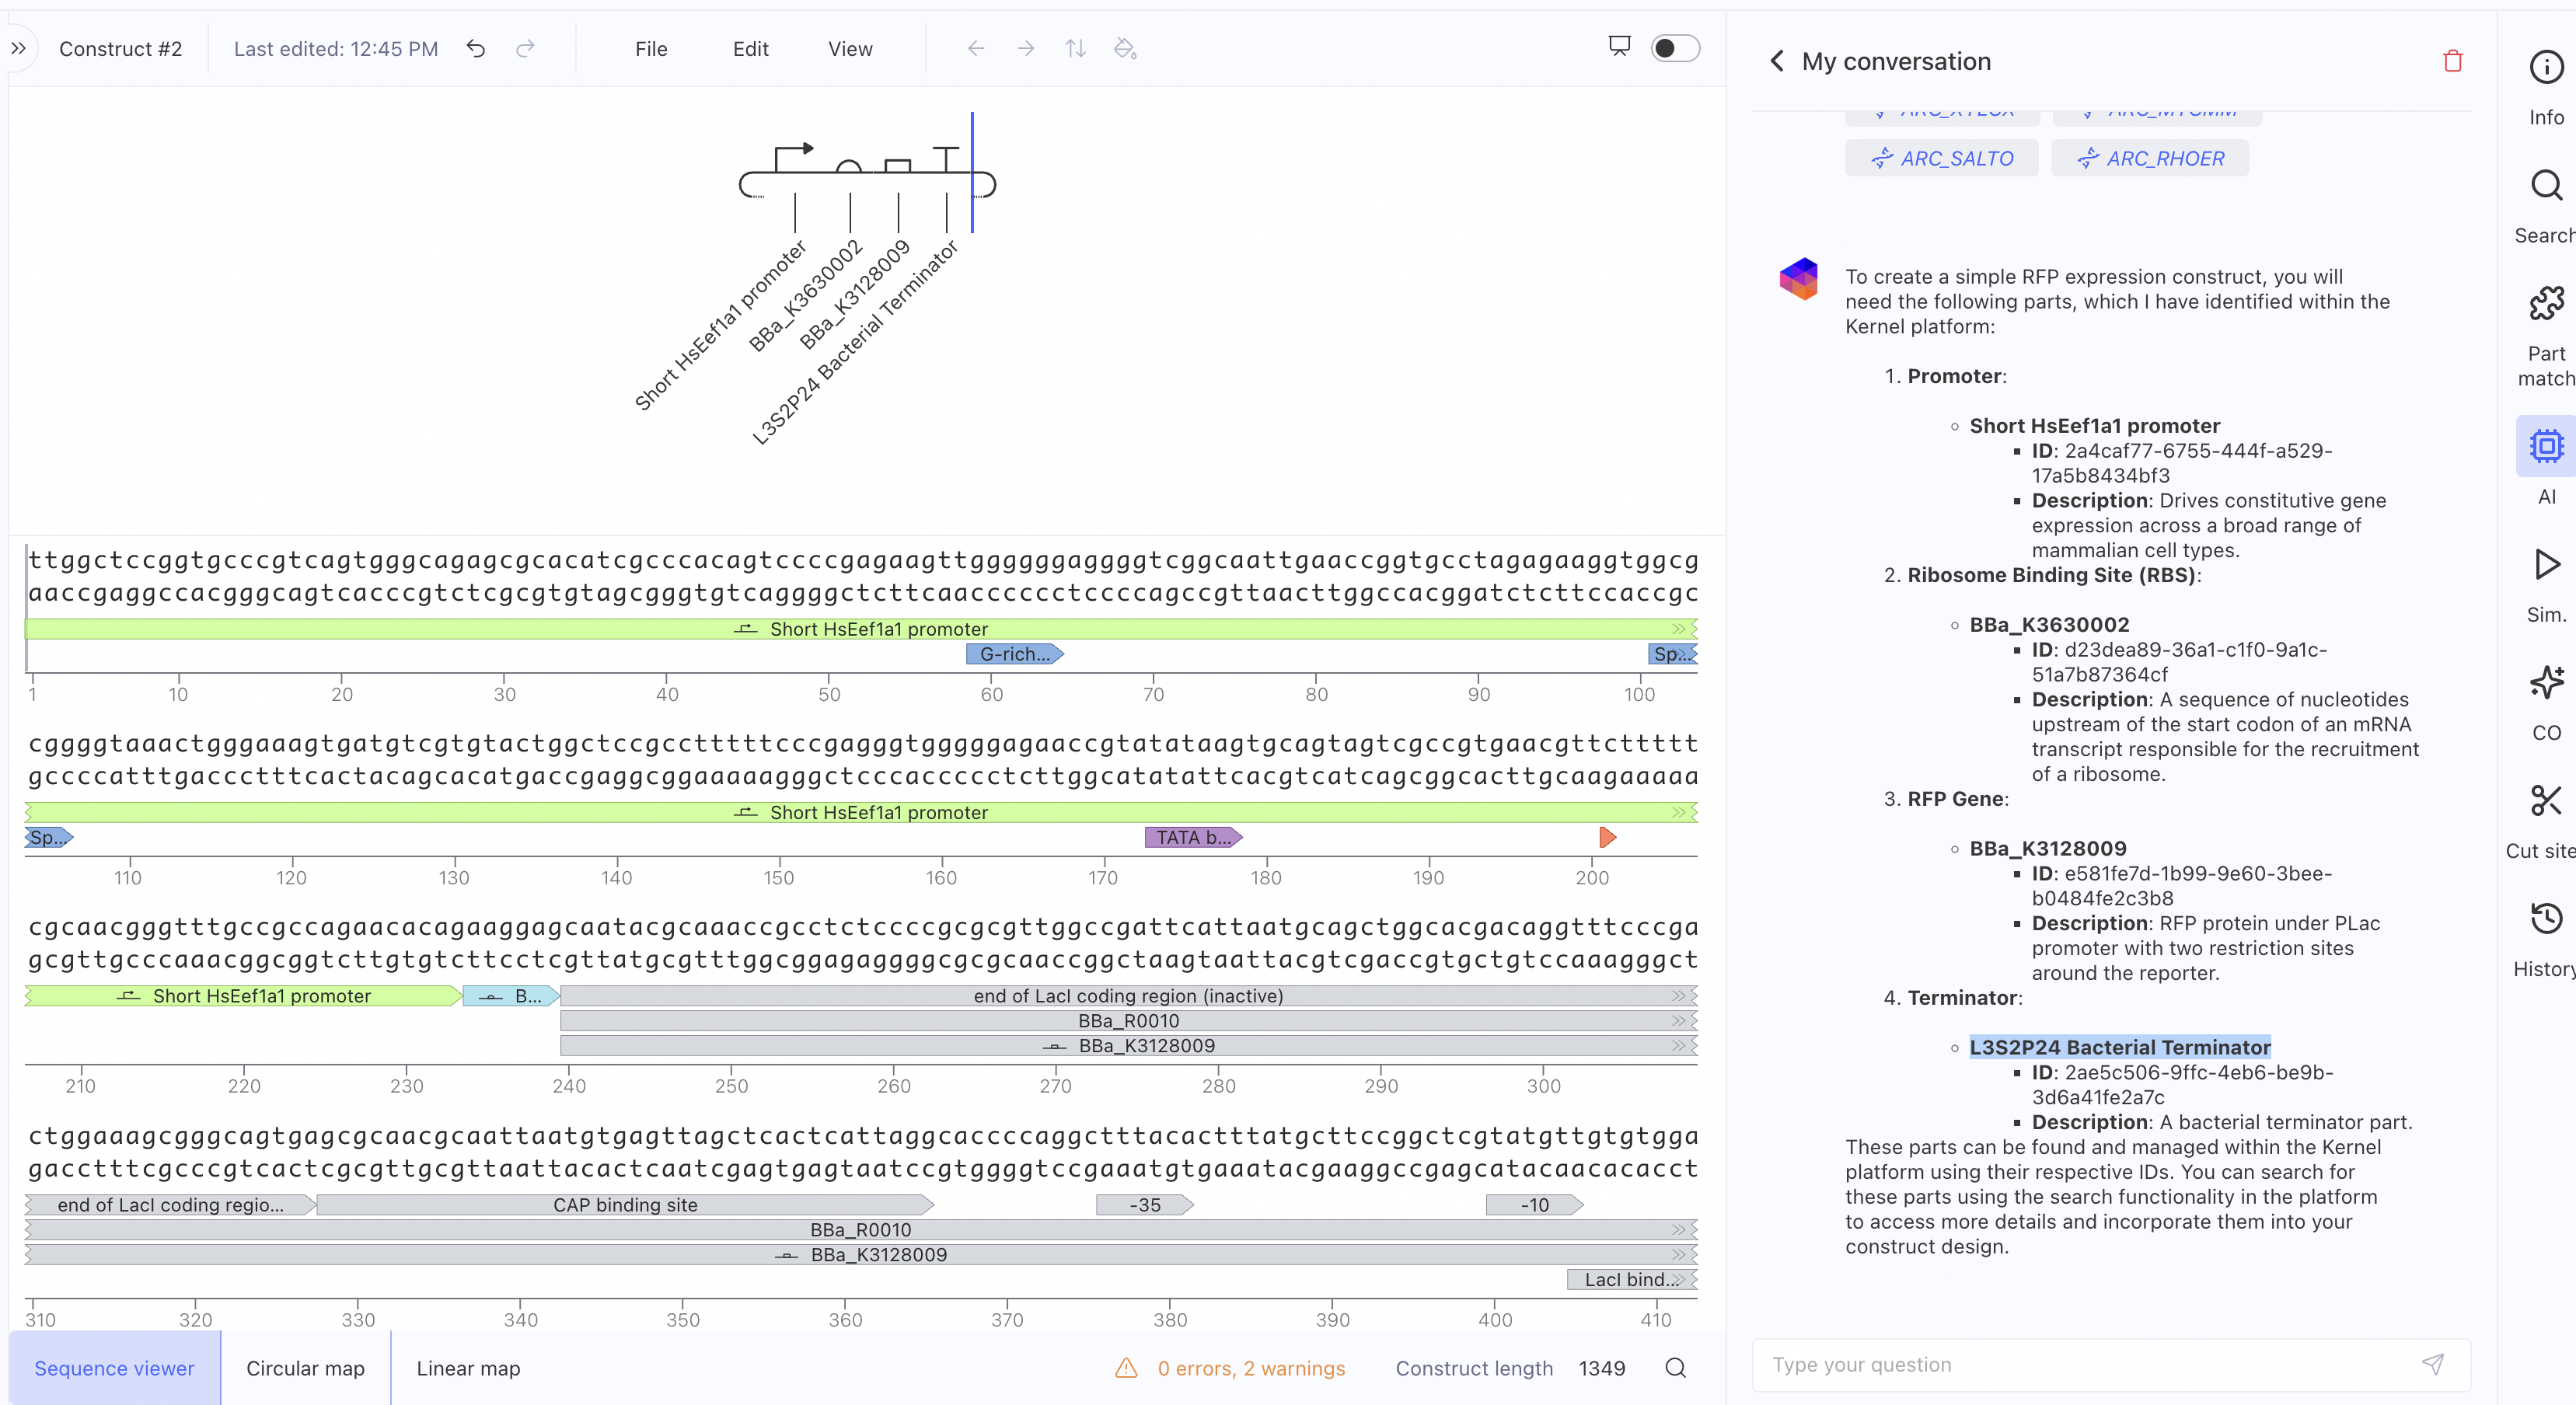
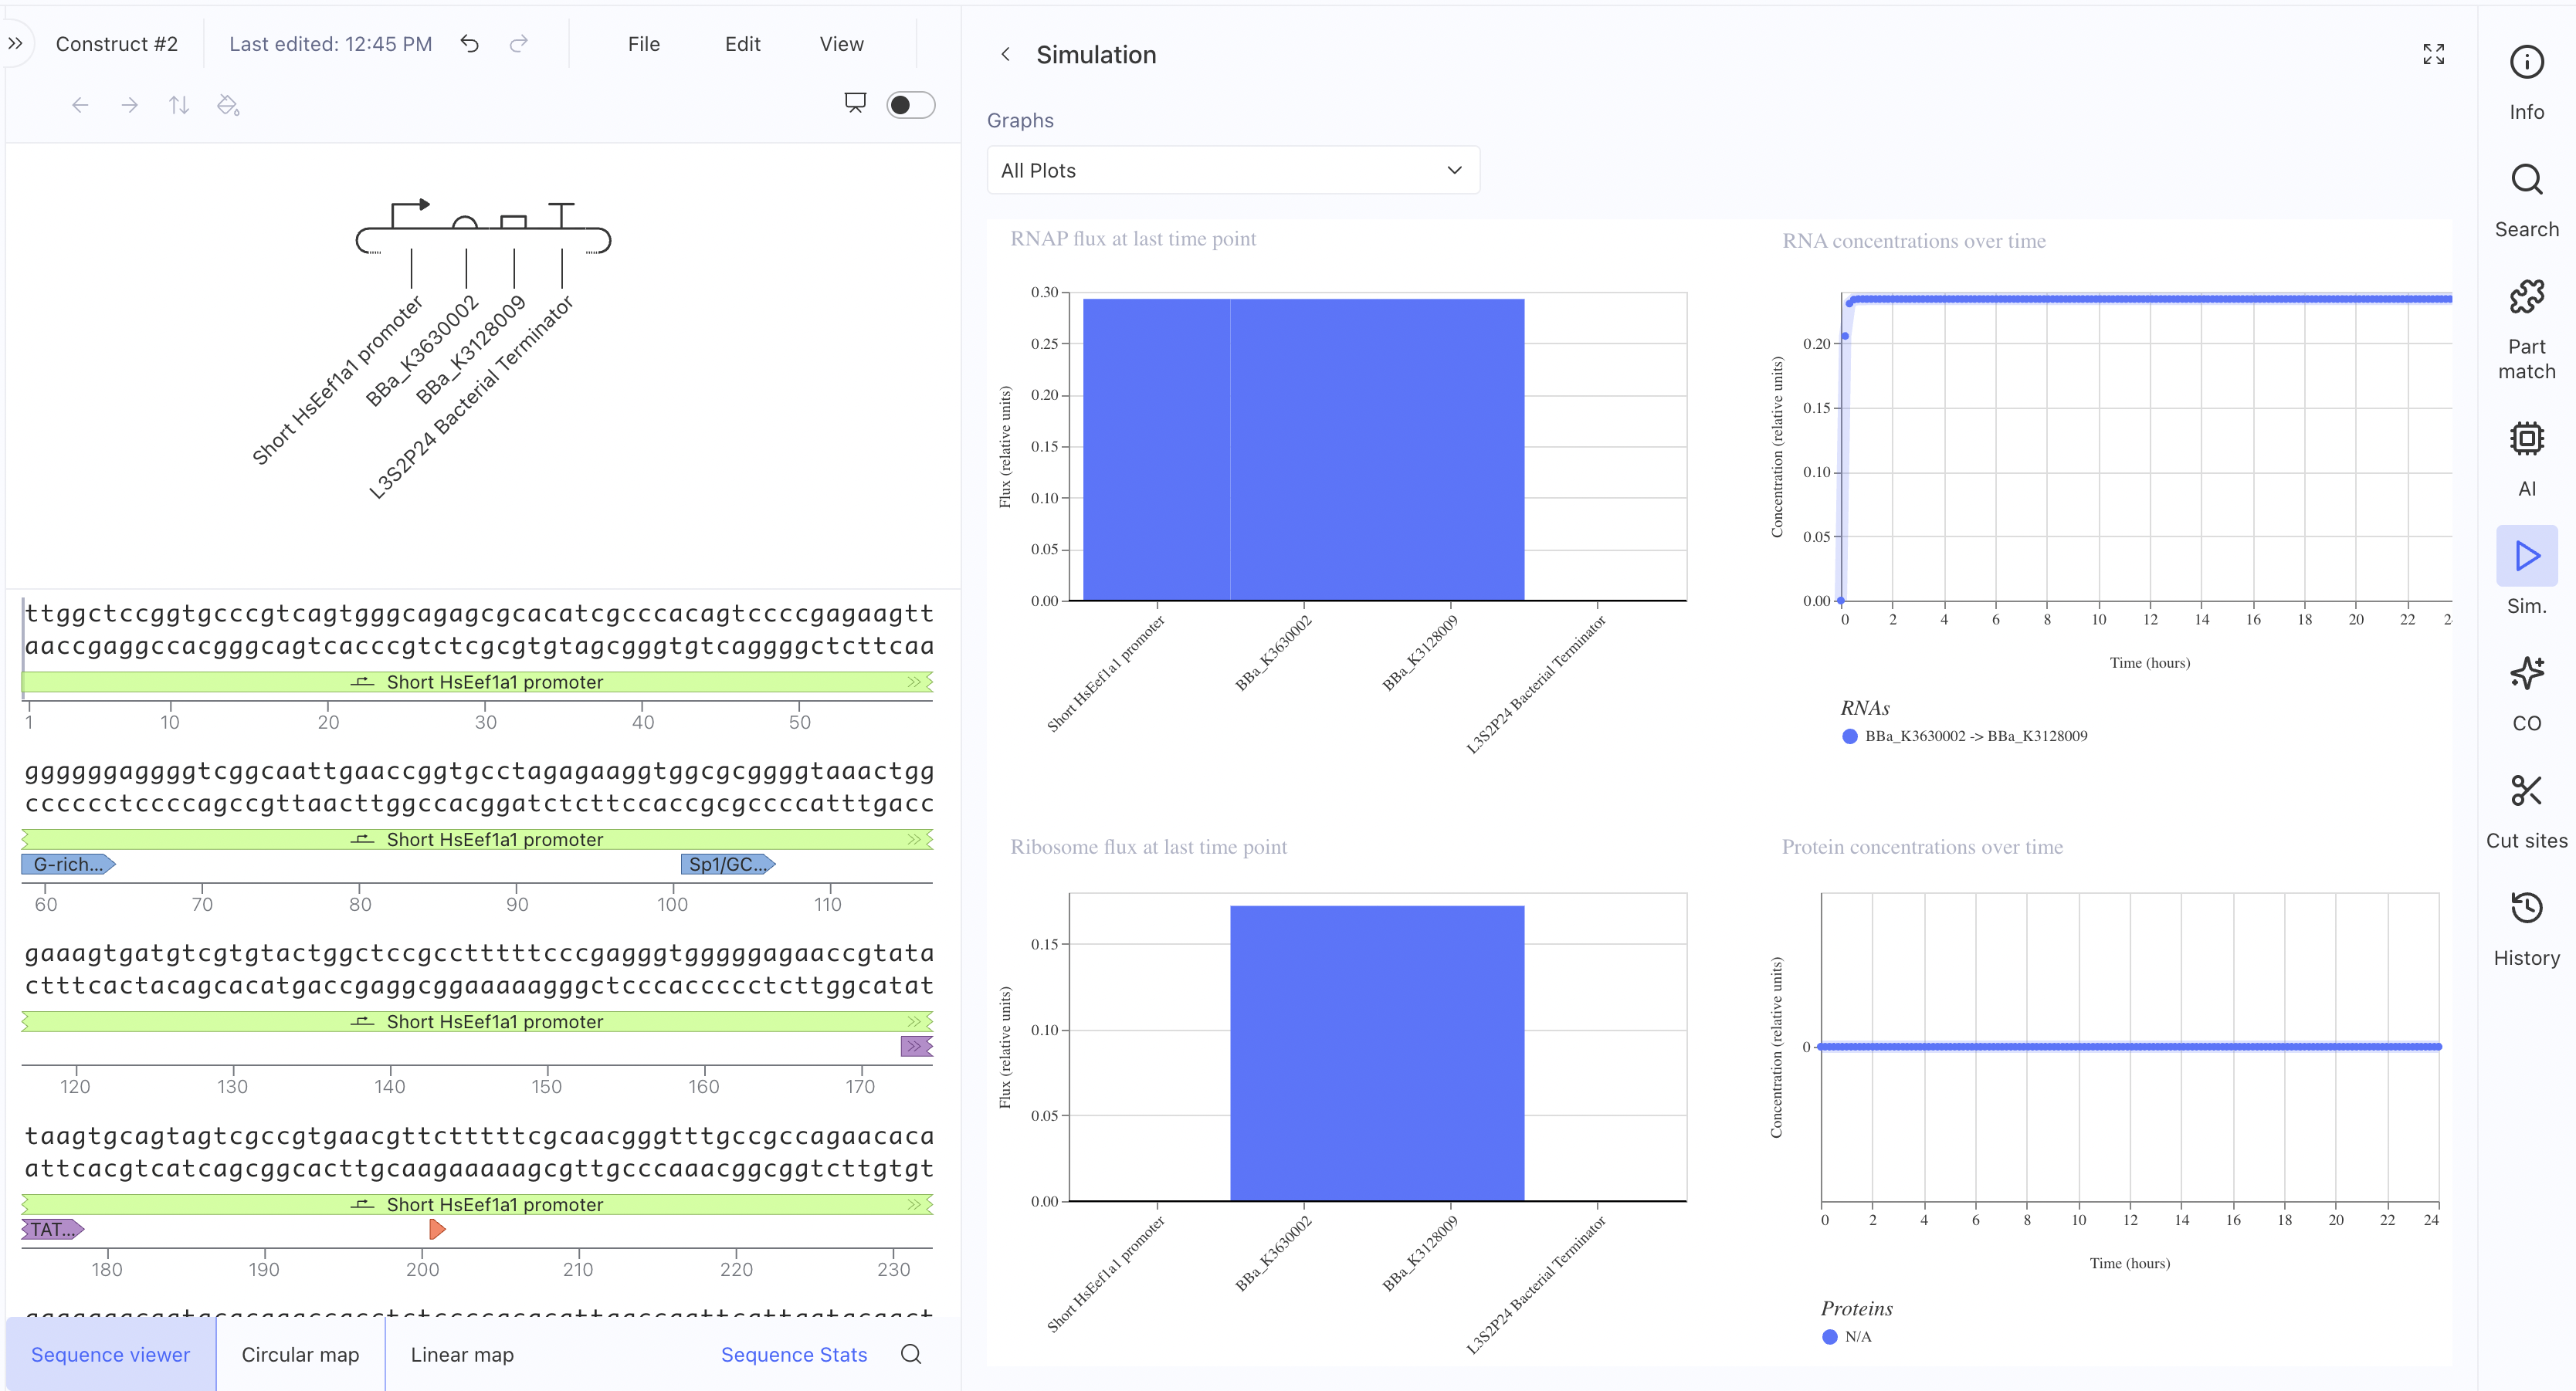
Construct 2: Mammalian Promoter-Driven Expression Circuit
This construct uses a Short HsEef1a1 promoter driving expression of
BBa_K3630002 and BBa_K3128009, with an L3S2P24 bacterial terminator.
The RNAP flux was lower here (~0.27 relative units) compared to
Construct 1, which makes sense since the HsEef1a1 promoter is a
mammalian promoter and not optimised for bacterial simulation contexts. I also asked the asimov AI for assistance
Construct 3: Multi-Part L-Protein Expression Circuit
This uses the constitutive promoter BBa_J23119, RBS BBa_B0034, the L-protein coding sequence BBa_E0040, a coding sequence extension BBa_B0032, an insulator BBa_E1010, and terminator BBa_B0015. The simulation showed RNAP flux, and interestingly the ribosome flux graph showed two distinct peaks suggesting the simulator is resolving translation at two separate coding regions. This is the construct architecture most directly applicable to expressing L-protein mutants in E. coli for the downstream plaque assay experiments.
