Week 2 HW: DNA r/w/e
Part 1: Benchling & In-silico Gel Art
1. Setup
I created a Benchling account and opened the Lambda DNA sequence (NC_001416). Initially I had another plasmid open (pBR322_EGFR), but I switched to Lambda DNA after confirming the correct assignment requirements.
2. Importing Lambda DNA
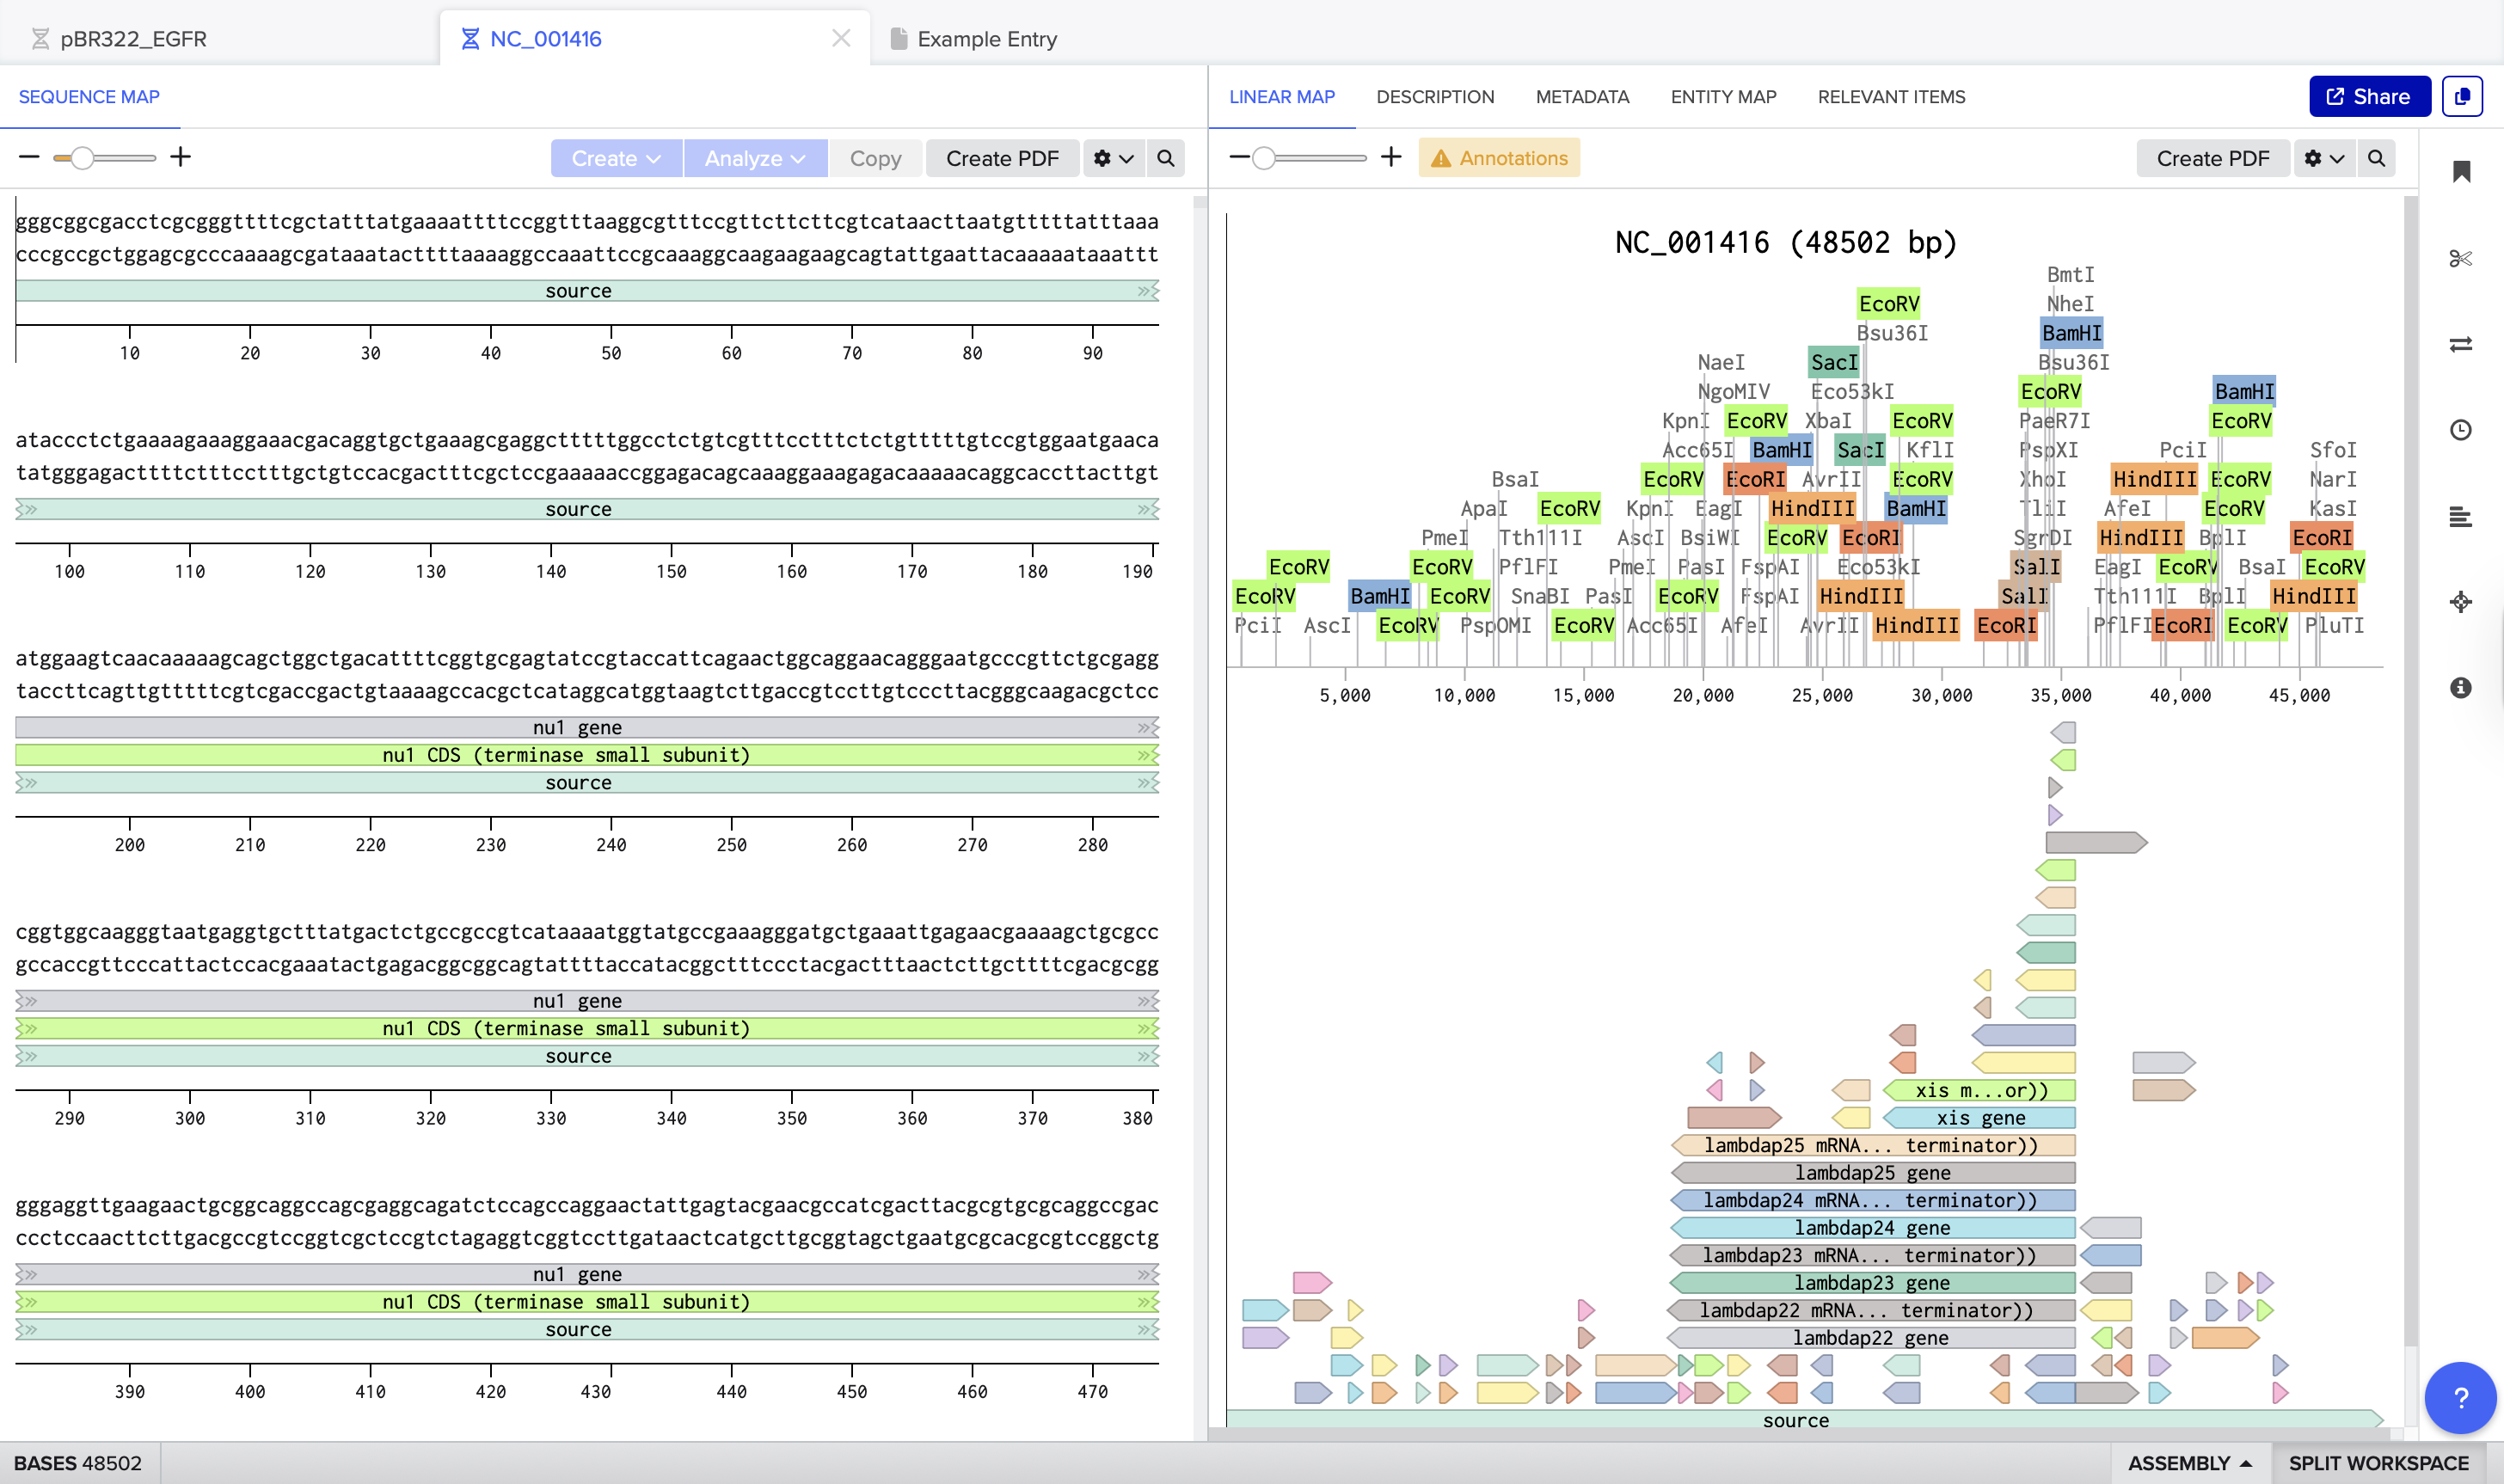
I opened the Lambda phage genome (NC_001416, ~48.5 kb) inside Benchling. The sequence map displays multiple restriction enzyme sites distributed across the genome.
3. Restriction Digest Exploration
I simulated restriction digests using the following enzymes:
EcoRI HindIII BamHI KpnI EcoRV SacI SalI
Initially I was confused and didn’t really understand what I was “filtering.” Benchling scans the DNA, finds specific enzyme patterns, simulates cuts, and gives fragment sizes, but at first I kept thinking: then what? I wasn’t familiar with the terminology or the real-world application, so it felt abstract.
To understand better, I asked ChatGPT and watched several explanatory videos. Even then I struggled a bit, but gradually I realized that each enzyme works like a specific filter or rule. By testing different enzymes, I could start to see the pattern differences they create in the DNA fragments.
This helped me understand that I was learning how different enzyme “filters” generate different visual rhythms, so I could begin deciding which enzymes to use intentionally for my visual composition.
After running the digest, I could see how each selected enzyme produced a different number of cuts and fragment sizes. For example, EcoRV generated many cuts(21), creating a dense distribution of smaller fragments, while EcoRI(5) and HindIII(6) produced fewer cuts.
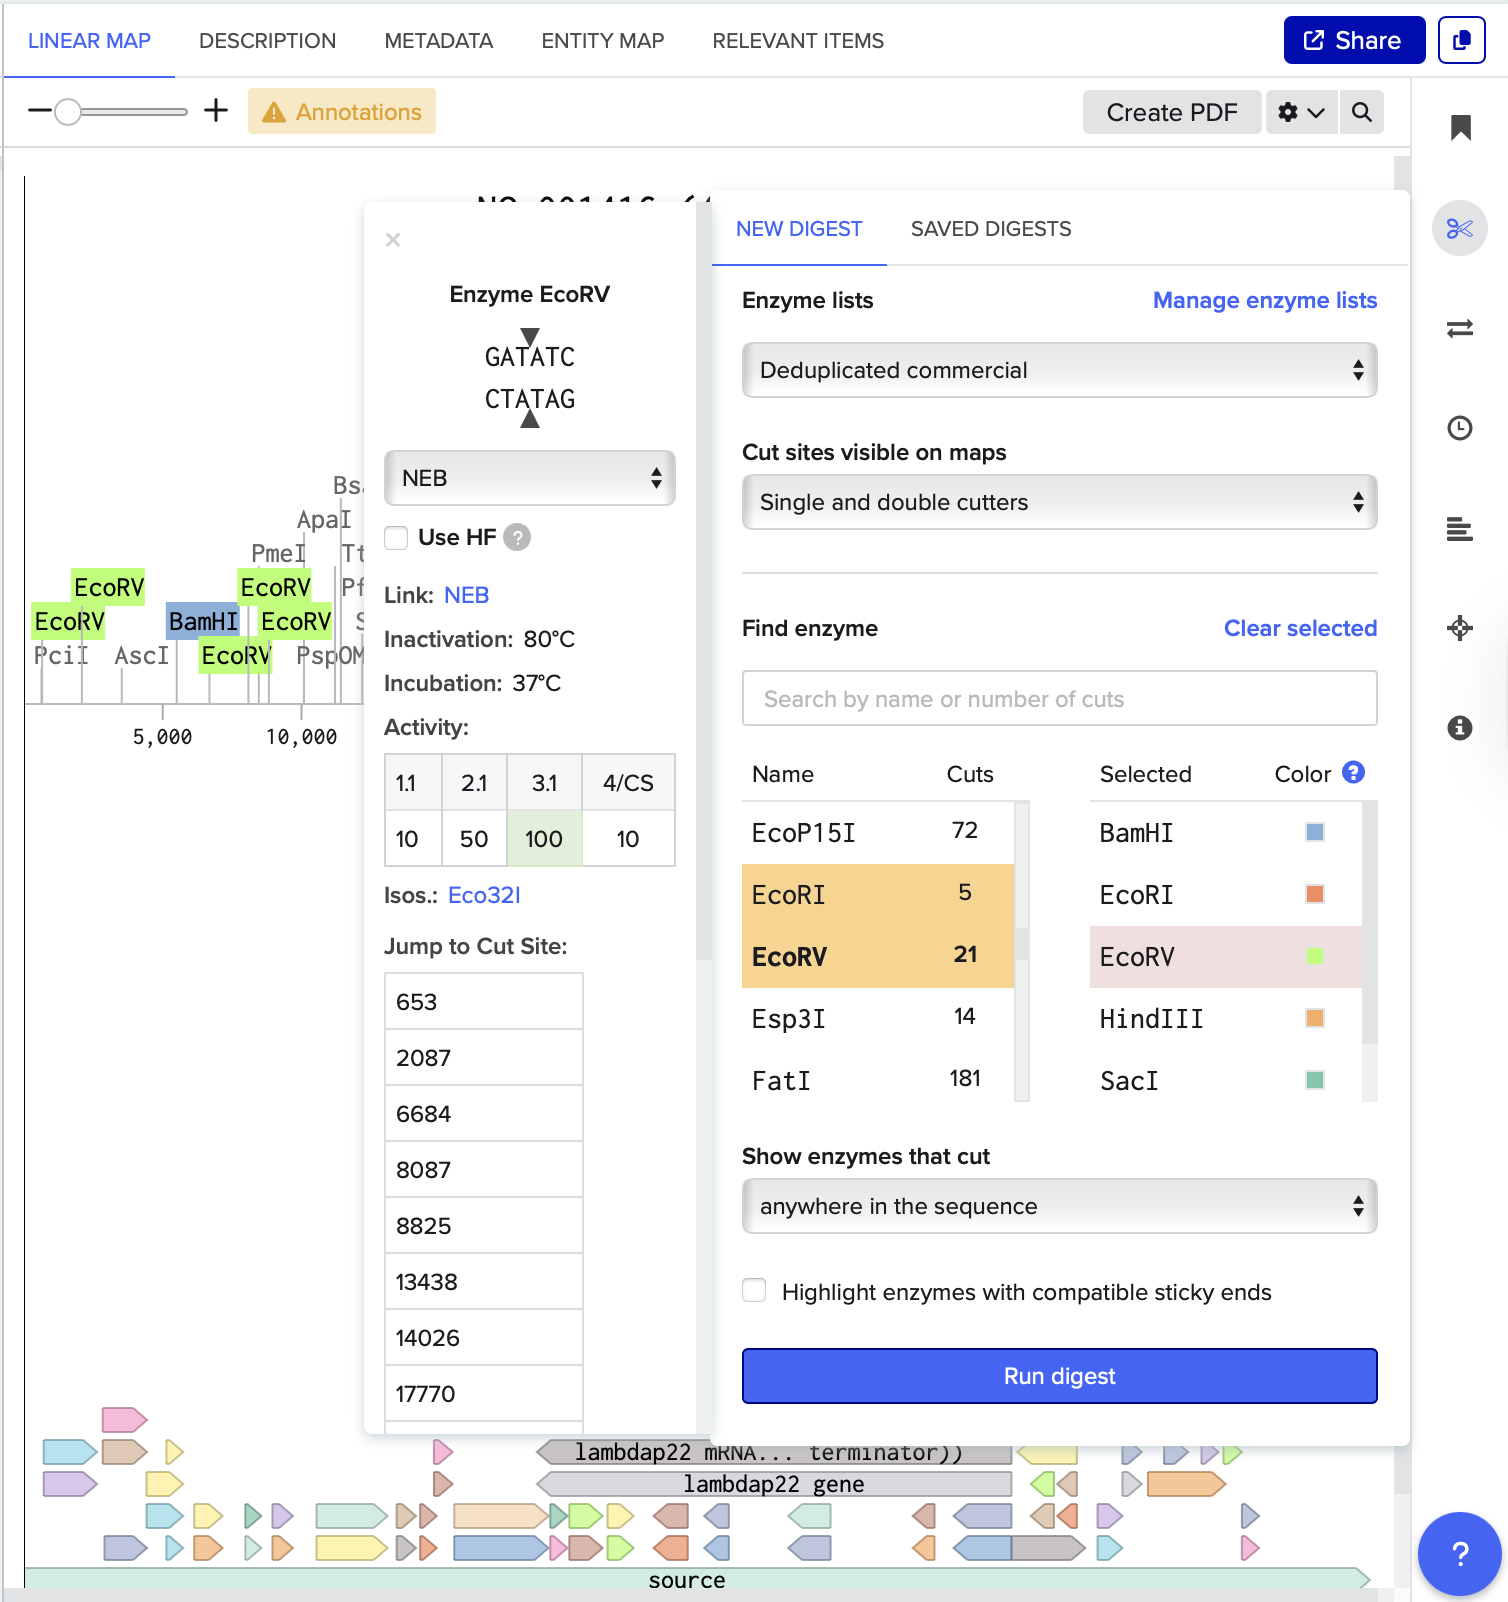
I also noticed that some enzymes, such as KpnI and SacI, did not appear prominently in the results or produced very few cuts in this sequence.
4. Gel Art Design Strategy
At this stage I stopped thinking about the enzymes only as a biology tool and started looking at them as pattern generators. Each enzyme produced different fragment distributions, so I explored how switching enzymes changed the visual rhythm of the gel.
The interface doesn’t allow precise editing of each lane. I couldn’t manually design bands. I had to cycle through combinations using the arrows and observe what happened. Because of that, my strategy became more about selecting which enzymes to keep active and then browsing through outcomes until I found something that felt balanced.
5. Iterations & Failed Attempts
Before this final version, I tried to create clearer shapes and more intentional patterns. I turned on many enzymes at once hoping to get complex results, but most of the outputs looked messy or repetitive.
One frustration was the lack of control. I expected to design the image directly, but the system works more like a generator. Many early attempts felt too basic or visually similar even when I changed enzymes.
After several tries, I stopped chasing a specific image and focused more on choosing a composition that felt visually stable.
6. Final Gel Composition
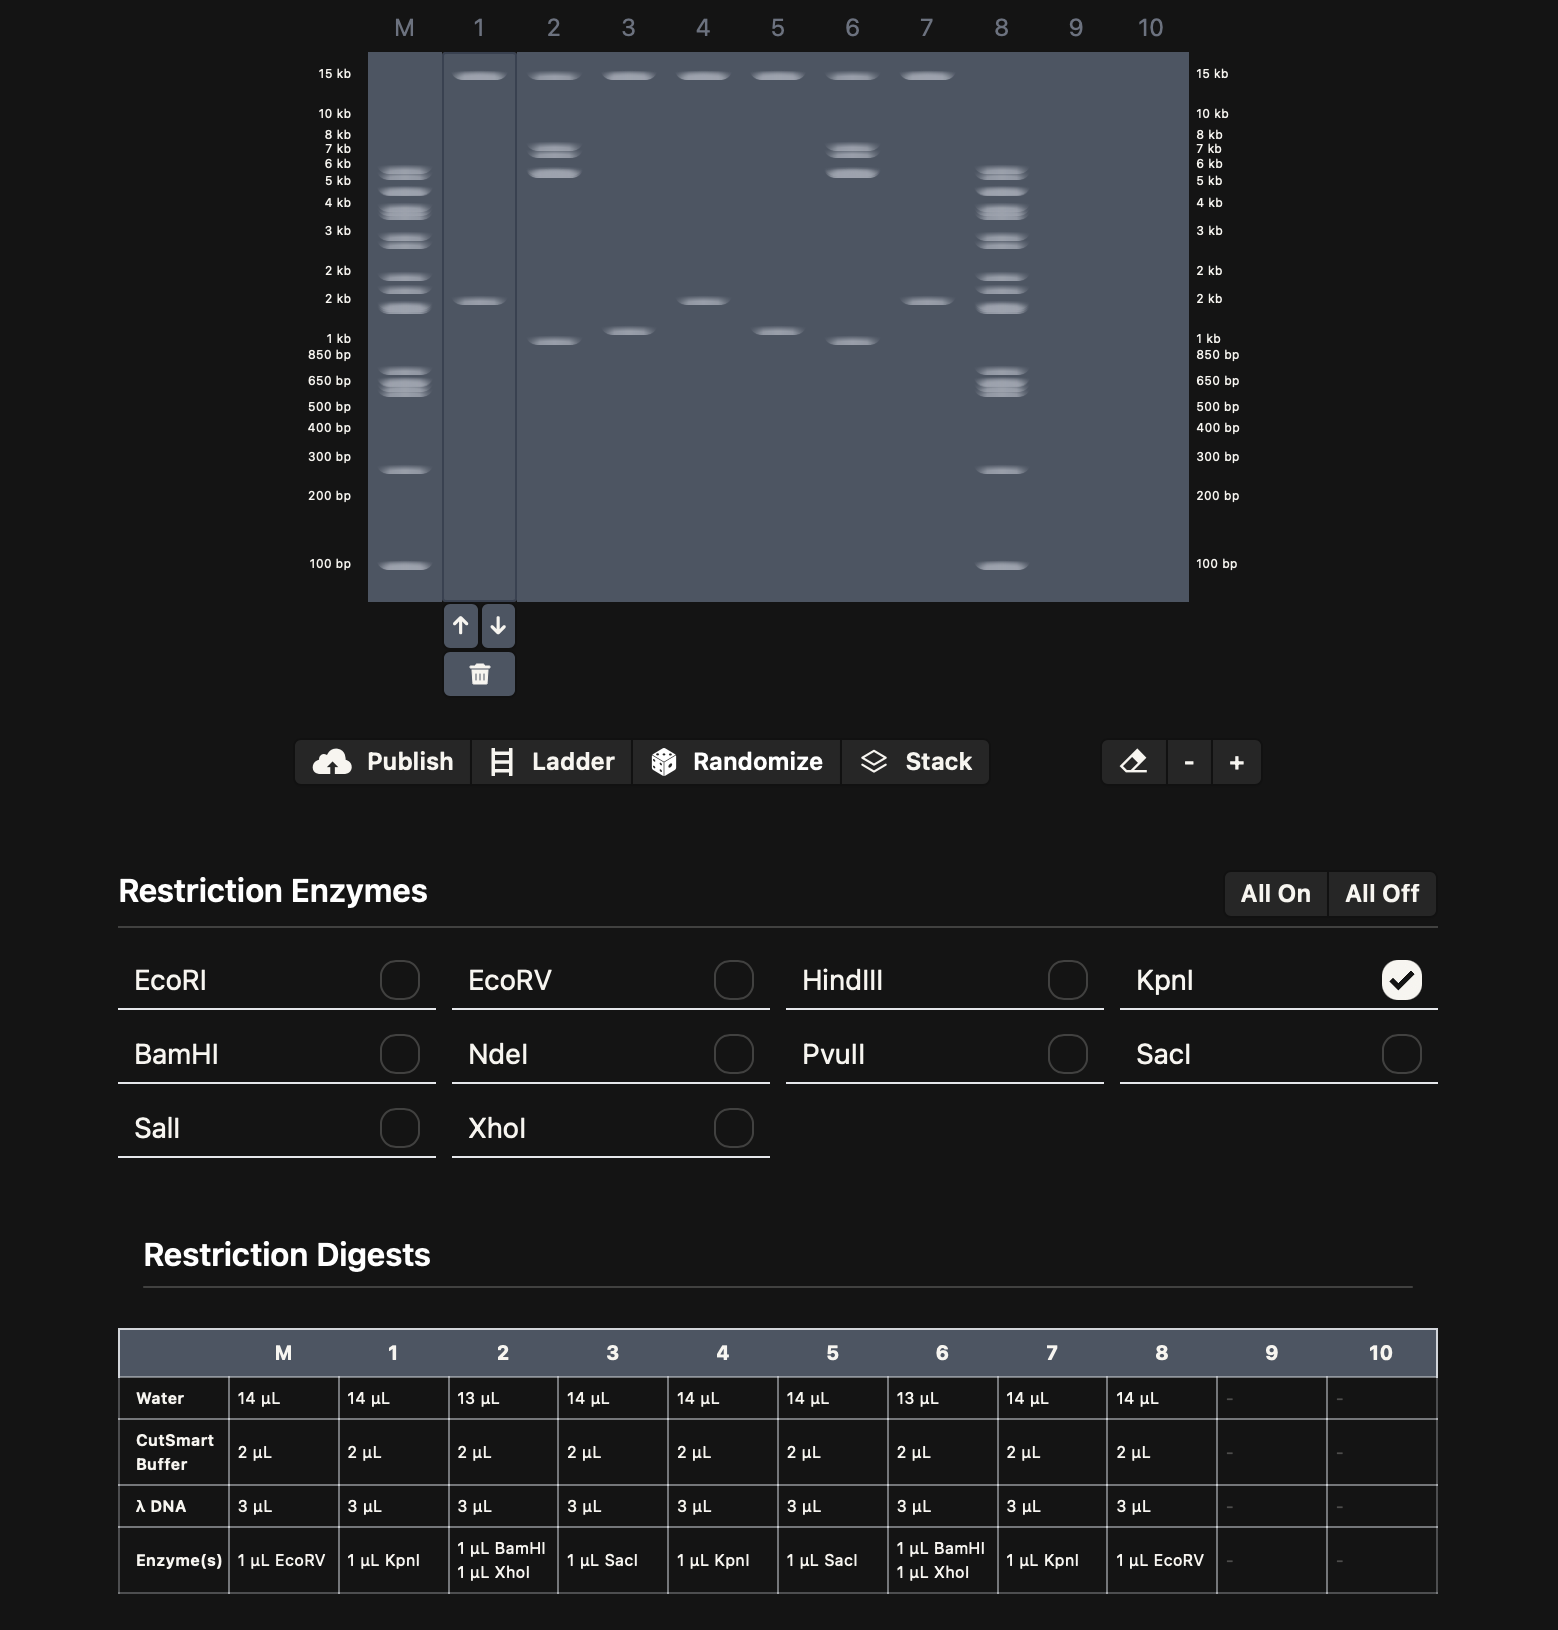
The final gel is simpler than what I first imagined, but it feels more readable. Instead of forcing a highly detailed figurative pattern, I aimed for a subtle, animal-like smiling face emerging from the band distribution.
Some lanes are denser. I imagined them as hair (EcoRV-heavy), while others remain more minimal (EcoRI / HindIII), creating lighter spacing that suggests the smile or mouth. I also used combined enzyme digests in lanes 2 and 6 because those areas form both the eyes and part of the mouth, helping balance the composition without making it too crowded.
7. Reflection
At the beginning I didn’t really understand what I was controlling or what “cutting or filtering” meant. The terminology and interface felt confusing, and I kept asking myself, “okay… but then what?”
Over time I realized that the control comes from choosing which enzymes to use, not from drawing the image directly. The system generates patterns automatically, so my role was more about testing, observing, and selecting what worked visually.
Honestly, I still think the interface limits how expressive the results can be. Many outputs felt repetitive, and it was harder than I expected to shape a strong visual composition. But the process helped me see how biological tools can be used in a more creative, exploratory way instead of only as technical steps.
Part 3: DNA Design Challenge
1. Choose your protein
For this assignment, I selected Green Fluorescent Protein (GFP). GFP is a protein originally isolated from the jellyfish Aequorea victoria. It emits green fluorescence when exposed to blue or ultraviolet light. I chose this protein because it is widely used in biotechnology as a visual reporter, allowing researchers to observe gene expression and cellular processes in real time. As a designer interested in perception and visualization, GFP represents a powerful example of how biological systems can translate invisible molecular activity into visible signals.
Protein sequence (sfGFP):
Protein sequence source: UniProtKB – P42212 (Green Fluorescent Protein, Aequorea victoria) https://www.uniprot.org/uniprotkb/P42212
2. Reverse Translate: Protein → DNA
At the beginning, I struggled to understand what “reverse translation” actually meant. I was confused about how one protein sequence could correspond to many possible DNA sequences, because I initially imagined it as a chemical state rather than a coding system. What helped me was realizing that DNA works more like a code than an ingredient. The sequence is read in groups of three letters, and different three-letter combinations can still produce the same amino acid. This means that reverse translation does not recover the original DNA, but instead generates one possible nucleotide sequence that could produce the protein.
To complete this step, I copied the GFP amino acid sequence from UniProt and used an online reverse translation tool. I learned that I do not need to manually convert each amino acid; instead, the tool assigns codons based on the genetic code. Through this process, I began to understand that the DNA sequence functions more like an instruction format than a visual structure, and that multiple DNA variations can lead to the same final protein.
To complete this step, I copied the GFP amino acid sequence from UniProt and used a bioinformatics reverse translation tool. I learned that I do not need to manually convert each amino acid; instead, the tool assigns codons based on the genetic code.
Example reverse-translated DNA sequence:
3. Codon Optimization
Different organisms prefer different codons for the same amino acid because they have different amounts of transfer RNA (tRNA). If a gene uses rare codons for a host organism, protein expression becomes inefficient.
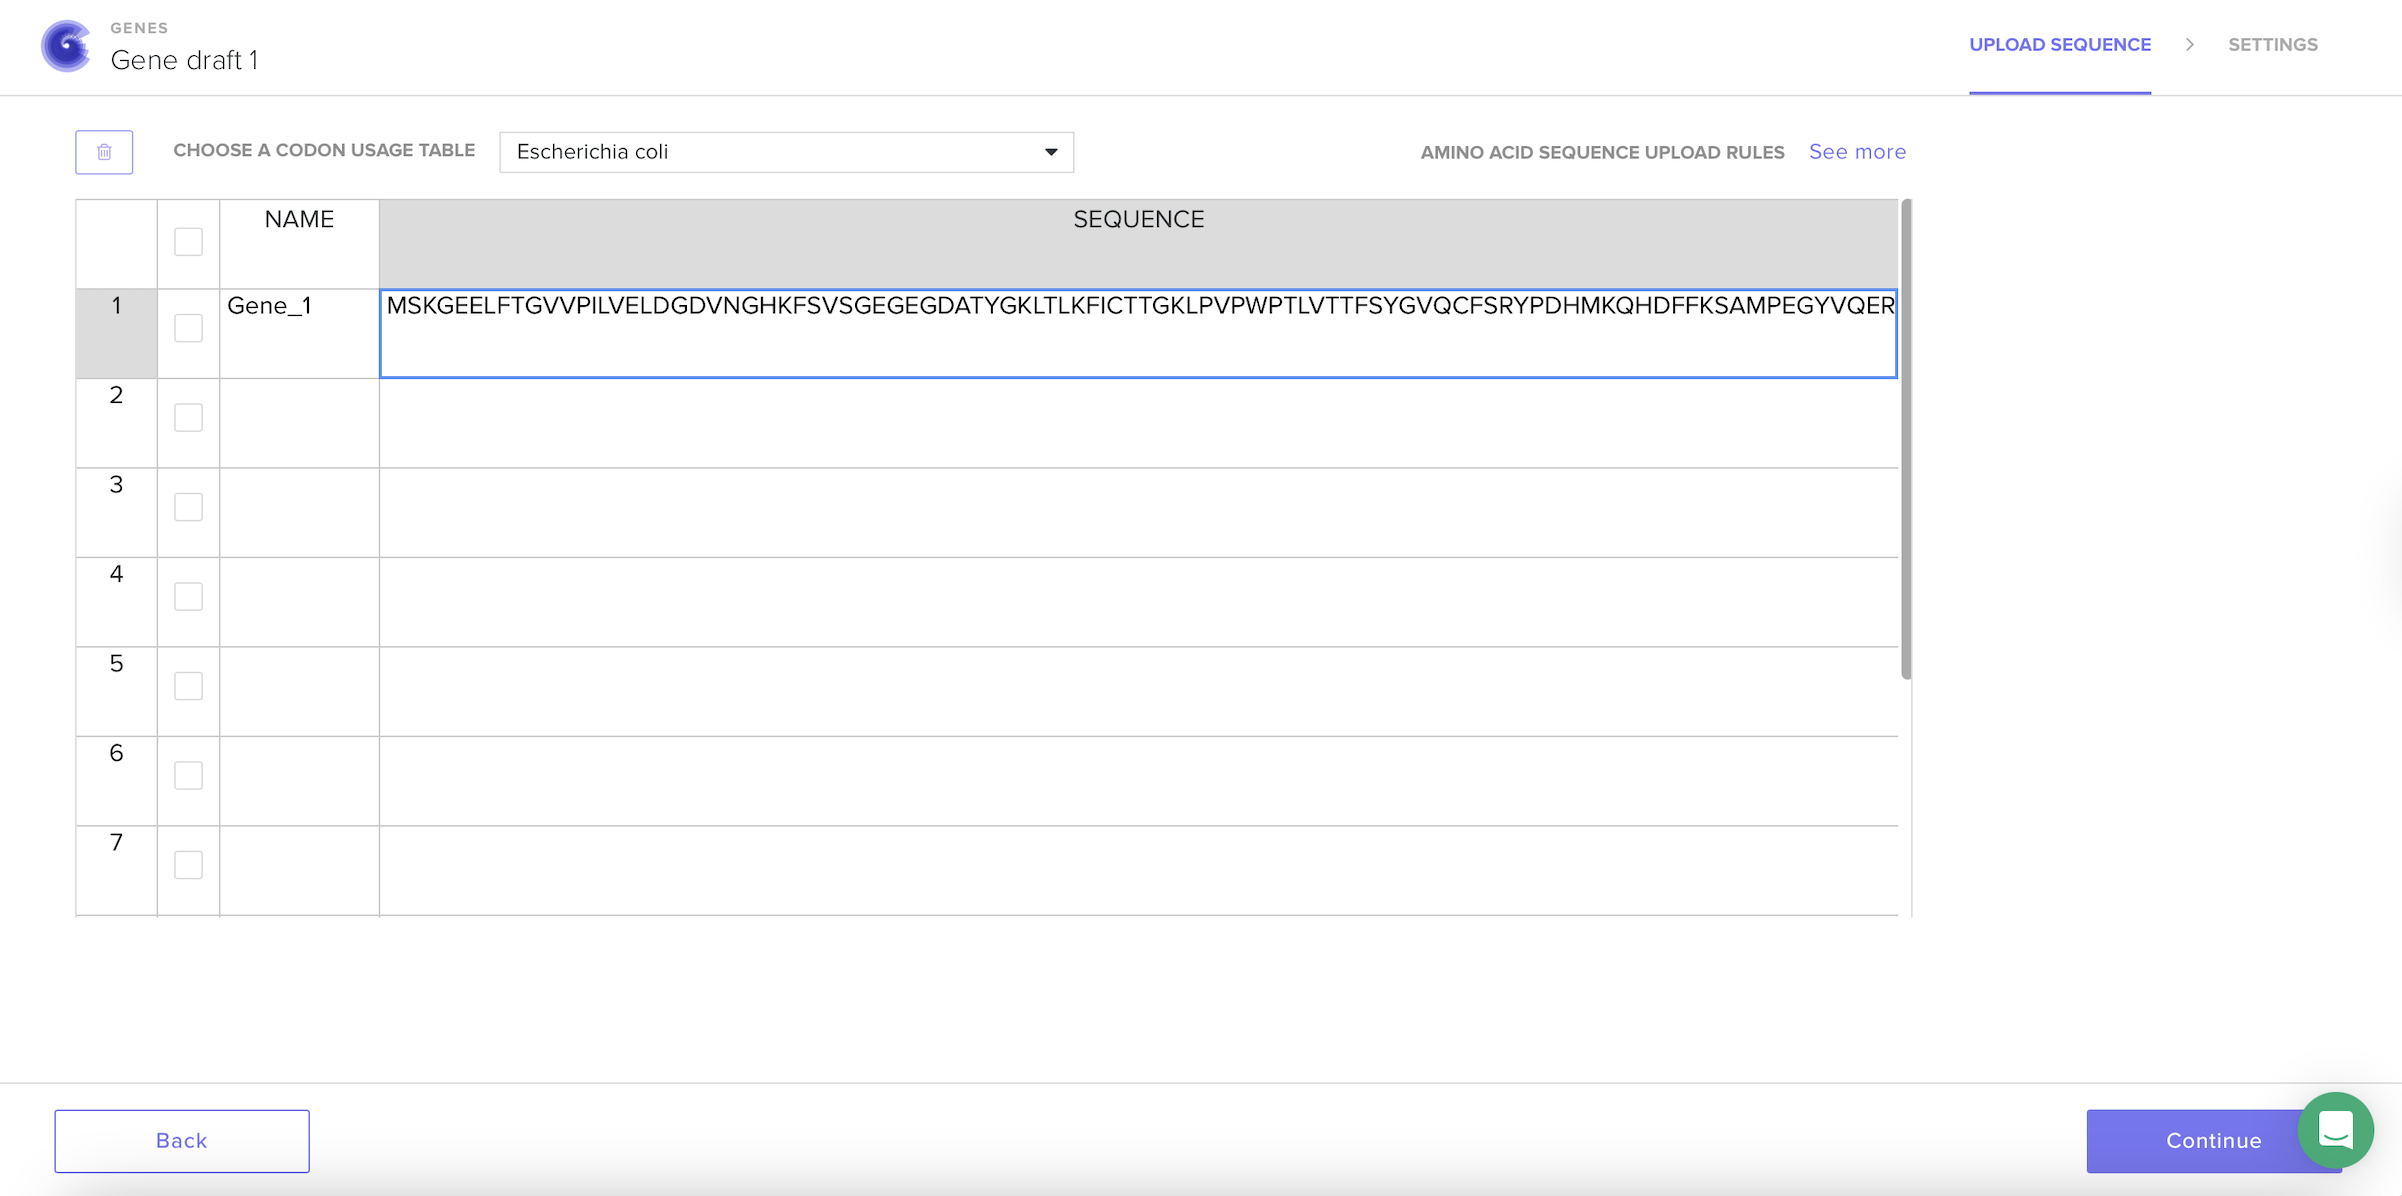
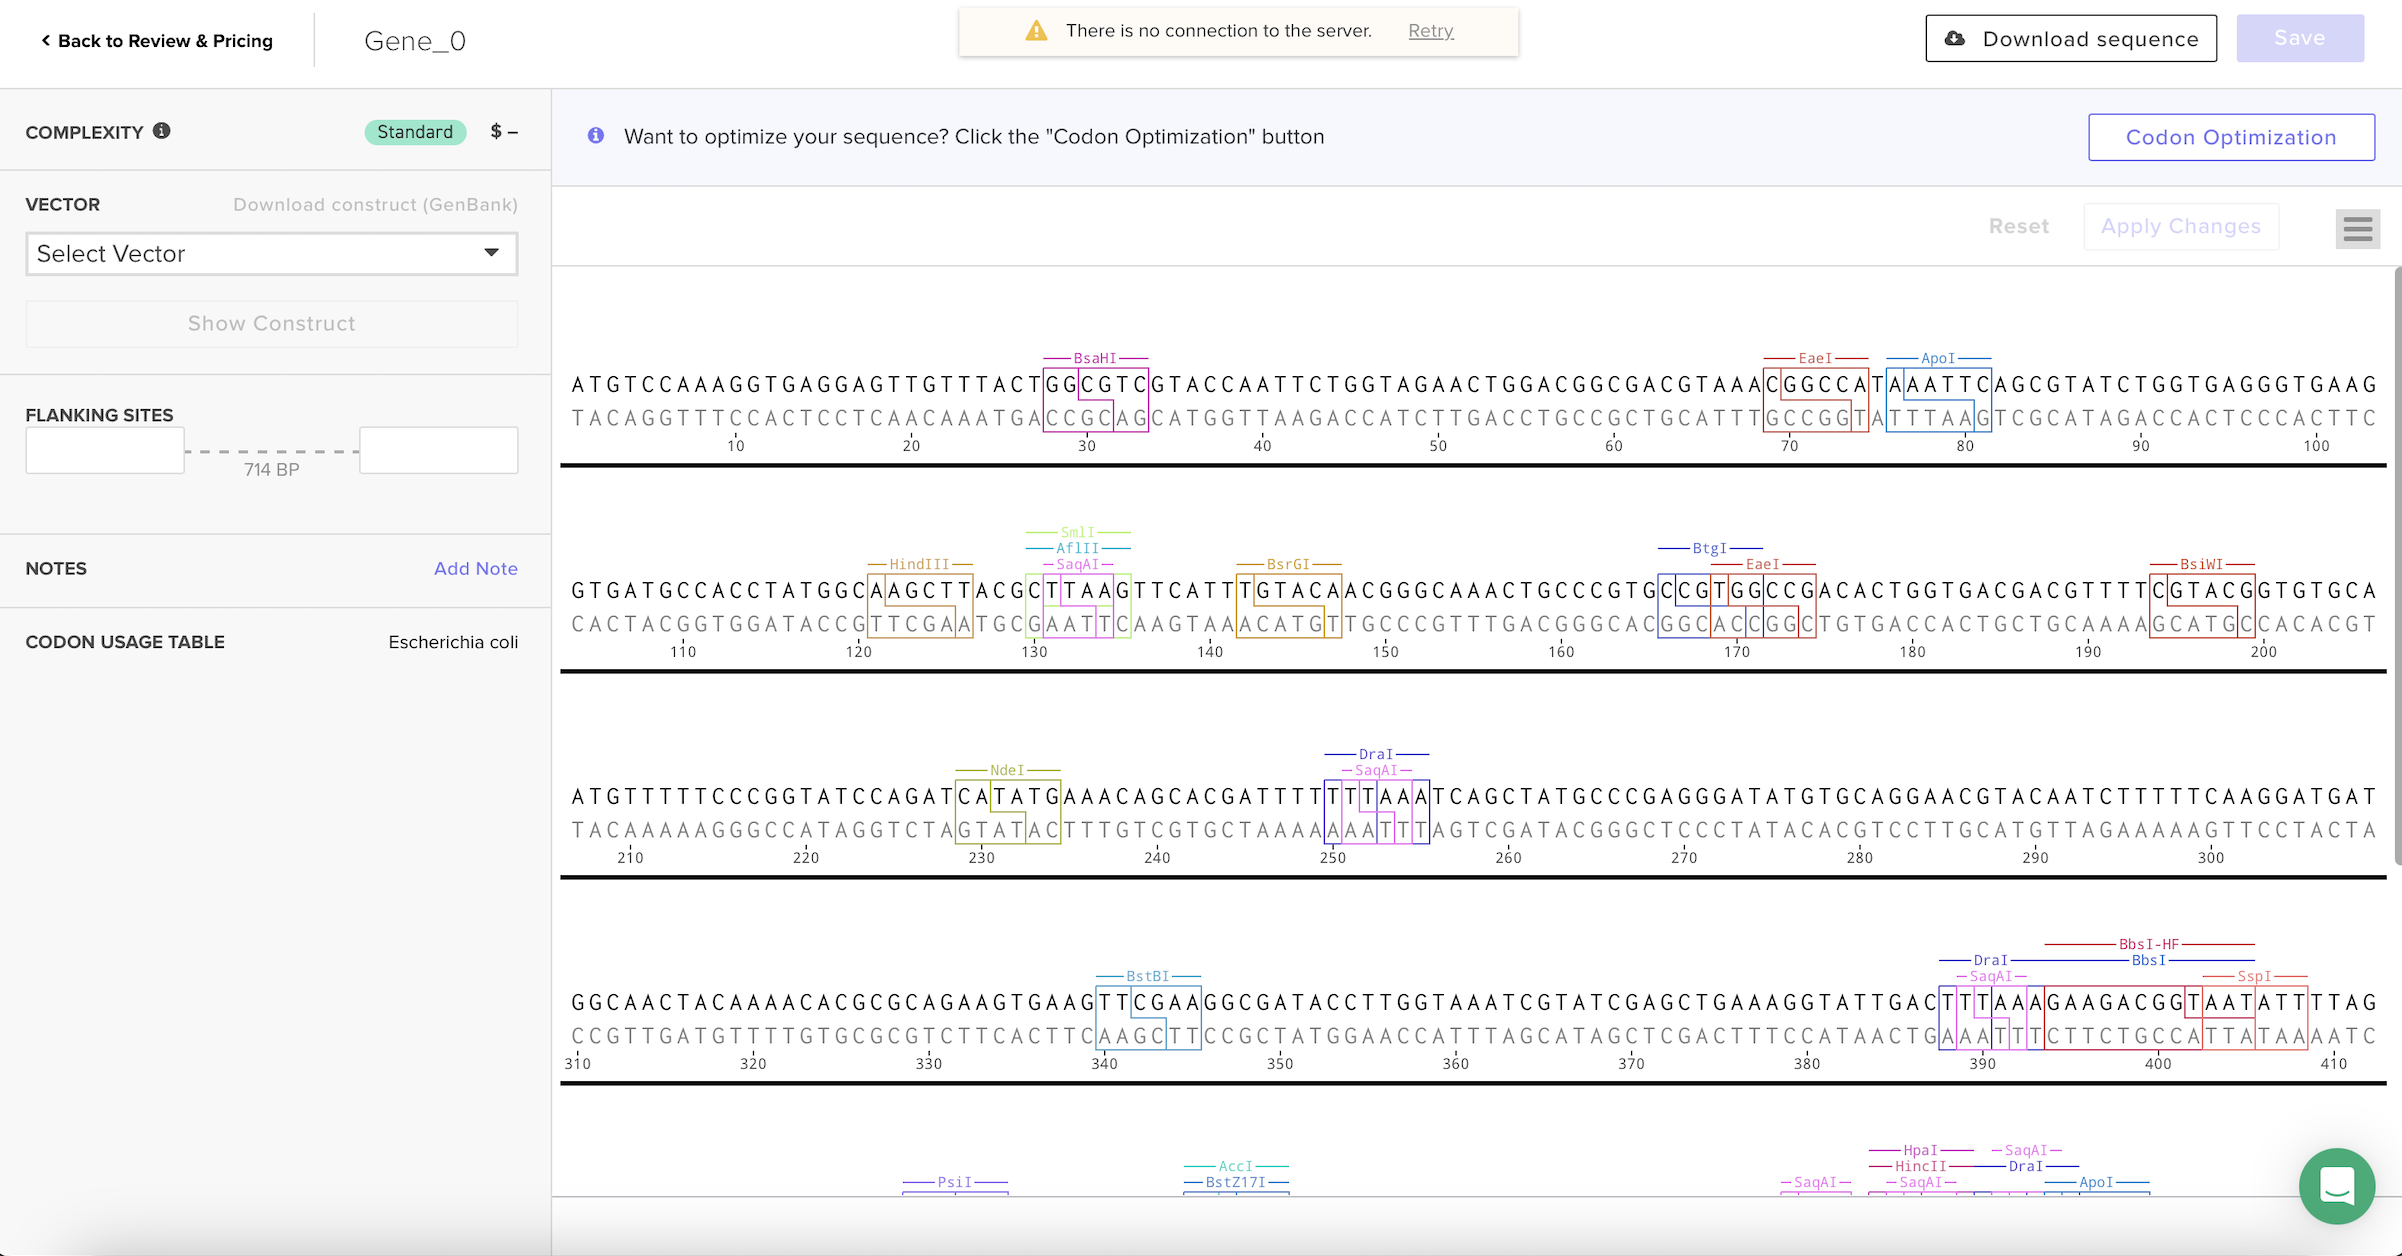
For the codon optimization step, I created an account on the Twist Bioscience platform and uploaded the GFP amino acid sequence. I selected Escherichia coli as the codon usage table because it is a common organism used for protein expression and was also discussed during recitation.
When several pop-up warnings appeared, such as messages about missing stop codons and vector assignment. I was confused about whether I needed to order the gene or select cloning options, since my goal was only to generate an optimized sequence for the assignment. I asked ChatGPT to help me interpret these warnings, and I learned that the platform assumes users want to synthesize DNA, while I only needed the optimized output sequence.
After selecting the codon usage table, the platform automatically generated a new nucleotide sequence that keeps the same protein but changes the DNA letters to better match how E. coli prefers to read codons.
I understand that codon optimization improves; translation efficiency, protein yield and mRNA stability.
I optimized the GFP sequence for E. coli because it grows quickly. It is commonly used for protein production and plasmid expression systems are well established.
4. You have a sequence! Now what?
Once the codon-optimized DNA sequence is obtained, several technologies can produce the GFP protein.
Cell-dependent method (using bacteria) The optimized GFP gene is inserted into a plasmid vector containing: promoter ribosome binding site antibiotic resistance gene
The plasmid is transformed into E. coli.
Inside the bacteria: DNA is transcribed into mRNA. Ribosomes translate mRNA into GFP protein.
The bacteria glow green under UV light, indicating successful expression.
Cell-free method Instead of living cells, a cell-free expression system uses extracted transcription and translation machinery. Mixing the DNA template with enzymes, ribosomes, and energy sources allows GFP production in a test tube. This approach is faster and avoids cellular complexity.