Week 6 HW: Genetic Circuits Part I: Assembly Technologies
This week we learn core molecular biology tools and techniques for processing and assembling DNA, including PCR and Gibson Assembly.
Assignment: DNA Assembly
What are some components in the Phusion High-Fidelity PCR Master Mix and what is their purpose?
- The mix contains DNA Polymerase, known for thermostable accuracy. Used to amplify fragments used in PCR for Gibson Assembly.
What are some factors that determine primer annealing temperature during PCR?
- length, temperature, presence of GC.
There are two methods from this class that create linear fragments of DNA: PCR, and restriction enzyme digests. Compare and contrast these two methods, both in terms of protocol as well as when one may be preferable to use over the other.
- PCR is much more likely to work with mutations that have a wider variation of results.
- Restriction enzyme digests work best when the sequence is well defined and repeatable.
- PCR has a thermocycle, RE has a single set temp.
- PCR required Primers, RE requires recognition sites
How can you ensure that the DNA sequences that you have digested and PCR-ed will be appropriate for Gibson cloning?
- Ensure overlaps are present for alignment
- Evaluate using electrophoresis
- Purify the dna
How does the plasmid DNA enter the E. coli cells during transformation?
- Electrostatic conditioning, or heat shock temporarily make the cells porous, then left to build antibiotic resistance
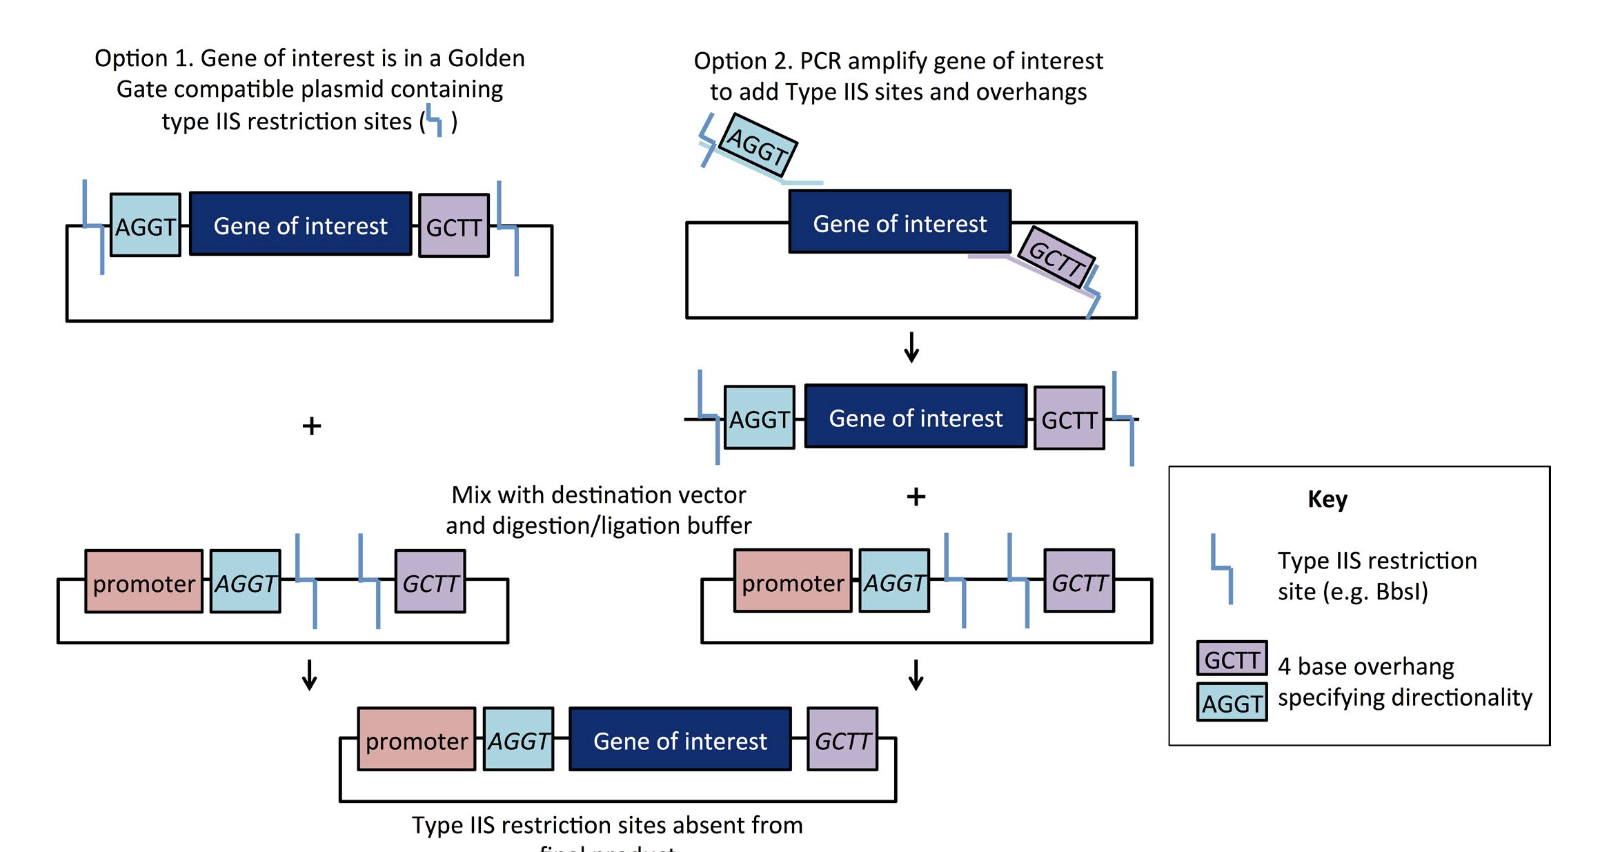
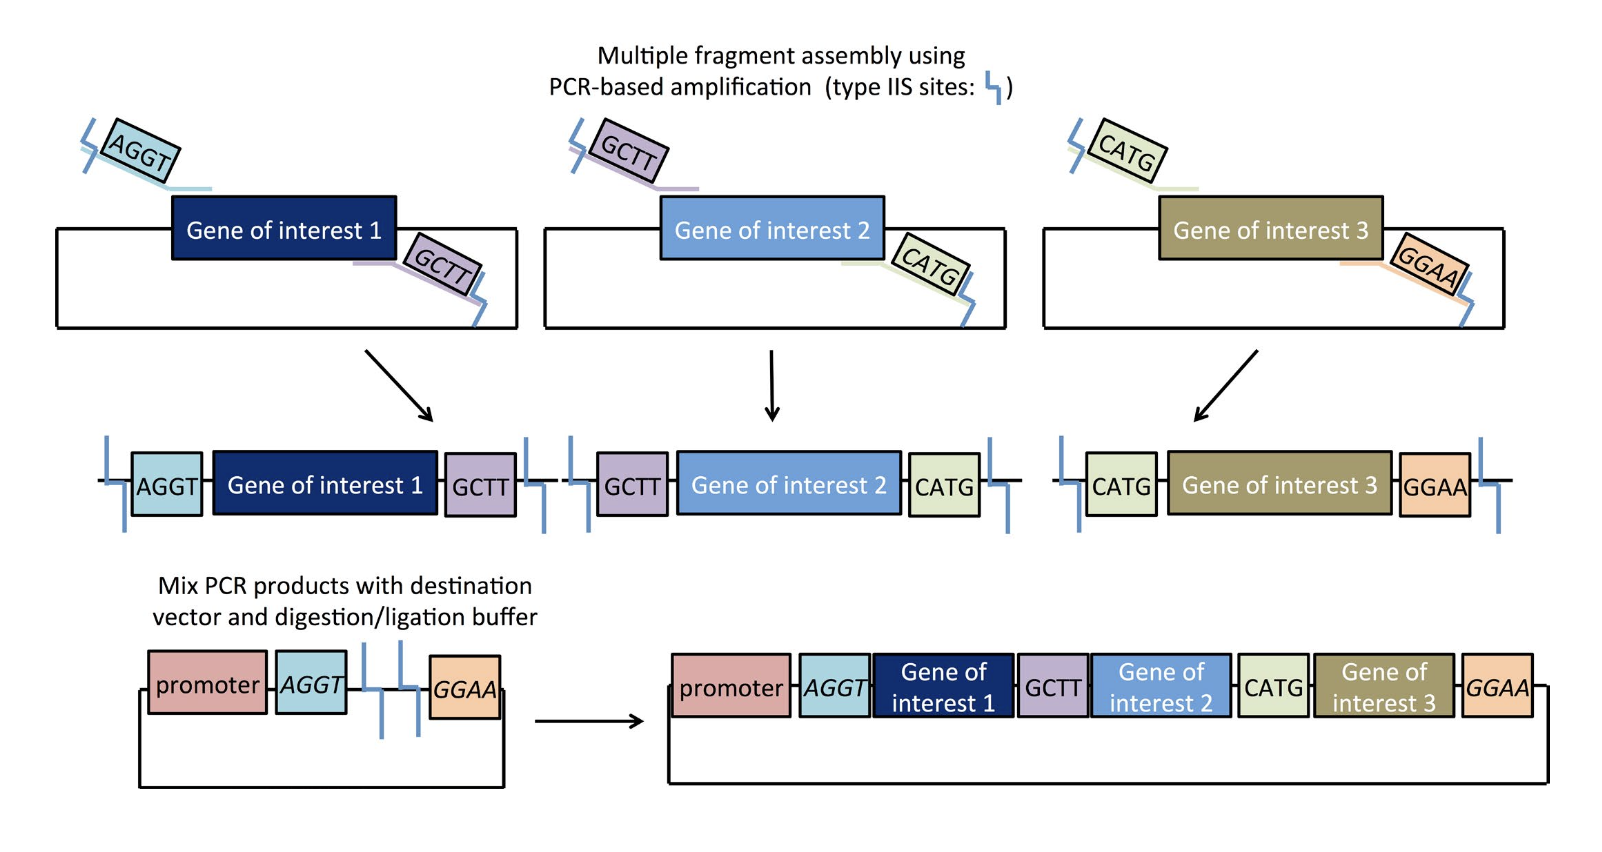
Describe another assembly method in detail (such as Golden Gate Assembly)
- Explain the other method in 5 - 7 sentences plus diagrams (either handmade or online).
- Golden Gate Assembly is a Restriction based cloning method
- Relies on Type IIS restriction enzymes
- Gene of interests surrounded by overhangs
- Overhangs are directional
- Mixed with designation vector promoter and buffer overhangs
- Type IIS restriction is removed from final product for accurate cloning
- Can be done in one reaction time.
- Explain the other method in 5 - 7 sentences plus diagrams (either handmade or online).
“Golden Gate Cloning” Plasmids 101 eBook 1
“Golden Gate Cloning” Plasmids 101 eBook 1
- Model this assembly method with Benchling or Asimov Kernel!
For this assembly, I followed the references provided by “Golden Gate Cloning” Plasmids 101 eBook 1 as well as an extended dialogue with Claude AI to explore the benchling assembly process.
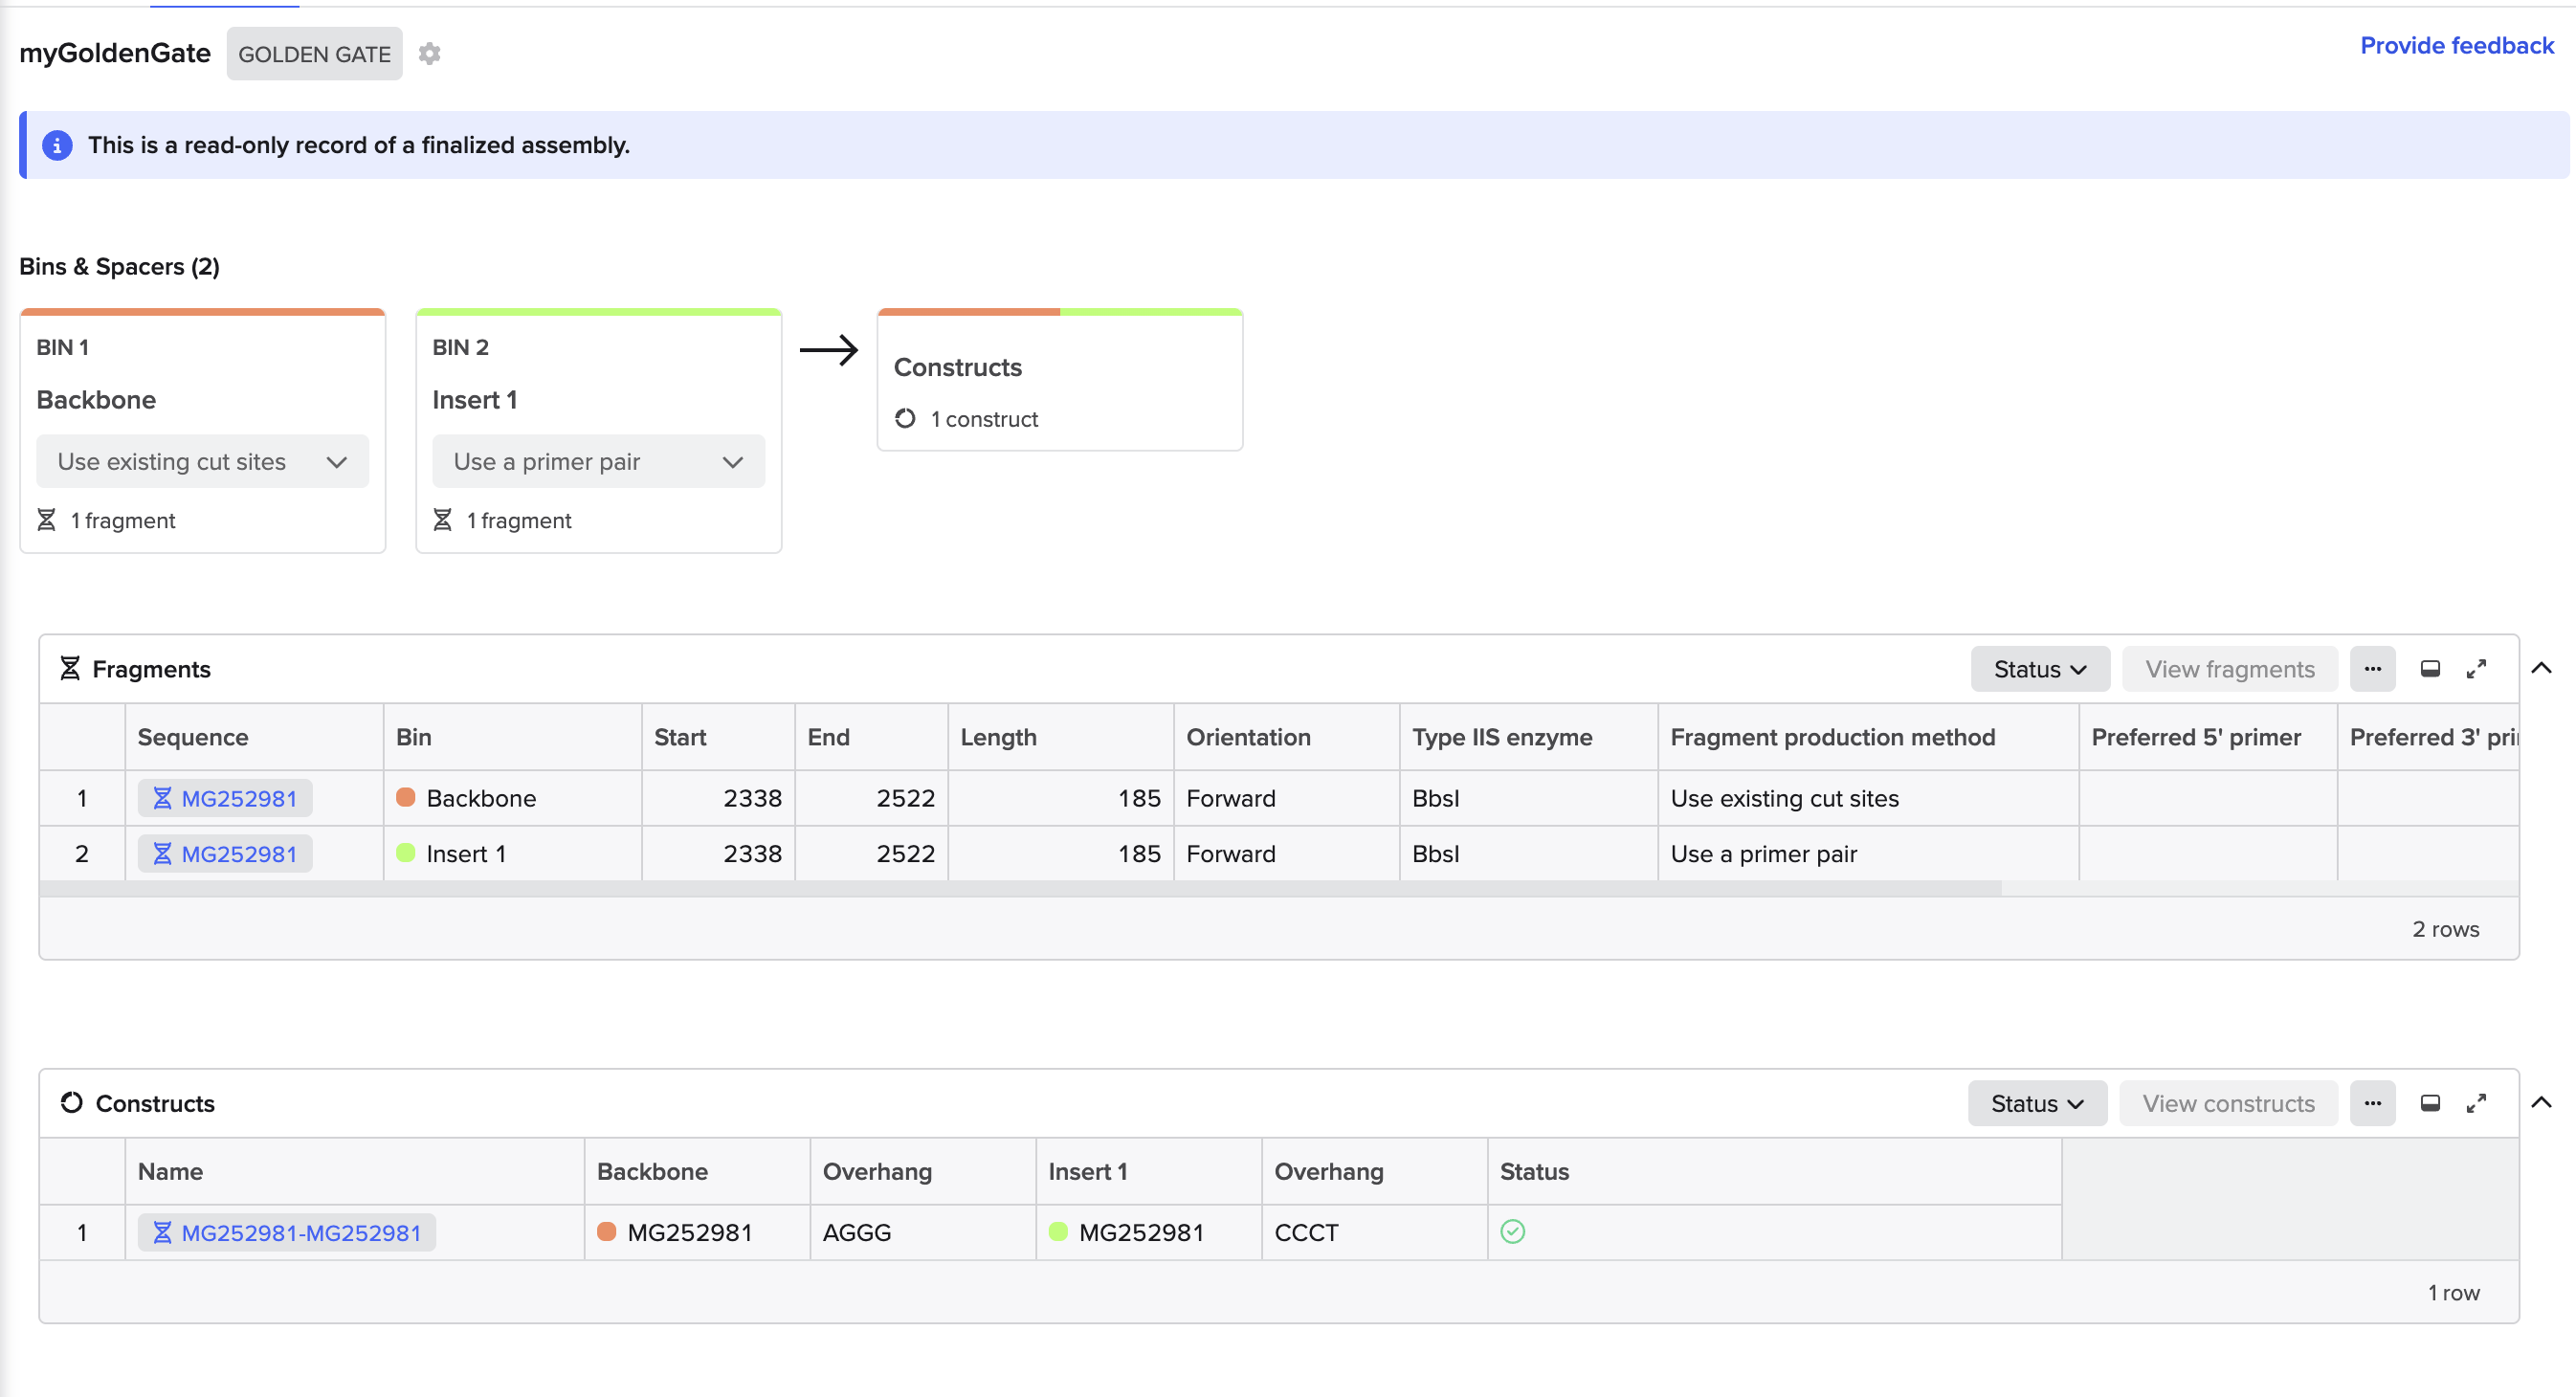
Golden Gate Assembly Wizard in Benchling
Resulting Assembly (with overlapping BSBI in Backbone)
Golden Gate Assembly Attempt Summary
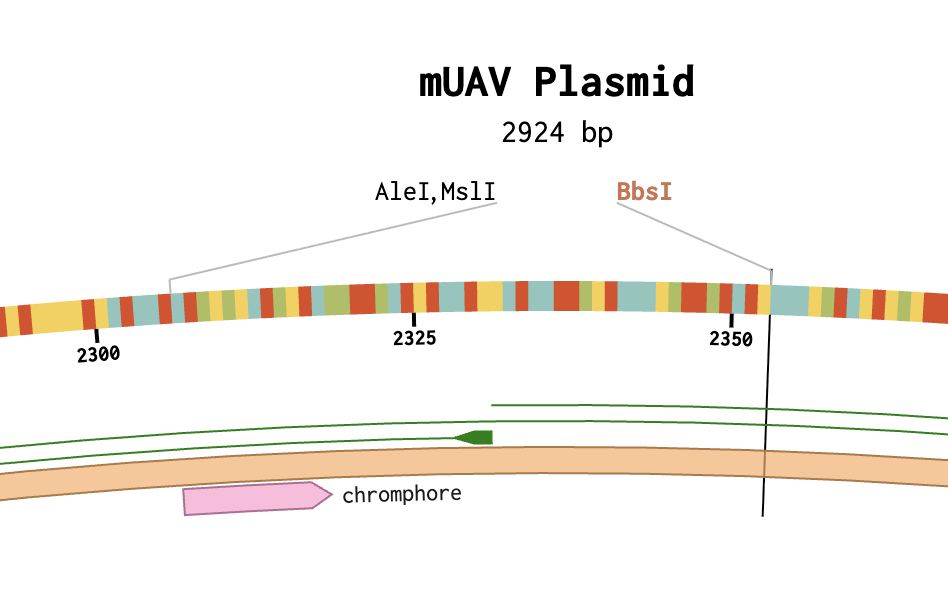
Using the mUAV plasmid (MG252981) as the source sequence in Benchling, the goal was to model a Golden Gate Assembly to swap the wildtype chromophore region (cagtgtcagtac, bases 2291-2302) with a mutant sequence (cagTGTCAGtac) to produce a color change in amilCP. A functional assembly was completed in Benchling, however it was not biologically accurate because the existing BbsI cut sites at positions 2338 and 2523 were not correctly flanking the target chromophore region, and possible account permission restrictions prevented direct sequence editing to reposition them. (no “pencil” icon present).
Top Three Lessons Learned
Lesson 1
Know your cut site positions before starting — BbsI sites must flank the exact target region; misplaced sites produce incorrect assemblies regardless of how clean the protocol execution is.
Lesson 2
Sequence editability must be confirmed first — importing from GenBank into a course account created read-only restrictions that blocked direct editing, requiring workarounds.
Lesson 3
Insert fragment length matters — a 12bp insert is too short for Benchling primer design; flanking sequence context is needed for successful primer generation.
Follow-up Action Items
Action Items
- Get edit permissions fixed by instructor
- Replace existing BbsI sites at 2338 and 2523 with silent substitution
GAGGAT - Place new BbsI sites flanking bases 2291-2302
- Redesign assembly with correctly positioned cut sites
- Extend insert sequence with flanking bases for successful primer design
Assignment: Asimov Kernel
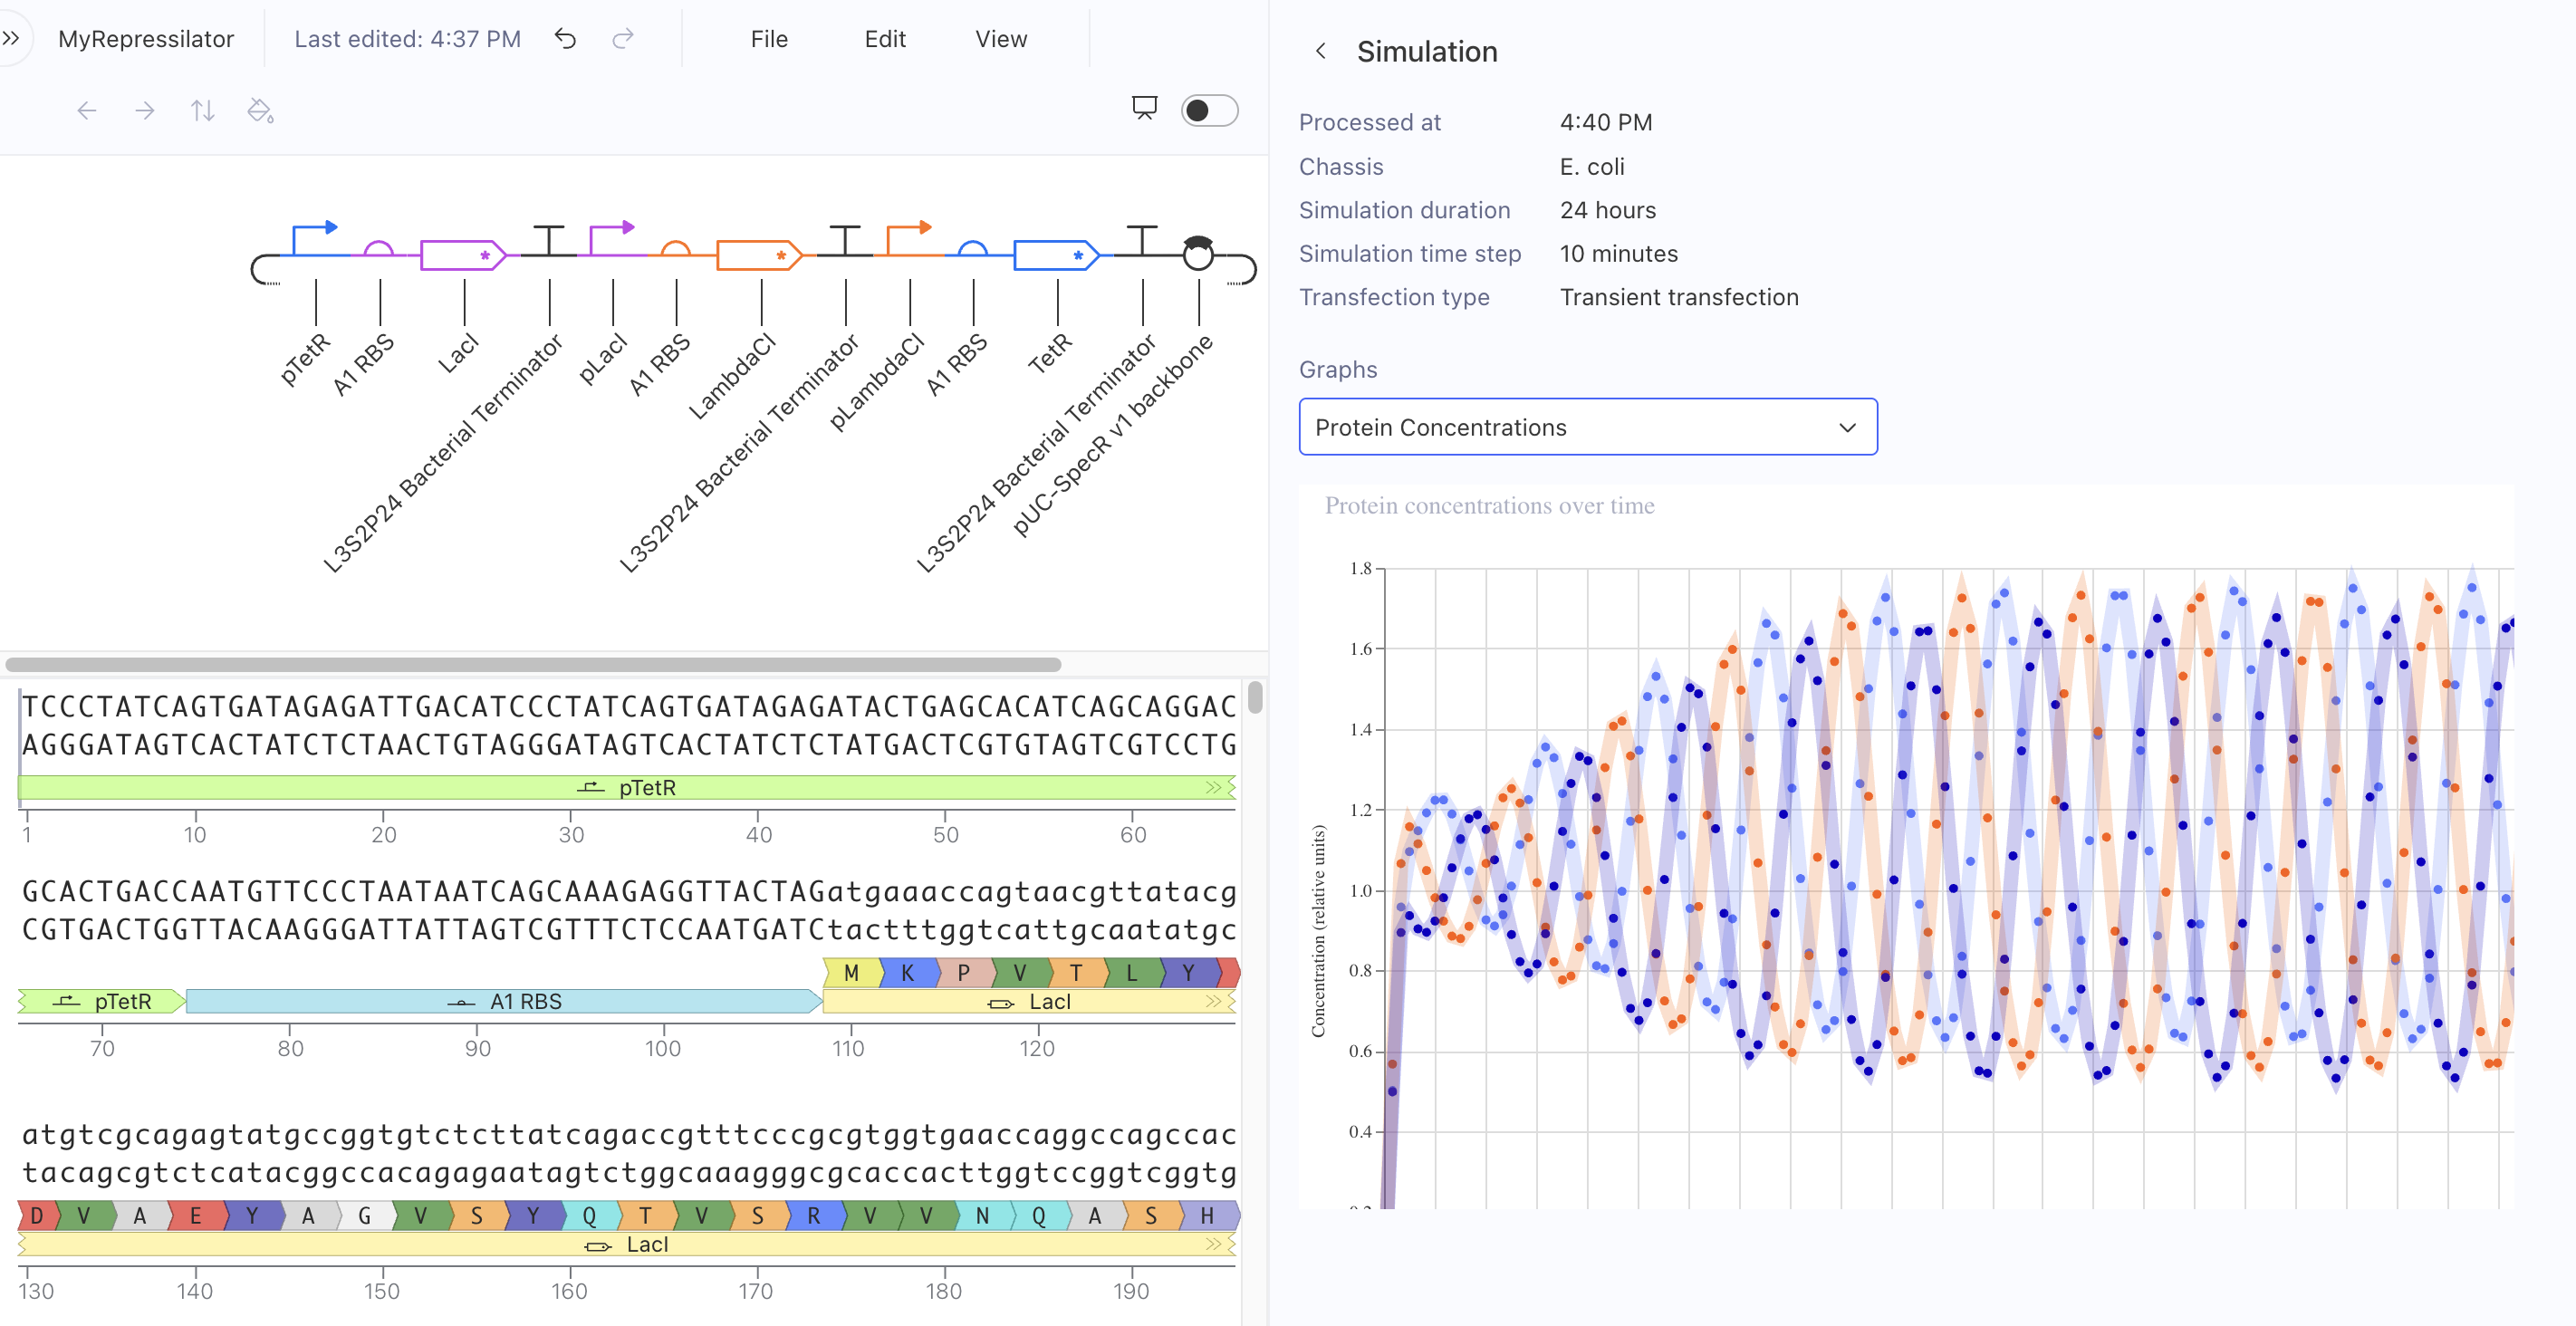
Kernel Experiment 1 — Repressilator
In my first Kernel experiment, I was able to locate the Repressilator in the public Bacterial Demos repository.
Initial Approach
Search Scope Limitation
I currently don’t have search scope permissions to directly query the repository from within my notebook to pull in parts by search. My approach was to reverse engineer a known construct that provides expected results in a simulation.
I attempted to copy individual parts over to my notebook, which appeared to work initially.
Circuit Design
I created a Repressilator circuit design and confirmed it mirrored the sequence construct and sequence length identically.
Non-Oscillating Result
However, the circuit returned a non-oscillating expression. Two possible causes are under investigation:
- Metadata is not fully present in the copied parts
- A permissions issue may be blocking necessary metadata from executing relative copies of parts
Status: TBD
Working Solution
Successful Approach
- Copied the entire working Repressilator construct to my local repository first
- Copied the components one by one locally within my notebook
- Successfully built and simulated with expected oscillating results
LAB: Gibson Assembly
Overview
Changing the color-generating chromophore of the purple Acropora millepora chromoprotein (amilCP) to a variety of orange, pink, and blue mutants.
- Build the Gibson Assembly in Asimov Kernel
- Participate in BioArt Engineering Workshop at MakerSpace Charlotte
BioArt Studio
On March 16th & 17th a two day “Introduction to BioArt Engineering” was conducted at MakerSpace Charlotte, led by Karen Ingram.
- The activity timed well with this week’s subject of color-expressing proteins.
- The program leverages a kit and hardware from Amino.bio, a provider of educational biotechnology experiments.
- We performed a BioArt experiment, using the engineering toolkit.
- We observed a demonstration of pre-lab set up protocols, including agar plate pouring, antibiotic treatment for control, and incubation.
Procedures
The activity was focused on the following procedures:
- Prepare the cells — Wake up the E. coli from the stab, chill them in transformation buffer to make them chemically competent (membrane-ready to accept foreign DNA).
- Transform — Add the DNA plasmid, then heat shock / ice shock to force the cell membranes to briefly open and close, trapping the plasmid inside.
- Select & observe — Plate onto selective (antibiotic) and non-selective plates with controls, incubate, and see who survived and expressed color.
Protocol Steps
Each participant including myself, performed the steps defined in the protocol:
- Plate Preparation — Make selective (antibiotic) and non-selective agar, then pour petri dishes and allow them to solidify.
- Control Plate Streaking — Streak the positive control bacteria stab onto a non-selective plate using the stencil, establishing your experimental baseline.
- Buffer Cooling — Chill the transformation buffer on ice to prepare it for making cells chemically competent.
- Stab Sample Collection — Collect a small sample of the “blank” K12 E. coli from its stab vial.
- Swirl Mixing — Mix the bacterial sample with the cold transformation buffer by gently swirling/flicking.
- Heat Shock & Ice Shock — Subject the cell-buffer mixture to a brief heat shock (42°C), then immediately return to ice — this is the key step that opens cell membranes to accept the DNA plasmid.
- Pouring Recovery Media — Add recovery media (LB broth) to the transformed cells and allow them to rest and recover.
- Plating Positive Control — Plate the pre-engineered positive control cells onto a selective plate to confirm the antibiotic selection is working.
- Scrape & Plate Transformed Cells — Spread the recovered transformed cells onto selective agar plates.
- Painting with Colorful Microbes — Use the Canvas-style technique to create BioArt patterns on agar plates with the engineered pigment-producing bacteria.
- Incubation — Place plates in the DNA Playground incubator (or equivalent at ~37°C) for 24–72 hours.
- Timed Photo Observation — Document results at intervals, comparing colony colors, density, and plate conditions across experimental and control plates.
At the time of this submittal, the incubation is at ~24 hours out of a 72 hr cycle.
Here are selected images from a very engaging, hands-on BioArt & Engineering experience.
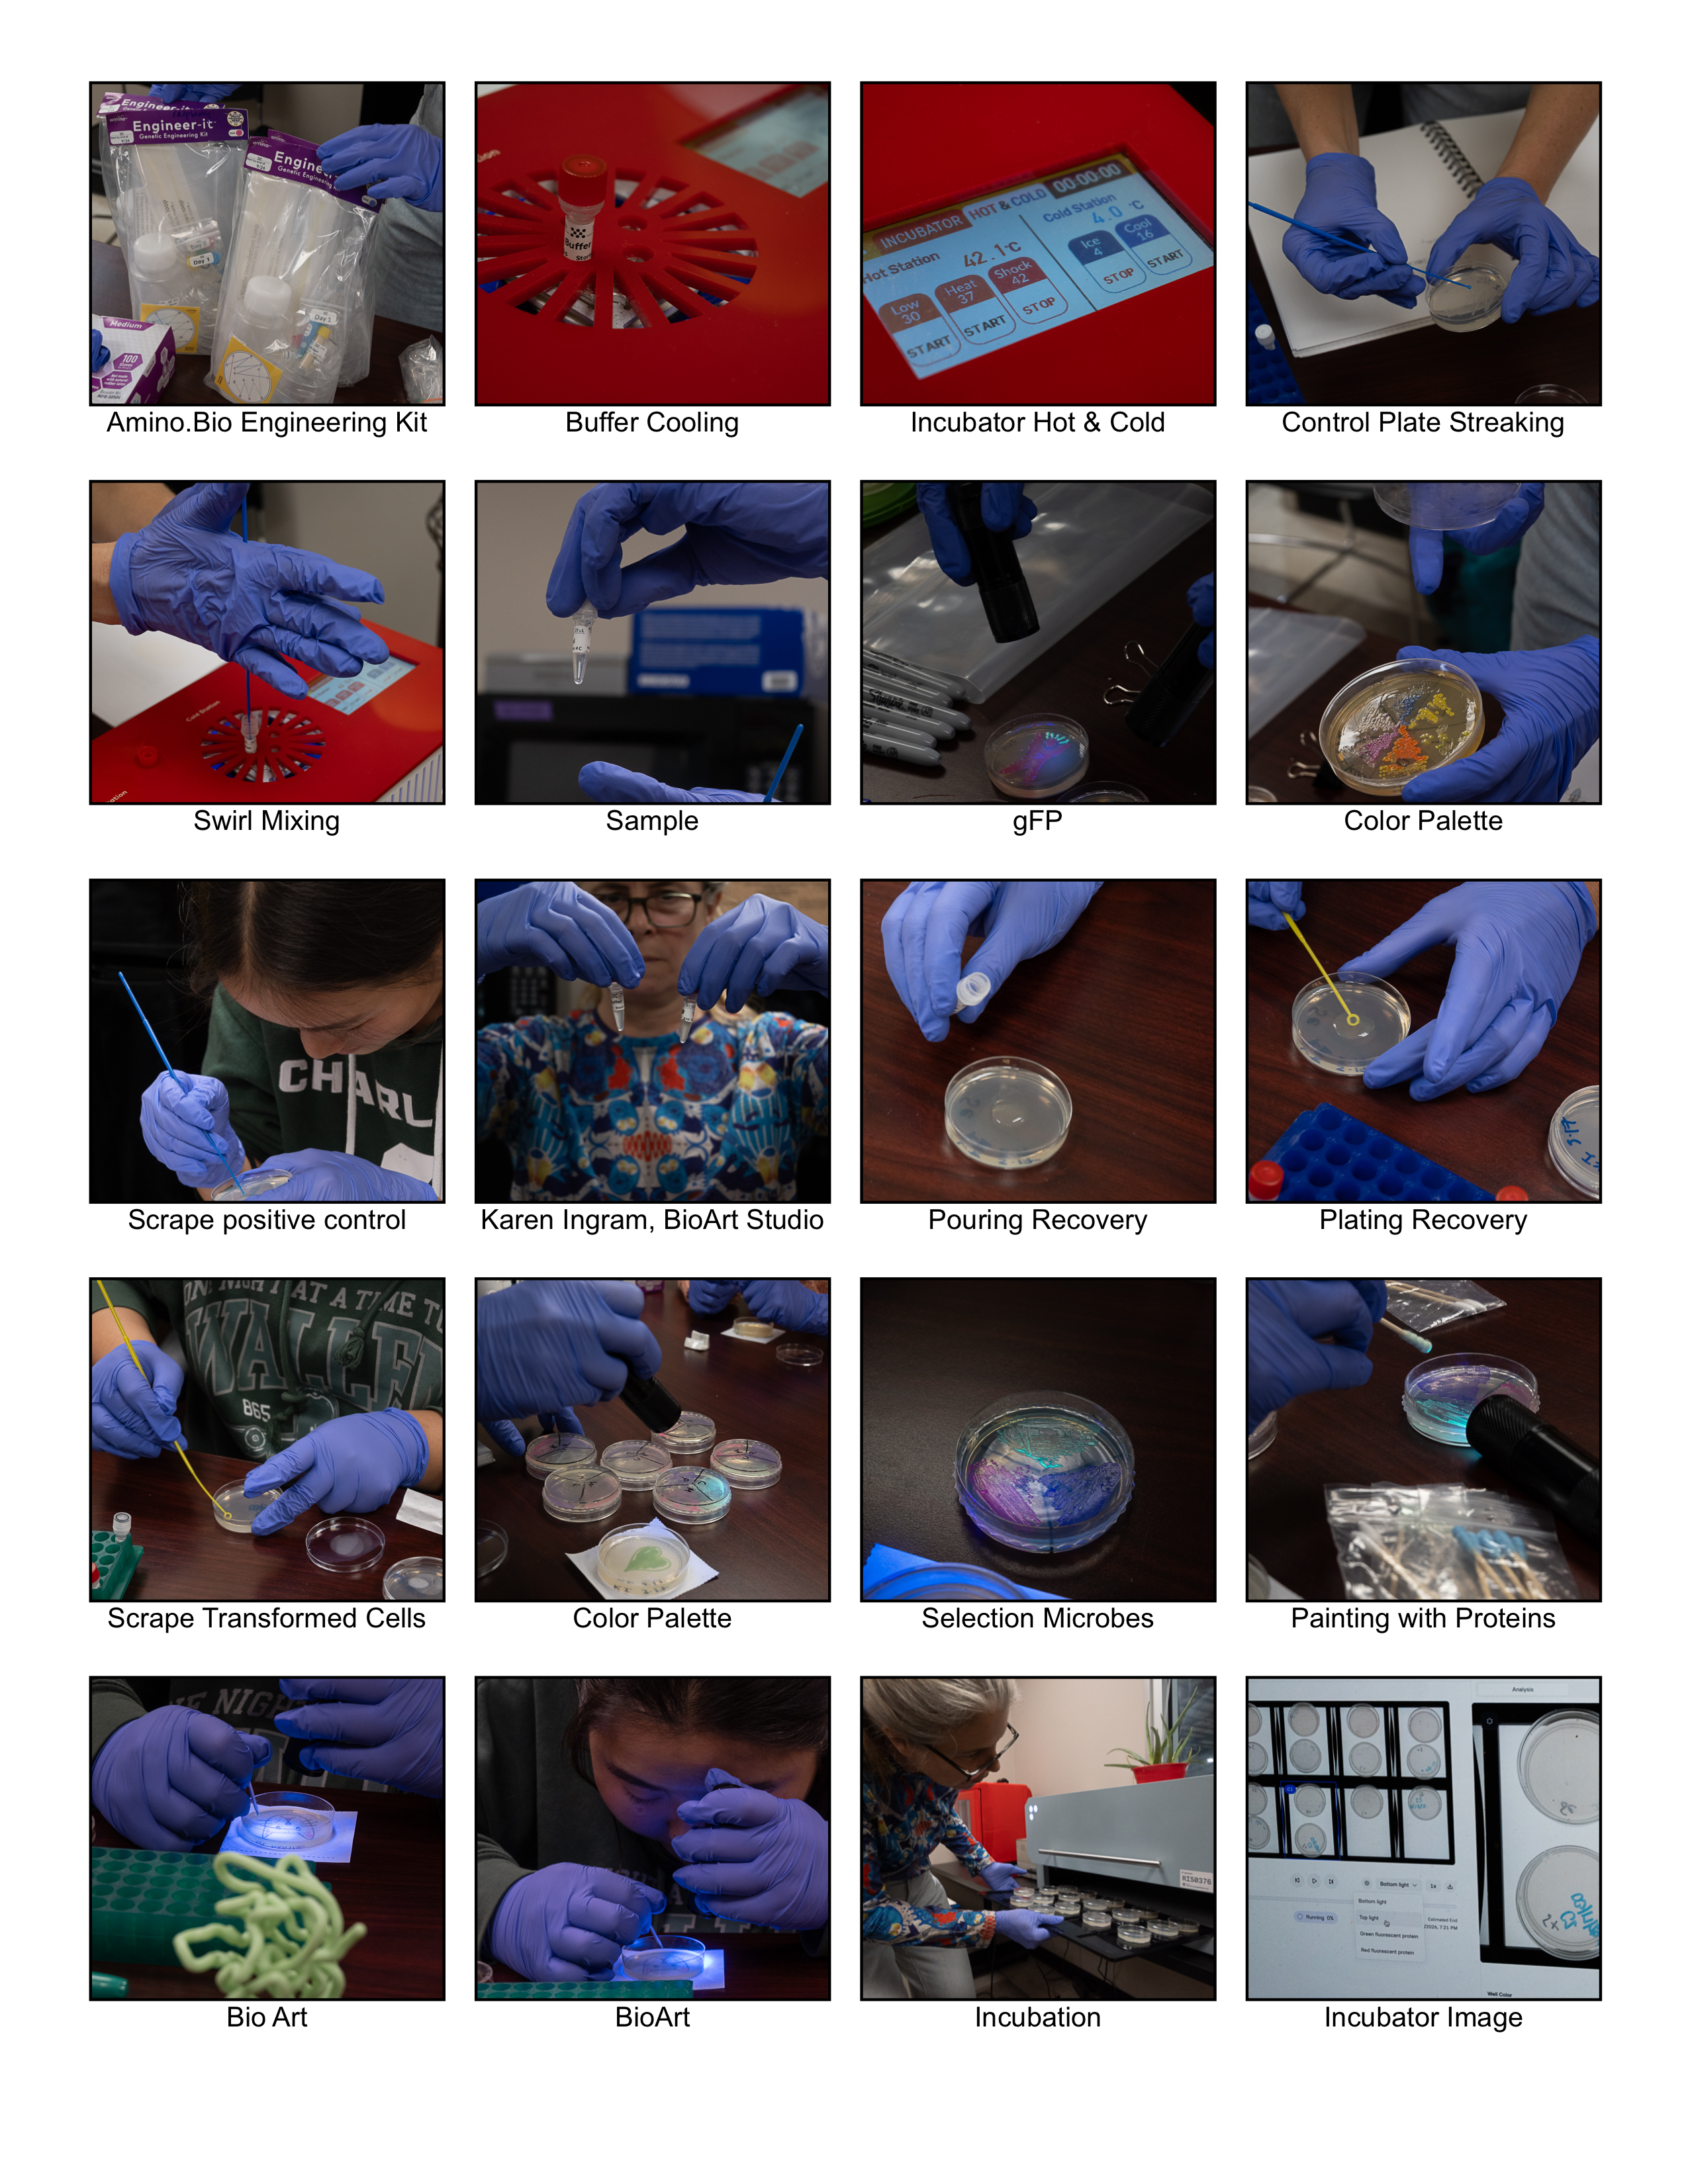
Photography (c)2026 Eric Schneider
Appendix
Footnotes
- Gearing, Mary. “Golden Gate Cloning.” Plasmids 101. Addgene. link
- Asimov. Kernel — genetic engineering design platform. link
- Ingram, Karen. BioGenetic Blooms. MakerSpace Charlotte BioArt Studio. link
- Amino Labs. Educational Biotechnology Experiments. link
Kernel Experiment — To-Do Checklist
Setup
- Create a Repository for your work
- Create a blank Notebook entry to document the homework
- Save the Notebook entry to your Repository
Explore Bacterial Demos
- Open the Bacterial Demos Repository
- Explore the devices to understand how parts work together
- Run the Simulator on various examples
- Open the Info panel by clicking the “i” icon on the right
- Follow the Simulator instructions found in the Info panel
Recreate the Repressilator
- Create a blank Construct and save it to your Repository
- Open the Characterized Bacterial Parts repository
- Search for Repressilator parts using the Search function in the right menu (SEARCH SCOPE TBD)
- Drag and drop parts into your blank Construct
- Run the Simulator using the play button
- Compare your results with the Repressilator Construct in Bacterial Demos
- Confirm results match expected oscillating behavior
Document in Notebook
- Copy the glyph image and paste into your Notebook entry
- Copy the Simulator graphs and paste into your Notebook entry
Build Your Own Constructs
- Build Construct 1 using parts from Characterized Bacterial Parts
- Build Construct 2 using parts from Characterized Bacterial Parts
- Build Construct 3 using parts from Characterized Bacterial Parts
For Each Construct
- Explain in your Notebook how you expect the Construct to function
- Run the Simulator and record your results in the Notebook
- If results don’t match expectations:
- Speculate on why in your Notebook
- Adjust Simulator settings to attempt expected outcome
- Document adjusted results