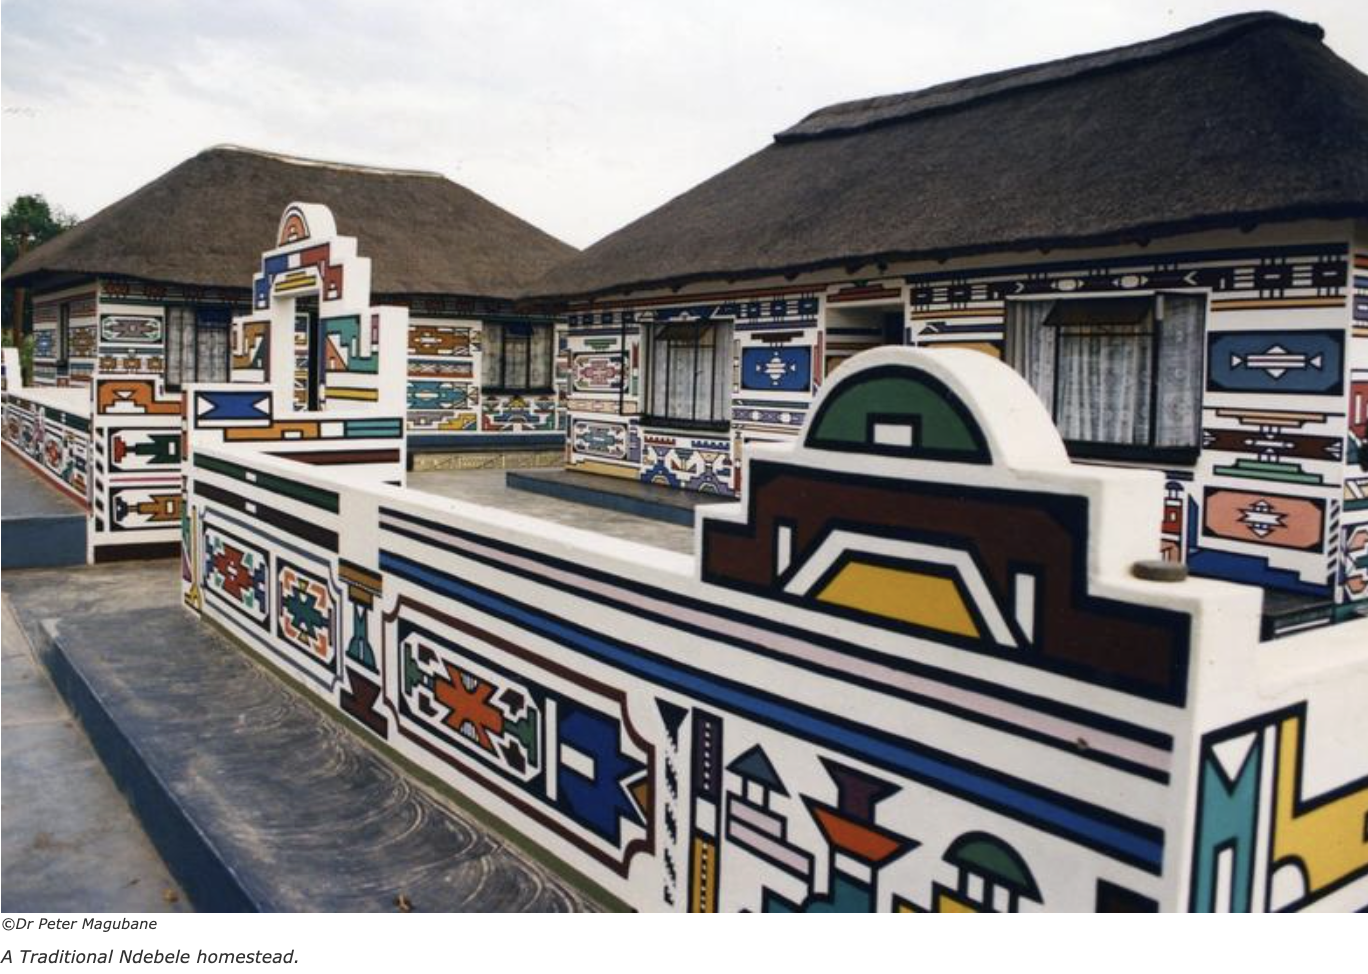
Since I am not present to interact directly with the Opentrons output, I thought about why I would want to pipette an image and what that image should represent and decided to use Ndebele bead patterns as inspiration.
Ndebele bead patterns have a very specific geometric logic. They are built on a grid of “bead units” arranged in bold, angular, symmetric designs. The traditional South Ndebele aesthetic uses high-contrast colors in step-like diagonal and horizontal bands, often with thick outlines and mirrored symmetry.
They are also studied as Ethno mathematics, which often promotes a more humanistic and inclusive perspective on mathematics, focusing on how different groups manage, understand, and navigate their reality.
I found it interesting to bring the mathematical and social aspects of this indigenous knowledge to the biochemical level, as this layering of meaning creates interesting avenues for reflection on various levels.
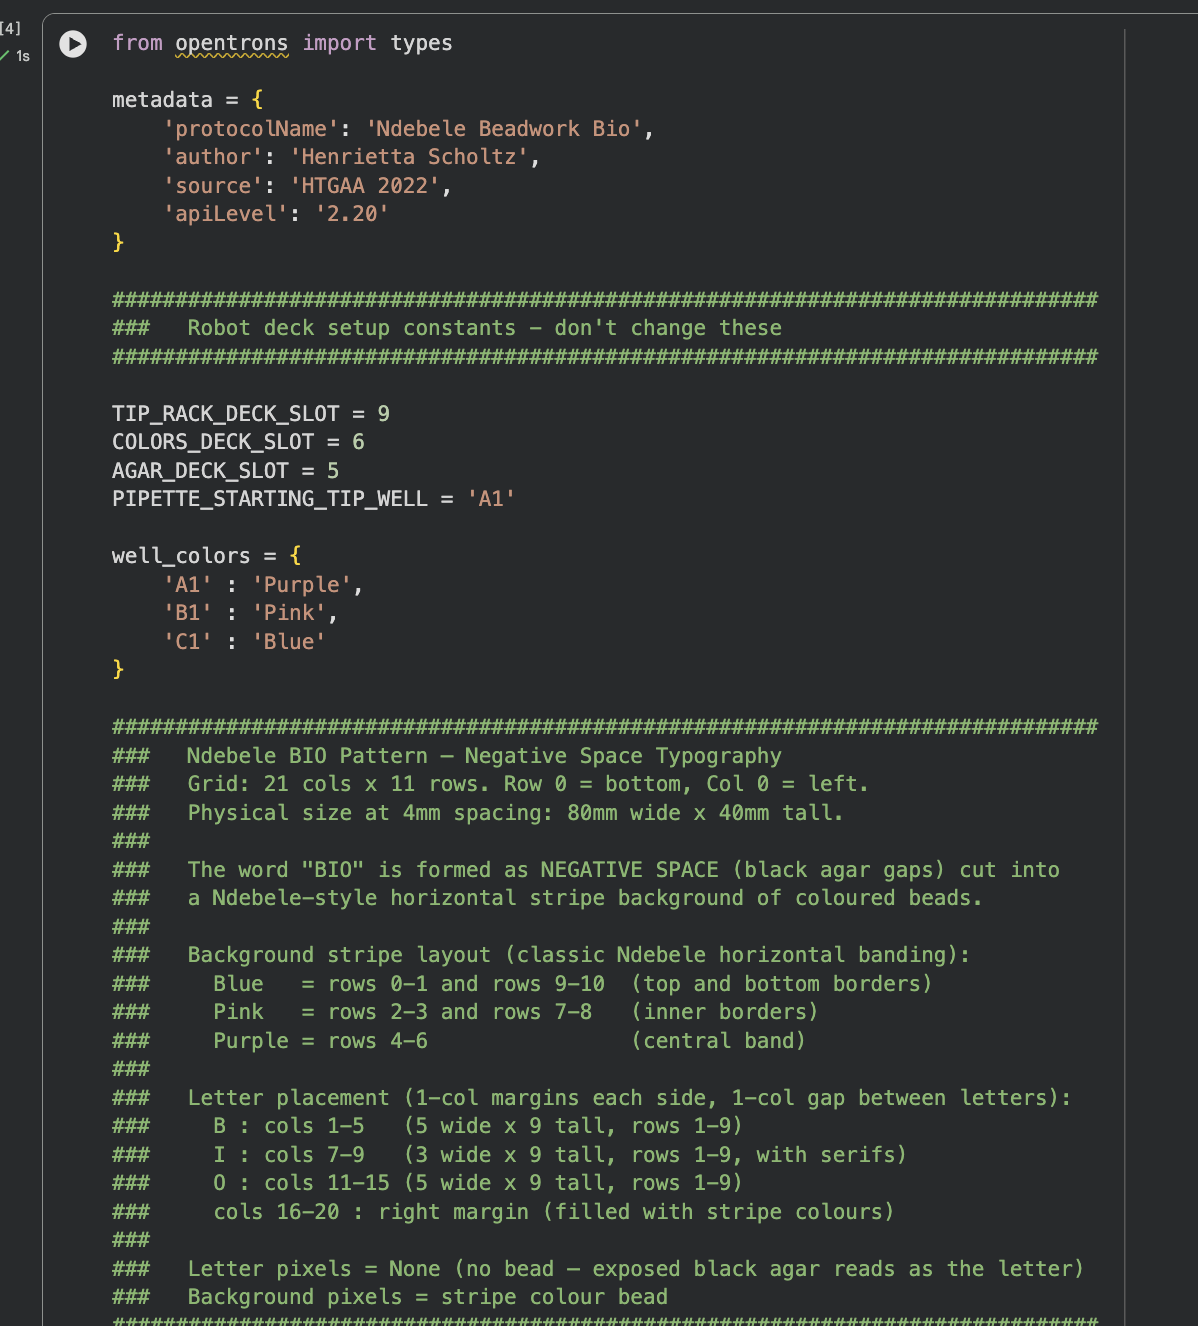
I am not a coder, but playing around with the example scripts, I ended up using Claude to vibe-code the desired patterns and position. It required some debugging and made various output versions.
Although the co-lab script runs without error, I am not sure if this will work on Opentrons.
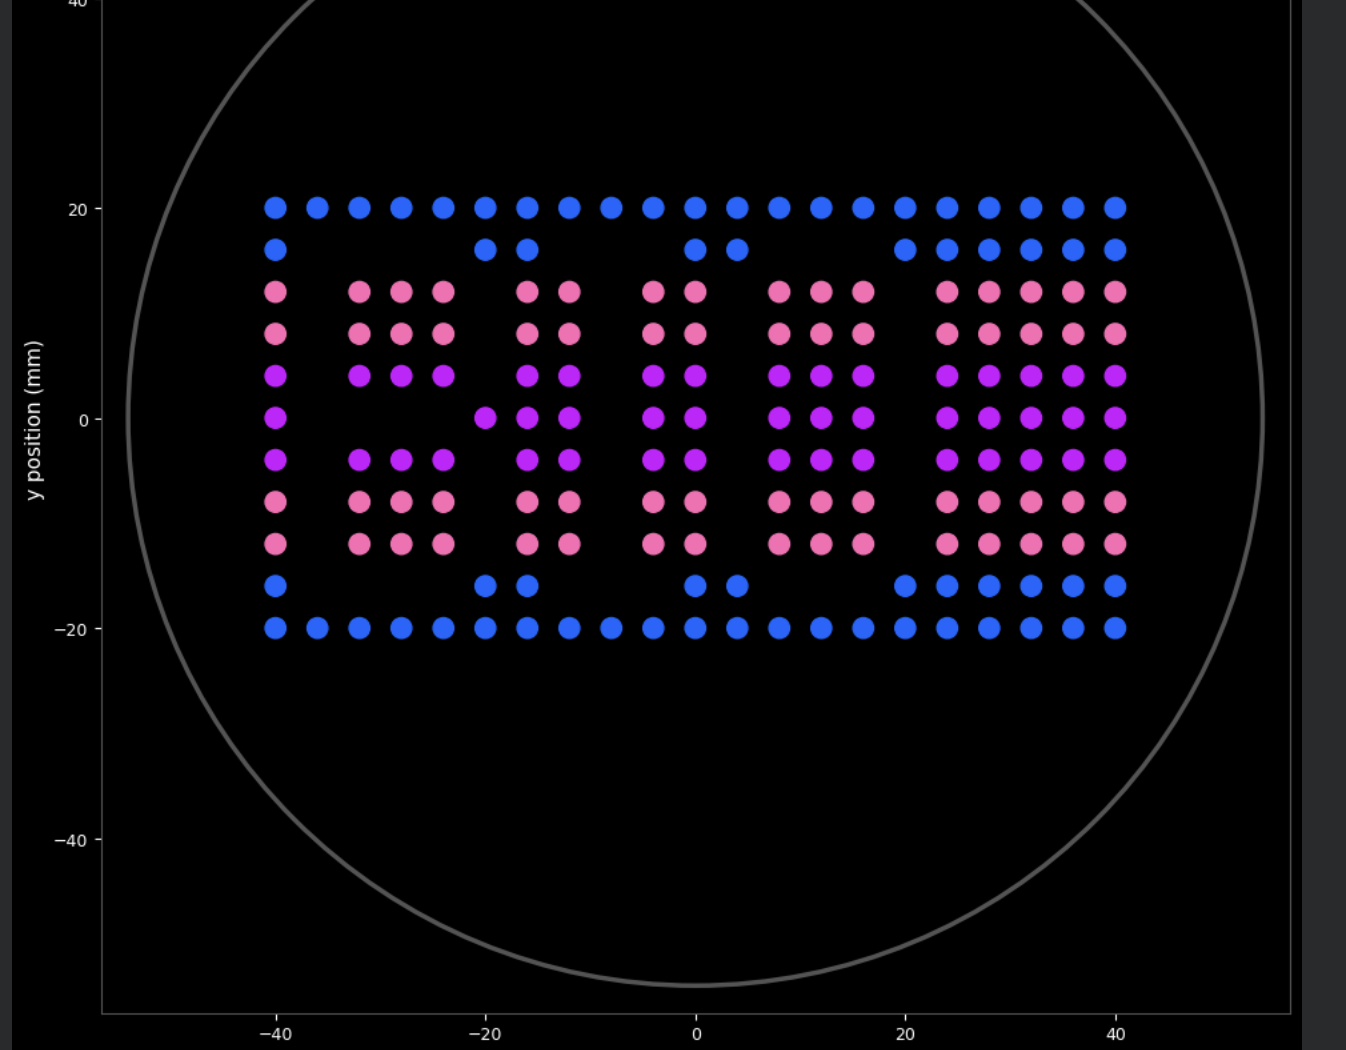
Below is the complete Python script that creates the Ndebele-inspired “BIO” pattern using negative space typography on a horizontal stripe background. The script was developed in Google Colab with Claude AI assistance and runs without errors in simulation.
from opentrons import types

metadata = {
    'protocolName': 'Ndebele Bio',
    'author': 'Henrietta',
    'source': 'HTGAA 2022',
    'apiLevel': '2.20'
}

##############################################################################
###   Robot deck setup constants - don't change these
##############################################################################

TIP_RACK_DECK_SLOT = 9
COLORS_DECK_SLOT = 6
AGAR_DECK_SLOT = 5
PIPETTE_STARTING_TIP_WELL = 'A1'

well_colors = {
    'A1' : 'Purple',
    'B1' : 'Pink',
    'C1' : 'Blue'
}

##############################################################################
###   Ndebele BIO Pattern — Negative Space Typography
###   Grid: 21 cols x 11 rows. Row 0 = bottom, Col 0 = left.
###   Physical size at 4mm spacing: 80mm wide x 40mm tall.
###
###   The word "BIO" is formed as NEGATIVE SPACE (black agar gaps) cut into
###   a Ndebele-style horizontal stripe background of coloured beads.
###
###   Background stripe layout (classic Ndebele horizontal banding):
###     Blue   = rows 0-1 and rows 9-10  (top and bottom borders)
###     Pink   = rows 2-3 and rows 7-8   (inner borders)
###     Purple = rows 4-6                (central band)
###
###   Letter placement (1-col margins each side, 1-col gap between letters):
###     B : cols 1-5   (5 wide x 9 tall, rows 1-9)
###     I : cols 7-9   (3 wide x 9 tall, rows 1-9, with serifs)
###     O : cols 11-15 (5 wide x 9 tall, rows 1-9)
###     cols 16-20 : right margin (filled with stripe colours)
###
###   Letter pixels = None (no bead — exposed black agar reads as the letter)
###   Background pixels = stripe colour bead
##############################################################################

BEAD_SPACING_MM = 4   # 4mm spacing keeps pattern clear of dish edge
BEAD_VOLUME_UL  = 1
MAX_ASPIRATE_UL = 16

def _make_pattern():
    """
    Build a 21-col x 11-row grid spelling BIO in negative space.

    Horizontal Ndebele stripes fill the background.
    Letter shapes are punched through as None cells (black agar).

    Letter pixel maps — 1 = letter pixel (None), 0 = background fill.
    Each letter is 5 wide x 9 tall (or 3 wide for I).
    Row order in map: index 0 = top of letter, index 8 = bottom.
    """
    cols = 21
    rows = 11

    # --- Ndebele horizontal stripe background ---
    def stripe_color(r):
        if r in (0, 1):      return 'Blue'
        if r in (2, 3):      return 'Pink'
        if r in (4, 5, 6):   return 'Purple'
        if r in (7, 8):      return 'Pink'
        return 'Blue'   # rows 9, 10

    # --- Letter pixel maps (1 = letter / negative space, 0 = background) ---
    # Row index 0 = top of letter, index 8 = bottom of letter

    B = [             # cols 1-5
        [1,1,1,1,0],  # top    — same wide bump as bottom
        [1,0,0,0,1],
        [1,0,0,0,1],
        [1,0,0,0,1],
        [1,1,1,1,0],  # mid serif
        [1,0,0,0,1],
        [1,0,0,0,1],
        [1,0,0,0,1],
        [1,1,1,1,0],  # bottom — matches top
    ]

    I = [         # cols 7-9
        [1,1,1],  # top serif
        [0,1,0],
        [0,1,0],
        [0,1,0],
        [0,1,0],
        [0,1,0],
        [0,1,0],
        [0,1,0],
        [1,1,1],  # bottom serif
    ]

    O = [             # cols 11-15
        [0,1,1,1,0],  # top arch
        [1,0,0,0,1],
        [1,0,0,0,1],
        [1,0,0,0,1],
        [1,0,0,0,1],
        [1,0,0,0,1],
        [1,0,0,0,1],
        [1,0,0,0,1],
        [0,1,1,1,0],  # bottom arch
    ]

    B_col, I_col, O_col = 1, 7, 11   # start columns for each letter

    grid = []
    for r in range(rows):
        row = []
        for c in range(cols):
            is_letter = False

            if B_col <= c < B_col + 5 and 1 <= r <= 9:
                map_row = 8 - (r - 1)   # flip: row 9 (top of letter) = map index 0
                map_col = c - B_col
                if B[map_row][map_col] == 1:
                    is_letter = True

            elif I_col <= c < I_col + 3 and 1 <= r <= 9:
                map_row = 8 - (r - 1)
                map_col = c - I_col
                if I[map_row][map_col] == 1:
                    is_letter = True

            elif O_col <= c < O_col + 5 and 1 <= r <= 9:
                map_row = 8 - (r - 1)
                map_col = c - O_col
                if O[map_row][map_col] == 1:
                    is_letter = True

            row.append(None if is_letter else stripe_color(r))
        grid.append(row)
    return grid

PATTERN = _make_pattern()

##############################################################################
###   OpentronsMock — simulation layer for Colab
###   Mimics the Opentrons API so run(protocol) works identically in Colab
###   and on the real robot. Records every drop for visualize().
##############################################################################

class OpentronsMock:

    class _Point:
        def __init__(self, x=0.0, y=0.0, z=0.0):
            self.x = x; self.y = y; self.z = z

    class _Location:
        def __init__(self, x=0.0, y=0.0, z=0.0, name=''):
            self.name  = name
            self.point = OpentronsMock._Point(x, y, z)
        def top(self, z=0):
            return OpentronsMock._Location(self.point.x, self.point.y, self.point.z + z, self.name)
        def move(self, pt):
            return OpentronsMock._Location(self.point.x + pt.x, self.point.y + pt.y, self.point.z + pt.z, self.name)

    class _Well:
        def __init__(self, name, x=0.0, y=0.0, z=0.0):
            self.name  = name
            self.point = OpentronsMock._Point(x, y, z)
            self._loc  = OpentronsMock._Location(x, y, z, name)
        def top(self, z=0):   return self._loc.top(z)
        def move(self, pt):   return self._loc.move(pt)

    class _Labware:
        def __init__(self, wells):  self._wells = wells
        def __getitem__(self, k):   return self._wells[k]
        def well(self, k):          return self._wells[k]

    class _TempModule:
        def __init__(self, plate):  self._plate = plate
        def load_labware(self, *a): return self._plate

    class _Pipette:
        def __init__(self, mock):
            self._mock   = mock
            self._color  = None
            self._volume = 0.0
            self.starting_tip = None
        def pick_up_tip(self):   pass
        def drop_tip(self):      self._color = None; self._volume = 0.0
        def move_to(self, loc):  pass
        def aspirate(self, volume, location):
            self._volume += volume
            self._color = self._mock.well_colors.get(getattr(location, 'name', ''), None)
        def dispense(self, volume, location):
            if self._color:
                pt = location.point
                self._mock._drops.append((pt.x, pt.y, volume, self._color))
            self._volume = max(0, self._volume - volume)

    class _Types:
        class Point:
            def __init__(self, x=0, y=0, z=0): self.x=x; self.y=y; self.z=z

    def __init__(self, well_colors):
        self.well_colors  = well_colors
        self.types        = self._Types()
        self._drops       = []

        color_wells       = {name: self._Well(name, i*9, 0) for i, name in enumerate(well_colors)}
        self._color_plate = self._Labware(color_wells)
        self._tip_rack    = self._Labware({f"{'ABCDEFGH'[r]}{c}": self._Well(f"{'ABCDEFGH'[r]}{c}")
                                           for r in range(8) for c in range(1, 13)})
        agar_well         = self._Well('A1', 0, 0, 0)
        self._agar_plate  = self._Labware({'A1': agar_well})
        self._temp_mod    = self._TempModule(self._color_plate)
        self._pipette     = self._Pipette(self)

    def load_labware(self, name, slot, label=''):
        if 'tiprack'  in name: return self._tip_rack
        if 'agar'     in name: return self._agar_plate
        if 'aluminum' in name: return self._color_plate
        return self._Labware({})

    def load_instrument(self, *a): return self._pipette
    def load_module(self, *a):     return self._temp_mod
    def comment(self, msg):        print(msg)

    def visualize(self, bead_radius_mm=1.3, figsize=(14, 10)):
        # Local imports — safe even if pd/plt were deleted by del np, pd above
        import pandas as pd
        import matplotlib.pyplot as plt
        import matplotlib.patches as patches
        from matplotlib.colors import to_rgba

        if not self._drops:
            print("No drops recorded — check that run(protocol) completed.")
            return

        color_map = {
            'Purple': '#CC00FF',   # violet fluorescent protein emission
            'Pink':   '#FF69B4',   # pink/mCherry variant emission
            'Blue':   '#0066FF',   # BFP — bright blue emission
        }

        fig, ax = plt.subplots(figsize=figsize)
        ax.set_facecolor('#000000')
        fig.patch.set_facecolor('#000000')

        xs  = [d[0] for d in self._drops]
        ys  = [d[1] for d in self._drops]
        pad = bead_radius_mm * 6

        # True circle petri dish — use the larger span as the radius so
        # the dish is always round and all beads sit inside it
        cx = (min(xs) + max(xs)) / 2
        cy = (min(ys) + max(ys)) / 2
        r  = max((max(xs) - min(xs)) / 2,
                 (max(ys) - min(ys)) / 2) + pad * 1.8   # single radius → circle

        # Set view limits to fully contain the circle
        margin = bead_radius_mm * 2
        ax.set_xlim(cx - r - margin, cx + r + margin)
        ax.set_ylim(cy - r - margin, cy + r + margin)
        ax.set_aspect('equal')

        # Show x/y axes with mm measurements — matches original Colab rendering
        ax.set_xlabel('x position (mm)', color='white', fontsize=11)
        ax.set_ylabel('y position (mm)', color='white', fontsize=11)
        ax.tick_params(colors='white', labelsize=9)
        for spine in ax.spines.values():
            spine.set_edgecolor('#555')

        ax.add_patch(plt.Circle((cx, cy), r, color='#000000', zorder=0))
        ax.add_patch(plt.Circle((cx, cy), r, fill=False, edgecolor='#555', linewidth=2.5, zorder=1))

        # Bead radius — slightly smaller than half the spacing so there is a
        # visible gap between every dot, matching the original code's style
        dot_r = bead_radius_mm * 0.75

        # Draw each bead — flat colour only, no shadow or highlight
        for (x, y, vol, color_name) in self._drops:
            hex_color = color_map.get(color_name, '#999999')
            ax.add_patch(plt.Circle((x, y), dot_r, color=hex_color, zorder=3))

        # Legend
        used = sorted(set(d[3] for d in self._drops))
        ax.legend(handles=[patches.Patch(color=color_map.get(c, '#999'), label=c) for c in used],
                  loc='upper right', facecolor='#2a2a2a', edgecolor='#555',
                  labelcolor='white', fontsize=11, framealpha=0.85)

        ax.set_title('Ndebele — BIO in Negative Space',
                     color='white', fontsize=14, fontweight='bold', pad=14)
        plt.tight_layout()
        plt.show()

        # Summary
        df = pd.DataFrame(self._drops, columns=['x_mm', 'y_mm', 'vol_ul', 'color'])
        print("\n=== Dispensing Summary ===")
        print(df.groupby('color').agg(beads=('vol_ul', 'count'), total_ul=('vol_ul', 'sum')))
        print(f"\nTotal beads dispensed : {len(self._drops)}")
        print(f"Total volume dispensed: {df['vol_ul'].sum():.0f} µL")


def run(protocol):
  ##############################################################################
  ###   Load labware, modules and pipettes
  ##############################################################################

  # Tips
  tips_20ul = protocol.load_labware('opentrons_96_tiprack_20ul', TIP_RACK_DECK_SLOT, 'Opentrons 20uL Tips')

  # Pipettes
  pipette_20ul = protocol.load_instrument("p20_single_gen2", "right", [tips_20ul])

  # Modules
  temperature_module = protocol.load_module('temperature module gen2', COLORS_DECK_SLOT)

  # Temperature Module Plate
  temperature_plate = temperature_module.load_labware('opentrons_96_aluminumblock_generic_pcr_strip_200ul',
                                                      'Cold Plate')
  # Choose where to take the colors from
  color_plate = temperature_plate

  # Agar Plate
  agar_plate = protocol.load_labware('htgaa_agar_plate', AGAR_DECK_SLOT, 'Agar Plate')  ## TA MUST CALIBRATE EACH PLATE!
  # Get the top-center of the plate, make sure the plate was calibrated before running this
  center_location = agar_plate['A1'].top()

  pipette_20ul.starting_tip = tips_20ul.well(PIPETTE_STARTING_TIP_WELL)

  ##############################################################################
  ###   Patterning
  ##############################################################################

  ###
  ### Helper functions for this lab
  ###

  # pass this e.g. 'Red' and get back a Location which can be passed to aspirate()
  def location_of_color(color_string):
    for well,color in well_colors.items():
      if color.lower() == color_string.lower():
        return color_plate[well]
    raise ValueError(f"No well found with color {color_string}")

  # For this lab, instead of calling pipette.dispense(1, loc) use this: dispense_and_detach(pipette, 1, loc)
  def dispense_and_detach(pipette, volume, location):
      """
      Move laterally 5mm above the plate (to avoid smearing a drop); then drop down to the plate,
      dispense, move back up 5mm to detach drop, and stay high to be ready for next lateral move.
      5mm because a 4uL drop is 2mm diameter; and a 2deg tilt in the agar pour is >3mm difference across a plate.
      """
      assert(isinstance(volume, (int, float)))
      above_location = location.move(types.Point(z=location.point.z + 5))  # 5mm above
      pipette.move_to(above_location)       # Go to 5mm above the dispensing location
      pipette.dispense(volume, location)    # Go straight downwards and dispense
      pipette.move_to(above_location)       # Go straight up to detach drop and stay high

  ###
  ### YOUR CODE HERE to create your design
  ###

  num_rows = len(PATTERN)
  num_cols = len(PATTERN[0])

  # Group bead positions by color to minimize tip changes.
  # Shared edge beads are de-duplicated by the seen set.
  color_order = ['Blue', 'Pink', 'Purple']  # only colours in use
  seen = set()
  schedule = {color: [] for color in color_order}

  for row_idx, row in enumerate(PATTERN):
    for col_idx, color in enumerate(row):
      if color is None:
        continue                      # no drop for open/white zones
      pos = (row_idx, col_idx)
      if pos in seen:
        continue                      # de-duplicate shared edge beads
      seen.add(pos)
      schedule[color].append(pos)

  # Dispense all beads of each color before moving to the next
  for color in color_order:
    positions = schedule[color]
    if not positions:
      continue

    # Split into chunks that fit within one tip's max aspirate volume
    chunk_size = MAX_ASPIRATE_UL // BEAD_VOLUME_UL
    chunks = [positions[i:i + chunk_size] for i in range(0, len(positions), chunk_size)]

    for chunk in chunks:
      pipette_20ul.pick_up_tip()
      pipette_20ul.aspirate(len(chunk) * BEAD_VOLUME_UL, location_of_color(color))

      for (row, col) in chunk:
        # Center the pattern on the plate
        x_offset = (col - (num_cols - 1) / 2.0) * BEAD_SPACING_MM
        y_offset = (row - (num_rows - 1) / 2.0) * BEAD_SPACING_MM
        adjusted_location = center_location.move(types.Point(x=x_offset, y=y_offset))

        dispense_and_detach(pipette_20ul, BEAD_VOLUME_UL, adjusted_location)

      # Clean up!
      pipette_20ul.drop_tip()


# Execute Simulation / Visualization -- don't change this code block
protocol = OpentronsMock(well_colors)
run(protocol)
protocol.visualize()
My project proposes a bacterial AND gate where the antimicrobial peptide Magainin is only expressed when two conditions are simultaneously true: the circadian regulator RpaA is active, and a pathogen signal is present. The core experimental challenge is verifying this gate actually works as designed, which requires sampling bacterial expression levels repeatedly across a full 24-hour cycle, under multiple conditions, without human error or gaps overnight. This is the automation task.
The Opentrons OT-2 would run an unattended 24-hour sampling protocol across three experimental conditions:
At each 2-hour timepoint, the robot samples each culture well, transfers to a measurement plate for fluorescence reading, and replaces the sampled volume with fresh media to keep cultures alive. This builds a full temporal expression profile across all three conditions without any overnight manual intervention.
I would use Claude for the coding and guidance in the technical parts of this.