Week 6 HW: DNA Assembly
Week 6: DNA Assembly
This week explores the experimental design and in-silico simulation of constructing genetic circuits. The first section details standard molecular cloning techniques like PCR and Assembly, whilst the second section documents my modeling results in Asimov Kernel.
Assignment: DNA Protocol Questions
1. Phusion High-Fidelity PCR Master Mix
What are some components in the Phusion High-Fidelity PCR Master Mix and what is their purpose?
- Phusion DNA Polymerase: The core enzyme. It possesses 5’→3’ polymerase activity for synthesis and 3’→5’ exonuclease activity for proofreading. This minimizes errors during amplification.
- Deoxynucleotide triphosphates (dNTPs): The basic building blocks (dATP, dCTP, dGTP, dTTP) used by the polymerase to synthesize the new matching DNA strand.
- Reaction Buffer (with MgCl₂): Provides the optimal pH and salt conditions. Magnesium ions (Mg²⁺) are a crucial cofactor that the polymerase requires to function properly.
2. Primer Annealing Temperature
What are some factors that determine primer annealing temperature during PCR?
- Primer Target Sequence (GC Content): Guanine and Cytosine form 3 hydrogen bonds compared to the 2 between Adenine and Thymine. Primers with a higher GC percentage have a higher melting temperature ($T_m$) and therefore require a higher annealing temperature.
- Primer Length: Longer primers have more complementary bases to pair with the template, increasing the sum of hydrogen bonding forces, thereby raising the $T_m$.
- Salt Concentration: The concentration of monovalent cations (like K⁺ or Na⁺) in the buffer stabilizes the DNA duplex, affecting the required annealing temperature.
3. PCR vs Restriction Enzyme Digests
Compare and contrast these two methods of creating linear DNA fragments.
Protocol: Utilizes thermal cycling (denaturation, annealing, extension) along with synthetic primers, dNTPs, and a polymerase enzyme to exponentially copy a specific DNA sequence.
Pros: Does not require large starting amounts of DNA. Allows you to "add" sequences (like homology overlaps, restriction sites, or barcodes) to the ends of the fragment via the primers.
Use Case: Ideal for amplifying a specific gene from a genomic sample or preparing fragments for homology-based assembly (like Gibson Assembly).
Protocol: Involves incubating the target plasmid or DNA snippet at a steady temperature (typically 37°C) with endonucleases that cut at specific recognition motifs.
Pros: Extremely precise with practically zero sequence mutations compared to PCR. Inexpensive and generates predefined overhangs for standard ligation.
Use Case: Ideal for moving existing fragments between standardized plasmids (like BioBrick standards), checking plasmid structure (diagnostic digest), or when high-fidelity amplification is too risky for a very large fragment.
4. Preparation for Gibson Assembly
How can you ensure that the DNA sequences that you have digested and PCR-ed will be appropriate for Gibson cloning?
Gibson Assembly requires adjacent segments of DNA to share common sequences. When designing the primers for PCR, you must add a homology overhang (typically 15–40 base pairs) to the 5’ end of the primer. This overhang strictly matches the end sequence of the adjacent piece of DNA it is meant to assemble next to. Without this overlap, the T5 Exonuclease cannot create the required complementary single-stranded sticky ends.
5. Plasmid Transformation into E. coli
How does the plasmid DNA enter the E. coli cells during transformation?
Generally, there are two common approaches:
- Chemical Transformation (Heat Shock): Cells are washed in a calcium chloride ($CaCl_2$) solution to neutralize the negative charges on the cell membrane and DNA. A sudden “heat shock” (e.g., 42°C for 45s) creates a thermal imbalance that sweeps the DNA into the cell through transient pores.
- Electroporation: The bacteria and DNA are subjected to a very brief, high-voltage electrical pulse. This localized electric field disrupts the phospholipid bilayer, opening temporary holes for the DNA to enter.
Detail of Another Assembly Method
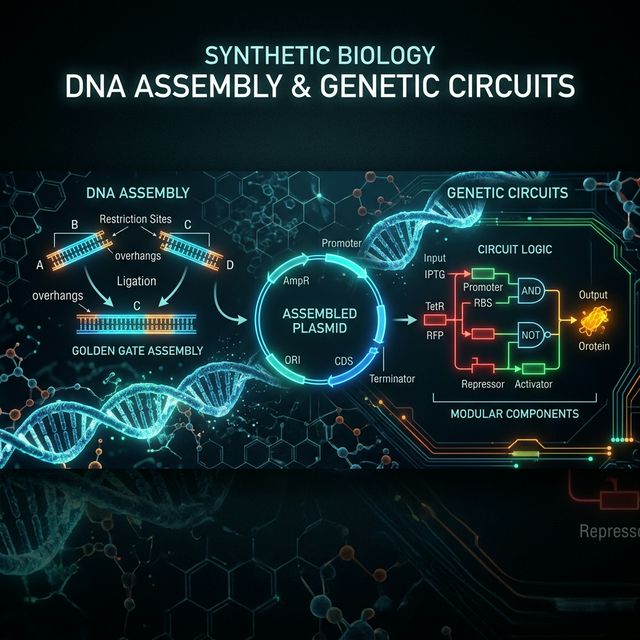
Golden Gate Assembly
Golden Gate Assembly is a sophisticated and highly efficient method for seamlessly joining multiple DNA fragments together in a single reaction tube.
At the heart of the method are Type IIS restriction enzymes (like BsaI or BsmBI). Unlike traditional restriction enzymes that cut exactly at their recognition site, Type IIS enzymes cut a specific distance away from their recognition site. This characteristic lets you place the recognition site on the very edge of the DNA insert. Once the enzyme makes the cut, the recognition site is entirely removed from the target fragment, leaving behind a 4-base pair overhang that you can completely customize.
By designing each consecutive DNA fragment with matching, distinct overhangs, they will naturally self-assemble in the correct order. The reaction mixture contains both the Type IIS restriction enzyme and DNA Ligase. It is put in a thermocycler that alternates between the optimal temperature for the cutter (e.g., 37°C) and the ligase (e.g., 16°C). Because the final, correctly assembled DNA no longer contains any recognition sites, the reaction is unidirectional—once the fragments are joined properly, they can never be re-cut by the enzyme. This enables the assembly of dozens of parts efficiently.
Simplified Model of Golden Gate Assembly:
graph TD
    A[Part 1: Promoter] -->|BsaI Cut| F1[Overhang: AATG]
    B[Part 2: Gene] -->|BsaI Cut| F2[Overhang: AATG / TCGG]
    C[Part 3: Terminator] -->|BsaI Cut| F3[Overhang: TCGG]

    F1 -. Ligation .-> F2
    F2 -. Ligation .-> F3

    F3 --> Final[Seamless Final Construct<br/>No BsaI sites remain!]
    style Final fill:#d4edda,stroke:#28a745,stroke-width:2px;
Assignment: Asimov Kernel Exploration
1. Recreating the Repressilator
Hypothesis: The Repressilator is a classic synthetic biology oscillator built from a ring of three repressor genes (tetR, cI, and lacI). Each repressor inhibits the transcription of the next one in the cycle. Because there are three nodes (an odd number), the system cannot settle into a stable state. It should produce continuous oscillations, like a biological clock.
Results: When simulating the construct, I observed wave-like oscillations in the concentration of the reporter protein over time. The peaks of each repressor’s expression lagged behind the previous one in the cycle, exactly matching the behavior of the Demo repository construct.
2. My Custom Construct 1: Constitutive GFP Generator
Design: Constitutive Promoter -> RBS -> GFP -> Terminator
Hypothesis: This is the simplest possible circuit. Because the promoter is constitutive (always “on”) and has no repressor binding sites, the production of GFP should rise steadily and then plateau when the rate of production matches the rate of degradation and cell growth dilution.
Results: As expected, the simulated curve showed a rapid logarithmic growth in GFP concentration that leveled off at a high, steady-state amount.
3. My Custom Construct 2: Inducible Toggle Switch
Design: I linked two repressor systems (Repressor A inhibits Promoter B and Repressor B inhibits Promoter A). A reporter gene is placed downstream of Promoter A. Hypothesis: This setup creates a bistable system. It can remain indefinitely in State A or State B, but not both. By adding a chemical inducer midway through the simulation that neutralizes Repressor B, the system should forcefully switch states. Results: The simulation started in one state (low reporter). Upon the simulated addition of the inducer, I observed an immediate “flip,” where the reporter concentration jumped to high and stayed there even as the inducer degraded, demonstrating cellular memory.
4. My Custom Construct 3: Feed-Forward Loop (FFL)
Design: A network where Protein X activates Protein Y, and both Protein X and Protein Y are required to activate the final Reporter Protein Z. Hypothesis: This is a coherent type-1 feed-forward loop. Functionally, it acts as a “sign-sensitive delay.” It filters out brief, noisy signals. If the input to X is only brief, Y won’t build up enough to turn on Z. Only a sustained input will turn on Z. Results: By simulating short pulses of input vs. a continuous sustained input, the simulation clearly showed the Reporter Z only activating when the input pulse duration exceeded the buildup threshold of Protein Y.