Making 3D Printable Green Man whose Face Fluoresces Green with High CO2 Level
This is the documentation for my final How to Grow Almost Anything (HTGAA) project. It is based on the class template. Most of the project hasn’t happened yet but I’m hoping I can implement it. Note that I’d still consult the Lifefabs Institute to check and review some of the protocol steps, especially in relation to calculations for amounts of reagents.
1. Abstract
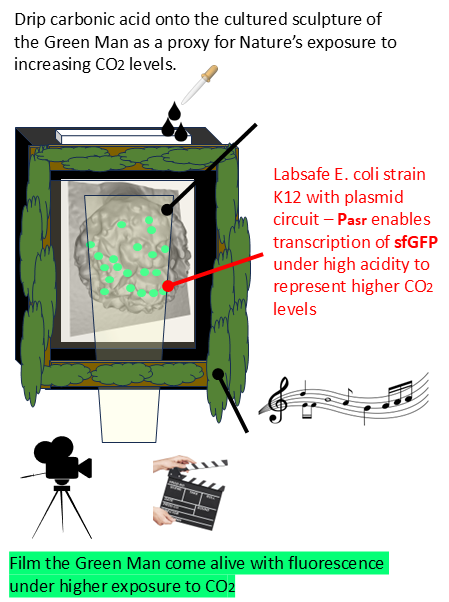
My project adapts an established genetic switch from synthetic biology into a Bioart installation that is meant to encourage conversations about how Nature will react to increasing levels of carbon dioxide. A 3D printed Green Man sculpture, immersed in a bioreactor, will be colonised by bacteria that have been engineered to glow a shade of ‘hopeful’ green in the presence of increased carbon dioxide. In this project, that carbon dioxide will come in the form of carbonic acid that is dripped onto the face while it is being filmed. The desired effect is that it should begin to fluoresce as the acid is dripped onto it.
When I began to think of a project for the HTGAA course, I first thought of biosensors, then a biosensor involving carbon dioxide - and then an image of a shadowed Green Man sculpture fluorescing a shade of green I had seen in laboratory experiments involving E. coli that could express sfGFP. The Green Man is a modern symbol of Nature, growth, rejuvenation, ecology and sustainability. I imagined it glowing green, partly in defiance of a worrying trend of atmospheric changes and partly from the hope that Nature would find a way to adapt and thrive. I wanted to film that moment as a way of sharing wonder at the physiological responses of different life forms to carbon dioxide and to encourage discussion about how plants or microorganisms could help sequester carbon dioxide.
Behind this imagined cinematic moment, the reality of the art and the science behind it is more complicated and likely more interesting than simply creating a short film that documents the sudden fluorescence. On the science front, I was more interested in adapting an existing genetic circuit to support a novel Bioart outcome than in supporting a novel contribution to the field of synthetic biology itself. I wanted a genetic circuit that is known to work and my risk appetite was largely shaped by the prospect I could be paying for materials and help to make the project a reality. My own newly cultivated skills with laboratory equipment and various resource constraints heavily influenced my choice of aims.
Ideally, I would want a genetic circuit that would cause engineered E. coli to flouresce from sfGFP when it was directly exposed to higher concentrations of gaseous carbon dioxide. However, my investigations suggested that at least for Aim 1, it was best to depend on a genetic circuit that used a pH sensing promoter to trigger sfGFP protein synthesis at low pH. The sensor is therefore a crude proxy for the presence of increased carbonic acid, which is what forms when carbon dioxide dissolves in water. In a future iteration for Aim 2, I would modify the circuit to detect concentrations of HCO3. For Aim 1, I will adapt a genetic circuit documented by Viral Patel that uses the asr gene promoter to initiate production of the sfGFP protein.1 It will be modified to support enzymes that would make it easy to substitute the gene sequence for sfGFP with that of another fluorescent protein.
On the Bioart front, I also had to moderate my initial expectations. I wanted to know what features of a 3D printed Green Man sculpture would best support the visual effect of fluorescing green. What properties of the sculptures themselves would influence bacterial growth and influence the definition of fluorescent patches being filmed? I also needed to limit the variety of Green Man sculptures I could capture, based on the logistics of travelling to various medieval churches and cathedrals and on the ability to turn hundreds of pictures into viable 3D-printable models.
1.1 Significance. This Bioart installation, which uses a biosensing genetic circuit, is about reflecting on the potential use of biosensors to qualitatively express to people rising levels of climate change gases, and on how plant-life may respond to rising carbon dioxide levels.
1.2 Broad objective. The main objective is to encourage discussion about Nature’s response to higher carbon dioxide levels and the prospect of using biosensors to encourage people to become more immediately aware and responsive to climate change gases. Other objectives are about examining how the nature of a sculpture surface could best promote culturing of fluorescing bacteria.
1.3 Hypothesis. The project will test whether the plasmid I’m able to engineer can be successfully cultured on a Green Man sculpture and glow green in the presence of carbonic acid made from combining baking soda and vinegar.
1.4 Specific Aims. The key steps include:
- Design a plasmid that supports a genetic circuit which uses Pasr to trigger transcription of genes that code for sfGFP when exposed to high acidity.
- Insert the plasmids into competent bacteria and test whether resulting culture fluoresces under acidic conditions and does not otherwise fluoresce.
- 3D print a variety of Green Man sculptures that have different surface properties.
- Evaluate which sculpture surface which would best support culturing the engineered culture of bacteria.
- Create the art installation and film the Green Man sculpture as carbonic acid is dripped onto the layer of engineered bacteria that cover it. Hope that it glows green and provide explanations if it does not!
1.5 Methods. These are the biotechnology techniques I will use:
- Adapt an existing acid-sensing genetic circuit 1 that uses the Pasr promoter to initiate transcription of genes that produce the sfGFP fluorescent green protein. Use Benchling to fully specify this sequence of interest and to embed it within a plasmid that has built-in resistance to chloramphenicol.
- Use bacterial transformation techniques to insert the plasmid into competent cells of E. coli strain K12.
- Streak plates to build up a large colony of bacteria for the experiment.
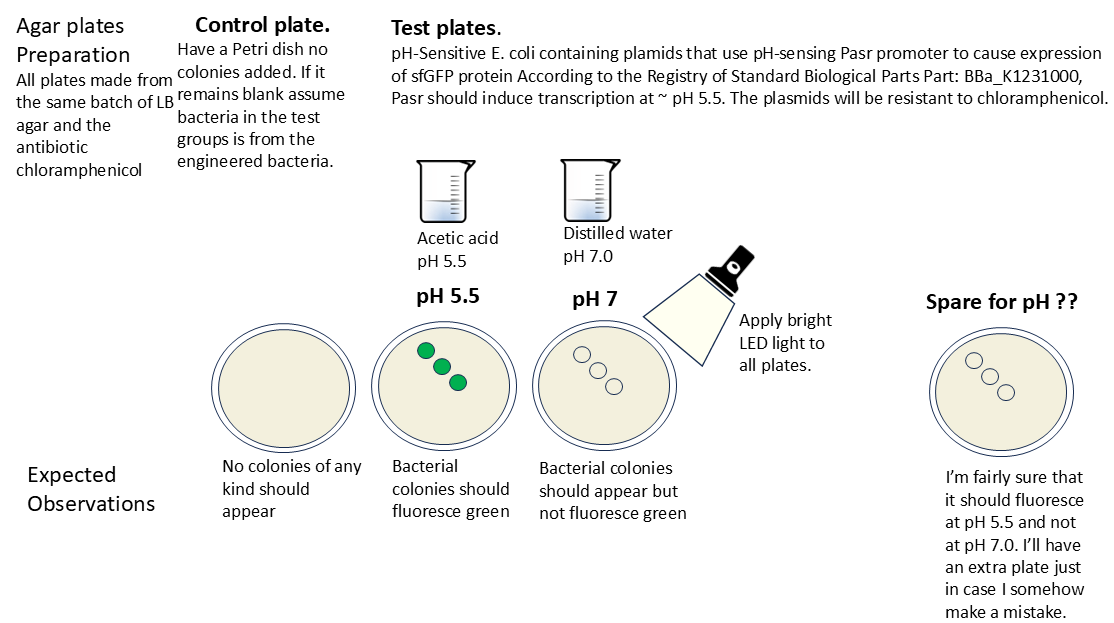
- Test that the circuit is working. Pour three agar plates with one being a control. Culture engineered bacteria in the two other plates and expose one to acetic acid pH 5.5 and another at pH 7.0. Only the plate exposed to pH 5.5 acetic acid should fluoresce.
- Prepare a nutrient environment (e.g. bioreactor) to help cultivate colonies of engineered bacteria on different Green Man sculpture surfaces.
2. Project Aims
2.1 Aim 1: Experimental Aim.
For the first aim, I will test whether I can make the Bioart installation work with pH-sensing bacteria. I will engineer a pH-sensing genetic circuit with a sfGFP reporter protein and incorporate that into lab-safe E. coli bacteria via a plasmid that will include the circuit’s DNA sequence. This part of the project will feature three main pieces of work.
First, I will adapt an existing circuit 1 that uses the asr gene promoter to initiate the transcription of sfGFP protein. I will design it using Benchling, and make a Twist order that incorporates the circuit into a backbone that supports resistance to the antibiotic chloramphencol. In the lab, I will receive my Twist order in the form of a package containing dessicated plasmids that include the genetic circuit.
Second, I will apply bacterial transformation to competent cells of E. coli strain K12 bacteria so they may express the circuit via the plasmids. I will then culture many plates to build up a stock of the engineered bacteria.
Third, I will test whether the genetic circuit I created actually works. I will prepare three petri plates with LB agar and chloramphenicol. One plate will serve as a control, and the second and third plates will be streaked with the engineered bacteria. Once the bacteria have cultured in the two plates, I will expose two plates to acetic acid solution, with one exposed to pH 5.5 and the other pH 7.0. I should observe that the control has no bacteria at all growing in it. The plate exposed to pH 5.5 should fluoresce green and the plate exposed to pH7.0 should show engineered bacteria colonies that don’t fluoresce.
For the Bioart aspect, I will visit cathedrals and try to capture various 3D-printable Green Man sculptures using the application Polycam. I will observe what factors about sculpture examples help 3D printing. I will then construct a bioreactor and attempt to determine which sculpture would be the best candidate to use in the final Bioart activity. I’ll be monitoring the apparent effects of texture, surface area and depth of the sculptures as well.
When I can confirm the genetic circuit works and identify the best candidate Green Man sculpture, I will then put together the Bioart installation and film the Green Man being exposed to strong carbonic acid.
2.2. Aim 2: Development Aim
If I manage to accomplish Aim 1, I will feel confident to try it again with a more specific genetic circuit that would trigger on higher levels of HCO3.
2.3 Aim 3: Visionary Aim
This is where Bioart provides a good support for having a visionary aim. It is meant to encourage more people to become interested in understanding physiological responses to carbon dioxide, in an era where fears of increasing global warming gases are increasing.
3. Background
3.1 Course required background questions
1. Briefly summarise two peer-reviewed research citations relevant to your research (minimum four sentences). Suziedeline’s paper, “The Acid-Inducible asr Gene in Escherichia coli: Transcriptional Control by the phoBR Operon” is the first to describe the role of asr gene in ph sensing. It will act as a switch in the genetic circuit I want to build.2 Pédelacq’s paper “Engineering and characterization of a superfolder green fluorescent protein” describes the characteristics of sfGFP, which is the fluorescent protein. It will be produced when the asr ‘switch’ is activated through exposure to a strong acid.3
2. Explain how your project is novel or innovative.(Minimum 3 sentences) The theme of this project is not about creating a novel biotechnology technique for manipulating living matter, nor developing a novel organism using standard techniques such as plasmid engineering. Its innovation is in how an established genetic circuit can be used to make a creative artistic expression that encourages discussion about increasing atmospheric carbon dioxide. So far I haven’t found anyone else trying to make Green man resin prints glow from proteins derived ultimately from a jelly fish! And I plan to make a great prop backdrop for the Green Man as it hopefully comes alive.
3. Explain why your project matters and what impact it could have (Minimum 5 sentences) My project is meant to promote a conversation about how Nature will react to rising levels of carbon dioxide. One of the problems with topics such as global warming is that the anticipated future seems so bleak it disengages people from thinking there is any way to avoid it. Doom can breed apathy, apathy can lead to acceptance, and acceptance can undermine a sense of participating in the issue further. Hope is important. I hope my project encourages people to consider how some parts of Nature may help sequester carbon dioxide to an extent: either from more invigorated growth of plants in some cases, or perhaps through microorganisms that can sense carbon dioxide and remove it from the atmosphere.
4. Describe the ethical implications associated with your project and identify relevant ethical principles (e.g. non-maleficence, beneficence, justice or responsiblity. Minimum 2 paragraphs) The ethical implications associated with my project could include:
- whether manipulating life is ethical
- whether the bacteria experiences harm
- whether an aesthetic has sufficient value to warrant any apparent risks - the risk vs. benefit aspect of biomedical ethics
People have manipulated life for millenia through the act of selective breeding to produce food, support pest control, or to achieve an aesthetic through specialised breeds of pets or ornamental plants. Transgenic manipulation between species can raise more concerns, either about the sanctity of natural breeding of two organisms that can produce offspring, or in the apparent harm a chimera could have on the environment. Bacteria cannot feel pain as we know it because they lack a brain and a nervous system. Some proteins produced by transgenic bacteria can create cytotoxic effects for the cells but it is not evident that they would suffer.
Inserting genes into bacteria via plasmids is a well established biotechnology and it has already shown benefits such as eating various pollutant sources and producing biopharmaceuticals such as insulin.[^4]
Growing bacteria for aesthetic bacteria has been done since Alexander Fleming created his bacterial paintings.4 The advent of the first fluorescent protein in the 1960s revolutionised biotechnology because it provided a way for scientists to visually track the creation or movement of microscopic life. In the years since then, more fluorescent proteins have been produced. The use of reporter proteins crossed into the realm of art long ago, and the best example of it is the ASM Agar Art Context. As the field of Bioart has grown, so too have exhibits which feature genetically-modified bacteria. Some labs are even producing antibiotic-responsive Bioart.5
There are several aspects of my project which I believe have made them ethical and safe. The final projects were approved by HTGAA nodes. If my project is implemented in the lab, it will be subject to biosafey protocols requires by the Lifefabs Institute. Examples of biosafety steps are described more in Section 4.2.
Now I want to move on to background I’d like to add…
3.2 Synthetic Biology Background
The synthetic biology focus of the project relates to a genetic circuit that uses a CO2-sensing promoter to act as a switch that turns on when exposed to high levels of carbon dioxide and causes transcription to begin of genes that code for the fluorescent green sfGFP protein 3. The plasmid would be inserted into E. coli strain K12 through bacterial transformation and then cultured. A key part of the project will be to test that genetic circuit works, so that I can be confident it will be activated during the Bioart installation.
I asked ChatGPT for guidance with the prompt: “How could I design a bacteria biosensor that glows green when it is exposed to high concentrations of carbon dioxide? Please include sources.”
Its response suggested three options listed here in increasing levels of difficulty:
- Option A: pH-based sensing. This approach uses a crude high acidity as a crude proxy for detecting carbon dioxide dissolved in water (carbonic acid). It has the disadvantage of not specifically triggering on increased exposure to high CO2 levels, but it probably the easiest to do.
- Option B: CO2/bicarbonate-responsive regulators. This approach provides a more specific solution but is more complex in that it would involve engineering a transcription factor that is responsive to bicarbonate.
- Option C: Synthetic two-component system. This would be the most specific approach, but it is the most complex of the three options. It would involve engineering a CO2-binding regulator and coupling it to a promoter that controlled GFP.
This step helped me establish the easiest option (Option A) to use for Aim 1 and a more meaningful but difficult to implement option (Option B) to use for Aim 2.
3.3 Climate Change: Rising levels of carbon dioxide
The amount of carbon dioxide has greatly increased in the last 100 years. Humans evolved during a time when the atmospheric concentration of CO2 was between 200-300 parts per million (ppm). 6 However, concentrations have risen sharply in the last 100 years and as of February it is 429 parts per million (ppm). 7 In Larcombe’s work with the NHANES cohort, he found between 1999 and 2020, the average blood bicarbonate levels rose by 7%.
These kinds of findings have made me reflect on how Nature will react to increasing atmospheric carbon dioxide in the atmosphere. Most of the prospects of climate change are bleak, but I am optimistic that Nature will react and adapt and survive. The way increasing concentrations of CO2 affect plants is complex, and exposure to carbon dioxide is only one of multiple factors that can influence plant development.8 However, increased carbon dioxide exposure is often associated with more rapid plant growth and with that I see an example of Nature’s resilience and its ability to grow and respond to changing environments.
My Bioart installation is an expression of hope that Nature will find a way to respond and survive as the CO2 levels climb higher. My hope does not just reside in plants, but in the potential for microbes to respond to higher cocnentrations and to help remedy rising levels as well. Bacteria have been known to sense carbon dioxide and to absorb it.
In this installation, an optimism is reflected in a metaphor of Nature itself: the Green Man, a modern-day figure born out of medieval church architectural motifs and recast today as a spirit associated with growth, renewal, ecology and sustainability.
3.4 Bioart Background
The Green Man describes a set of images that are found in Church architecture and were popular in European churches between the twelfth and sixteenth centuries. They are characterised by various forms, often featuring greenery growing out of a mouth, eyes or ears and a face that grows or is covered by leaves. The term ‘Green Man’ was coined by Lady Raglan, who believed they were a relic of pagan nature worship that survived Christianity. Today we know that these assumptions are not true. Nonetheless since the 1930s the Green Man has taken on a new identity. In the latter part of the twentieth century, the Green Man has come to represent a closer relationship with Nature. 9
When I first thought of the genetic circuits described in the HTGAA class, I began thinking of various biosensors. I considered a biosensor for carbon dioxide that would glow green in the presence of high CO2 concentrations. Then I imagined a plant with new leaves of the same fluorescent colour and then the figure of the Green Man representing Nature. Although I’m using the Green Man as a metaphor for Nature, I don’t want to claim that Nature - especially plants - will thrive in the presence of increased carbon dioxide. The physiological responses from organisms are varied and complicated. The glow is more an expression of hope that it will adapt, and that perhaps there is hope that either plants or perhaps engineered bacteria can work to sequester some of the carbon dioxide that is pouring into the atmosphere.
If I just wanted to show a Green Man sculpture glowing in the presence of increased carbon dioxide, I could have used an electronic sensor that would turn a green light on to show the Spirit’s response. However, the approach would have made for a mechanical rather than an organic response and undermine the point of emphasising a response from Nature. Therefore, I needed some biological way to make the Green Man’s face fluoresce. Although I most imagined the response of plants, I couldn’t think of a plant that would glow in the response to increased carbon dioxide.
The most practical way of making this happen was to rely on bioengineered bacteria that could achieve the same effect. This approach would not only provide an organic response, but also support future conversations about the role of a genetic circuit in bacteria that could perhaps sense increasing carbon dioxide levels and then trigger trascription of genes that could make proteins which sequestered the gas somehow.
It would be impractical to try growing fluorescing bacteria colonies on Green Man jewelry or Green Man decorations because they wouldn’t be amenable for suppporting laboratory work. As well, the presence of silver or pewter Green Man masks would have likely killed any bacteria. I needed to be able to customise the size of a Green Man sculpture using materials that were more likely to support laboratory work. Therefore, I sought use the mobile application Polycam to capture hundreds of pictures of various Green Man sculptures and then export them as *.STL files that could be 3D printed in a resin that could be autoclaved.
The 3D printed surfaces needed to be recognisable to a viewer and be able to support colonies of fluorescing bacteria. As I would later learn, there are a number of logistical issues involved with creating candidate Green Man sculptures that are appropriate for the project. Some would appear far away from my camera, and either lack the clear resolution or the sculptural depth for them to be recognisable to viewers. In order to increase the likelihood I would obtain viable 3D printable models, I decided to capture as many Green Man sculpture examples I could cover within a reasonable distance from London. I would go to Ely Cathedral, St. Albans Cathedral, Canterbury Cathedral and Canterbury’s St. Augustine’s Abbey to obtain a wide variety of examples. The more I explored and travelled to find them, the more I saw how different they could be from one another.
I began to wonder whether properties of the sculpture would influence bacterial growth. Specifically, I tried to think about whether the smooth vs rough and flat vs curved contrasts in sculptural traits would make a difference to growing bacterial colonies on them.
Of those Green Man sculptures that seem viable, I also needed to consider which would create the most obvious visual effect of fluorescence. Part of that visual effect would also depend on my choice of fluorescent protein. It seemed a given the protein should be green, but I picked sfGFP over GFP because its folding had been optimised for better performance in fluorescing.310
Growing bacterial colonies directly onto plastic resin sculptures would likely not foster growth of fluorescing bacterial colonies. Therefore I began to consider that the sculptures would likely need to be immersed in a small bioreactor.
4. Experimental Design, Techniques, Tools and Technology
4.1 Assessing bioethics and biosafety of the project
This project proposal was approved by Lifefabs, the London node of the MIT How to Grow Almost Anything (HTGAA) course. It will be implemented in the Lifefabs Biofabrication Lab and I will follow biosafety protocols the lab follows. Examples of its practices include measures such as
- cleaning laboratory spaces with isopropyl alcohol at the beginning and end of every activity
- the use of gloves in the laboratory area used to handle equipment and other project materials
- autoclaving of LB agar mix
- the safe disposal of any material involving the bacteria, antibiotics or any other biological waste through designated clinical waste disposal units
The project will involve the use of a lab-safe version of E. coli, Strain K12, which is specifically designed to support educational projects. There are further measures which reduce the risk of reducing any risk of incurring any negative outcomes from the use of synthetic biology:
- the genetic circuit relies on the use of the asr promoter gene, whose behaviour was first documented in 1999 and is well-understood.
- the circuit is only designed to trigger the production of a well-tested and well-documented fluorescent protein sfGFP
- it relies on techniques such as bacterial transformation, streaking and agar plate production, all of which come from well-established processes that are documented in protocols.
- materials will be ordered from well-established vendors
4.2 Choose the best candidate biosensor circuit for detecting increasing carbon dioxide concentrations.
To support my first aim, I needed to identify the best ph-sensing promoter gene which would be used to control the expression of sfGFP. I asked ChatGPT to suggest suitable promoters on multiple occassions and the main ones were:
- cadBC
- asr
I chose to use asr because it was the most prominently described pH-sensing promoter I found in the literature. asr’s role in pH sensing was first described by Sužiedėlienė in 1999.1 The ability to sense and respond to changes in pH is an important characteristic of many bacteria, especially those which may change from being in lowly acidity environment outside a body to a highly acidic environment inside a host body. Sužiedėlienė observed this behaviour in E. coli, which also happens to be the species of bacteria I would be using for bacterial transformation in the lab. If I had picked a gene from a very different lifeform from E. coli, I might have had to make adaptions so that it would work. But, Sužiedėlienė’s study of asr behaviour was in E. coli itself, so I felt it would be easy to include it in a plasmid sequence that was destined to be included in labsafe E. coli anyway.
Having established what promoter ‘switch’ to use, I needed to decide which fluorescent protein it would ’turn on’. In keeping with the theme of the Green Man, that protein had to be green. Perhaps the most common green fluorescent protein is GFP, which was derived from the jellyfish Aequorea Victoria. It was first isolated by Shimomura in 1962 and made into a commonly used laboratory tool by Tsien. 2 However, the protein has been adapted in various ways since then.
One of GFP’s shortcomings was that it didn’t fold efficiently when it was expressed in E. coli, the workhorse bacteria of synthetic biology. In 2006, Waldo and others published their work on a modified version of GFP that would become known as super-folding GFP (sfGFP). 3[^4].
Having established that the desired circuit would use the asr promoter gene to control transcription of sfGFP, I tried to determine whether anyone had already done work on this. I found Viral Patel’s very well-documented circuit on the Registry of Standard Biological Parts. The main description read: “The asr promoter is a pH-responsive promoter. This part contains the asr promoter with its native RBS. The asr promoter is a pH- responsive promoter native to E. coli. It induces transcription in acidic conditions (~pH 5.5)”
On the page for the circuit, I clicked ‘Design’ and then clicked ‘Get part sequence’. I copied the sequence for the asr promoter and then consulted Homework Week 2, submitting a Twist order. I replaced the promoter used in the example with the one described by Patel.
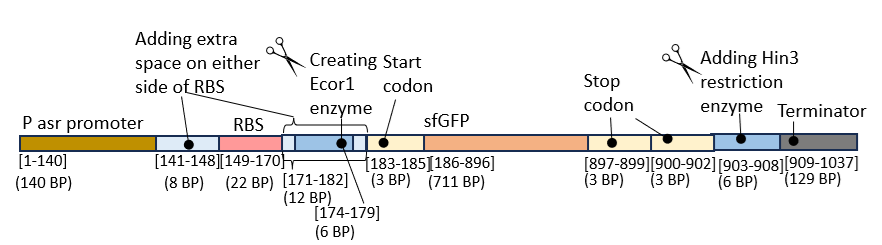
I was fortunate to have my sequence of interest reviewed by the very helpful TA Juan Diego Unda. He made some suggestions which I followed:
- added some nucleotides to provide space on either side of the RBS so that the RBS had room to bind
- added an extra stop codon to help ensure transcription ends
- added restriction enzymes to make it easier later one if I wanted to snip out sfGTP and put in another colourful protein!
- rremoved the His-tag sequence because I didn’t need it
The key components of the sequence of interest were then:
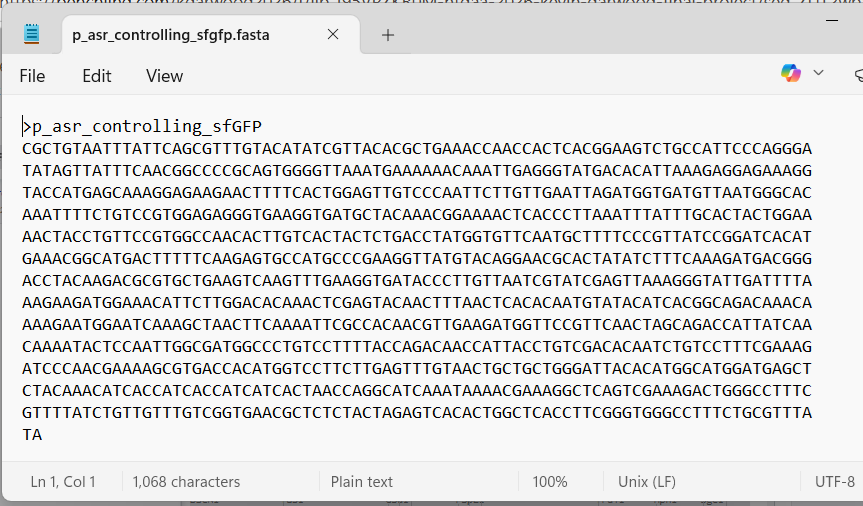
P-asr promoter sequence: CGCTGTAATTTATTCAGCGTTTGTACATATCGTTACACGCTGAAACCAACCACTCACGGAAGTCTGCCATTCCCAGGGATATAGTTATTTCAACGGCCCCGCAGTGGGGTTAAATGAAAAAACAAATTGAGGGTATGACA
Filler base pairs before the RBS: TACTAGAG
RBS: CATTAAAGAGGAGAAAGGTACC
Filler base pairs after RBS: tacGAATTCtag which include coding to support the Ecor1 enzyme GAATTC
Start Codon: GAATTC
sfGFP: AGCAAAGGAGAAGAACTTTTCACTGGAGTTGTCCCAATTCTTGTTGAATTAGATGGTGATGTTAATGGGCACAAATTTTCTGTCCGTGGAGAGGGTGAAGGTGATGCTACAAACGGAAAACTCACCCTTAAATTTATTTGCACTACTGGAAAACTACCTGTTCCGTGGCCAACACTTGTCACTACTCTGACCTATGGTGTTCAATGCTTTTCCCGTTATCCGGATCACATGAAACGGCATGACTTTTTCAAGAGTGCCATGCCCGAAGGTTATGTACAGGAACGCACTATATCTTTCAAAGATGACGGGACCTACAAGACGCGTGCTGAAGTCAAGTTTGAAGGTGATACCCTTGTTAATCGTATCGAGTTAAAGGGTATTGATTTTAAAGAAGATGGAAACATTCTTGGACACAAACTCGAGTACAACTTTAACTCACACAATGTATACATCACGGCAGACAAACAAAAGAATGGAATCAAAGCTAACTTCAAAATTCGCCACAACGTTGAAGATGGTTCCGTTCAACTAGCAGACCATTATCAACAAAATACTCCAATTGGCGATGGCCCTGTCCTTTTACCAGACAACCATTACCTGTCGACACAATCTGTCCTTTCGAAAGATCCCAACGAAAAGCGTGACCACATGGTCCTTCTTGAGTTTGTAACTGCTGCTGGGATTACACATGGCATGGATGAGCTCTACAAA
Two stop codons: TAATGA
Sequence to support Hin3 enzyme: AAGCTT
Terminator: CCAGGCATCAAATAAAACGAAAGGCTCAGTCGAAAGACTGGGCCTTTCGTTTTATCTGTTGTTTGTCGGTGAACGCTCTCTACTAGAGTCACACTGGCTCACCTTCGGGTGGGCCTTTCTGCGTTTATA
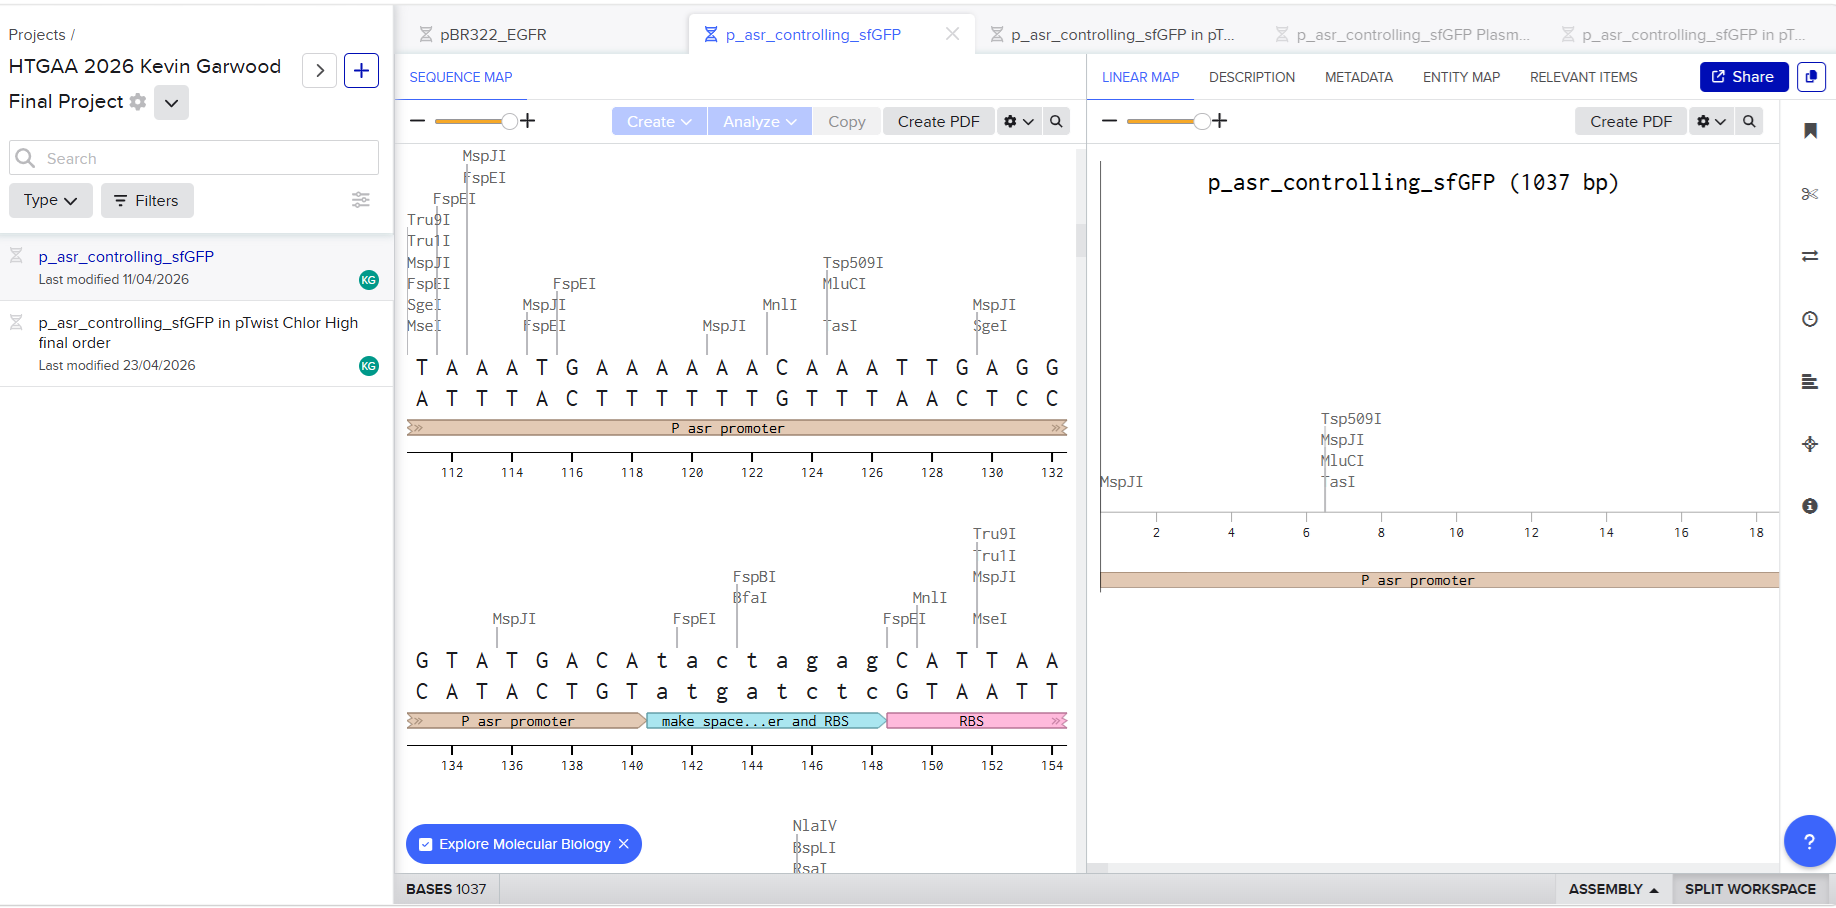
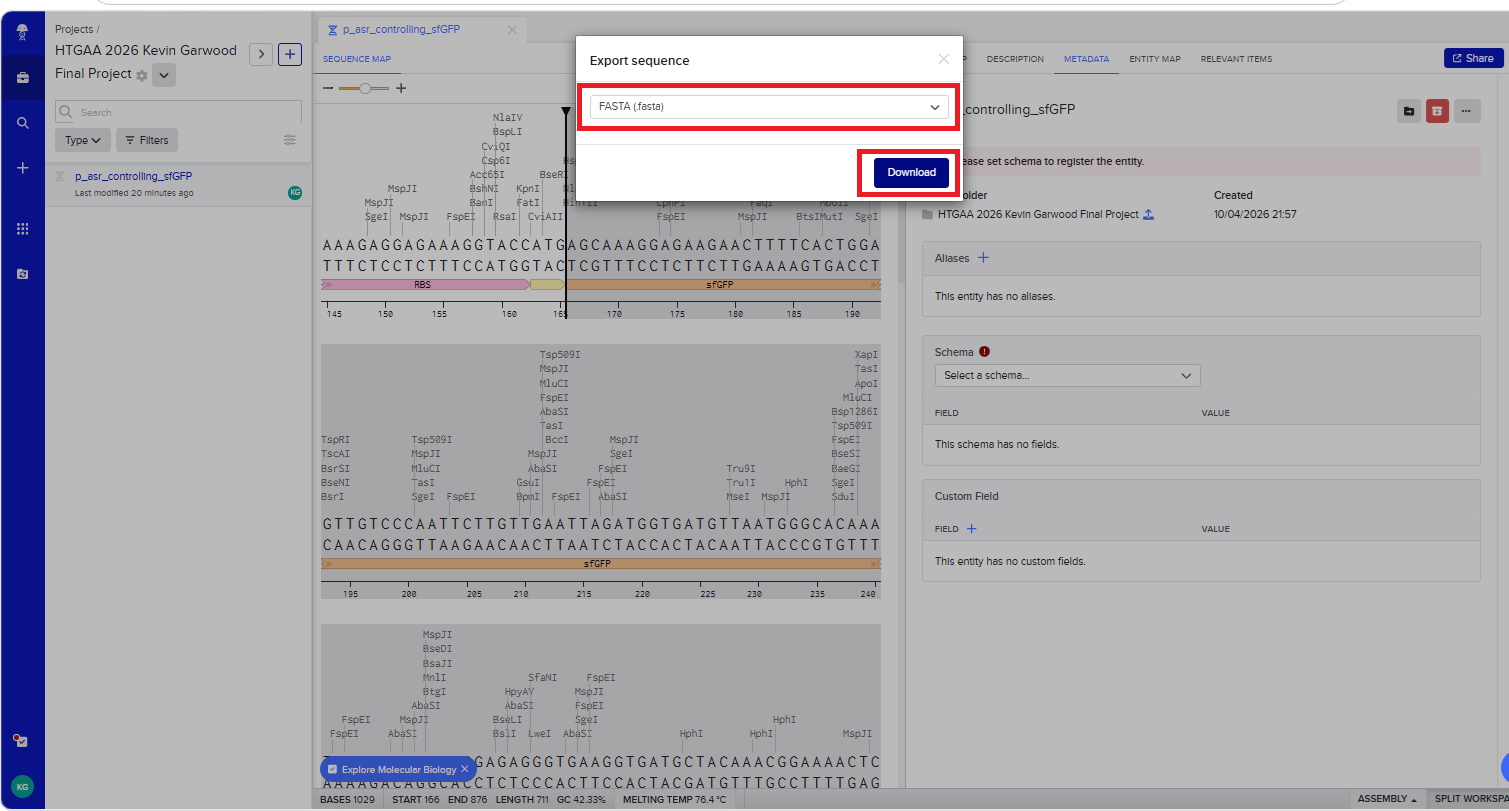
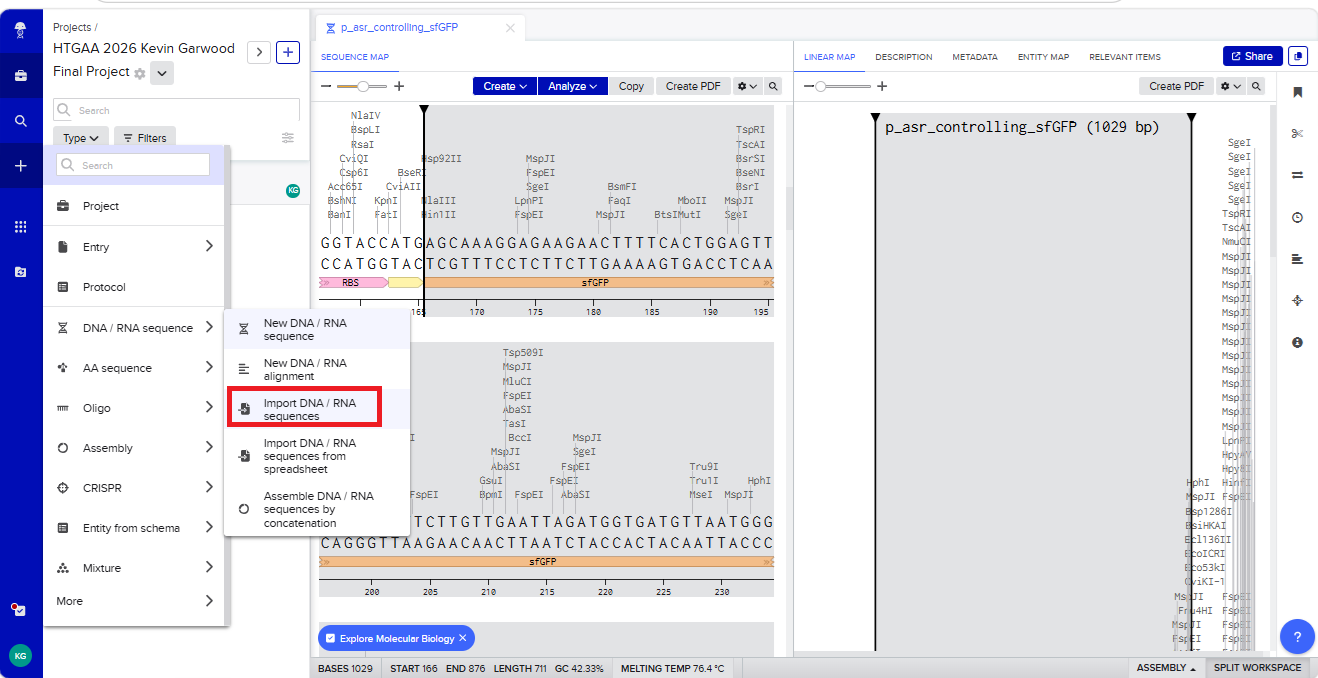
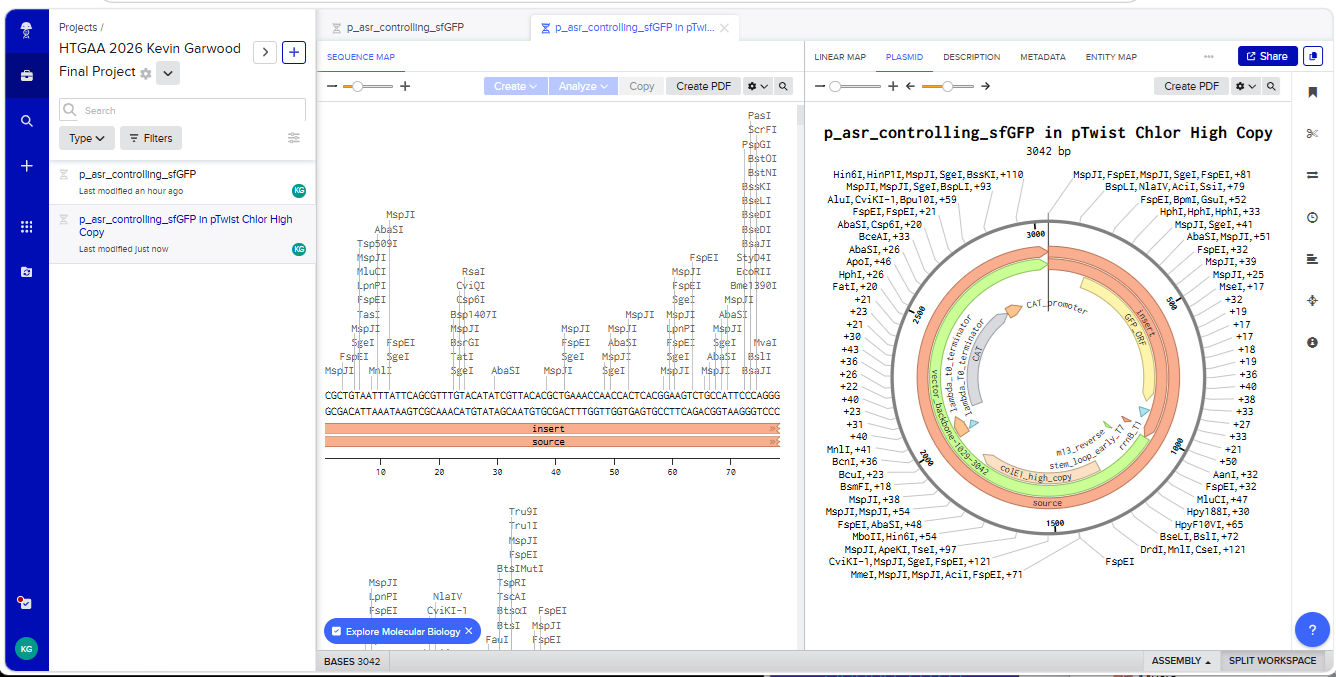
The main sequence of interest containing the genetic circuit is shown below:
In Benchling, the sequence looked like this:
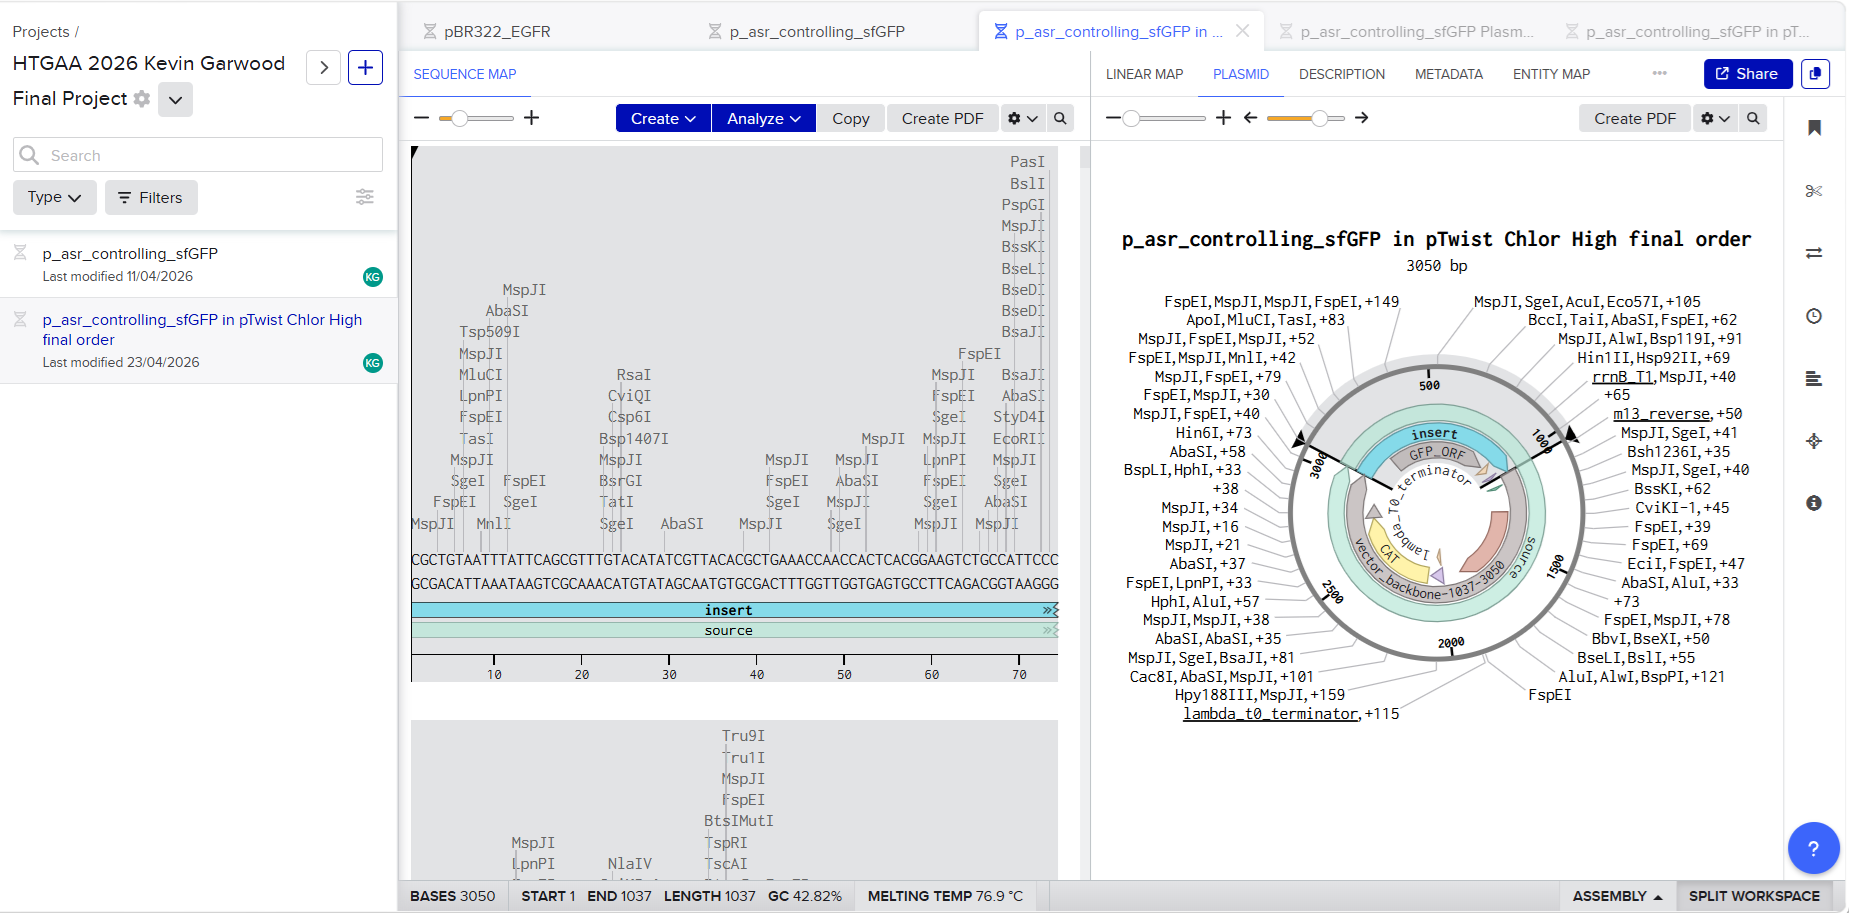
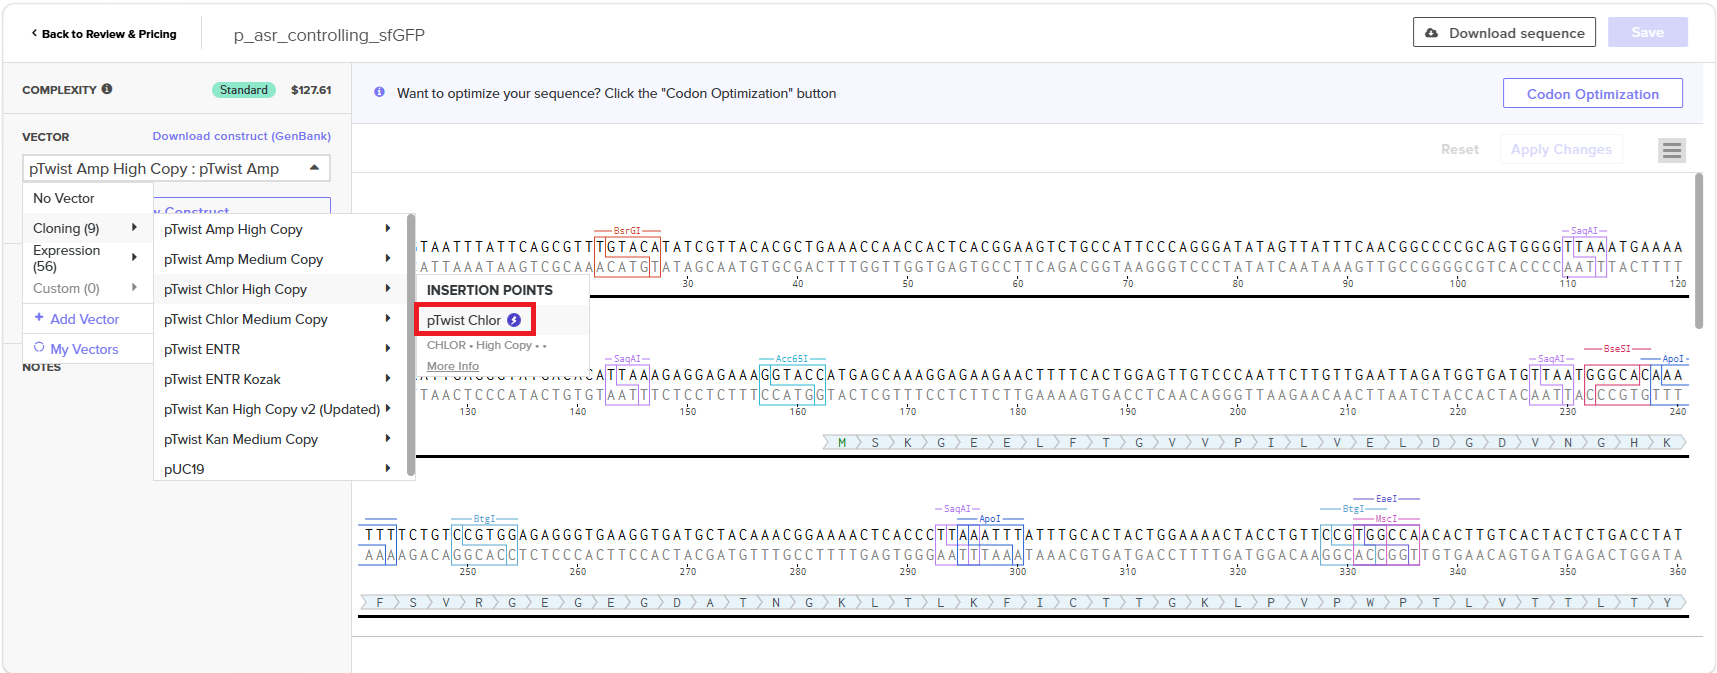
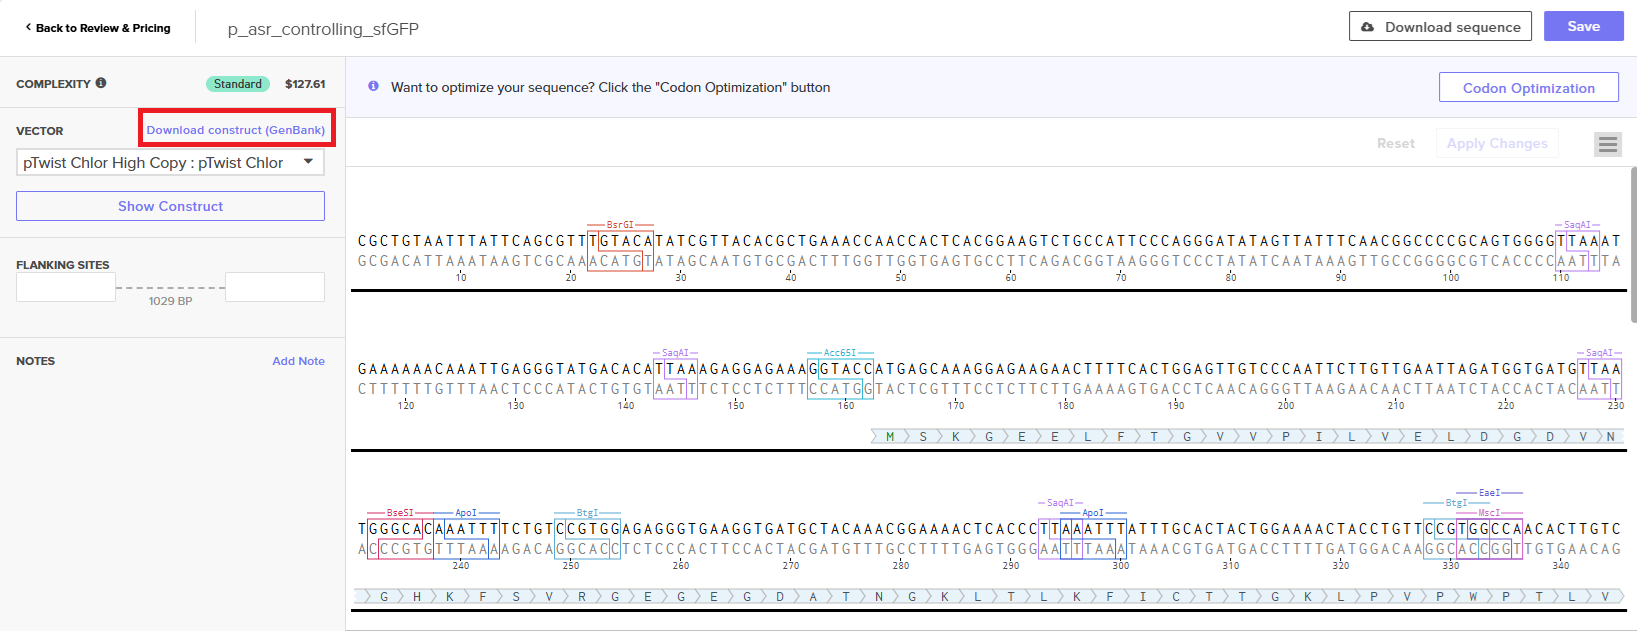
I then used the web site Twist to insert the sequence into a plasmid backbone that had been made to be resistant to the antibiotic chloramphenicol. This characteristic will be important when I am culturing the engineered bacteria in the lab. In a petri dish containing an agar mix with chloramphenicol, only the bacteria used for the circuit will grow. I downloaded the entire sequence to view it in Benchling and got Juan’s help again to make sure the sequence was correct. The whole sequence was submitted to Twist as an order. It is shown in this Benchling screenshot:
4.2.1 Protocol
The steps for this part of the project were then:
- Identify the ph-sensing promoter gene that would be best to initiate transcription of sfGFP
- Follow the homework we did to submit an order to Twist
- Have the order assessed by a TA
- Submit the order to Twist Bioscience for a chloramphenicol-resistant plasmid that uses an asr promoter to trigger sfGFP protein production in acidic conditions.
4.3 Select 3D printable Green Man sculptures
Once I begin using the Twist-manufactured plasmid in the lab, I imagine my project will need to move quite quickly to work within the practical time limits of using up reagents to maintain bacterial colonies. It made sense to next address the concerns about identifying and selecting 3D-printable Green Man sculptures that would support both the final Bioart installation activity and a research activity for determining how the sculpture surface influenced the growth of fluorescent bacteria.
I limited my search for Green Man sculptures to locations that seemed within reach of London: St. Albans Cathedral, Ely Cathedral, Canterbury Cathedral and Canterbury’s St. Augustine’s Abbey. I used the phone application Polycam to capture each candidate Green Man sculpture. Polycam works best when the target object is nearby, and when it is possible to take pictures within at least an arc of 180’ around it.
4.3.1 Protocol
- Visit multiple churches and cathedrals within a reasonable distance from London and find examples of Green Man sculptures.
- Capture pictures of Green Man sculptures, regardless of whether they would likely produce a 3D model or not. They are useful to illustrate challenges with creating 3D printable sculptures.
- For viable candidate sculptures, begin taking pictures from one side of the sculpture and slowly capture them at different angles until the other side is reached. Then take more pictures in separate passes that take pictures of the sculptures from above and then below. Polycam has a threshold of 150 pictures for each attempt to create a 3D model.
- Remove any pictures that are either blurred or which may capture undesired scenery (like my feet or a blank wall!)
- In Polycam, export each project as a *.STL file.
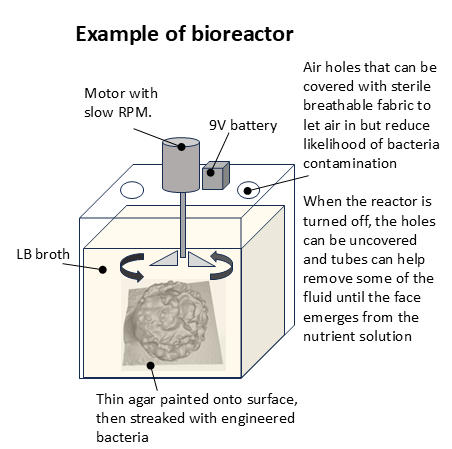
4.4 Design a bioreactor
A bioreactor will be designed for the project in order to foster growth of the engineered bacteria. From what I’ve gathered so far from some Youtube videos, a bioreactor could comprise a glass jar with a lid that has been punctured with perhaps three holes: one to push the shaft of a slow-turning motorised propeller and two holes that could be used to support intake of air or outtake of fluid when the reactor stops. The reactor should provide enough room to fit the petri dish (e.g. w: 110mm x l: 110 mm x h: 150 mm). The reactor should be tall enough to accommodate the height of a sculpture resting at the bottom and a propeller to mix the broth that surrounds it.
4.4.1 Protocol
- Obtain a glass, lidded container (perhaps a jar?) that is capable of containing a sculpture that is 100mm x 100mm x 100mm.
- Perforate the container lid with three holes. One should be wide enough to allow a small motor shaft to pass through it. The other two should be wide enough to allow plastic tubes to be inserted.
- Add two plastic fins onto the motor shaft to form the propeller that will sit in the bioreactor’s nutrient bath.
- Push the motor shaft through the hole. Attach the end without the propeller to a small, slow-turning servo motor.
- Cover the other two holes with sterile gauze such that air can enter.
- Create a 9V battery pack and test attaching leads to the motor. The motor should be able to turn off and on.
- Fill the glass container with distilled water and test whether the propeller can mix the fluid. Ensure that the propeller can be lifted to different heights.
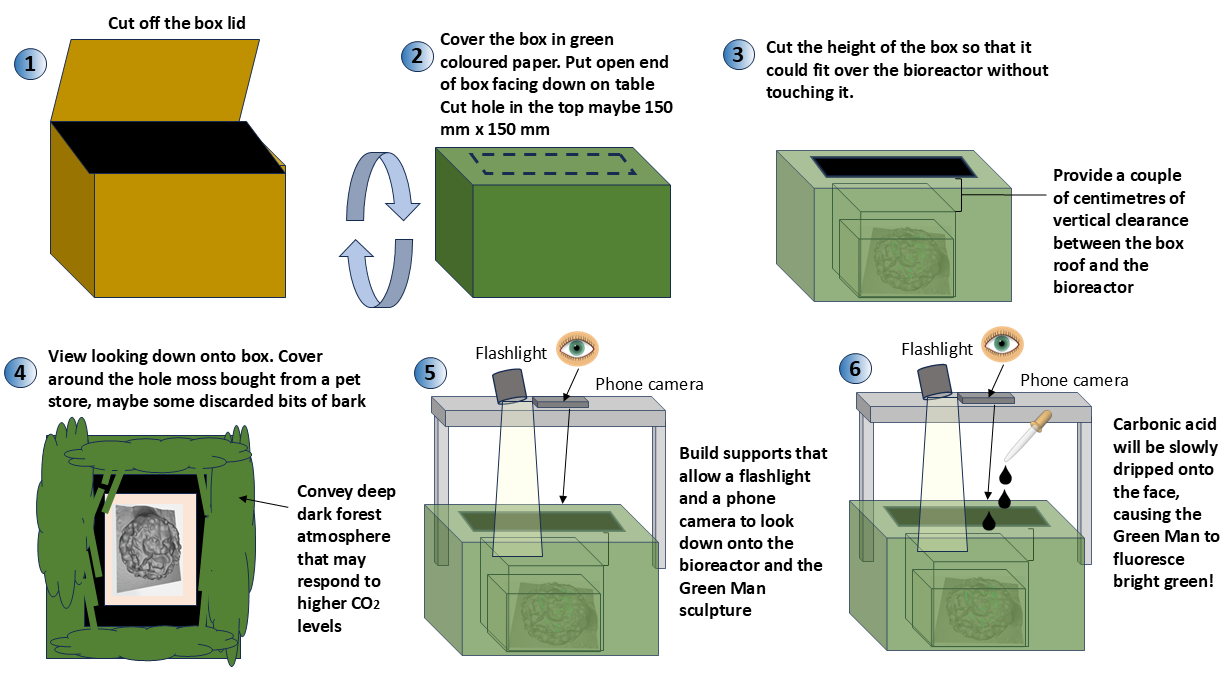
4.5 Create the Biart set design that will house the bioreactor
Once the bioreactor has been creator, the project will need to embed it with a set prop that promotes the aesthetic and spirit of the Bioart activity.
4.5.1 Protocol
4.6 Perform bacterial transformation using the plasmids created by Twist Bioscience
After Twist Bioscience sends the engineered plasmids to the Lifefabs Institute, I will need to perform bacterial transformation to make competent Strain K12 E. coli absorb them. Once the plasmids have entered the bacteria, the bacteria can be multiplied and cultured to create a stock supply for the rest of the project.
4.6.1 Protocol
Bacterial transformation should take about 4 hours. I need to check some of the steps for these!
Thaw competent cells
- Thaw 50 µL DH5α competent cells on ice.
- Add a small amount of buffer to an Eppendorf tube. Keep the tube in cold water.
- Extract some glycerol that comes with the Twist plasmid order and coat the head of an innoculation loop with it.
- Dip the innoculation loop into the plasmid DNA powder (I need input on this, I’m not sure).
- Wipe the glycerol-covered innoculation loop into the buffer solution used by the Eppendorf tube.
- Gently flick the Eppendorf tube until everything is in the bottom of it. Make sure nothing is on the sides.
- Inclubate on ice for 20-30 minutes.
Heat shock
- Heat shock at 42’C for 60 seconds. Immediately return the Eppendorf tube to ice for 2 minutes.
- Recover in LB broth. Add 1000 µL LB miller broth
- Incubate at 37’C, shaking at ~200-250 rpm for between 30 and 60 minutes.
Prepare LB agar Miller with chloramphenicol
- Following the Sigma Aldrich recipe suspend 20g of LB agar Miller powder in 500 mL of distilled water into an erlenmeyer flask.
- Heat in microwave for 20 seconds. Stir the flask until the powder is dissolved.
- Obtain a small square of autoclave tape and attach it to the Erlenymeyer flask. Lightly cover the top of the flask with tinfoil.
- Ask the Lifefabs Institute staff to autoclave for 15 minutes at 121’C.
- Cool to 50’C.
- Add 12.5g of chloramphenicol and mix. The amount should be enough to pour at least 10 petri plates. (Review to reduce the amount of LB Miller agar chloramphenicol mix needed)
Pour petri plates to build up stock
- In the fume hood, open up 10 standard petri plates, resting the lid resting above and slightly to the right on top of the bottom part of each petri plate.
- Pour 25mL of LB Agar Miller with chloramphenicol into each plate.
- Allow the plates to gel.
- Pour 100 µL of the recovered transformed cells into each of the plates.
- Allow the plates to set for 20 minutes to minimise condensation forming on the top of the plates.
- Seal the plates. Tape them with shut with petri tape.
- Label each plate: “KG-[date]-LB Ag Miller chlor - plate [nth plate]” on the side with a pen.
- Turn the plates upside down and incubate them overnight at 37’C.
- Autoclave any dish that came into contact with the antibiotic.
- Refrigerate all the plates at 4’C to last two weeks???
4.7 Test that engineered plasmids work
For this section, I just need a reliable acid that can be used to test whether genetic circuit will work. I considered these acids to use for this section:
- carbonic acid
- acetic acid
- citric acid
Carbonic acid should be used in the final Bioart activity because it contains dissolved carbon dioxide and makes the activity seem more meaningful to the topic of the project. However, carbonic acid is difficult to prepare because dissolved carbon dioxide can quickly escape. I asked ChatGPT which of acetic acid or citric acid should be used to test the pH-sensing biosensor that uses E. coli.
4.7.1 Protocol
The main parts of the protocol are illustrated below, but other smaller steps are described in this section.
Obtain a plate of stock engineered bacteria from the fridge
- Remove one of the 10 plates from the fridge and let it warm up.
Prepare LB agar Miller with chloramphenicol
- Following the Sigma Aldrich recipe suspend 20g of LB agar Miller powder in 500 mL of distilled water into an erlenmeyer flask.
- Heat in microwave for 20 seconds. Stir the flask until the powder is dissolved.
- Obtain a small square of autoclave tape and attach it to the Erlenymeyer flask. Lightly cover the top of the flask with tinfoil.
- Ask the Lifefabs Institute staff to autoclave for 15 minutes at 121’C.
- Cool to 50’C.
- Add 12.5g of chloramphenicol and mix.
Streak agar plates with engineered bacteria stock The project should only require three plates to test whether the genetic circuit is working: a control, one plate exposed to pH 5.5 acid and on exposed to 7.0 pH. One additional plate will be prepared just in case another pH value is needed to test the genetic circuit contained in the plasmid.
- In the fume hood, open up 4 standard petri plates, resting the lid resting above and slightly to the right on top of the bottom part of each petri plate.
- Pour 25mL of LB Agar Miller with chloramphenicol into each plate.
- Allow the plates to gel.
- Smear an innoculating loop in the colonies of the stock plate and streak onto three plates. Leave the fourth one as a control.
- Close the plates and tape them shut with plate tape. On the control, write: “KG pH - [date] - LB Ag Miller chlor - plate control” on the side with a pen.
- On the other three, write: “KG pH - [date] - LB Ag Miller chlor - plate [nth plate]” on the side with a pen.
- Colour them with a green highlighter pen to help distinguish them from the stock plates.
Culture plates overnight
- Turn the plates upside down and incubate at 37’C overnight.
Prepare solution of acetic acid
- Obtain a pH meter.
- Prepare one solution of acetic acid at pH 5.5. Use Dri-Pak Extra Strength White Vinegar According to the safety sheet for the product, the pH should be between 2.0 and 2.4.
- For the pH 7.0 solution, just use distilled water.
Pour acetic acid onto plates and observe the effects
- Observe that the control petri plate should have nothing growing in it.
- Pour 100mL of Dri-Pak Extra Strength White Vinegar into a beaker. According to the product specification, the acid should be of pH 2.0 to 2.4. Measure the pH using a pH meter.
- Dilute the solution with distilled water until the pH meter reads 5.5.
- Pour 100mL of distilled water into another beaker and take a pH meter. It should be about 7.0
- Obtain a flashlight and turn it on.
- Slowly cover one petri plate showing colonies with the pH 5.5 acetic acid. Shine a light on the surface for several minutes. The bacteria should fluoresce green.
- Slowly cover another cultured petri plate showing colonies with the distilled water. Shine a light on the surface for several minutes. The bacteria should not fluoresce.
4.8 Test ability for sculptures to grow E. coli bacterial colonies
In theory, this step is only about whether bacteria can grow on different sculpture surfaces. If the lab has some E. coli stock that always fluoresces green, I could use that instead. That would let me do the bacteria growth investigation in parallel or before the Bioart demonstration.
4.8.1. Protocol
Each candidate sculpture will be painted with a thin layer of agar gel, then streaked with fluorescing E. coli. If the lab has spare stock of E. coli that always fluoresces with sfGFP or GFP, use that. If not, use stock from the engineered bacteria. Once streaked, the sculpture will be lowered into the bioreactor. The bacteria will be cultured overnight.
Here are the relevant protocol activities for this step:
Immersing a new 3D printed Green Man sculpture in the bioreactor
- Empty, dry and autoclave the bioreactor.
- In a fume hood, paint a think layer of agar onto a candidate Green Man sculpture. Let it gel.
- Using engineered bacteria grown from a stock, lightly streak the surface.
- Lower the 3D printed sculpture into the bioreactor container. (Does this require adding chloramphenicol?)
- Prepare LB broth and submerge the sculpture under enough fluid so a propeller could turn it.
- Insert the propeller shaft through one hole in the bioreactor lid and connect it to a servo motor that supports slow turning.
- Cover the other two holes of the lid with sterile gauze.
- Connect the motor to the battery and wait until the propeller starts to mix the broth.
Draining the bioreactor
- Stop the motor and disconnect it from the battery.
- Remove the sterile guaze from the holes.
- Insert tubing and extract fluid from the reactor until the face appears to emerge from the nutrient bath.
Remove a sculpture from the bioreactor
- Remove the propeller, motor and battery.
- Loosen the glass container lid.
- Autoclave the entire apparatus to kill both the bacteria and any antibiotic.
- Wipe the sculpture clean. Safely dispose of any liquid or tissues in the clinical waste bin. (need this reviewed)
4.9 Film Bioart activity
Prepare the best performing Green Man sculpture in a fresh bioreactor mix
- Chill Dri-Pak Extra Strength White Vinegar overnight in the lab fridge.
- Obtain baking soda
- Reserve a pH meter.
- Follow the ‘Immersing a new 3D printed Green Man sculpture in the bioreactor’ and ‘Draining the bioreactor’ steps in the previous section. Let the bioreactor run overnight.
- On the demonstration day - Cover the bioreactor with the set prop and set up the camera.
- Prepare a solution of carbonic acid by mixing white vinegar and baking soda until the pH is about 5.0.
- Assume that the carbon dioxide gas will rapidly leave the solution and the pH will increase. When the mix is ready, begin filming.
- Drip the fizzing carbonic acid onto the face of the Green Man sculpture and film it.
5 Results and Quantitative Expections
You are required to validate at least one aspect of your final project aims. What aspect of your final project did you choose to validate? (min. 2 sentences) I partly validated my first aim by designing DNA relevant to my final project and having it assessed by one of the TAs (Juan Diego Unda) who has a lot of experience looking at plasmid sequences. I haven’t managed to do much more because there were delays in sending off plasmid orders. Write down a detailed protocol of how you validated this aspect of your final project. (Numbered list or paragraph is fine) I already described this in Section 4.2.
What synthetic biology techniques did you utilize in validating this aspect of your final project? You can refer to the list of techniques in question 8. (min. 4 sentences) I crafted a plasmid sequence by using a library of known biological parts, Benchling to edit my plasmid sequence of interest and Twist to embed the sequence within a plasmid backbone that had resistance to chloramphenicol.
You must present data as part of your final project and include some analysis of that data. The data may be collected experimentally in the lab or generated as simulated data (e.g., using the Asimov Kernel or another simulation method). (min. 2 sentences) Again, we have experienced delays in getting the Twist orders processed.
Did you encounter any unexpected challenge(s) when performing your validation? If so, describe the challenge(s) and strategies to overcome it. If not, discuss potential problems, difficulties, limitations, and/or alternative strategies to overcome challenges in your final project. (min. 4 sentences). I thought copying and pasting sequence bits into the homework template would be sufficient to getting a working circuit. But this is where it becomes very valuable to have your work assessed by a skilled TA such as Juan Diego Unda (Thanks man!)
5.1 Preliminary results - issues with creating 3D printable Green Man sculptures
I visited Ely Cathedral, St. Alban’s Cathedral, Canterbury Cathedral and St. Augustine’s Abbey. Many Green Man sculptures are built high up on ceilings or tall archways, which can make it difficult to photograph them with high resolution. Moreover, their distance from the camera makes it difficult to take pictures from many angles, which leaves the sculptures having little depth.
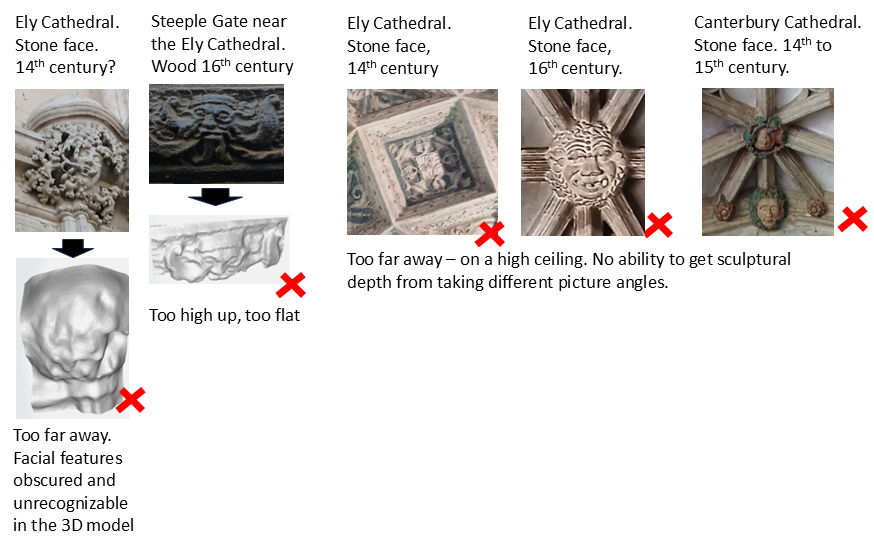
Other sculptures showed more promise, mainly because most were within reach. Some were captured in dim lighting, which may have some impact on making the figure recognisable. Some attempts resulted in 3D images that appeared to stand at an awkward angle. I’m not sure how well those angles could be adjusted with software, or if they would impact 3D printing efforts. With one - the lion face on the wooden gate door at Canterbury Cathedral - I wasn’t sure whether it would be classified as a heraldry image of as a lion or as a Green Man sculpture with a lion face.
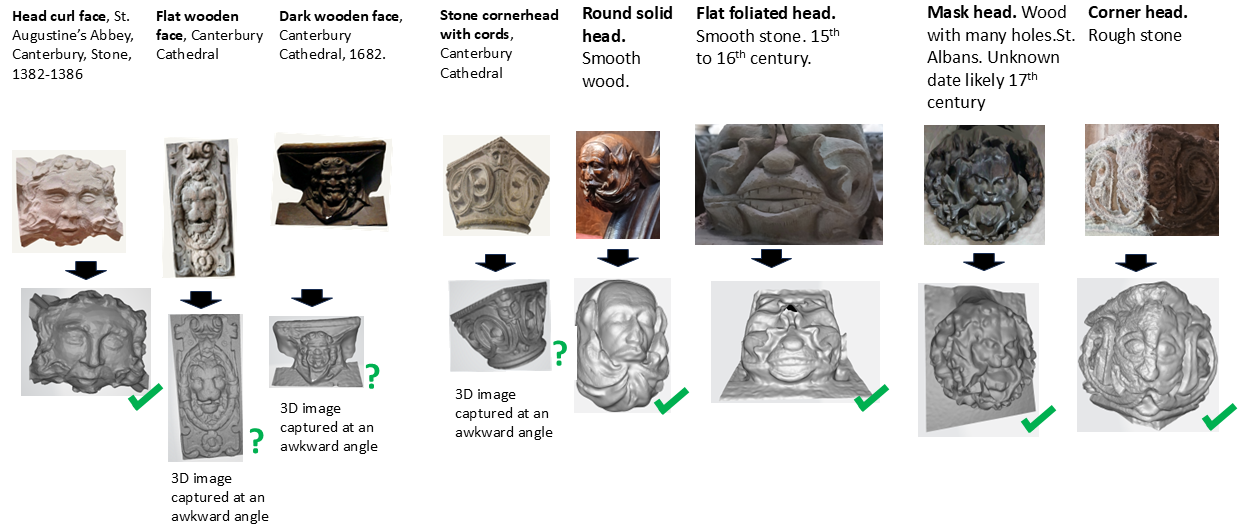
From this set I think these five would be the best candidates
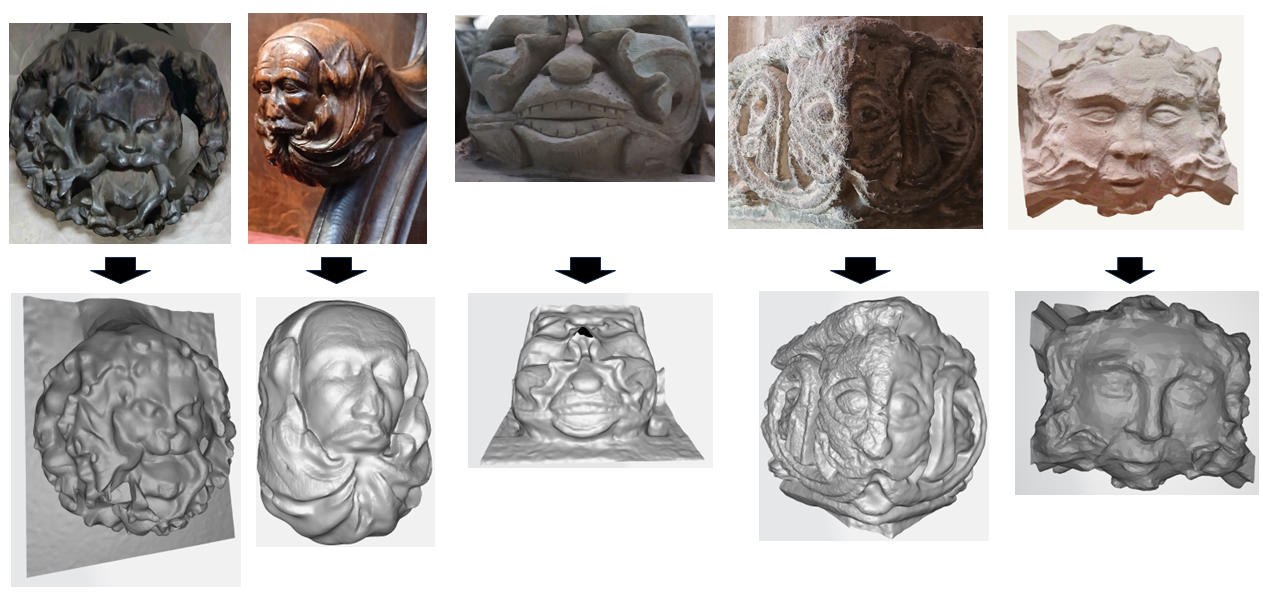
The sculptures should be 3D printed using a thermal plastic that is able to be autoclaved. When they are printed, the scaffolding beads will have to be cut from the the sculpture and probably sanded. The candidate sculptures should be printed such that their longest dimension is the width of standard petri dish (e.g. 100mm).
6 Timeline and Contingencies
The workflow for this project is shown below. It is meant to identify opportunities where some parts could be done in parallel. The main important time constraint comes into play once I’ve done bacterial transformation and plated the colonies of engineered bacteria. If it’s refrigerated, I’m guessing they will be viable for at most a week. Beyond that a second try at bacterial transformation would be needed, followed by another attempt to streak new stock plates.
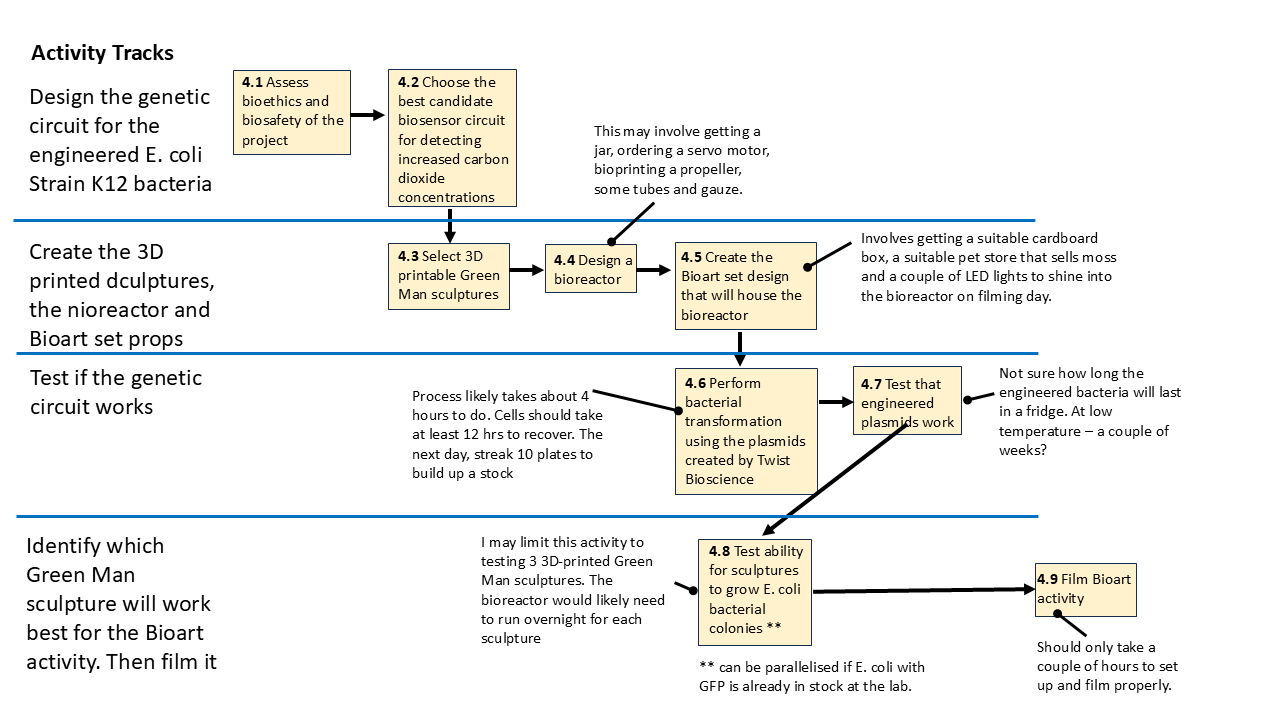
For the part of the project that is about testing how well fluorescing bacteria would grow on the different sculpture shapes, I could probably make do with just colonising cheaper stocks of competent E. coli K12 bacteria or those that are commonly made to accept plasmids that always fluoresce GFP. They do not have to be from the same stock as I’ve engineered, which may be a useful time-saving approach to explore. If I could use cheap or free existing lab stock (if it’s available!) I would then try to push bacterial transformation to happen later.
7 Materials and Costs
Note that many of these costs may end up being shared across other people doing projects in the lab.
5.1 Ordering the plasmid from Twist Bioscience
Twist indicated that the final cost for ordering the plasmid containing my circuit was $188.33 USD (£139.47) Cost of ordering the custom plasmid from Twist Bioscience This cost will probably be covered by MIT but I’ll need to confirm that. The cost
The cost does not include import tariffs for receiving the order in the UK.
| Item | Reason | Manufacturer | Amount | Unit Cost | Total Cost | UK Cost |
|---|---|---|---|---|---|---|
| plasmid | need for the genetic circuit | Twist Bioscience | 1 order | $128.33 | $128.33 | £95.04 |
| 10 µg - 100 µg DNA | need sufficient quantity to cover mistakes | Twist Bioscience | 1 | $50.00 | $50.00 | £37.03 |
| glycerol stock | used to prolong storage of plasmid | Twist Bioscience | 1 unit | $10.00 | $10.00 | £7.41 |
- cost does not include tariff receiving this item from the US.
5.2 Materials likely covered by the Lab
This needs to be reviewed because it’s just a guess. I expect some of these may need to be reserved in advance:
- Isopropyl alcohol to wipe surfaces
- paper towel
- blue lab gloves
- labcoat
- goggles
- pH meter
- beakers, Erlenmeyer flasks
- fridge
- autoclaving tape ??
- petri dish tape ??
5.3 Bacterial transformation
| Item | Reason | Manufacturer | Amount | Unit Cost | Total Cost | UK Cost |
|---|---|---|---|---|---|---|
| DH5α Competent Cells | Need cells that can accept engineered plasmid | ThermoFisher | 10 x 100 μL | £128.65 | £128.65 | £128.65 |
| LB Broth (Miller) | Provide nutrients to help transformed bacteria recover | Sigma-Aldrich | 250g | £52.70 | £52.70 | £52.70 |
5.4 Pouring agar plates
| Item | Reason | Manufacturer | Amount | Unit Cost | Total Cost | UK Cost |
|---|---|---|---|---|---|---|
| LB Broth with agar (Miller) | Need to provide agar media to grow bacteria | Sigma-Aldrich | 250g | £71.20 | £71.20 | £71.20 |
| Chloramphenicol powder | Needed to kill any unwanted bacteria contaminating plates | Sigma-Aldrich | 25g | £53.20 | £53.20 | £53.20 |
| Culture dishes | Required to grow bacteria | Sigma-Aldrich | 20 plates | £34.00 | £34.00 | £34.00 |
| Innoculating loops | To help streak plates | ??? | 2 | ??? | ??? | ??? |
It’s probably easier to just pay for a few of these directly from the lab.
5.5 Bioreactor
| Item | Reason | Manufacturer | Amount | Unit Cost | Total Cost | UK Cost |
|---|---|---|---|---|---|---|
| Wide glass pickle jar | Provides the bioreactor container | ? | 1 | ? | ? | ? |
| 3D printed propeller | Provides the means for stirring the broth | ? | 1 | ? | ? | ? |
| Sterile guaze | Cover the two holes that would let the air in but keep out some contaminants | Boots | 1 | £2.90 | £2.90 | £2.90 |
| Servo motor | Hitec UK | 1 | £14.99 | £14.99 | £14.99 |
5.6 Bioreactor broth
| Item | Reason | Manufacturer | Amount | Unit Cost | Total Cost | UK Cost |
|---|---|---|---|---|---|---|
| LB Broth (Miller) | Needed to encourage growth of engineered bacteria | Sigma-Aldrich | 250g | £52.70 | £52.70 | £52.70 |
| This cost is likely already covered by 5.2 Bacterial Transformation |
5.7 Set design
| Item | Reason | Manufacturer | Amount | Unit Cost | Total Cost | UK Cost |
|---|---|---|---|---|---|---|
| Cardboard box | Set prop structure | anyone, probably Sainbury’s | 1 | £0.00 | £0.00 | £0.00 |
| Green construction paper | Cover box with something evoking forest | CASS art store | 1 sheet | £5.00 | £5.00 | £5.00 |
| Moss | Surround the box hole that looks down onto the bioreactor. Evokes deep forest imagery | London Terrariums | 1 moss box | £5.00 | £5.00 | £5.00 |
| Elmer’s School Glue | Binds moss, green paper, box together | Ryman’s | 1 bottle | £5.00 | £5.00 | £5.00 |
| Small flashlight | Shine down onto the bacteria to observe flourescence (already have) | Mountain Warehouse | 1 | £0.00 | £0.00 | £0.00 |
| Dri-Pak Extra Strength White Vinegar | Used to make carbonic acid to drip onto Green Man sculpture | Dri-Pak | 1 | £3.99 | £3.99 | £3.99 |
| Baking Soda | Used to make carbonic acid to drip onto the Green Man sculpture | Dri-Pak | 1 | £2.50 | £2.50 | £2.50 |
References
Patel, Viral, Part BBa_K1231000 - The asr promoter is a pH-responsive promoter, Registry of Standard Biological Parts, September 2013, https://parts.igem.org/wiki/index.php/Part:BBa_K1231000. Accessed May 12, 2026. ↩︎ ↩︎ ↩︎ ↩︎
Sužiede˙ liene˙, Edita, et al. “The acid-inducible asr gene in Escherichia coli: transcriptional control by the phoBR operon.” Journal of bacteriology 181.7 (1999): 2084-2093. ↩︎ ↩︎
Pédelacq, Jean-Denis, et al. “Engineering and characterization of a superfolder green fluorescent protein.” Nature biotechnology 24.1 (2006): 79-88. [^4] İncir, İbrahim, and Özlem Kaplan. “Escherichia coli in the production of biopharmaceuticals.” Biotechnology and Applied Biochemistry 72.2 (2025): 528-541. ↩︎ ↩︎ ↩︎ ↩︎
Dunn, Rob, Smithsonian Magazine, July 2010, https://www.smithsonianmag.com/science-nature/painting-with-penicillin-alexander-flemings-germ-art-1761496/ ↩︎
Antibiotic-Responsive Bioart: Exploring DIYbio as a Design Studio Practice, Youtube, May 15, 2018, https://www.youtube.com/watch?v=uUHZI-KTlIg ↩︎
Larcombe, Alexander, Bierwirth, Philip, The Conversation, March 11, 2026, https://theconversation.com/rising-co-levels-are-reflected-in-human-blood-scientists-dont-know-what-it-means-277833 ↩︎
Carbon dioxide - Earth Indicator, NASA, https://science.nasa.gov/earth/explore/earth-indicators/carbon-dioxide/. Accessed May 12, 2026. ↩︎
Cho, Renee, “How Climate Change Will Affect Plants”, State of the Planet, January 2022, https://news.climate.columbia.edu/2022/01/27/how-climate-change-will-affect-plants/ ↩︎
Hayman, Richard. The green man. Shire Publications, 2010. ↩︎
“GFP (green fluorescent protein): Properties, origin, specifications, tips”, proteintech, https://www.ptglab.com/news/blog/gfp-green-fluorescent-protein-properties-origin-specifications-tips/, Accessed May 12, 2026. ↩︎


