Part 1: Class Assignment 1. “The Big Idea” In the world of Big Farm, nutrient pollution is a big problem, particularly near farms where fertilizers and manure release excess phosphorus and nitrogen into the environment. This leads to issues like eutrophication, dead zones, and human health impacts. This also leads to losses in other industries such as fishing or recreational activity. Paradoxically, we also frequently see cases of nutrient depletion, particularly in the context of agriculture. Monocropping and poor agricultural practices has led to the depletion of topsoil, making it one of the scarcest resources in the world. According to the UN Food and Agricultural Organization, 90% of our world’s topsoil is at risk by 2050. To combat this, I’m interested in seeing if a circular nutrient economy is possible:
Part 1: Final Project To validate my “Aragonite Anchor” this semester, I’ll first confirm protein expression and localization using SDS-PAGE and Western Blotting. By fractionating the cells and targeting my specific gene tags, I can prove the OmpA-CBP-1 fusion is actually reaching the outer membrane. To measure the binding affinity to CaCO3, I’ll use Fluorescence Spectroscopy; by tagging the protein with a marker like GFP, I can quantify exactly how much “glue” stays stuck to the crystals after washing.For structural characterization, I’ll use XRD to verify I’ve successfully formed the aragonite phase and SEM to get the “money shot” of the layered, nacre-like morphology. Finally, I’ll test the mechanical strength of the composite via Nanoindentation. This will let me measure the Young’s Modulus and fracture toughness, providing the quantitative data needed to prove my engineered protein actually makes the material stronger than a standard mineral control.
Part 1: Global Pixel Art So, unfortunately I didn’t receive an email to contribute to this, and I saw the homework posting AFTER the deadline. I guess I will just have to TA next year instead!
Part 2: Cell Free Synthesis E. coli Lysate BL21 (DE3) Star Lysate: Provides the essential cellular machinery, including ribosomes, tRNAs, and initiation/elongation factors, required for translation. T7 RNA Polymerase: Specifically transcribes the target DNA template into mRNA, driving high-level protein expression. Salts/BufferPotassium Glutamate: Acts as the primary salt to maintain ionic strength and provides potassium ions, which are vital for ribosomal activity. HEPES-KOH (pH 7.5): A buffering agent that stabilizes the pH of the reaction, ensuring enzymatic activity remains optimal as metabolic byproducts accumulate. Magnesium Glutamate: Supplies $Mg^{2+}$ ions, which are critical cofactors for polymerase activity and the structural stability of ribosomes. Potassium Phosphate (Monobasic/Dibasic): Works alongside HEPES to provide secondary buffering capacity and maintains inorganic phosphate levels for energy cycling. Energy / Nucleotide System Ribose & Glucose: Serve as carbon and energy sources that the lysate’s endogenous pathways use to regenerate ATP. AMP, CMP, GMP, UMP (NMPs): These monophosphate nucleotides are the raw building blocks that the system phosphorylates into NTPs for RNA synthesis. Guanine: Acts as a precursor to maintain the pool of guanosine nucleotides, which are essential for the initiation and translocation steps of translation. Translation Mix (Amino Acids)17 Amino Acid Mix / Tyrosine / Cysteine: These are the physical building blocks of the protein; Tyrosine and Cysteine are often added separately due to lower solubility or specific stability requirements. Additives & Backfill Nicotinamide: Helps stabilize and regenerate $NAD^{+}$ levels, supporting the metabolic flux required for sustained energy production.Nuclease Free Water: Acts as the solvent for the reaction, ensuring no residual enzymes degrade the DNA template or mRNA products. Comparing Master Mixes The 1-hour PEP/NTP mix is designed for speed and immediate energy, utilizing pre-formed NTPs and Phosphoenolpyruvate (PEP) as a direct, high-energy phosphate donor for rapid, short-burst reactions. In contrast, the 20-hour NMP-Ribose-Glucose mix is optimized for sustainability and cost-effectiveness, using cheaper precursors (NMPs and sugars) that the system slowly converts into energy via endogenous metabolism to support protein production over a much longer duration. While the 1-hour mix prioritizes a quick “sprint” for rapid results, the 20-hour mix facilitates a “marathon” by recycling energy through more complex biochemical pathways.
PART 0: BASICS I have attended all lectures and recitation necessary to prepare for this week.
PART 1: GEL ART & BENCHLING I made my free account on Benchling, following Ice’s tutorial in class on Lambda DNA. I then played around with Ronan’s website and Benchling’s Digest feature to try to come up with something I liked. Ultimately, I came up with something that looks vaguely like a lucky cat (if you squint).
Part 1: Python Script Despite having taking 6.100A, I am still not very adept with Python. I am even less skilled with Google Colab, so I had no choice but to use the GUI to generate my Python script. I produced this beautiful piece of art:
I also created this one:
Part 1: Conceptual Questions Assuming protein mass of meat is 20%, 0.20 x 500=100g of actual protein in this meat. If average residue is roughly 100 Da, I can probably assume that’s roughly 100g/mol, meaning I now have 1 mol of residue. In one mole, there’s roughly 6 x 10²³ molecules. Thus, there are roughly 6 x 10²³ molecules of amino acids in 500 grams of meat We digest these proteins, not incorporate them into our bodies. We rebuild our own proteins using molecular tools in our body, that may or may not come from what we eat. There are only 20 “natural” amino acids because that’s what biology standardized our amino acids as. These amino acids have good chemical diversity, synthetic accessibility and different constraints. Now that we have evolutionarily reached this place, it is difficult to incorporate more without rewiring our whole system. As to why there’s only 20 versus like 100, this could be because if there were too many, it would be rather costly and inefficient, so it’s better to keep our biological systems simple. Yes, noncanonical amino acids are frequently made, and they can also probably be genetically encoded as well. For example, fluoroleucine or p-iodo-phenylalanine. Before enzymes & life, amino acids came from multiple plausible sources. For example, strecker synthsis in watery environments, delivery by meteorites (they were found in chondrites), or even atomsphere/UV activity. They are left handed Yes, proteins contain other helical motiefs like π-helix, collagen triple helix, β-helix / solenoid-like helices. New helical patterns can be found by analyzing high resolution structures. Most molecular helices are right hanaded because of chirality bias in L-amino acids. Another reason could be that right-handed packing avoids clashes and are better for L residues in general (so as a result of sterics). They have sticky edges where backbone hydrogen bond donors/acceptors are exposed at the sheet edges, and adding on another strand would satisfy H-bonds. This allows β-sheets to extend into larger assemblies easily. Drivers include bacbkone hydrogen bonding, hydrophobic effect and shape complentarity. Growth is probably also kinetically favorable. Amyloid diseases tend to form β-sheets because the cross-β amyyloid architecture is very stable and can form many sequences once misfolded. This ultimately templates further misfolding and thus createspersistent aggregates that disrupt cells. Yes, they are often found in nanofibers, hydrogels, templates for mineralization, etc. A simple, reliable design is a β-hairpin that self-assembles with controlled registry: Design rules:
Part 1: SOD1 Binder Peptide Design Part A: The retrieved SOD1 sequence is:
MATKAVCVLKGDGPVQGIINFEQKESNGPVKVWGSIKGLTEGLHGFHVHEFGDNTAGCTSAGPHFNPLSRKHGGPKDEERHVGDLGNVTADKDGVADVSIEDSVISLSGDHCIIGRTLVVHEKADDLGKGGNEESTKTGNAGSRLACGVIGIAQ Upon introducing the A4V Mutation, we get:
MATKVVCVLKGDGPVQGIINFEQKESNGPVKVWGSIKGLTEGLHGFHVHEFGDNTAGCTSAGPHFNPLSRKHGGPKDEERHVGDLGNVTADKDGVADVSIEDSVISLSGDHCIIGRTLVVHEKADDLGKGGNEESTKTGNAGSRLACGVIGIAQ The following amino acids were generated with their subsequent perplexity scores:
Part 1: Homework Questions Phusion High-Fidelity PCR Master Mix contains several components required for DNA amplification. The Phusion DNA polymerase is the enzyme that synthesizes new DNA strands; it has proofreading (3’→5’ exonuclease) activity, which greatly reduces mutation rates compared with standard Taq polymerase. The mix also includes dNTPs (deoxynucleotide triphosphates), which are the nucleotide building blocks incorporated into the newly synthesized DNA. A reaction buffer provides the correct chemical environment (pH, salts, stabilizers) to maximize enzyme activity and fidelity. Mg²⁺ ions (usually from MgCl₂) act as essential cofactors for polymerase function and influence enzyme efficiency. Primer annealing temperature is mainly determined by the melting temperature (Tm) of the primers, which depends on their sequence composition. Primers with higher GC content generally have higher Tm because G–C pairs form three hydrogen bonds compared with two in A–T pairs. Primer length also affects Tm, as longer primers form more stable duplexes with the template. Salt concentration and Mg²⁺ levels in the reaction buffer influence DNA duplex stability and therefore the optimal annealing temperature. Additionally, primer secondary structure or mismatches can reduce binding stability and may require lower annealing temperatures. PCR and restriction enzyme digestion both produce linear DNA fragments but operate through different mechanisms. PCR uses primers and a DNA polymerase to amplify a specific DNA region from a template through thermal cycling. This method is highly flexible because primers can introduce mutations, overhangs, or homologous regions, making PCR useful when generating fragments for cloning or modifying sequences. In contrast, restriction enzyme digestion uses enzymes that recognize specific short DNA sequences and cut at those sites, producing predictable fragments with defined ends (often sticky or blunt). The digest protocol is simpler and faster if the required restriction sites already exist in the DNA. PCR is preferable when amplifying small regions, adding sequences, or working from low DNA amounts, while restriction digests are preferable when cutting large plasmids or isolating fragments with existing restriction sites without introducing polymerase errors. For Gibson Assembly, DNA fragments must have overlapping homologous sequences at their ends so they can anneal during the assembly reaction. These overlaps are usually designed into PCR primers, ensuring that adjacent fragments share complementary sequences. After PCR amplification or digestion, the fragments should be checked by gel electrophoresis to confirm the correct size and purity. It is also important to verify that the overlaps match the intended assembly order and that no incompatible restriction sites remain within the overlaps. Golden Gate Assembly is a DNA cloning method that uses Type IIS restriction enzymes and DNA ligase in a single reaction to assemble multiple DNA fragments in a defined order. Unlike standard restriction enzymes, Type IIS enzymes cut outside their recognition site, producing custom overhangs that can be designed to be unique for each fragment. During the reaction, the restriction enzyme cuts the DNA to create compatible overhangs, and DNA ligase simultaneously joins the fragments together. Because the recognition sites are removed after ligation, the final assembled product cannot be cut again, allowing the reaction to proceed efficiently toward the correct construct. To model this, I just chose two random sequences (LACMG that we worked with once, and a gibberish one that I have for some reason). I went to Benchling to model the assembly, and this is what came out of it:
Part 1: Homework Questions IANNs allow cells to perform analog, weighted, decision-making rather than simple binary logic. Traditional genetic circuits usually implement Boolean gates, where inputs are treaed as on/ofof signals and outputs are discrete. In contrast, IANNS use components whose activities can vary continuously, allowing inputs to contribute different weights to a final output. This allows cells to integrate multiple signals simultaneously, filter noise and produce grade responses. IANNs overall can scale more easily to complex behaviors, making them better suited for biological environments with continuos noisy signals. A useful application of IANN would be a smart probioitic diagnostic cell that detects complex disease states in the gut.
Inputs: The circuit could receive several molecular signals associatied with inflammation, such as nitric oxide levels, reactive oxygen species or other responsive promoters. Each input drives production of regulators that act with different weights on the expression of a reporter gene. Processing: Each regulator modifies the stability or translation of the reporter mRNA. If the combined signal exceeds a threshold, the cell expresses a fluorescent protein or therapeutic molecule. This allows the cell to classify complex physiological states, rather than triggering on a single biomarker that might fluctuate naturally.
Output: Low combined signal → little or no reporter expression.
Moderate signal → weak expression.
High combined signal → strong reporter or drug release. Limitations: There are several constraints that could limit implementation. For example, gene expression fluctuations can distort weights and thresholds, making outputs inconsistent. Promoters and translation systems may saturate, preventing precise analog weighting. Large networks can slow cell grwoth or destabilize circuits. Furhtermore, large networks could slow cell growth or dsetabilize circuits and tuning these weights rqequires iterative experimental optimization. stuff Part 2: Fungal Materials Several commercial materials are made from fungal mycelium. One example is mycelium-based packaging produced by Ecovative, which grows fungal mycelium through agricultural waste to create molded protective packaging that replaces polystyrene foam. Mycelium composites are also used for insulation panels and structural building materials, such as mycelium bricks and boards that can be grown into shape. Another emerging product is mycelium leather, developed by companies like MycoWorks and Bolt Threads, which produces flexible sheet materials that mimic animal leather for fashion products.
These fungal materials offer several advantages over traditional materials. They are renewable and biodegradable, can be grown from agricultural waste, and require much lower energy input than plastics or synthetic foams. Mycelium materials can also be grown directly into molds, reducing manufacturing steps and waste. However, they also have disadvantages: mechanical strength and durability are generally lower than plastics or synthetic composites, they can be sensitive to moisture, and scaling production with consistent material properties remains challenging. One useful direction would be engineering fungi to produce stronger or more functional mycelium materials. For example, genes could be modified to increase chitin or glucan crosslinking in the cell wall to improve stiffness and toughness of mycelium composites used in construction or packaging. Fungi could also be engineered to produce functional biomaterials, such as mycelium that incorporates conductive proteins for bioelectronics or that secretes adhesives or antimicrobial compounds. Another application could be fungi engineered to capture pollutants, such as heavy metals or microplastics, allowing grown fungal materials to act as environmental filtration systems.
Fungi offer several advantages as engineering hosts compared with bacteria. Because fungi are eukaryotes, they perform complex post-translational modifications and protein folding, which are necessary for many enzymes and biomaterials that bacteria cannot produce efficiently. Filamentous fungi naturally grow large structural networks (mycelium), allowing them to form macroscopic materials without external scaffolds, something bacteria generally cannot do. Fungi also secrete large amounts of enzymes and proteins, making them good platforms for producing extracellular biomolecules or structural polymers.
However, fungi are generally harder to genetically manipulate than bacteria: transformation efficiencies are lower, genetic tools are less standardized, and growth is typically slower. Part 3: Proposal Draft Aim 1:
Part 1: General Homework Questions Cell’s survival is the priority. In CFPS, the “cell” is broken open, leaving only the machinery. The advantages include more direct access (adding non-canonical AA, detergents, chaperones) or an open system to monitor the reaction in real-time and adjust variables. One case where this is more beneificial would be in toxic proteins; if the protein kills a living host, it can still be produced in a cell-free system because there’s no “life” to extinguish. Another case could be for rapid prototyping, where CFPS allows for cycles in hours rather than the days required for usual cell transformation and growth. Major components: crude extract provides things like ribosomes, RNA polymerase, translation factors, the DNA template encodes the protein, the energy mix provides energy, amino acids provide building blocks for proteins and cofactors/salts provide ions that help stability and enzyme activity. Energy provision regeneration is critical because translation is energy-intensive. Every peptide bond requires the hydrolysis of multiple high-energy phosphate bonds. Without regeneration, ATP levels plummet in minutes, and the accumulation of inorganic phosphate inhibits the reaction. Something possible for continuous supply would be to use Secondary Energy Source, such as the Creatine Phosphate/Creatine Kinase system. Creatine kinase transfers a phosphate group from creatine phosphate back to ADP, maintaining a steady-state concentration of ATP throughout the batch reaction. Prokaryotic: High yield, fast and cheap. A protein that might be produced is GFP, that is simple and doesn’t require complex folding or glycolysations. Eukaryotic systems provide lower yield but are capable of complex post-translational modifications like glycosylation and proper disulfide bond formation. A protein that might be produced in one of these systems is human insulin, which requires specific folding and bridges that the eukaryotic machinery handles better. When encountering low protein yields in a cell-free system, the first step is often to investigate template stability. In many extracts, endogenous nucleases are present that can rapidly degrade linear DNA templates. A common troubleshooting strategy is to switch to a circular plasmid or supplement the reaction with nuclease inhibitors like Gam protein. A second common culprit is codon bias, where the genetic sequence of the target protein utilizes codons that are rare within the organism from which the extract was derived. This can be addressed through synonymous gene sequence optimization or by using specialized extracts supplemented with rare-target tRNAs. Finally, the concentration of magnesium ions is a critical variable that often requires a titration experiment. Because magnesium is essential for ribosome assembly but inhibitory at high concentrations, performing a series of reactions across a gradient is a standard strategy to find the “sweet spot” for a specific proteins. Part 2: Homework Questions from Kate Adamala Designing a cell-free experiment for membrane proteins introduces the unique challenge of hydrophobicity, as these proteins often aggregate or misfold without a lipid environment. To address this, one can incorporate synthetic surfactants or detergents into the reaction to keep the protein soluble during synthesis. Alternatively, a more biomimetic approach involves adding nanodiscs or liposomes directly into the cell-free mix, providing a membrane-like scaffold for the protein to insert into co-translationally. The primary advantage here is that the open nature of the system allows you to precisely control the lipid composition to optimize the stability and activity of the membrane protein without the toxicity issues often seen in living hosts.
Subsections of Homework
Week 1 HW: Principles and Practices
Part 1: Class Assignment
1. “The Big Idea”
In the world of Big Farm, nutrient pollution is a big problem, particularly near farms where fertilizers and manure release excess phosphorus and nitrogen into the environment. This leads to issues like eutrophication, dead zones, and human health impacts. This also leads to losses in other industries such as fishing or recreational activity. Paradoxically, we also frequently see cases of nutrient depletion, particularly in the context of agriculture. Monocropping and poor agricultural practices has led to the depletion of topsoil, making it one of the scarcest resources in the world. According to the UN Food and Agricultural Organization, 90% of our world’s topsoil is at risk by 2050. To combat this, I’m interested in seeing if a circular nutrient economy is possible:
A. Capture nitrogen & phosphorus from the water
B. Convert them to stable bioproducts
C. Capsulize them to regenerate soil
Phase 1 would involve pulling the nitrate and phosphate from the environment. There’s plenty of natural phenomenon that I can take inspiratino from in order to do so, but for this aspect I think I would have ot do more research. Some examples I can think of are just creating microbial biofilms on 3D-printed lattices, or mimicking natural filters.
Phase 2 would involve locking this biomass into soil-safe carriers, which would almost certainly involve microbiome engineering as well. Possible options include simple alginate/cellulose pellets, biopolymer beads, mycelium composites or mineralized granules. These would have to be designed to be slow release so that run-off is minimized and we don’t face the issue that inspired this project. One thing to note is that good soil is not just a few nutrients, and requires a balance of other factors, including microorganism diversity and organic matter. It might be possible that the final product is some sort of mixture rather than a homogeneous assortment of pellets.
I believe the development of Phase 2 would increase agricultural diversity across the globe and could also potentially allow for at-home growth in areas where soil generally is not necessarily suitable for doing so. This could reduce traditional lawns and increase area for people to garden in their yards, which is another added benefit for the environment.
2. Governing “The Big Idea”
There are a few goals I would want to target with this project. They can be further broken down into sub-components.
Environmental Protection The most optimistic outcome of the project is the hope that there is a beneficial environmental impact, and close to no environmental harm. To achieve this, there needs to be a couple of considerations:
Adequate testing
There should be field pilots and monitoring over multiple seasons before consideration for deployment
Protect biodiversity
Installation should not affect sensitive habitats, and any scenario where this could occur, impact assessments should be done
Chemicals and components used should not pose a risk to the environment
Environmental Justice & Transparency Potential risks should be addressed prior to the experiment. The project and its applications should also be placed in the correct cultural and social context.
Equitable access for all areas
Small farms and low-income areas need to be considered. In that case, affordability is also a concern
Transparency in historically polluted areas
Communities should be consulted on consent and opinions
Purpose Rather than self-reporting nutrient removal and soil impacts, minimum thresholds should be required with regards to things like nutrient capture efficiency, runoff/leaching rates, carbon footprint, etc.
Design
Federal & state regulators set standards
Companies certify products before sale
Universities and other R&D groups test prototypes under common protocols
Independent parties audit field trials This scenario could be analogous to emissions standards for vehicles
Assumptions
Metrics are measurable and cheap to do so
Lab results translate to real watersheds
Regulators can keep up with new designs
Risks of Failure & “Success”
“Success”:
Firms would try to optimize only for regulated metrics, rather than ecosystem complexity
Start-ups are crowded out by compliance costs
Failure:
Innovation is bottlenecked by strict rules
Loopholes leads to greenwashing
Slow approvals delay overall benefits
Scenario 2: Transparency & Public Accountability
Purpose There would likely be limited visisbility into field performance, thus it may be possible to create open data platforms and certification schemes that let different members of the community to evaluate systems
Design
Univerities publish standard test protocols
NGOs run registries
Firms disclose performance data
Local governments host dashboards
Assumptions
Transparency will deter bad practice
Communities are interested in engaging with data
Transparency puts pressure on firms to improve
Risks of Failure & “Success”
“Success”:
Pressure of reputation stifles experimentation
Surveillance burdens small operaors
Politicization of environmental metrics
Failure:
Data mishandling or misinterpretation
Firms selectively report
Continued public mistrust
Scenario 3: Market-Driven Scaling
Purpose Nurient recovery would probably struggle economically. To counteract this, there could be subsidies provided, nutrient-credit markets and public procruement to accelerate deployment once systems meet safety threshoulds.
Design
Governments pay for nutrient removal
Farmers get rebates for recycled fertilizers
Cities host infrastructure for the capure
community boards approve projects This system could be analogous to current renewable energy tax credits.
Assumptions
Price signals will drive adoption
Farmers would accept the recyled inputs
Monitoring would prevent abuse of the system
Risks of Failure & “Success”
“Success”:
Dependence on incentives
Nutrient extraction from ecologically sensitive waters
Monoculture of this technology
Failure:
Gaming of credits
Inequitable deployment
Political instability
4. Scoring
The following scale is used to score these strategies:
I believe the most important to value here would be the environmental performance standards. It seems that none of the other strategies quite work without solid thresholds and protocols. It also most supports my idea of aligning innovation with environmental protection rather than letting it fall into the hands of the market and the public.
By requiring these thresholds, regulators can ensure these technologies genuinely make a beneficial impact in reducing pollution instead of just shifting risks from waterways to soils or communities.
I have completed: A. Lab Specific Training B. Safety Training in Atlas
Part 3: Week 2 Lecture Prep
1. Questions from Professor Jacobson
Q1: The error rate of polymerase is 1:10^2. Compared to the length of the human genome, this is 300 S per base addition. To deal with this, biology adds quality control steps. For example, proofreading, mismatch repair systems, damage repair pathways and cell-cycle checkpoints. This is necessary to copy the human genome effectively.
Q2: Most amino acids have multiple codons. An average human protein is around ~400 amino acids long (https://bionumbers.hms.harvard.edu/bionumber.aspx?s=n&v=4&id=106445). This means the total number of possible DNA sequences could be on the order of 10^100 or more, so in theory, many different DNA strings could lead to the same amino-acid chain.
In practice, most of these codes don’t work that well because different codon choices can fail or perform poorly for different reasons. Examples could be codon bios, folding effects or other constraints.
2. Questions from Dr. LeProust
Q1: Currently, the most common method for oligo synthesis is: Coupling with phophoramidite –> Capping the unreacted sites –> Oxidizing it –> Deblocking it. In this case, the deblocking step is preparing it for the next nucleotide.
Q2: It is difficult to make longer than 200nt as compounding errors lead to truncated molecules.
Q3: A 2000 bp gene would require 2000 flawless coupling cycles with near-perfect chemistry every time. This involves a lot of effort and this level efficiency is unrealistic. Additionally, this scenario would probably lead to accumulating chemical damage and costs.
3. Questions from George Church
The ten amino acids generally considered essential for animals are arginine, histidine, isoleucine, leucine, lysine, methionine, phenylalanine, threonine, tryptophan, and valine. Essential amino acids cannot be sufficiently synthesized in an animal’s carbon skeleton, so they must be obtained from diet or symbionts.
The “lysine contingency” is the fact that animals in particular have lost the ability to make lysine. Given that it’s an essential amino acid, it now seems that this may be more of an evolutionary constraint that allows an ecosystems to create reliance between species. Our drive for this amino acid has led to unique agricultural systems and food webs that may not exist if we could produce it. For example, lysine production for animal feed is currently a major industry for optimizing livestock growth. If it were non-essential to animals, this industry may not exist, and we may not feel the need to farm so extensively.
I also wonder if it would be possible that animals have developed into lysine dependent over millions of years, in the sense that it was once possible non-essential. In this case, it would’ve been just a self-imposed evolutionary change.
As you can see, I’ve done my best to personalize this page so far. Yippee!
Week 10 HW: Imaging and Measurement
Part 1: Final Project
To validate my “Aragonite Anchor” this semester, I’ll first confirm protein expression and localization using SDS-PAGE and Western Blotting. By fractionating the cells and targeting my specific gene tags, I can prove the OmpA-CBP-1 fusion is actually reaching the outer membrane. To measure the binding affinity to CaCO3, I’ll use Fluorescence Spectroscopy; by tagging the protein with a marker like GFP, I can quantify exactly how much “glue” stays stuck to the crystals after washing.For structural characterization, I’ll use XRD to verify I’ve successfully formed the aragonite phase and SEM to get the “money shot” of the layered, nacre-like morphology. Finally, I’ll test the mechanical strength of the composite via Nanoindentation. This will let me measure the Young’s Modulus and fracture toughness, providing the quantitative data needed to prove my engineered protein actually makes the material stronger than a standard mineral control.
Part 2: Waters HW 1
According to Expasy: Theoretical pI/Mw: 5.90 / 27875.41
To find the molecular weight from the BioAccord spectrum, we select two adjacent peaks. Let’s pick the two most intense peaks: Peak 1: 903.7753 & Peak 2: 933.8860. Using the formula for n that I was given, n ~ 30.98, meaning z ~31. Thus, the peak at 903.7753 has a charge of +31, and the peak at 933.8860 has a charge of +30. Relating m/z, MW and z, I get MW ~ 27,986 Da. To find the mass accuracy, I used the accuracy equation, getting a result of about 3960 ppm. The calculated accuracy of ~3960 ppm is quite high for a high-resolution mass spectrometer like the Waters BioAccord (which typically provides < 20 ppm).A difference of 110.85 Da is very significant. In a synthetic biology context, this suggests the protein being measured is not exactly the theoretical sequence.
Part 3: Waters HW 2
eGFP contains 20 lysines and 7 arginines
19 peptides will be generated from this digestion
There are about 19 peaks when considered above 10%
Part 3 matches with part 2
The main peak is at m/z 525.76712; this spacing is roughly 0.5, so we can conclude that 2+ is the most abundant charge state. Thus, using equations, we can calculate that the mass is about 1051 Da
The peptide thus most likely be FEGDTLVNR, which has a mass that matches very closely with our calculated mass. This error is roughly 2.8ppm
88%
Part 4: Water HW 3
To identify the oligomeric species on the CDMS spectrum, we first need to calculate the theoretical masses for each state. The spectrum’s x-axis is in Megadaltons (MDa), so we’ll convert the kilodalton (kDa) subunit masses accordingly.
Based on the subunit masses provided in Table 1: 7FU Subunit: 340 kDa = 0.34 MDa
8FU Subunit: 400 kDa = 0.40 MDa
Thus:
7FU Decamer: 3.40 MDa
8FU Didecamer: 8 MDa
8FU 3-Decamer: 12 MDa
8FU 4-Decamer: 16 MDa
To map this to the CDMS spectrum: 7FU Decamer: This corresponds to the peak labeled 3.4 on the spectrum. It sits just to the left of the larger 4.013 MDa peak. 8FU Didecamer: This corresponds to the very tall, prominent peak labeled 8.33. While the theoretical math suggests 8.0 MDa, the 8.33 peak is the primary didecamer signal in this region for KLH-2.
8FU 3-Decamer: This corresponds to the peak labeled 12.67. This aligns well with the expected 12 MDa range. 8FU 4-Decamer: This corresponds to the small cluster of peaks around the 16-17 MDa mark. While there isn’t a single high-intensity label like the others, the signal intensity between 15 and 20 MDa represents these higher-order oligomers.
Week 11 HW: Building Genomes
Nothing to see here… Please refer to WEEK 12.
Week 12 HW: Bioproduction
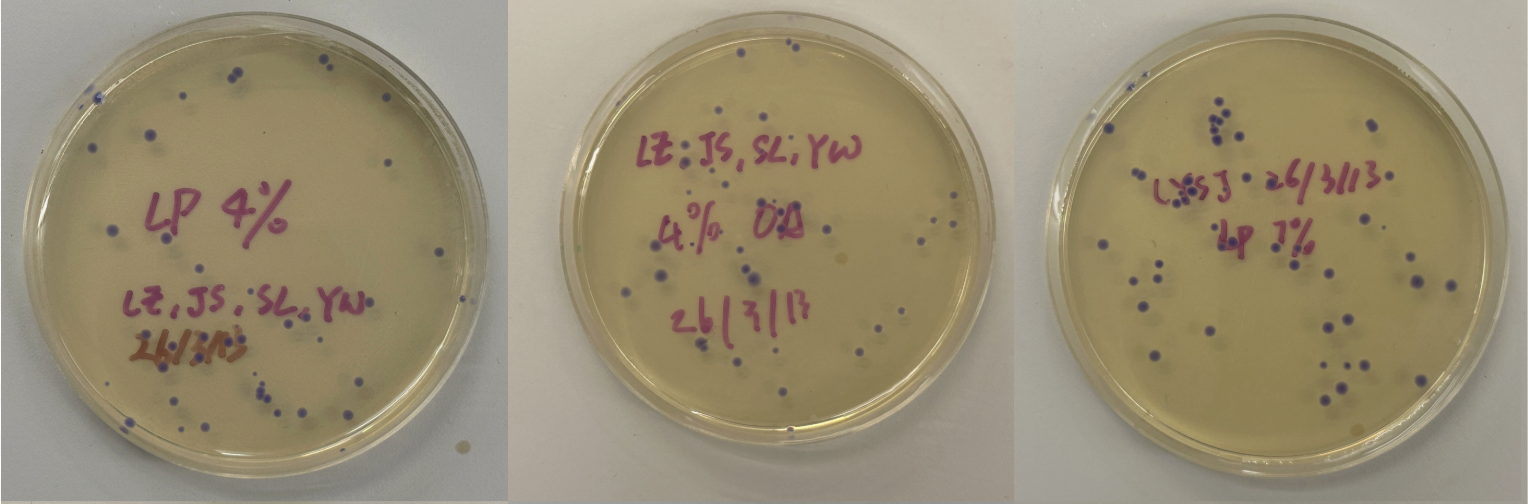
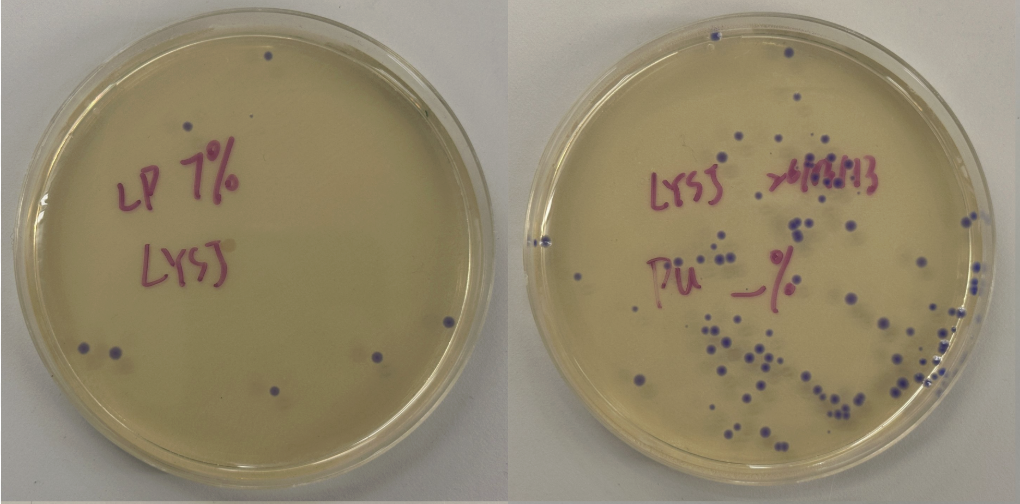
Part 1: Global Pixel Art
So, unfortunately I didn’t receive an email to contribute to this, and I saw the homework posting AFTER the deadline. I guess I will just have to TA next year instead!
Part 2: Cell Free Synthesis
E. coli Lysate
BL21 (DE3) Star Lysate: Provides the essential cellular machinery, including ribosomes, tRNAs, and initiation/elongation factors, required for translation.
T7 RNA Polymerase: Specifically transcribes the target DNA template into mRNA, driving high-level protein expression.
Salts/BufferPotassium
Glutamate: Acts as the primary salt to maintain ionic strength and provides potassium ions, which are vital for ribosomal activity.
HEPES-KOH (pH 7.5): A buffering agent that stabilizes the pH of the reaction, ensuring enzymatic activity remains optimal as metabolic byproducts accumulate.
Magnesium Glutamate: Supplies $Mg^{2+}$ ions, which are critical cofactors for polymerase activity and the structural stability of ribosomes.
Potassium Phosphate (Monobasic/Dibasic): Works alongside HEPES to provide secondary buffering capacity and maintains inorganic phosphate levels for energy cycling.
Energy / Nucleotide System
Ribose & Glucose: Serve as carbon and energy sources that the lysate’s endogenous pathways use to regenerate ATP.
AMP, CMP, GMP, UMP (NMPs): These monophosphate nucleotides are the raw building blocks that the system phosphorylates into NTPs for RNA synthesis.
Guanine: Acts as a precursor to maintain the pool of guanosine nucleotides, which are essential for the initiation and translocation steps of translation.
Translation Mix (Amino Acids)17 Amino Acid Mix / Tyrosine / Cysteine: These are the physical building blocks of the protein; Tyrosine and Cysteine are often added separately due to lower solubility or specific stability requirements.
Additives & Backfill
Nicotinamide: Helps stabilize and regenerate $NAD^{+}$ levels, supporting the metabolic flux required for sustained energy production.Nuclease
Free Water: Acts as the solvent for the reaction, ensuring no residual enzymes degrade the DNA template or mRNA products.
Comparing Master Mixes
The 1-hour PEP/NTP mix is designed for speed and immediate energy, utilizing pre-formed NTPs and Phosphoenolpyruvate (PEP) as a direct, high-energy phosphate donor for rapid, short-burst reactions. In contrast, the 20-hour NMP-Ribose-Glucose mix is optimized for sustainability and cost-effectiveness, using cheaper precursors (NMPs and sugars) that the system slowly converts into energy via endogenous metabolism to support protein production over a much longer duration. While the 1-hour mix prioritizes a quick “sprint” for rapid results, the 20-hour mix facilitates a “marathon” by recycling energy through more complex biochemical pathways.
Part 3: Designing Experiment
Properties of Proteins
sfGFP (Superfolder GFP): Known for its robust and rapid folding kinetics, sfGFP can fold correctly even when fused to poorly behaved proteins, making it the most reliable “readout” for initial expression levels in lysate.
mRFP1 (monomeric Red Fluorescent Protein): A key property is its relatively low quantum yield and slow maturation compared to newer variants; in a cell-free system, this may lead to a delayed or dim signal if the incubation ends before the chromophore fully oxidizes.
mKO2 (monomeric Kusabira Orange 2): This protein features excellent pH stability and rapid maturation, allowing it to maintain a bright orange signal even if the cell-free reaction becomes slightly acidic due to metabolic byproduct accumulation.
mTurquoise2: It is characterized by a high fluorescence quantum yield and superior photostability, making it ideal for high-sensitivity imaging, though its cyan emission is highly dependent on the correct folding of its rigid beta-barrel structure.
mScarlet-I: This is one of the brightest red FPs available but is notably sensitive to oxygen levels for chromophore maturation; in a 36-hour cell-free “painting” (especially if wells are sealed), limited oxygen may significantly cap its peak fluorescence.
Electra2: Specifically designed for rapid maturation, Electra2 is intended for real-time monitoring of translation, meaning its signal will likely peak much earlier in the 36-hour window than more stable but slower-maturing proteins like mRFP1.
Hypothesis
Protein: mScarlet-I
Reagent(s): Catalase or increased HEPES-KOH concentration
Expected Effect: By increasing the HEPES-KOH concentration or adding Catalase, we can counteract the “acid sensitivity” and oxidative stress that often occurs during a prolonged 36-hour incubation. Since mScarlet-I is highly bright but sensitive to its environment, maintaining a stable pH and reducing reactive oxygen species (ROS) from the long-term metabolic activity of the NMP-Ribose-Glucose system will prevent premature quenching and maximize the final fluorescence intensity.
Week 2 HW: DNA READ, WRITE & EDIT
PART 0: BASICS
I have attended all lectures and recitation necessary to prepare for this week.
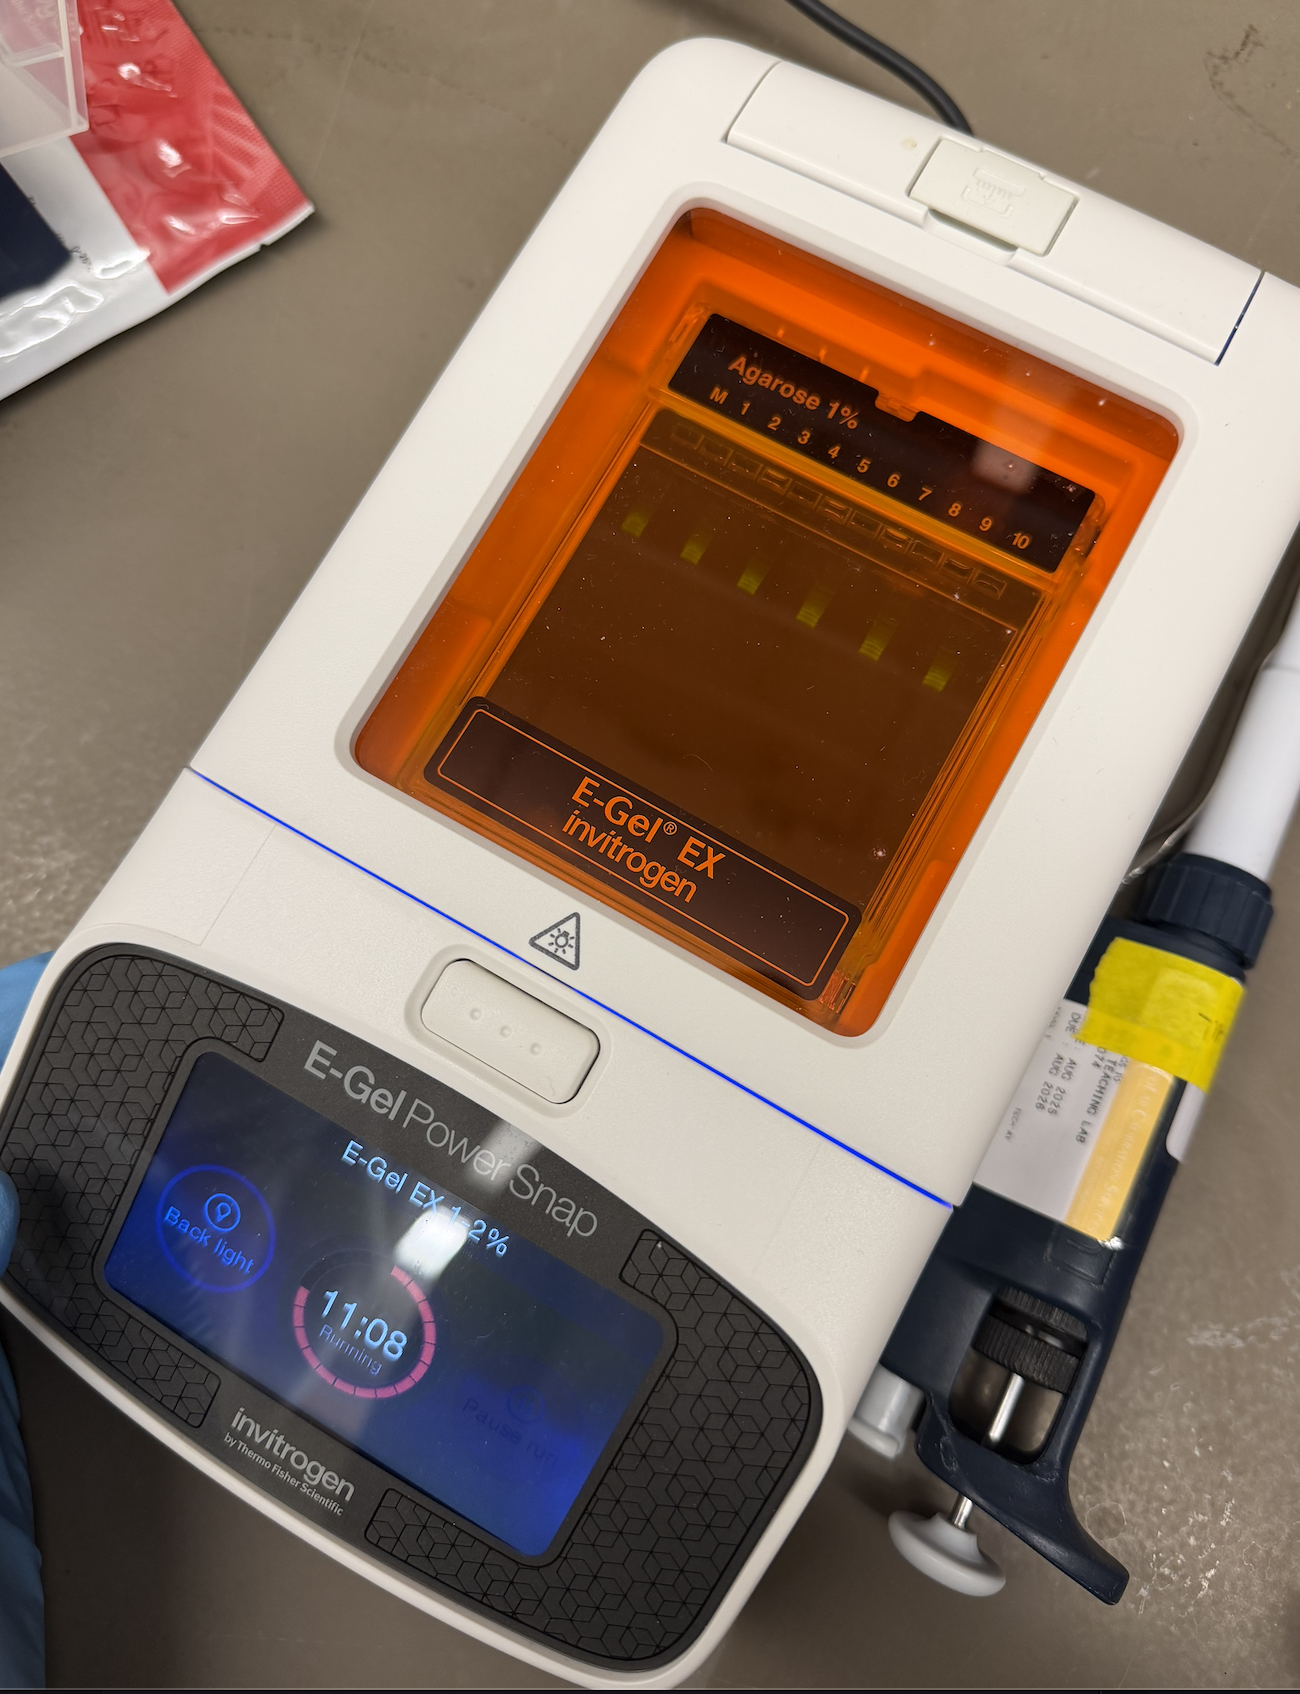
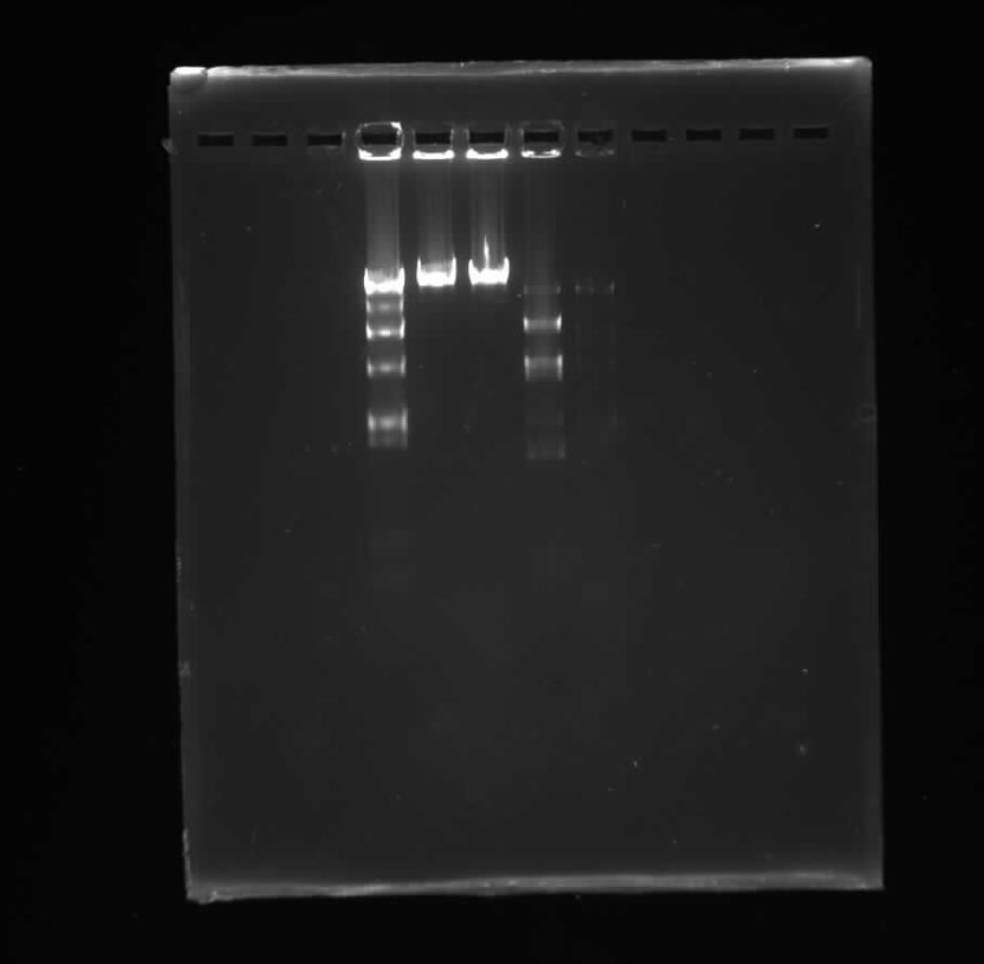
PART 1: GEL ART & BENCHLING
I made my free account on Benchling, following Ice’s tutorial in class on Lambda DNA. I then played around with Ronan’s website and Benchling’s Digest feature to try to come up with something I liked. Ultimately, I came up with something that looks vaguely like a lucky cat (if you squint).
PART 2: GEL ART & RESTRICTION DIGESTS
Look at my design here!
PART 3: DNA DESIGN CHALLENGE
3.1
The protein I will choose for this is CLOCK which is apparently responsible for regulating the 24H mammalian circadian rhythm. I chose this because the concept of a circadian rhythm in general is interesting to me and its interesting that it’s regulated by a protein and not some psychological factor. Although I guess if you deep dived into all human actions, you could boil it down to the result of some complex protein interactions.
To optimize my codon sequence, I used a tool offered by Twist. Since I’m just playing around with the protein, I left most options blank, for example, “Sites to Avoid Introducing.”
Codon optimization is necessary because different organisms prefer different synonymous codons to encode the same amino acid. Although the genetic code is universal, the frequency with which specific codons are used varies between species. If a gene is expressed in a host organism that does not frequently use certain codons, translation can become slow or inefficient. Optimizing codon usage ensures that the DNA sequence matches the host organism’s codon bias.
I chose to optimize the codon sequence for Homo sapiens because the CLOCK protein is a human transcription factor and is typically studied in mammalian cell systems. Since the goal is to express functional CLOCK protein in a human cellular environment, optimizing for human codon bias ensures efficient translation using human tRNA pools and supports proper protein folding and regulation. Additionally, expressing CLOCK in human cells preserves the relevant post-translational modifications and cellular context necessary for its biological function in circadian regulation.
To produce this CLOCK protein form optimized DNA, both in vivo and in vitro systems can be used.
In vivo methods (cell-dependent) involve inserting the optimized CLOCK DNA sequence into a plasmid expression vector under the control of a strong promoter. This plasmid can then be introduced into human cells. Once inside the cell:
The plasmid enters the nucleus, where transcription occurs
mRNA is processed
mRNA is translated
tRNA pairs with complementary codons on mRNA
The protein is synthesized
The protein folds
Because the DNA was optimized for Homo sapiens, this translation efficiency would be quite high.
In vitro methods (cell-free) involve adding the optimized DNA into a biochemical mixture containing things like tRNAs, amino acids, purified ribosomes, etc. In these systems:
DNA first transcribed into mRNA
Ribosomes in the extract translate the mRNA directly into protein
The reaction follows the same biochemical principles of transcription/translation.
These systems allow rapid protein production and tighter control over experimental conditions, though they may lack some post-translational modifications found in living cells.
In both methods, the fundamental process remains the same.
PART 4: PREPARING A DNA ORDER
I followed the tutorial on the homework page.
PART 5: DNA READ/WRITE/EDIT
5.1 DNA READ
To be honest, I would want to sequence my own DNA the most. All of these other things are probably frequently sequenced in research, but there’s probably a <1% chance that my DNA would ever be sequenced in a relevant way. I could learn a lot about myself that would be almost impossible for me to learn otherwise.
I would use Illumina sequencing to do so. It is a second-generation technology and is well-suited for human DNA because it provides high-throughput and accuracy at a relatively low cost. The input would be genomic DNA extracted from my cells (like blood), which would then be fragmented into short pieces. After fragmentation, adapters would be ligated onto both ends of each fragment, allowing the fragments to bind to a flow cell and serve as primer-binding sites. These fragments are amplified through bridge PCT to create clusters of identical DNA copies. Here, sequencing occurs through sequencing-by-synthesis. Fluorescently labeled reversible terminator nucleotides are added in each cycle and each incorporated base emits a distinct fluorescent signal that is detected by a camera. After imaging, the terminator is remove and the next cycle can begin. Base calling is performed by identifying the fluorescent signal at each cycle to determine the sequence of each fragment. The output would ultimately be millions to billions of short DNA reads.
5.2 DNA WRITE
I don’t know much about DNA synthesis and what’s actually possible. I think sensors would be cool although I’m not creative enough to come up with novel ideas. If I had to choose, I think a biomaterial would be most up my alley, like synthetic spider silk (which is really hard) or something inspired by spider-silk for textiles. The construct could also include an anchoring domain to coat cotton fibers or a crosslinking handle for durability, enabling a bio-based coating or fiber additive that adapts comfort and moisture handling without petroleum-derived polymers. It would just be very interesting to me and it would be a very unique material to work with if I was actually able to synthesize something with the same relative strength as spider silk.
I would use chemical DNA synthesis followed by gene assembly. In modern DNA synthesis, short DNA fragments are chemically built one nucleotide at a time on a solid support. Because longer genes cannot be synthesized in a single piece, multiple short fragments are designed with overlapping regions and then assembled enzymatically into the full-length gene. After assembly, the construct would be inserted into a plasmid and verified using Sanger sequencing where DNA polymerase copies the template strand in the presence of fluorescently labeled chain-terminating nucleotides. When a terminator is incorporated, elongation stops, producing fragments of different lengths that are separated and read to determine the sequence. This method is highly accurate and well suited for confirming a single engineered gene, though it is relatively low-throughput and not ideal for sequencing very large genomes.
5.2 DNA EDIT
I think I would probably be most interested in conservation. I would edit the DNA of reef-building corals to enhance their resilience to oceanic changes. Coral bleaching occurs when heat stress disrupts the relationship between corals and their symbiotic algae, leading to widespread reef decline. Rather than drastically altering the organism, I would focus on targeted edits to genes involved in heat shock response, oxidative stress regulation, and cellular repair pathways. Enhancing the expression or function of these stress-response genes could increase thermal tolerance and reduce bleaching under moderate heat stress.
I would use CRISPR-based genome editing technologies, as they allow precise and targeted modifications to specific DNA sequences. CRISPR systems use a guide RNA designed to match a target gene sequence and a DNA-cutting enzyme to create a break at that location. The cell’s natural DNA repair machinery then repairs the break, either introducing small changes or incorporating a designed DNA template to achieve a specific modification. Preparation would involve identifying the target coral genes, designing guide RNAs to match those sequences, and preparing the necessary components—such as the Cas enzyme, guide RNA, and potentially a repair template. These components would be delivered into coral embryos or cells using appropriate transformation methods. While CRISPR offers high precision compared to older gene-editing tools, limitations include variable editing efficiency, potential off-target edits, and challenges associated with delivering editing machinery effectively in marine organisms.
Week 3 HW: Lab Automation
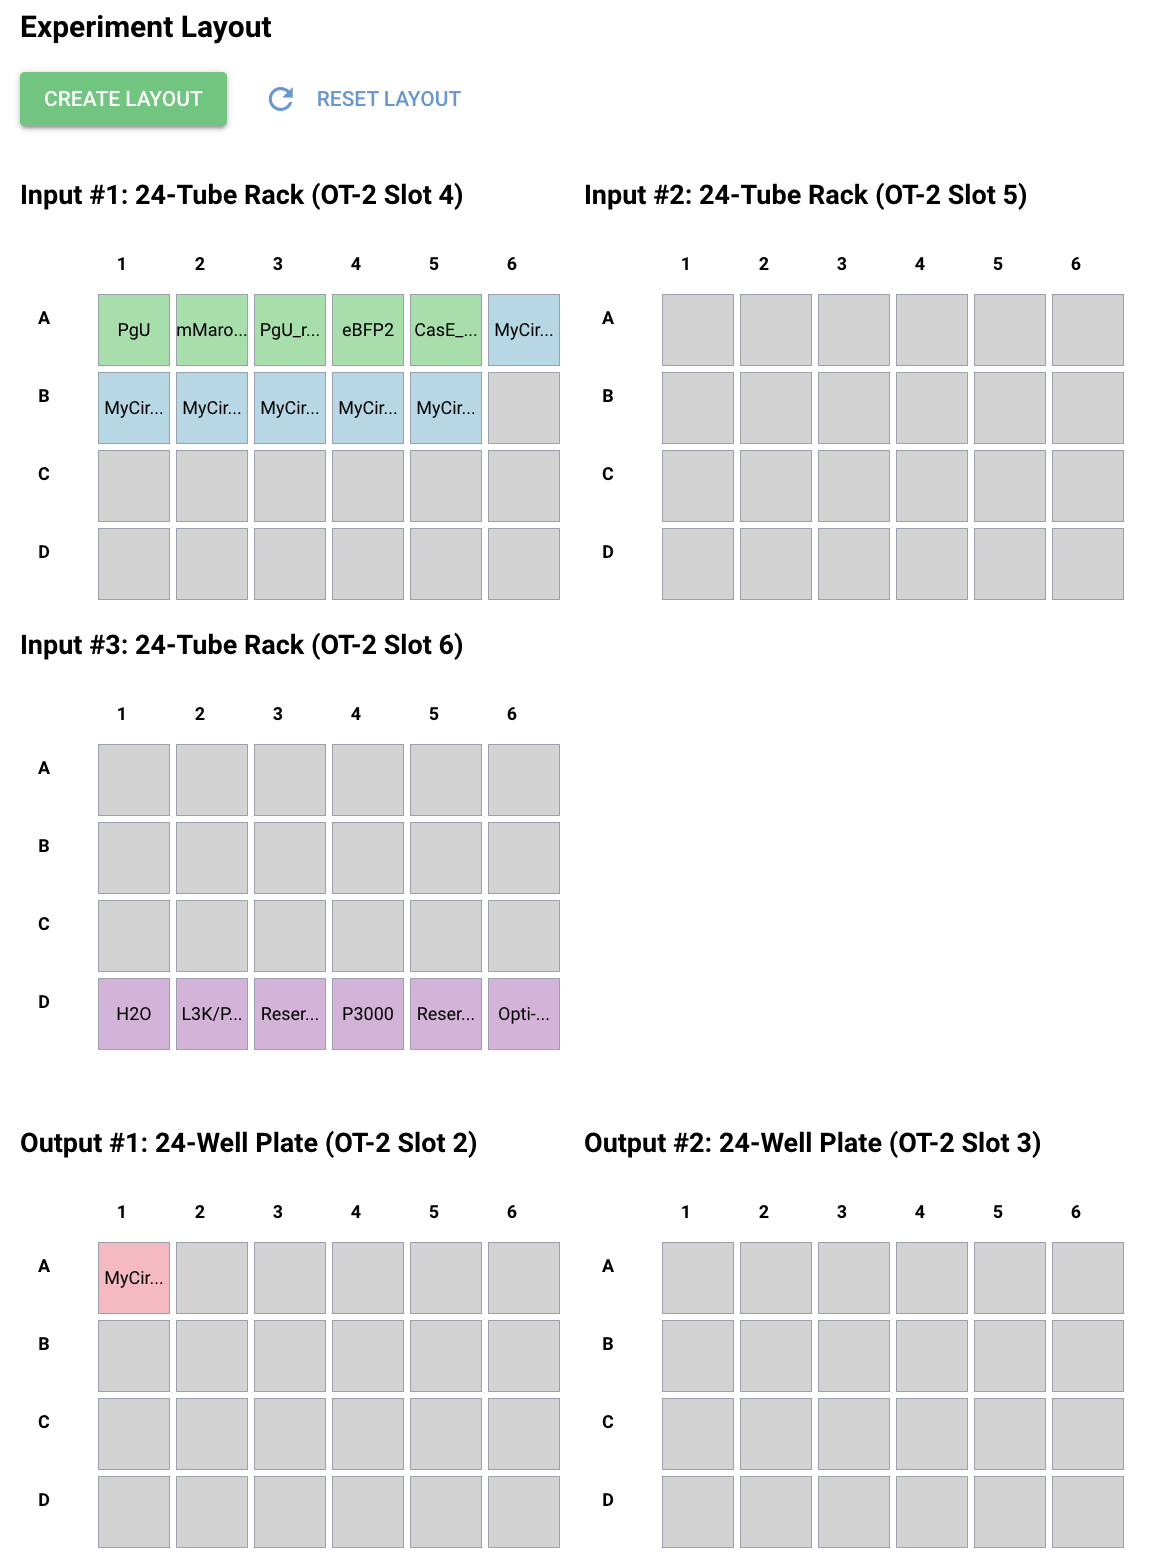
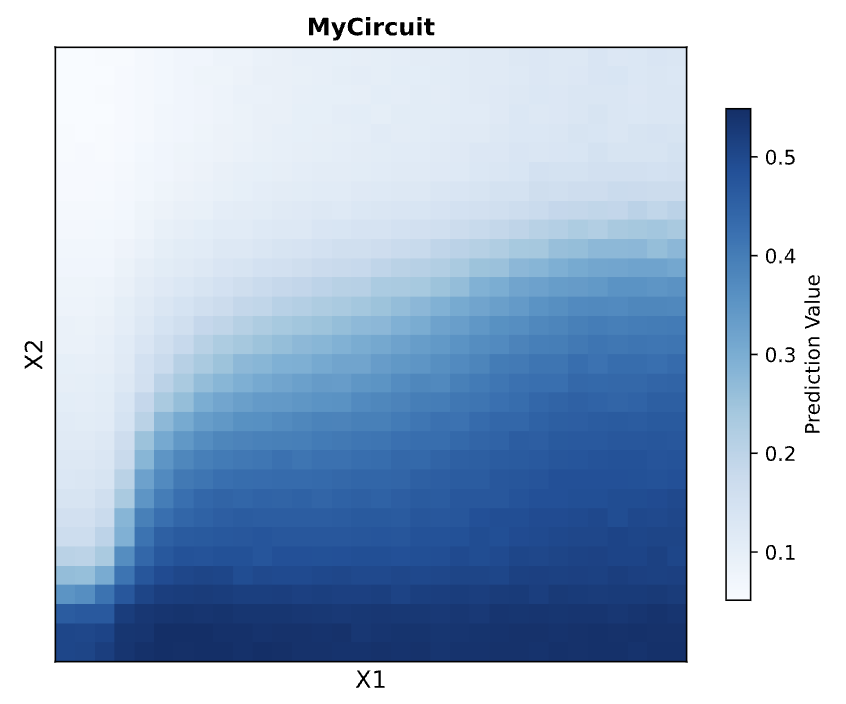
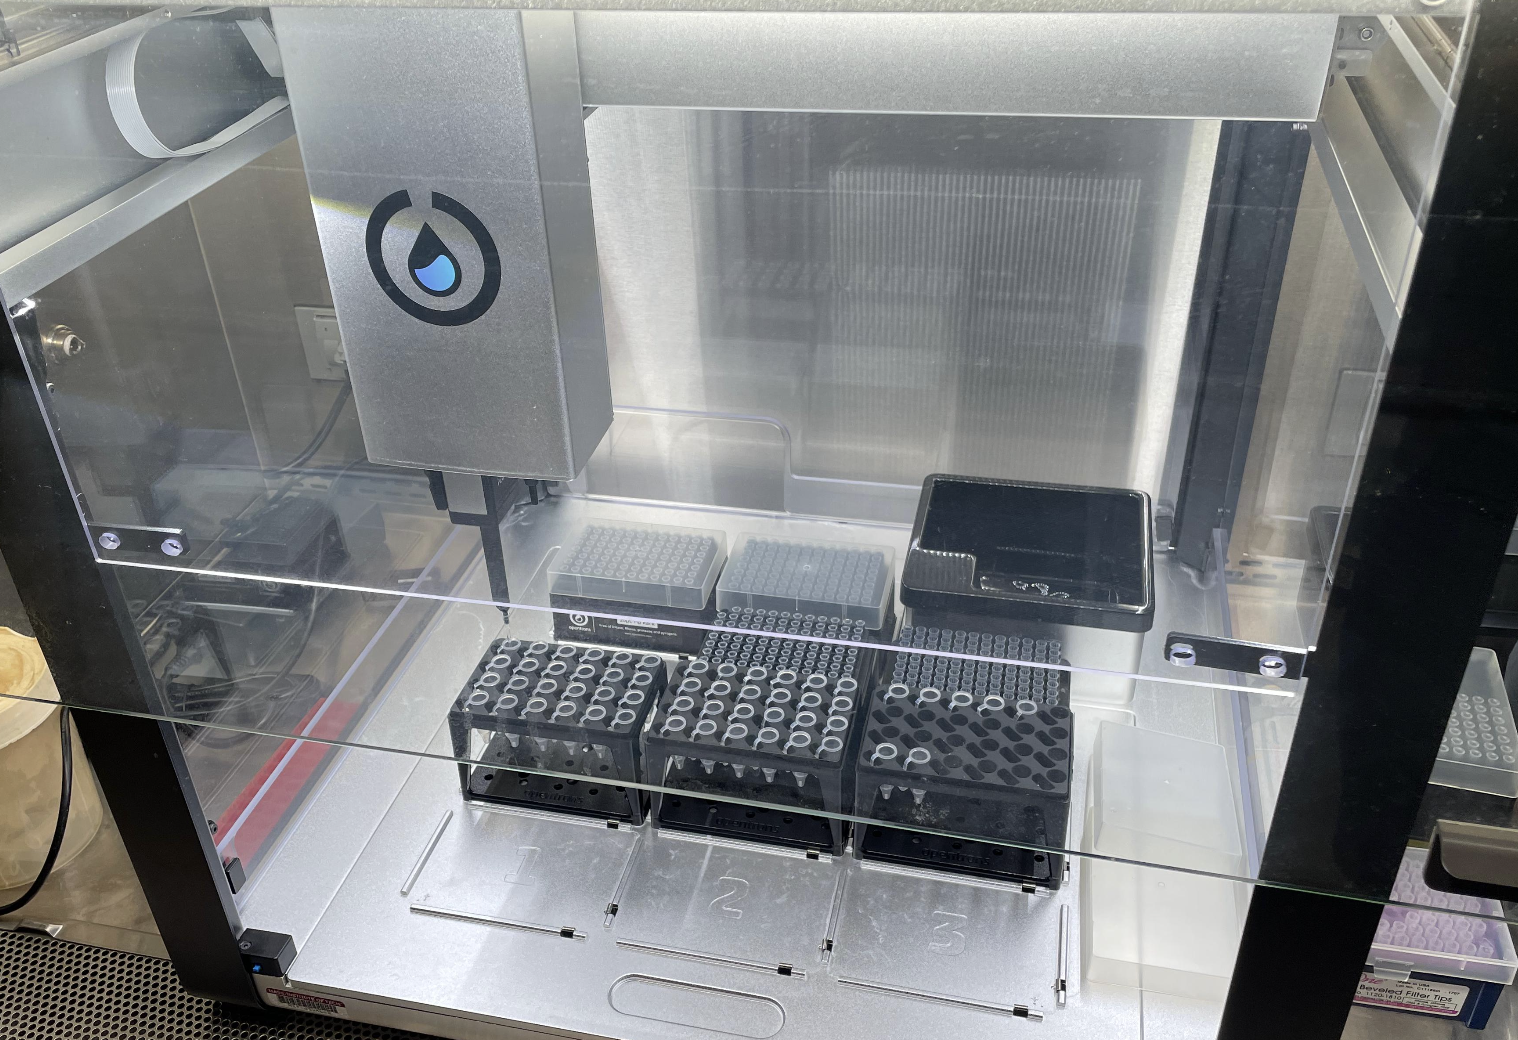
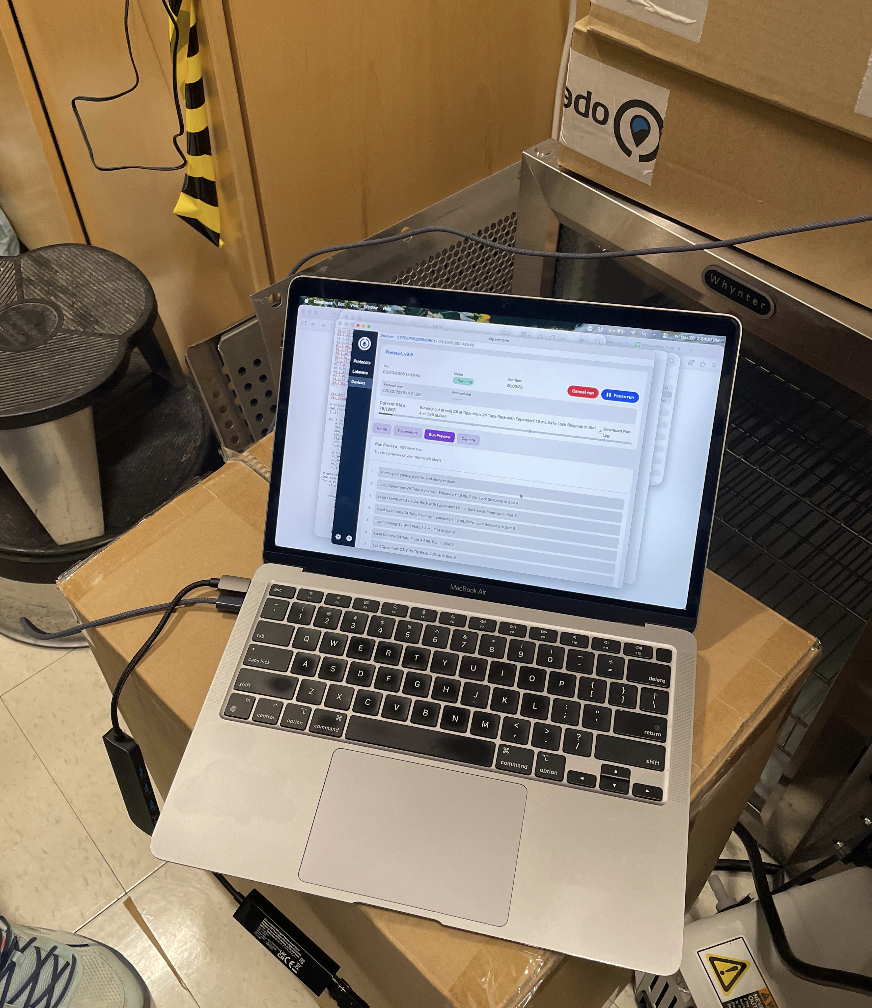
Part 1: Python Script
Despite having taking 6.100A, I am still not very adept with Python. I am even less skilled with Google Colab, so I had no choice but to use the GUI to generate my Python script. I produced this beautiful piece of art:
I also created this one:
Part 1: Post-Lab Questions
Question 1
The paper I chose is titled “AssemblyTron: flexible automation of DNA assembly with Opentrons OT-2 lab robots.”
This paper introduces AssemblyTron, an open-source Python framework that automates DNA assembly workflows by linking j5 DNA design outputs directly to execution on the Opentrons OT-2 liquid handling robot, addressing a major bottleneck in the “Build” step of synthetic biology’s Design–Build–Test–Learn (DBTL) cycle.
The software can do a variety of tasks. For example, it parses combinatorial design files, generates deck setup instructions, tracks reagent volumes and concentrations, optimizes PCR conditions (including gradient annealing calculations), and produces robot-ready protocols with minimal human intervention.
The authors demonstrate that AssemblyTron can automate PCR setup with optimized annealing temperature gradients, Golden Gate assembly, and homology-based assembly (IVA/AQUA). Performance (transformation efficiency and assembly fidelity) was comparable to manual methods. Overall, the platform reduces time, training burden, cost, and human error in molecular cloning while increasing accessibility to automated synthetic biology workflows.
Question 2
One semi-final concept is: Automated high-throughput screening of heavy-metal–capturing protein/peptide hydrogels to identify formulations that (1) bind Pb²⁺/Cu²⁺/Ni²⁺ strongly, (2) remain mechanically stable, and (3) can be regenerated (release metals on command for reuse).
Rather than focusing on a single formulation, I intend to use automation to systematically explore a formulation space defined by binding motif sequence (e.g., histidine-rich, cysteine-rich, or acidic domains), polymer concentration, crosslink density, pH, and salt conditions. This approach allows rapid mapping of structure–property–function relationships for environmentally relevant remediation materials.
Using the Opentrons OT-2, I will automate preparation of a 96-well hydrogel library. The robot will dispense defined volumes of protein or peptide stock solutions, buffers at varying pH, salt solutions, and crosslinking agents to generate a matrix of conditions with built-in replicates. After gel formation, the OT-2 will add standardized metal solutions and perform timed incubations. By measuring the depletion of metal ions from solution, I can calculate binding capacity and compare performance across formulations.
To evaluate reusability, the robot could also perform regeneration cycles by washing gels and introducing elution buffers to release captured metals. Subsequent rebinding assays will quantify how much capacity is retained after multiple cycles. This enables screening not only for binding strength but also for material durability and practical reuse potential. Where possible, I will include simple mechanical proxies to confirm that optimized metal-binding formulations still form stable hydrogels.
To support the workflow, I plan to design and 3D print custom tube adapters and plate alignment fixtures to improve reproducibility and organization of reagents. If available, Ginkgo Nebula can be used to help design and track sequence variants, generate plate maps, and manage combinatorial condition matrices.
References: Bryant, J. A., Kellinger, M., Longmire, C., Miller, R., & Wright, R. C. (2023). AssemblyTron: Flexible automation of DNA assembly with Opentrons OT-2 lab robots. Synthetic Biology, 8(1), ysac032. https://doi.org/10.1093/synbio/ysac032
Week 4 HW: Protein Design Part I
Part 1: Conceptual Questions
Assuming protein mass of meat is 20%, 0.20 x 500=100g of actual protein in this meat. If average residue is roughly 100 Da, I can probably assume that’s roughly 100g/mol, meaning I now have 1 mol of residue. In one mole, there’s roughly 6 x 10²³ molecules. Thus, there are roughly 6 x 10²³ molecules of amino acids in 500 grams of meat
We digest these proteins, not incorporate them into our bodies. We rebuild our own proteins using molecular tools in our body, that may or may not come from what we eat.
There are only 20 “natural” amino acids because that’s what biology standardized our amino acids as. These amino acids have good chemical diversity, synthetic accessibility and different constraints. Now that we have evolutionarily reached this place, it is difficult to incorporate more without rewiring our whole system. As to why there’s only 20 versus like 100, this could be because if there were too many, it would be rather costly and inefficient, so it’s better to keep our biological systems simple.
Yes, noncanonical amino acids are frequently made, and they can also probably be genetically encoded as well. For example, fluoroleucine or p-iodo-phenylalanine.
Before enzymes & life, amino acids came from multiple plausible sources. For example, strecker synthsis in watery environments, delivery by meteorites (they were found in chondrites), or even atomsphere/UV activity.
They are left handed
Yes, proteins contain other helical motiefs like π-helix, collagen triple helix, β-helix / solenoid-like helices. New helical patterns can be found by analyzing high resolution structures.
Most molecular helices are right hanaded because of chirality bias in L-amino acids. Another reason could be that right-handed packing avoids clashes and are better for L residues in general (so as a result of sterics).
They have sticky edges where backbone hydrogen bond donors/acceptors are exposed at the sheet edges, and adding on another strand would satisfy H-bonds. This allows β-sheets to extend into larger assemblies easily.
Drivers include bacbkone hydrogen bonding, hydrophobic effect and shape complentarity. Growth is probably also kinetically favorable.
Amyloid diseases tend to form β-sheets because the cross-β amyyloid architecture is very stable and can form many sequences once misfolded. This ultimately templates further misfolding and thus createspersistent aggregates that disrupt cells.
Yes, they are often found in nanofibers, hydrogels, templates for mineralization, etc.
A simple, reliable design is a β-hairpin that self-assembles with controlled registry:
Design rules:
Use alternating hydrophobic / polar residues to create amphipathic strands
Use a tight turn motif
Put charged residues at ends to control solubility and alignment
Keep strands ~6–10 residues each for clean hairpins
with hydrophobes on one face and charged/polar on the other.
Part 2: Protein Analysis and Visualizations
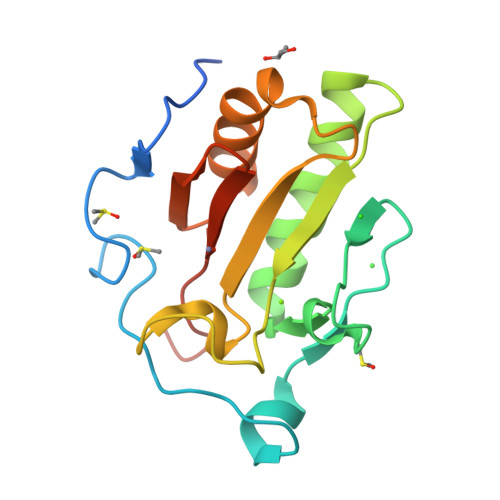
I’m picking the Sonic hedgehog protein. I recently found out it exists and has a silly name. It is an important signaling molecule that plays a role of embryonic development in animals, so it’s pretty cool that such a silly protein name has quite an important role in our lives.
The amino acid sequence is as follows:
MLLLARCLLLVLVSSLLVCSGLACGPGRGFGKRRHPKKLTPLAYKQFIPNVAEKTLGASGRYEGKISRNS
ERFKELTPNYNPDIIFKDEENTGADRLMTQRCKDKLNALAISVMNQWPGVKLRVTEGWDEDGHHSEESLH
YEGRAVDITTSDRDRSKYGMLARLAVEAGFDWVYYESKAHIHCSVKAENSVAAKSGGCFPGSATVHLEQG
GTKLVKDLSPGDRVLAADDQGRLLYSDFLTFLDRDDGAKKVFYVIETREPRERLLLTAAHLLFVAPHNDS
ATGEPEASSGSGPPSGGALGPRALFASRVRPGQRVYVVAERDGDRRLLPAAVHSVTLSEEAAGAYAPLTA
QGTILINRVLASCYAVIEEHSWAHRAFAPFRLAHALLAALAPARTDRGGDSGGGDRGGGGGRVALTAPGA
ADAPGAGATAGIHWYSQLLYQIGTWLLDSEALHPLGMAVKSS
According to the Google Colab notebook:
The length of the protein is: 462 aminoacids.
The most common amino acid is: A, which appears 57 times.
Humans have three Hedgehog homologs: SHH, IHH and DHH. Across species, SHH is conserved. This protein belongs to the Hedgehog signaling protein family.
This particular structure was Deposited: 2019-06-28 and Released: 2019-11-13. It can be considered a good quality structure as the experiment type is XRD with a resolution of 1.43 Å. This is a very small resolution value, and means atomic positions are pretty well defined.
In this particular entry, there are other ions such as Zinc, Magnesium, as well as solvent molecules. This was found by clicking “Ligand Interactions”
This protein belongs to the Hedgehog family of signaling proteins. SHH proteins have a conserved N-terminal signaling domain (Shh-N) found across animals. In structural classification systems (like SCOP, CATH), this domain is placed in a signaling/ligand family with a unique fold that binds Zn²⁺ and interacts with receptors such as Patched. So in structural classification terms, this is not a generic enzyme fold but rather a specific morphogen fold conserved among Hedgehog homologs.
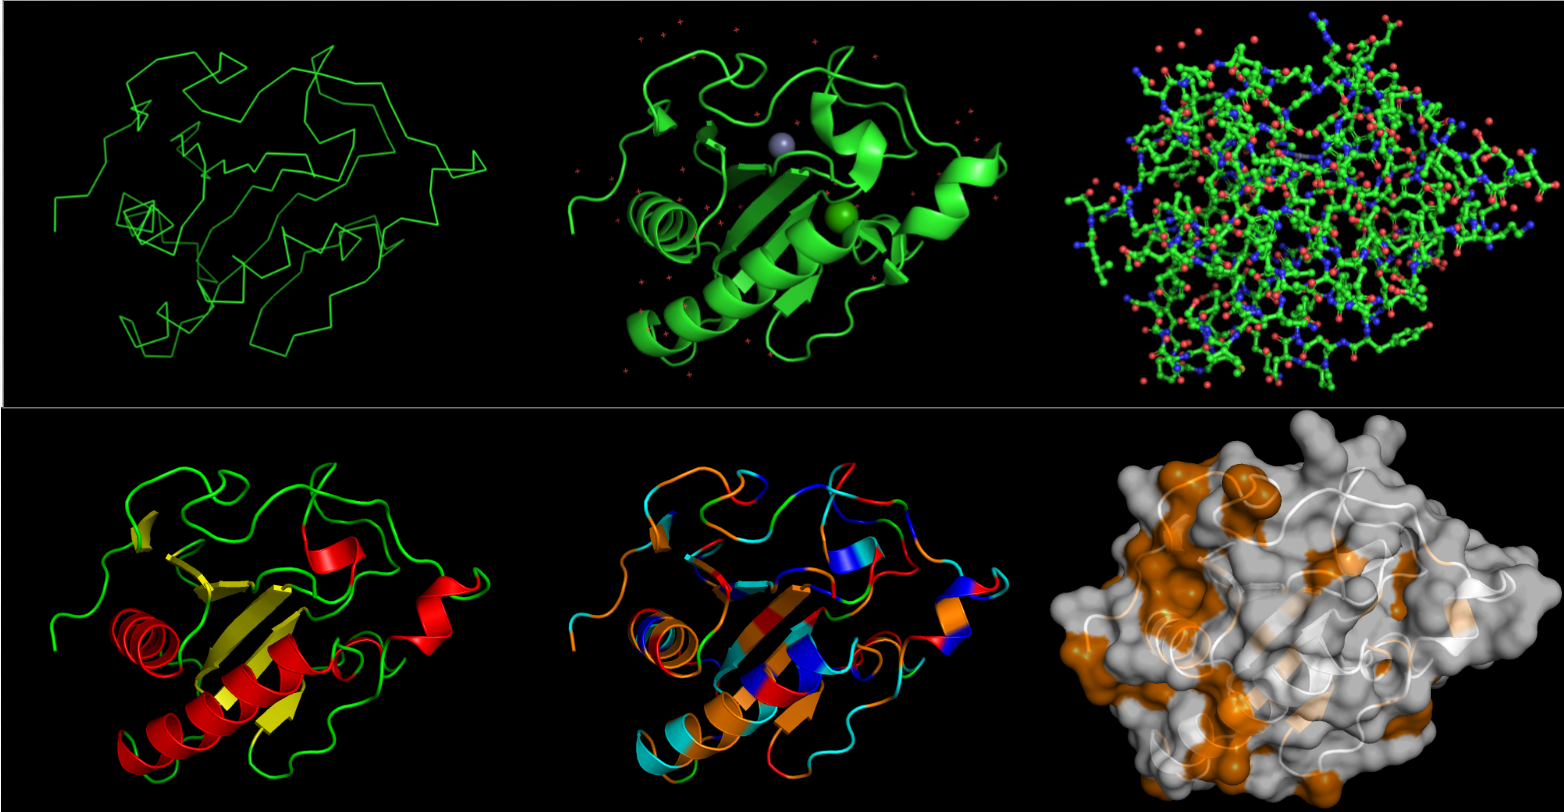
I then used PyMol to visualize my structure.
On the top, from left to right, the images are: ribbon, cartoon and ball-and-stick visualizations. On the bottom, the protein is colored by secondary structure, residue type, and the surface.
From what I can see, it definitely has more helices than sheets. I want to say all the residues are equally represented. I represented hydrophobic residues in orange, and everythign else (varying in charge) in other colors: blue for + charge, red for - charge, cyan for no charge. But other than that, thee are less hydrophobic residues than hydrophilic. Overall, there doesn’t seem to be a very deep binding pocket from any angle.
Part 3: Using ML-Based Protein Design Tools
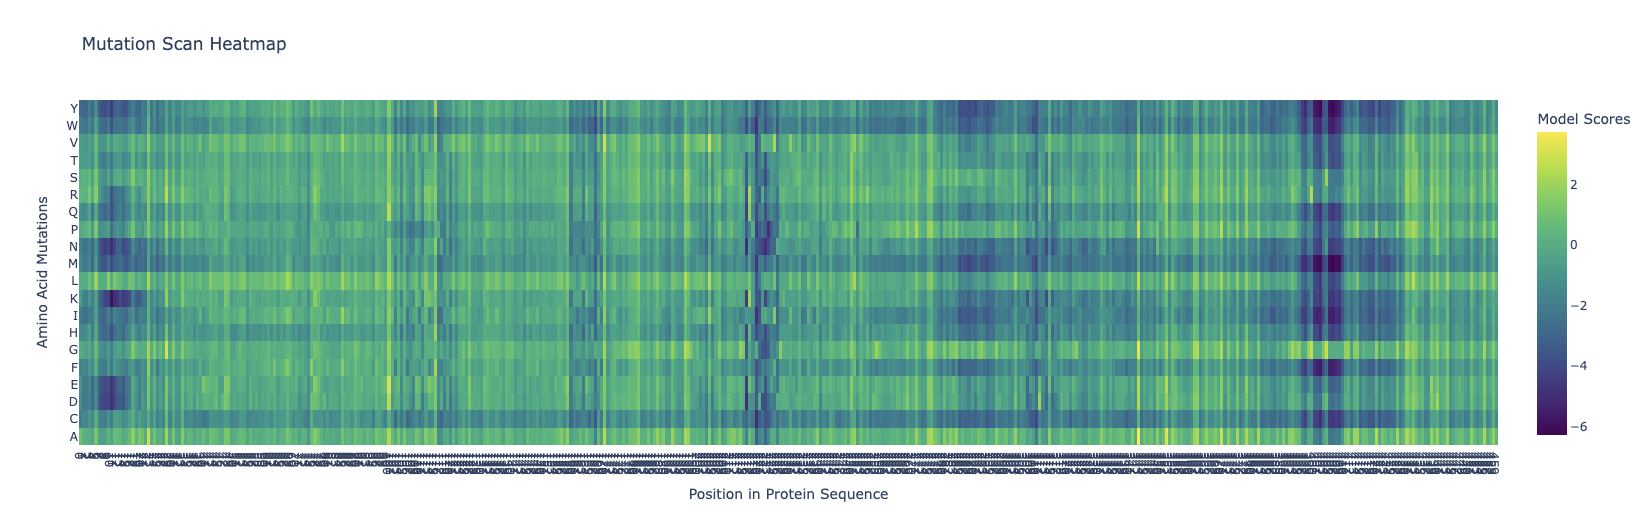
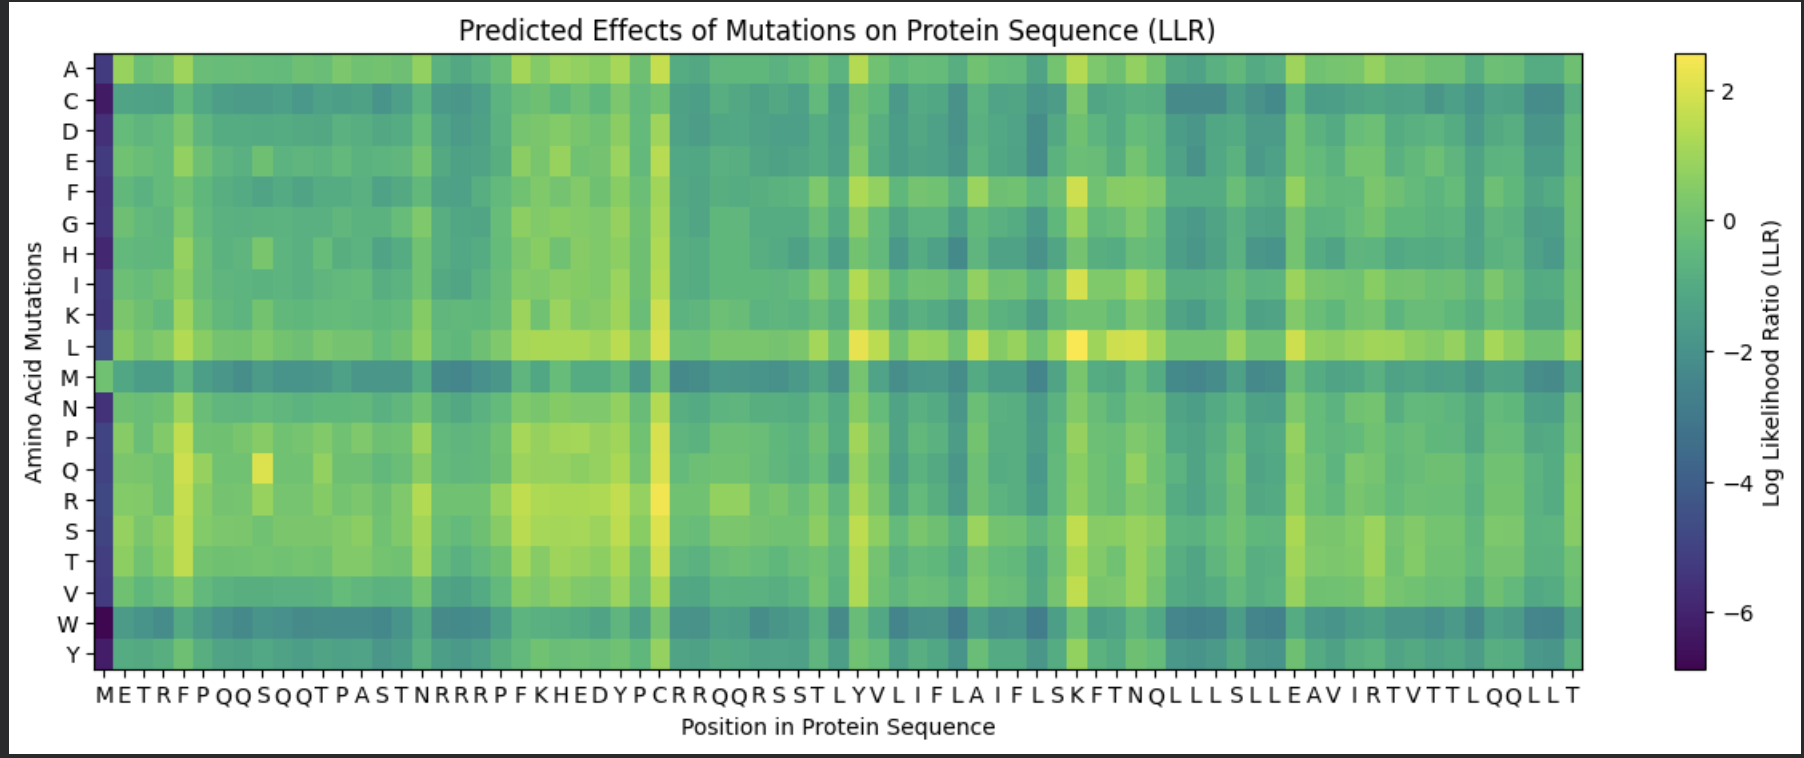
Deep Mutational Scans
I chose to use model esm2_t6_8M_UR50D
The dark blue means that mutations are not very likely to happen. Around the 400-410 mark, there is a dark blue column that is similar across all the different variations, meaning that this location is probably not extremely likely to mutate. I’m kind of intrigued as to why this could be, and frankly I don’t know that I can come with any good explanation for this.
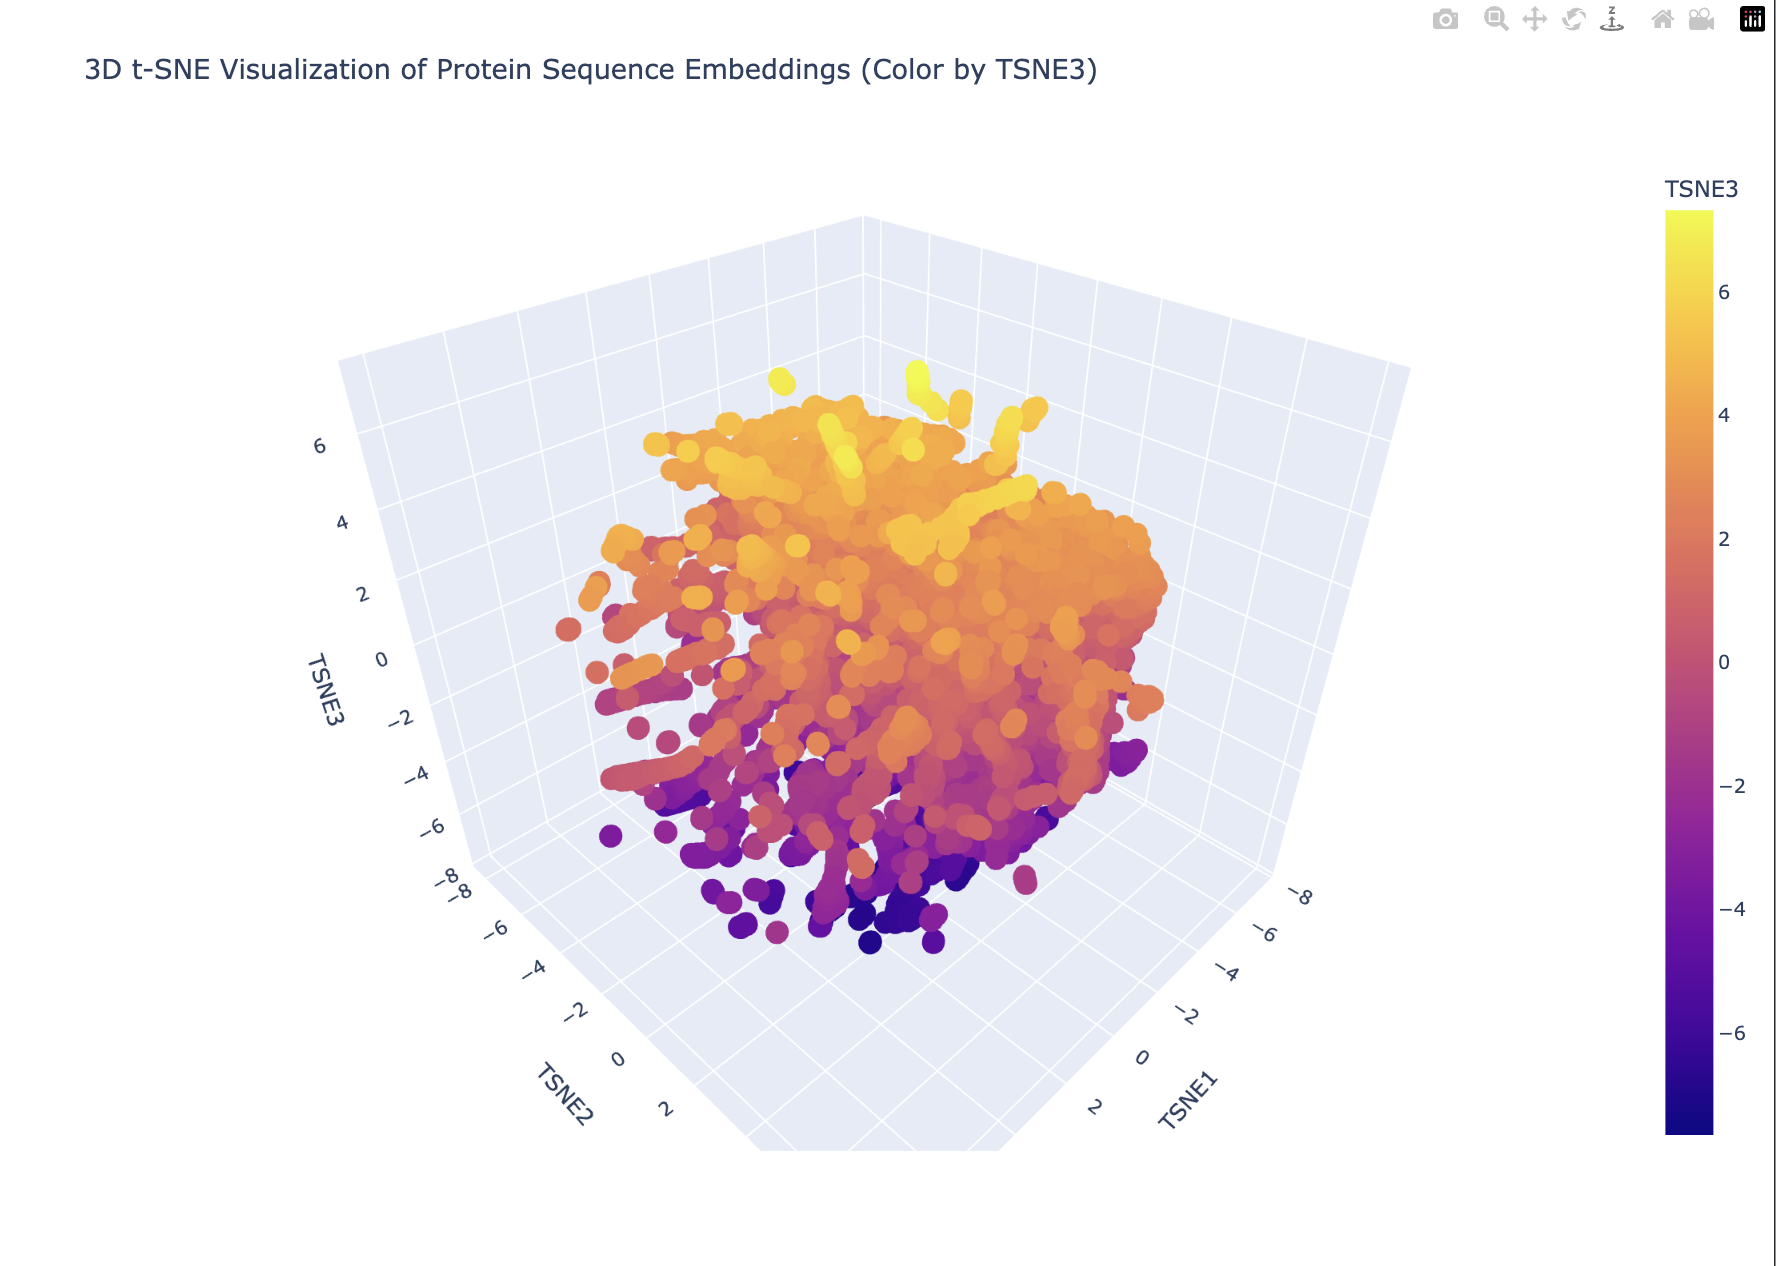
Latent Space Analysis
This is what the code produced.
My plot looks like a single dense blob with smooth gradients (especially along TSNE3). This suggests that there are no strongly separated protein families. Furthermore, TSNE3 captures a continuous variation in possibly protein length, compositional differences or evolutionary divergence. This looks more like a continuum than discrete groups.
The embedding does not show sharply separated clusters, suggesting that the proteins form a continuous similarity space rather than distinct families. My protein lies within a dense region of the embedding, indicating that it shares sequence-level similarity with many neighboring proteins. The local neighborhood likely contains proteins with related sequence motifs or structural features.
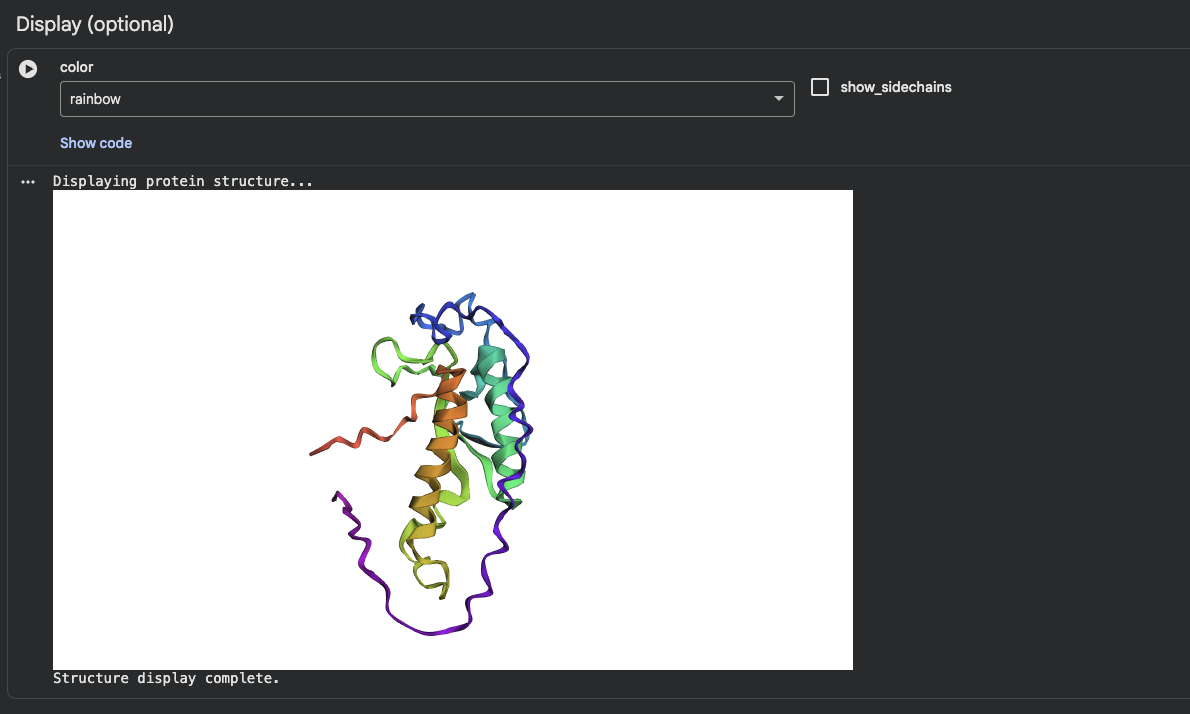
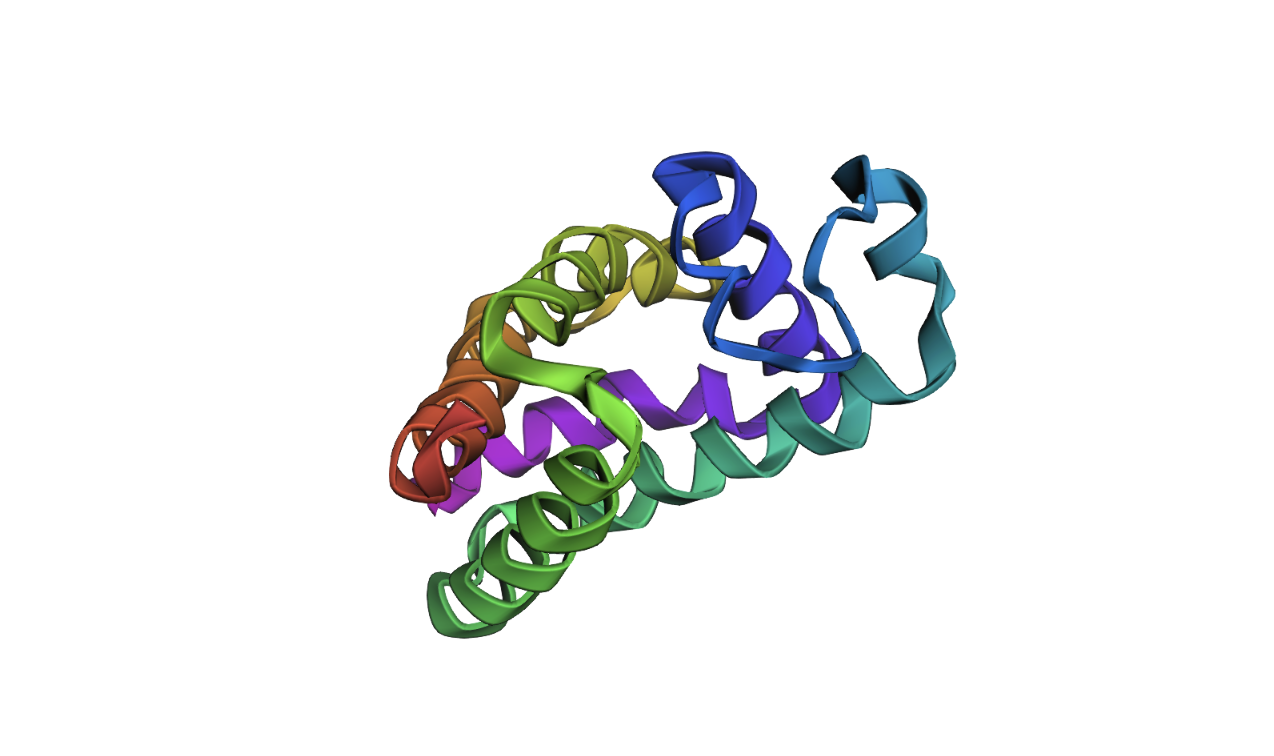
Protein Folding
I was able to find my protein. The first image shows the complete sequence, which seems to differ from the original structure. However, it is difficult to tell because they are oriented differently. When adding mutations (the second image), it seems that the protein is quite susceptible to mutational changes. I deleted a very large chunk, however, and it’s possible that 20 amino acids affects it much less than 50 amino acids deleted.
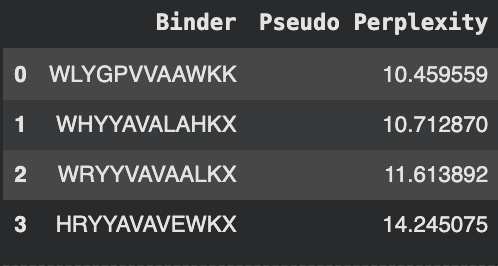
The following amino acids were generated with their subsequent perplexity scores:
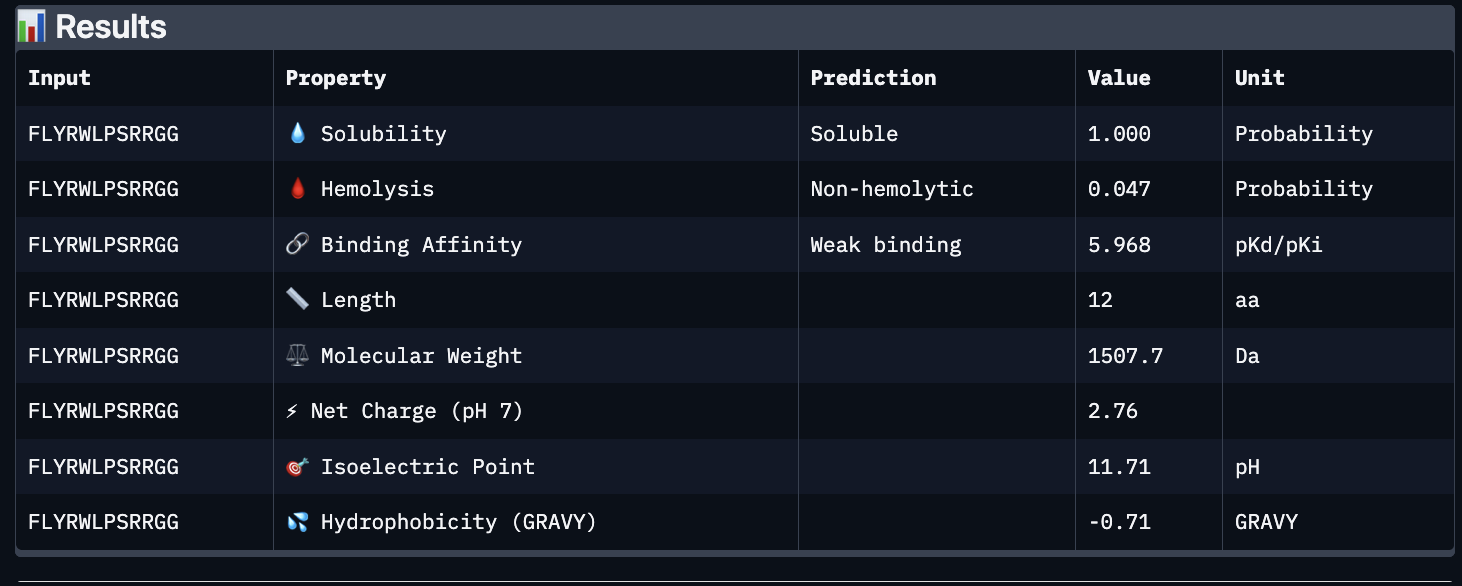
The known binder FLYRWLPSRRGG was added for comparison.
Part B:
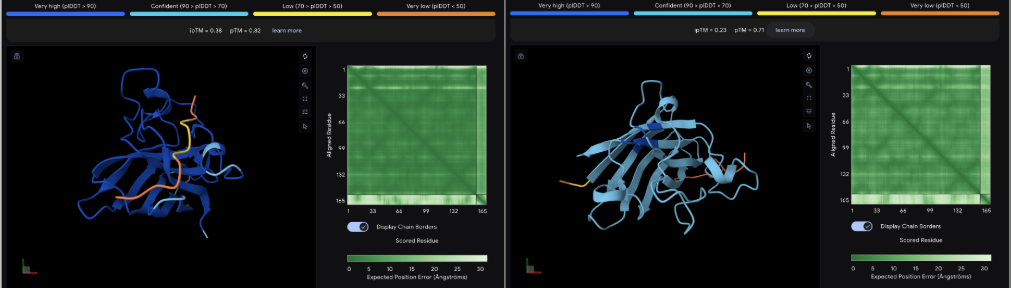
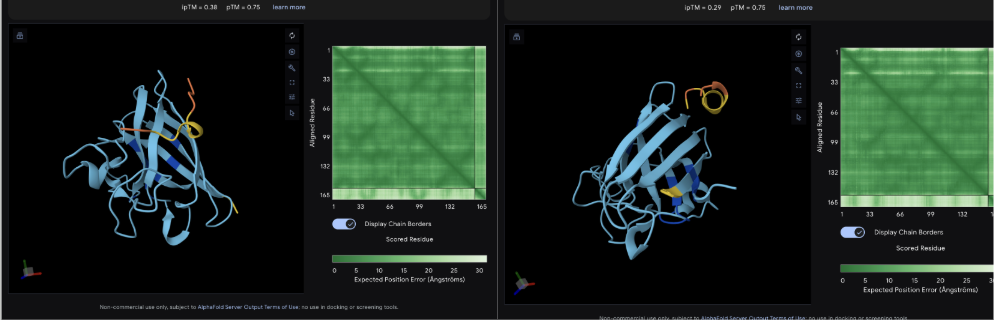
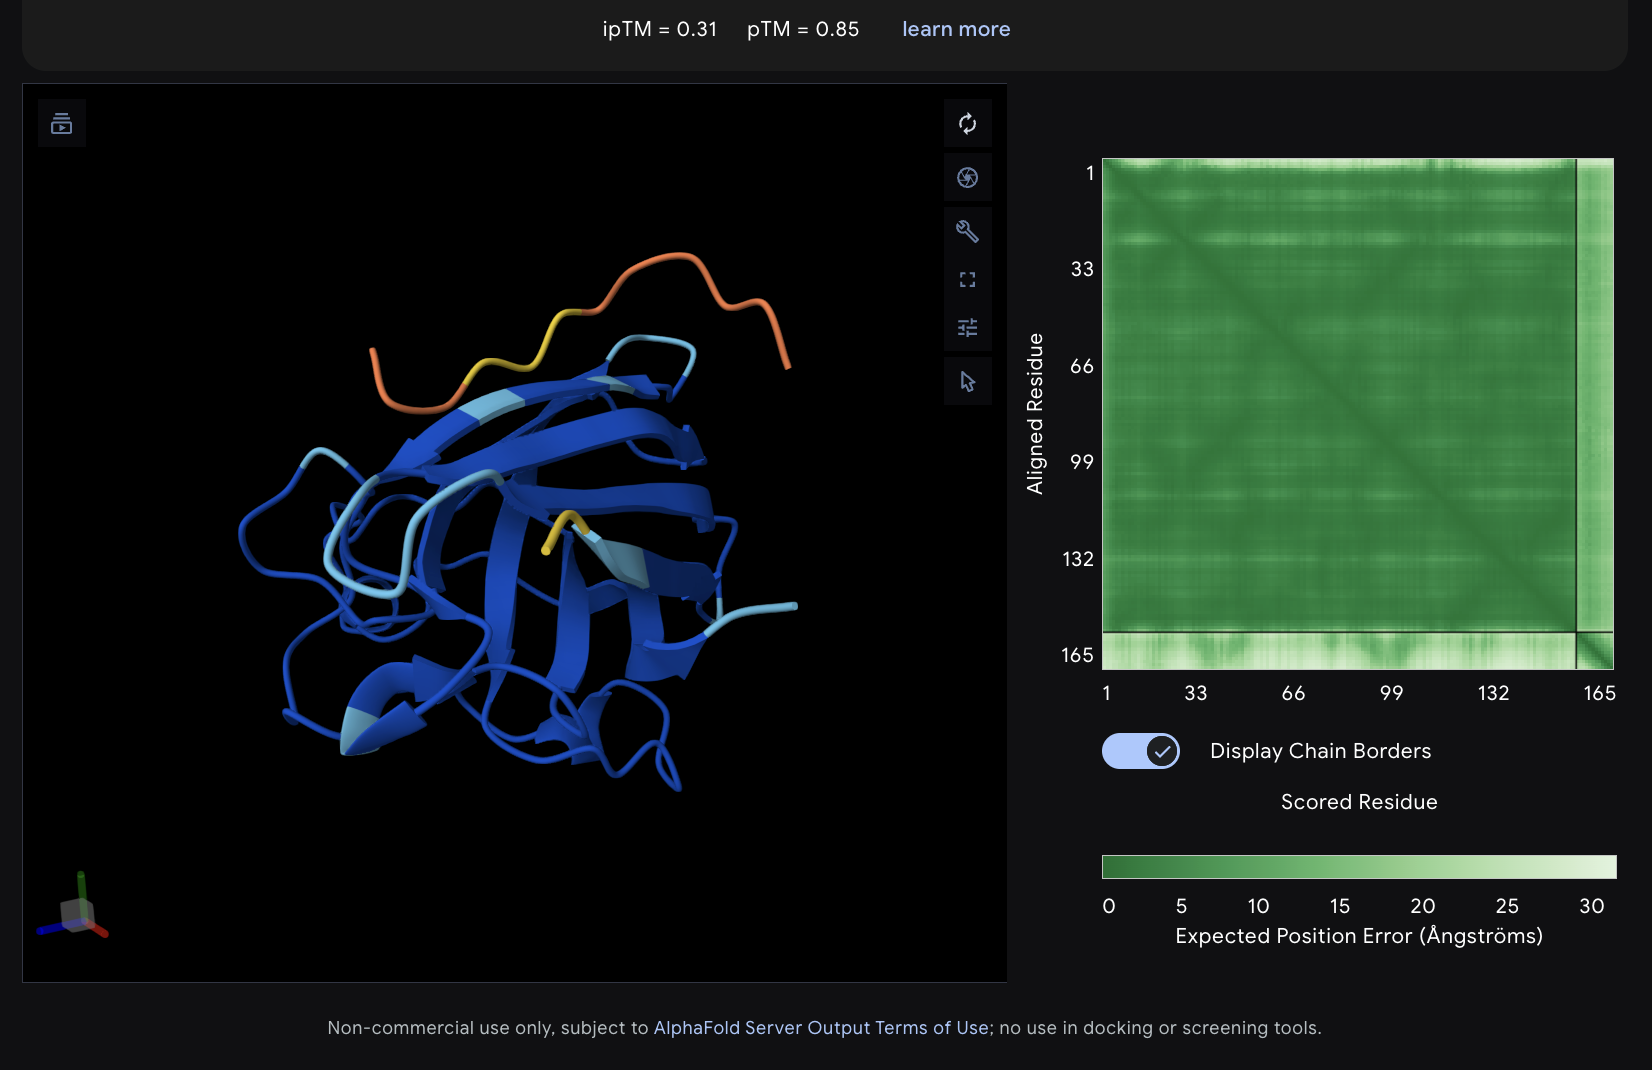
There was an apparent issue with the predictions, as the final letter was X, though AlphaFold does not accept this. To solve this issue, any X was replaced with an A:
The images are somewhat blurry, but it just seems like the peptides tend to be very surface bound, typically near the β-barrel region. Interestingly enough, even the known peptide did not have a very high ipTM score, as there were still orange and yellow parts, which made me very curious. iPTM scores were: 0.38, 0.23, 0.38, 0.29, 0.31, for known and index 0-3, respectively. The AlphaFold ipTM score is a key metric for evaluating the accuracy of protein-protein, protein-nucleic acid, or protein-ligand interaction models. It specifically measures the confidence in the relative positions and orientation of the two interacting chains. Values above 0.8 are generally considered high-confidence predictions, while values below 0.6 usually indicate a failed prediction. Evidently, everything I had was a failed prediction, though interestingly enough, index 2 had the same score.
Part C:
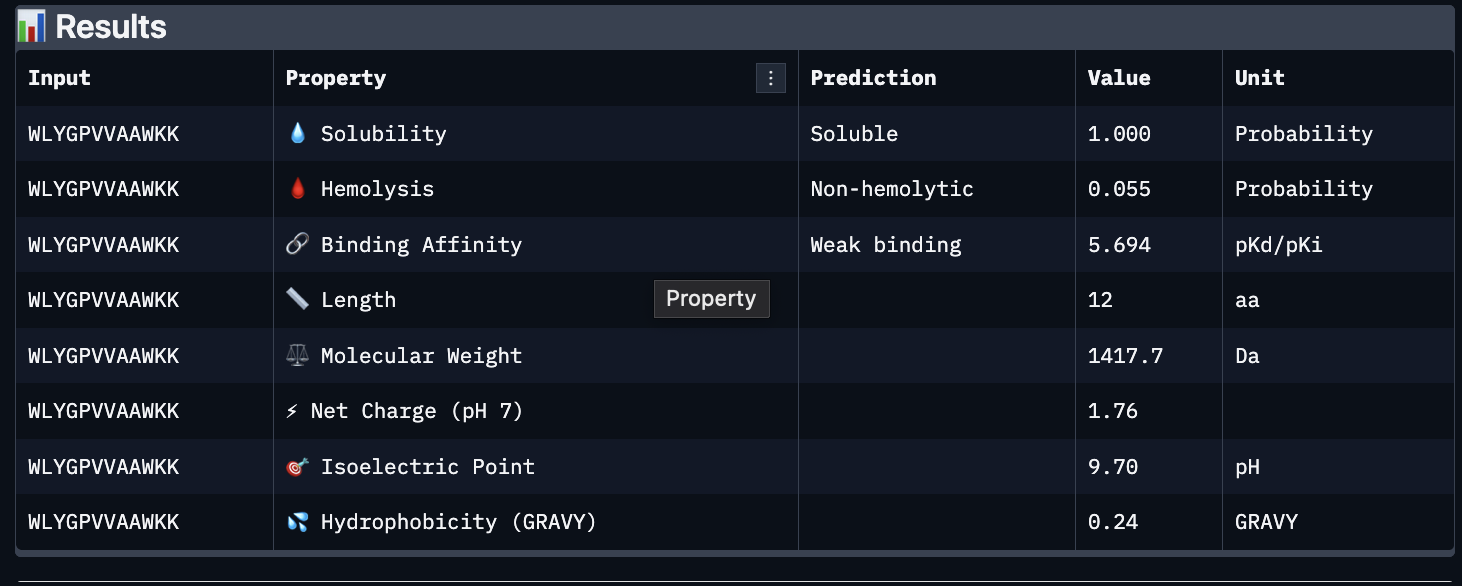
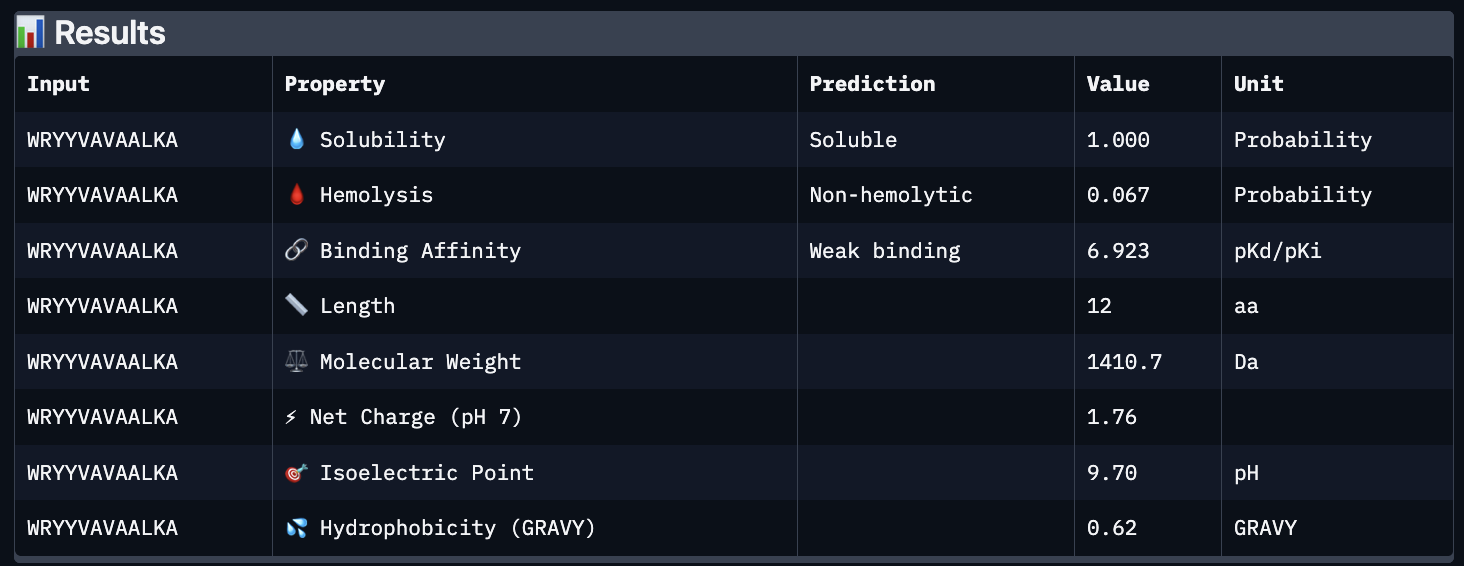
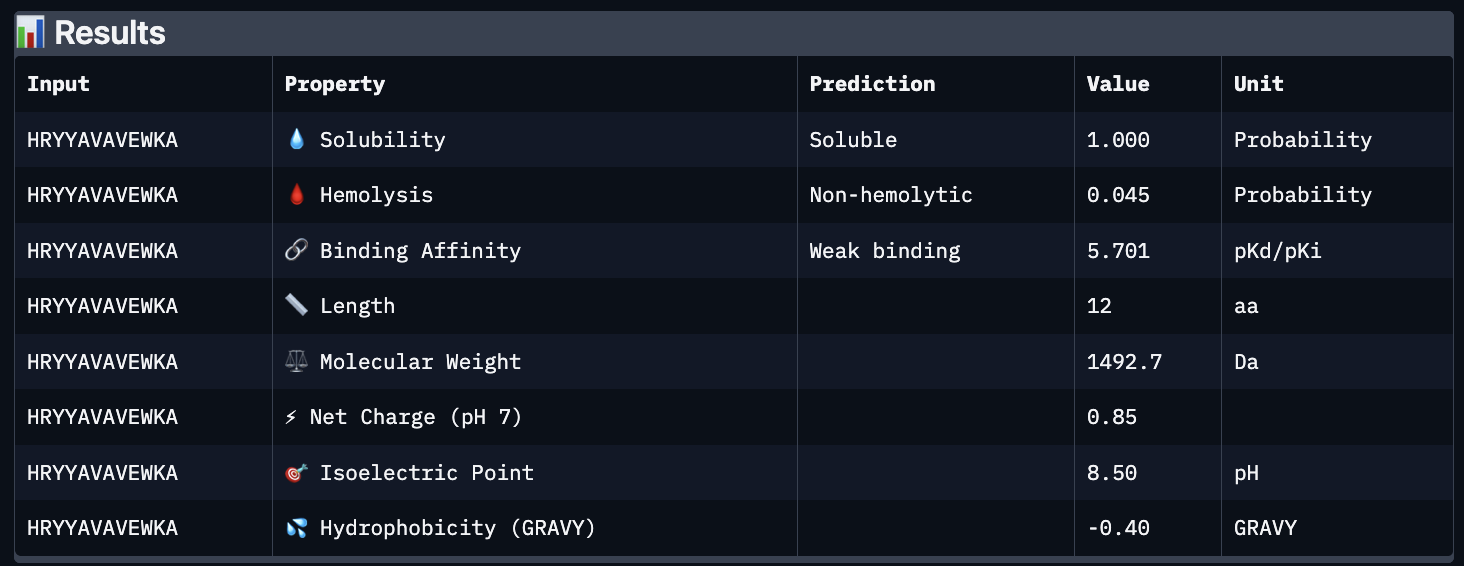
Using PeptiVerse, I got the following images:
These predictions pretty much align with what I actually saw in AlphaFold, particularly with the weak binding. Between the known, index 0, 1 and 4, the binding predictions were marginally different, which is suprising because the known had a higher score, and the same score as index 2. However, index 2 has a relatively large jump in predicted affinity. Other than that, they were all predicted to be soluble and non-hemolytic.
If I had to choose a peptide to advance, I would pick index 2, only because on paper it looks slightly stronger than the other options with a slightly higher iPTM and binding affinity score. But to be honest, if I were tasked with this, I would try to generate other peptides first because these are all very poor options.
Part D:
To follow the homework, I had my target protein with the A4V mutation, and I chose 3 samples with a binder length of 12. I also checked off the boxes: Hemolysis, Affinity, Solubility and Motif. For the motif positions, I chose 2-7 because I wanted it to bind near the site 4 mutation.
The following peptides were generated:
‘EKLQCKKTFENQ’
‘KVKQCGFTQGDE’
‘STESGDTSYGTA’
Unsurprisingly to me, these optimized peptides had weak predicted binding affinities according to peptiverse. It’s possible that I just did not pick a good site to bind to, but part of me feels that the tools for predicting proteins are not advanced enough to make significant predictions. They differ from my PepMLM peptides very greatly though, as there seem to be a different general composition and more variety in amino acids.
In theory, if they were worth advancing, I would make sure to observe their binding and activity first. Then, I would try to assess stability and pharmacokinetic propertie,s and stability and half-life would be very useful measurements here. I think it would be worth evaluating almost everything, as in order to be used in clinical applications, peptides should be seriously screened as to not interfere with the human body.
Part 3: Lab
To be honest this lab was super confusing. I generated all of these things from the Google Colab that was generated up until the “stop here” point. This is what was generated:
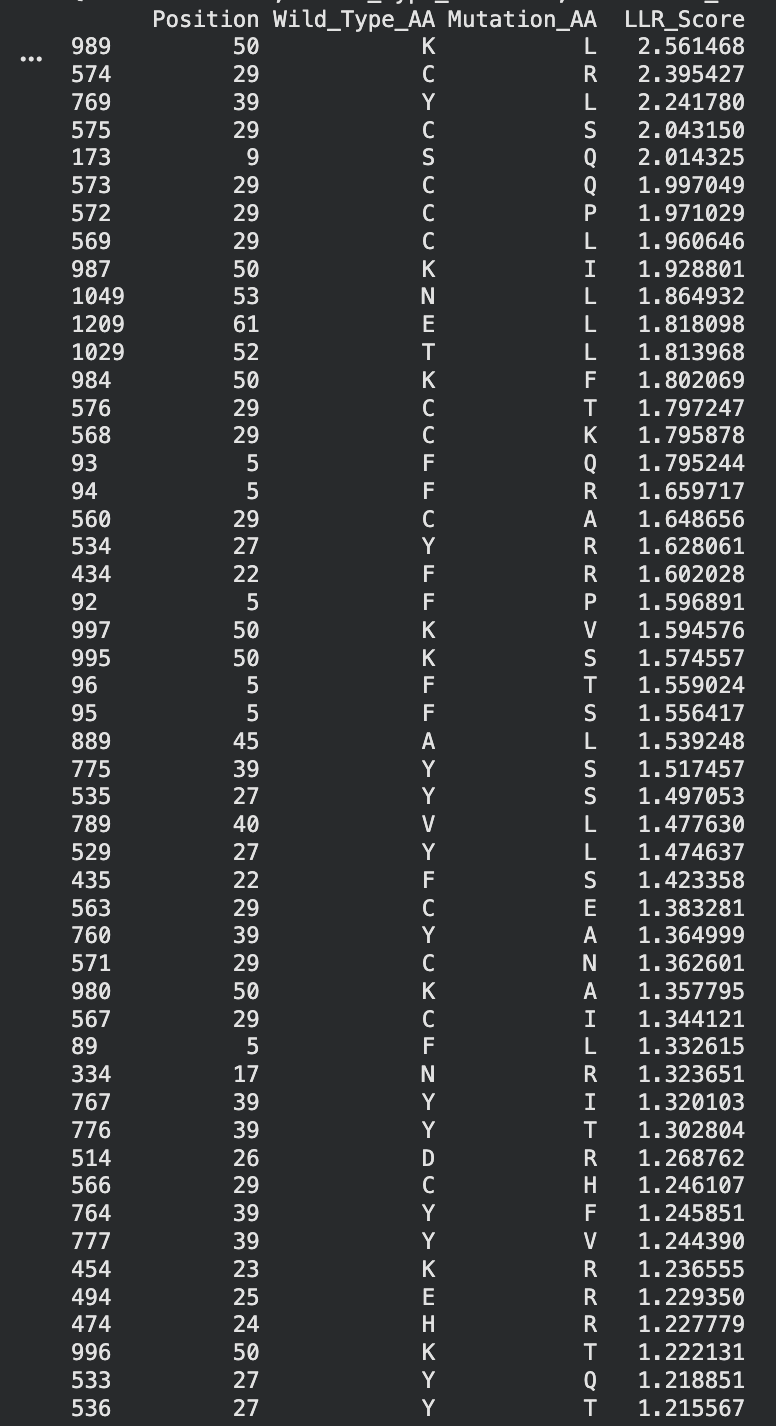
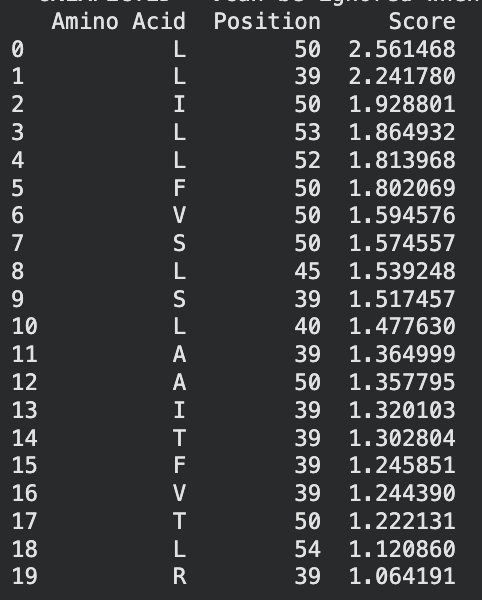
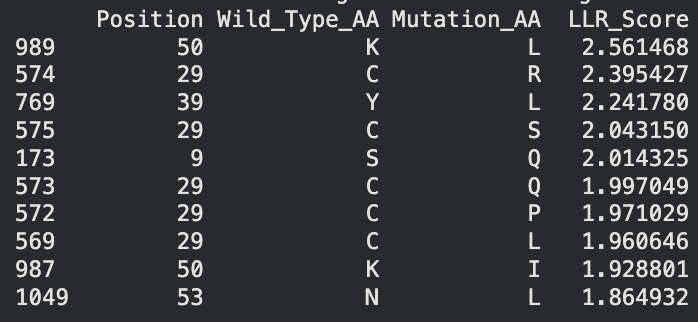
I identified the probable transmembrane helix by locating the longest hydrophobic stretch in the sequence, which spans approximately residues 40–62. Residues before this region were treated as soluble. Based on this topology estimate, I selected at least 2 mutations from the transmembrane region and at least 2 from the soluble region, prioritizing substitutions with high mutation scores and avoiding changes likely to disrupt conserved or experimentally sensitive residues.
A good set of five mutations would be:
S9Q (soluble region) – Position 9 is in the N-terminal soluble region. The mutation S→Q had a high computational score and similar polarity, so it likely preserves structure while allowing variation.
C29R (soluble region) – Position 29 is also in the soluble domain and appears multiple times in the mutation-score ranking. Substituting arginine introduces a charged residue that may improve solubility while remaining tolerated experimentally.
Y39L (soluble / boundary region) – Position 39 sits right before the transmembrane helix. The mutation to leucine had a strong score and may stabilize the transition into the hydrophobic helix because leucine is hydrophobic.
K50L (transmembrane region) – Position 50 lies inside the predicted transmembrane helix. Replacing lysine (charged) with leucine (hydrophobic) should better match the membrane environment. It also had the highest LLR score, suggesting it is strongly favored.
N53L (transmembrane region) – Position 53 is also inside the hydrophobic helix. Substituting leucine increases hydrophobicity and is consistent with residues typically found in membrane-spanning helices.
I selected mutations with high predicted scores, avoided stop mutations or positions that eliminated protein expression in the experimental dataset, and ensured the substitutions were biophysically reasonable for their regions. For soluble regions I chose substitutions that maintain polarity or introduce tolerated charges, while for the transmembrane helix I favored hydrophobic substitutions that stabilize membrane insertion
Week 6 HW: Genetic Circuits Part I
Part 1: Homework Questions
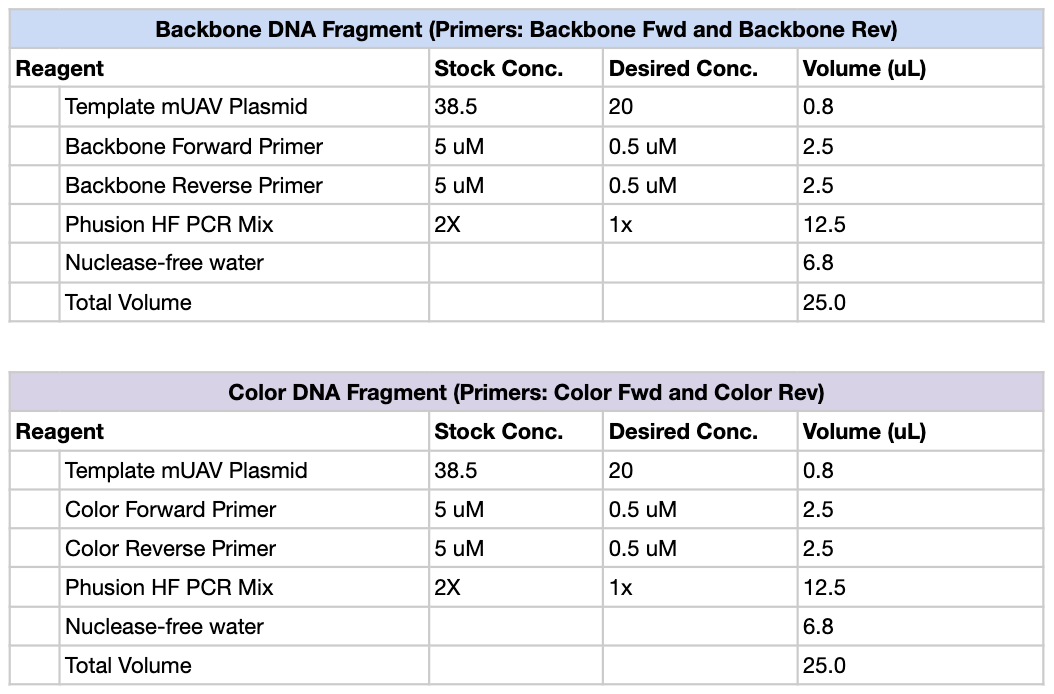
Phusion High-Fidelity PCR Master Mix contains several components required for DNA amplification. The Phusion DNA polymerase is the enzyme that synthesizes new DNA strands; it has proofreading (3’→5’ exonuclease) activity, which greatly reduces mutation rates compared with standard Taq polymerase. The mix also includes dNTPs (deoxynucleotide triphosphates), which are the nucleotide building blocks incorporated into the newly synthesized DNA. A reaction buffer provides the correct chemical environment (pH, salts, stabilizers) to maximize enzyme activity and fidelity. Mg²⁺ ions (usually from MgCl₂) act as essential cofactors for polymerase function and influence enzyme efficiency.
Primer annealing temperature is mainly determined by the melting temperature (Tm) of the primers, which depends on their sequence composition. Primers with higher GC content generally have higher Tm because G–C pairs form three hydrogen bonds compared with two in A–T pairs. Primer length also affects Tm, as longer primers form more stable duplexes with the template. Salt concentration and Mg²⁺ levels in the reaction buffer influence DNA duplex stability and therefore the optimal annealing temperature. Additionally, primer secondary structure or mismatches can reduce binding stability and may require lower annealing temperatures.
PCR and restriction enzyme digestion both produce linear DNA fragments but operate through different mechanisms. PCR uses primers and a DNA polymerase to amplify a specific DNA region from a template through thermal cycling. This method is highly flexible because primers can introduce mutations, overhangs, or homologous regions, making PCR useful when generating fragments for cloning or modifying sequences. In contrast, restriction enzyme digestion uses enzymes that recognize specific short DNA sequences and cut at those sites, producing predictable fragments with defined ends (often sticky or blunt). The digest protocol is simpler and faster if the required restriction sites already exist in the DNA. PCR is preferable when amplifying small regions, adding sequences, or working from low DNA amounts, while restriction digests are preferable when cutting large plasmids or isolating fragments with existing restriction sites without introducing polymerase errors.
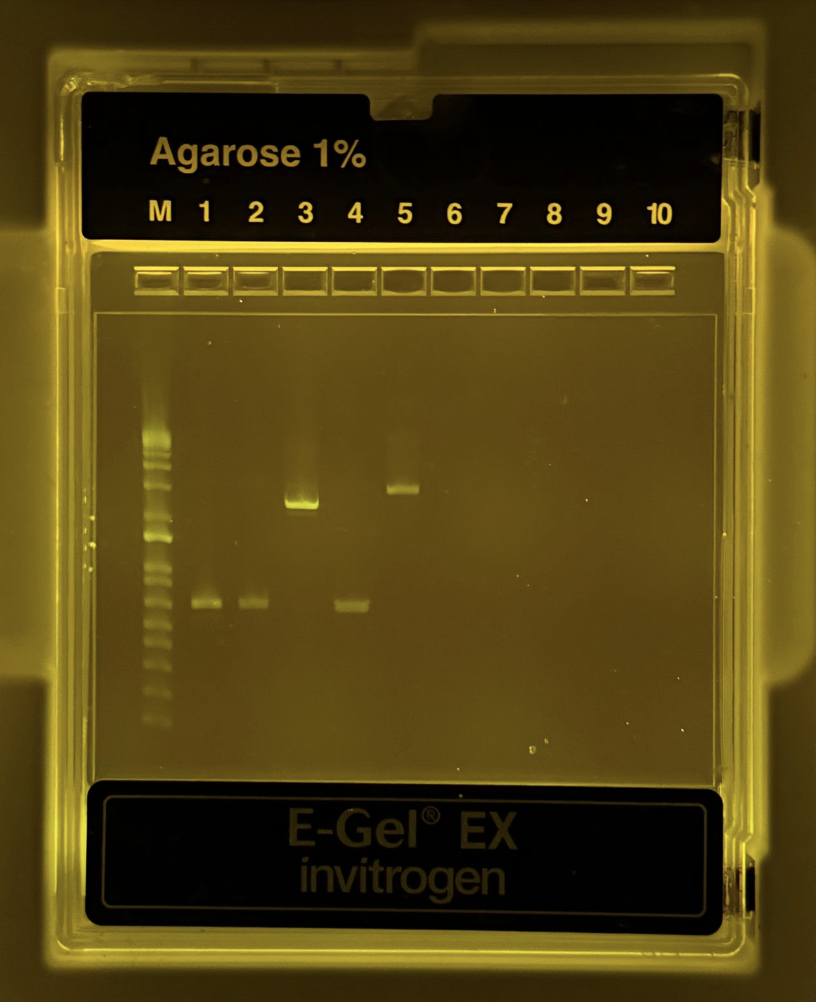
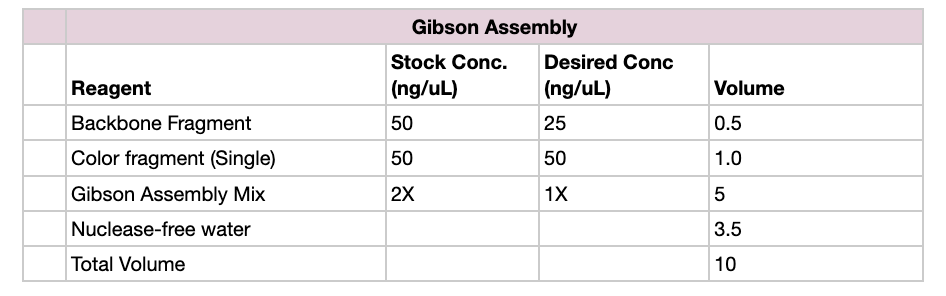
For Gibson Assembly, DNA fragments must have overlapping homologous sequences at their ends so they can anneal during the assembly reaction. These overlaps are usually designed into PCR primers, ensuring that adjacent fragments share complementary sequences. After PCR amplification or digestion, the fragments should be checked by gel electrophoresis to confirm the correct size and purity. It is also important to verify that the overlaps match the intended assembly order and that no incompatible restriction sites remain within the overlaps.
Golden Gate Assembly is a DNA cloning method that uses Type IIS restriction enzymes and DNA ligase in a single reaction to assemble multiple DNA fragments in a defined order. Unlike standard restriction enzymes, Type IIS enzymes cut outside their recognition site, producing custom overhangs that can be designed to be unique for each fragment. During the reaction, the restriction enzyme cuts the DNA to create compatible overhangs, and DNA ligase simultaneously joins the fragments together. Because the recognition sites are removed after ligation, the final assembled product cannot be cut again, allowing the reaction to proceed efficiently toward the correct construct.
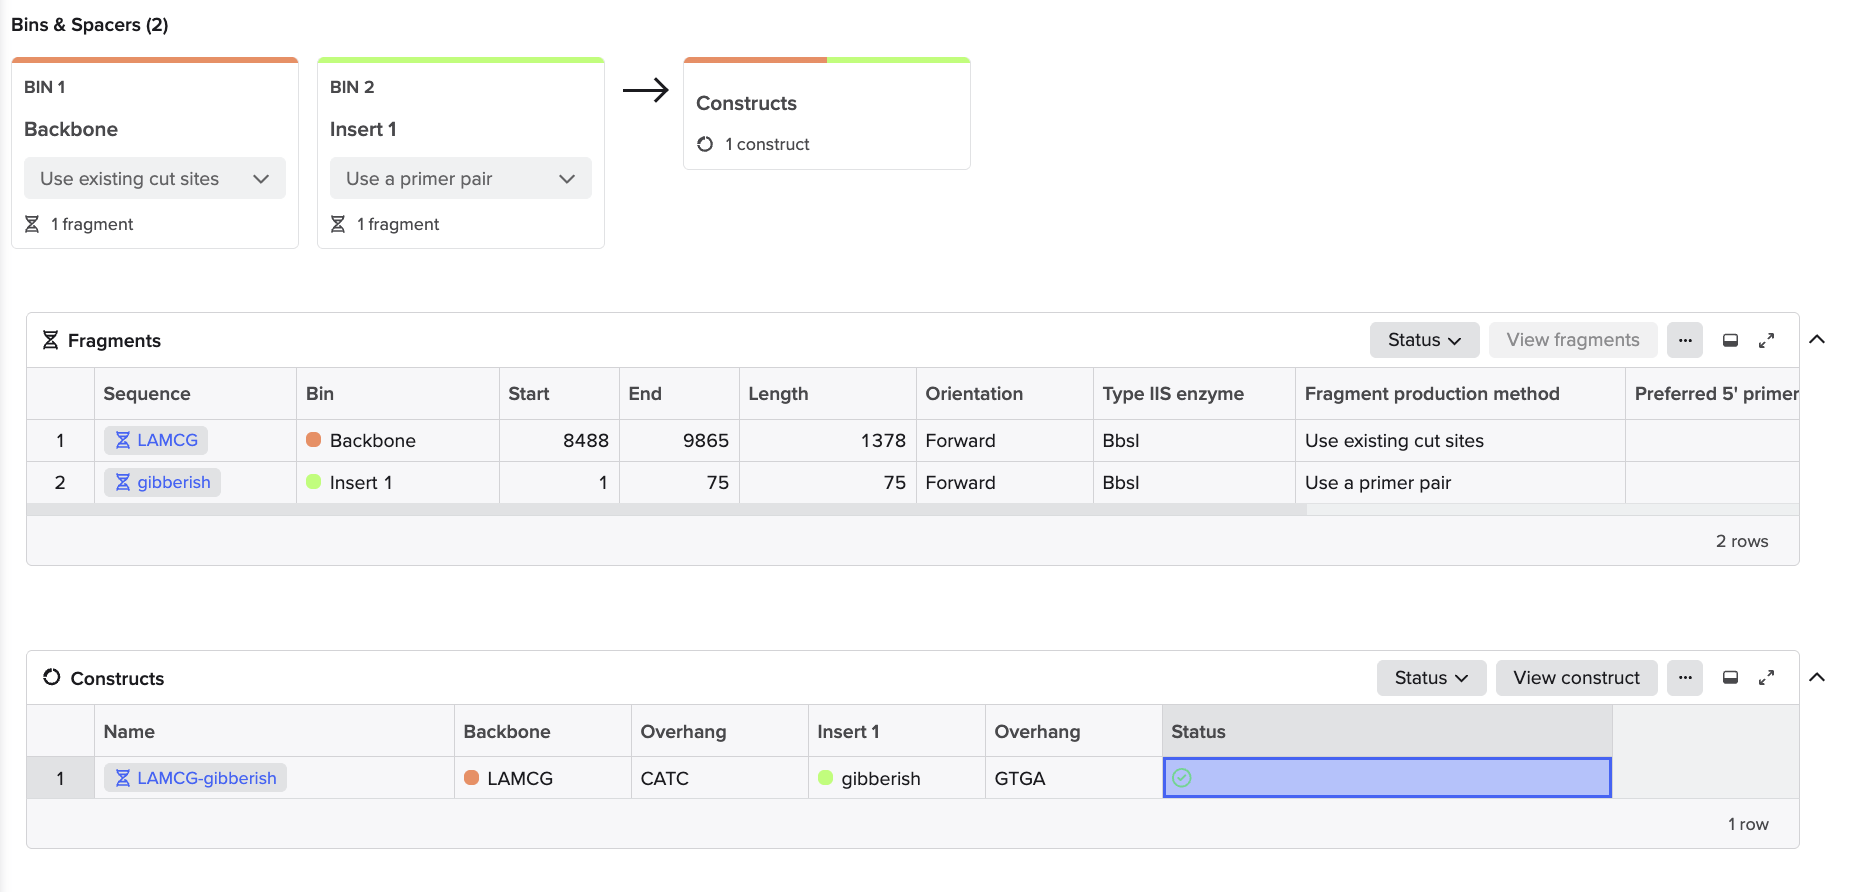
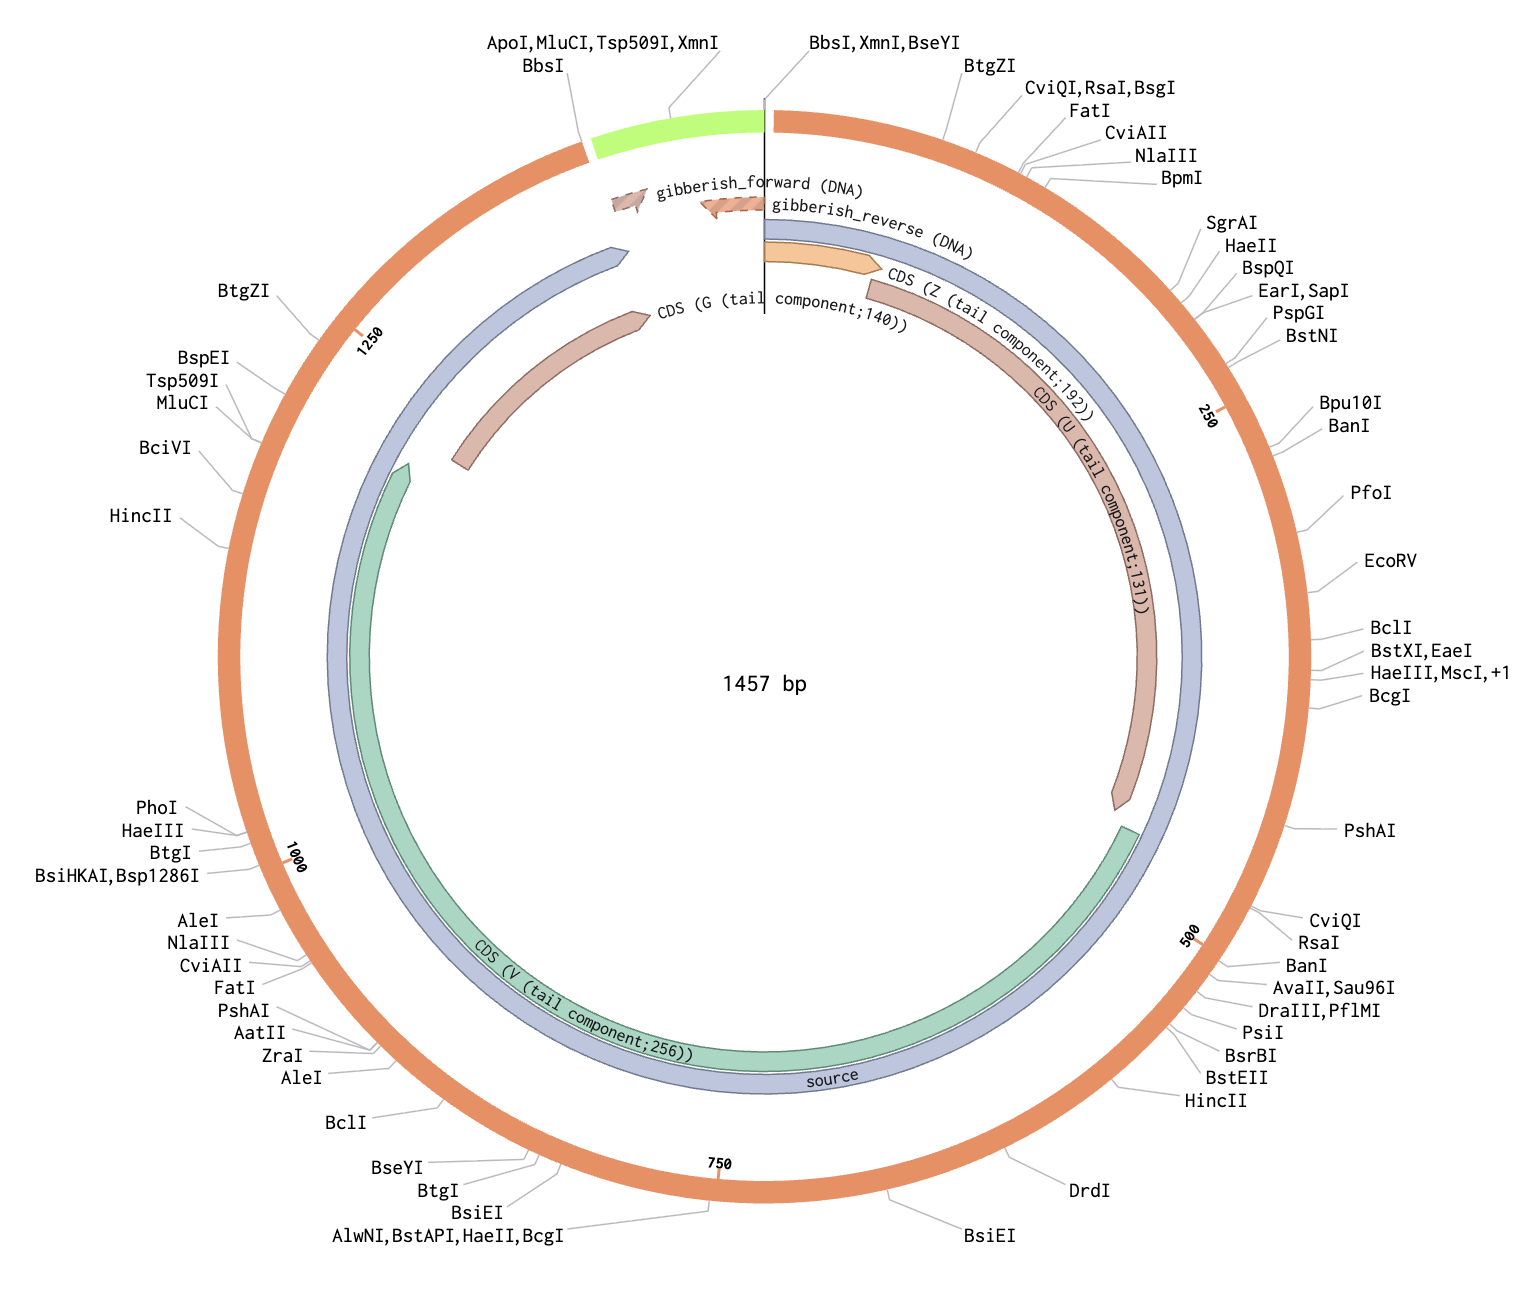
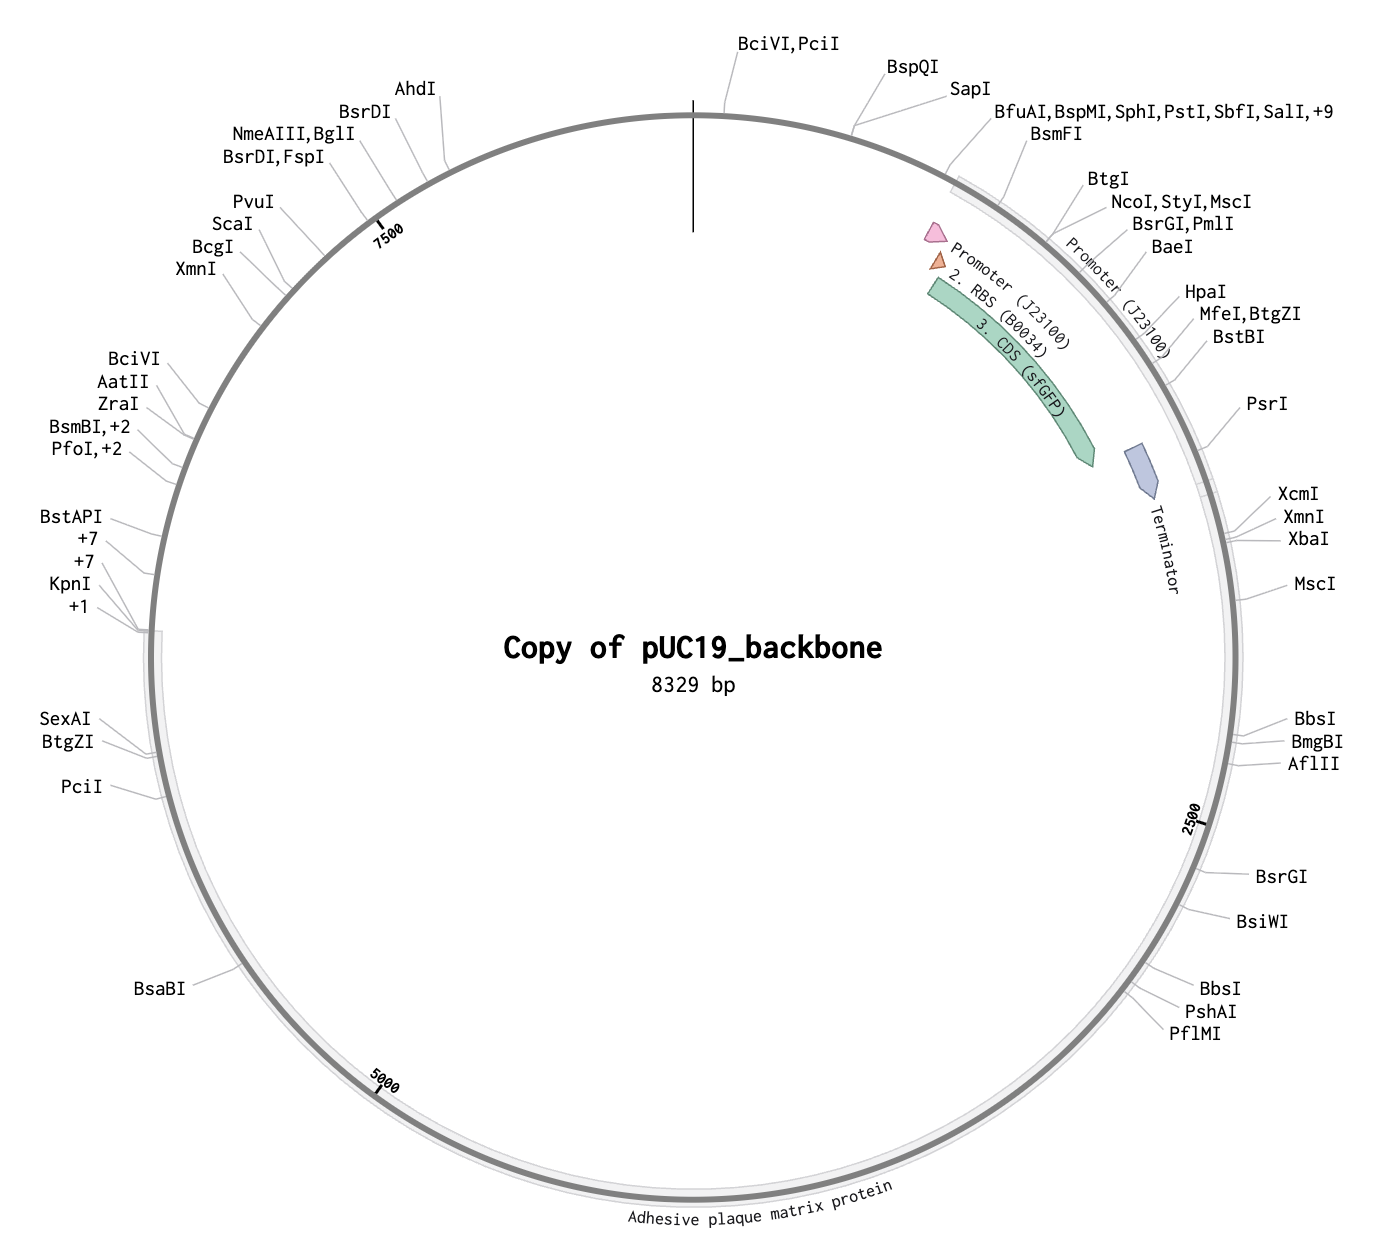
To model this, I just chose two random sequences (LACMG that we worked with once, and a gibberish one that I have for some reason). I went to Benchling to model the assembly, and this is what came out of it:
Hopefully the steps I followed were right because I just followed the template that I Was provided through Benchling.
Part 2: Kernel
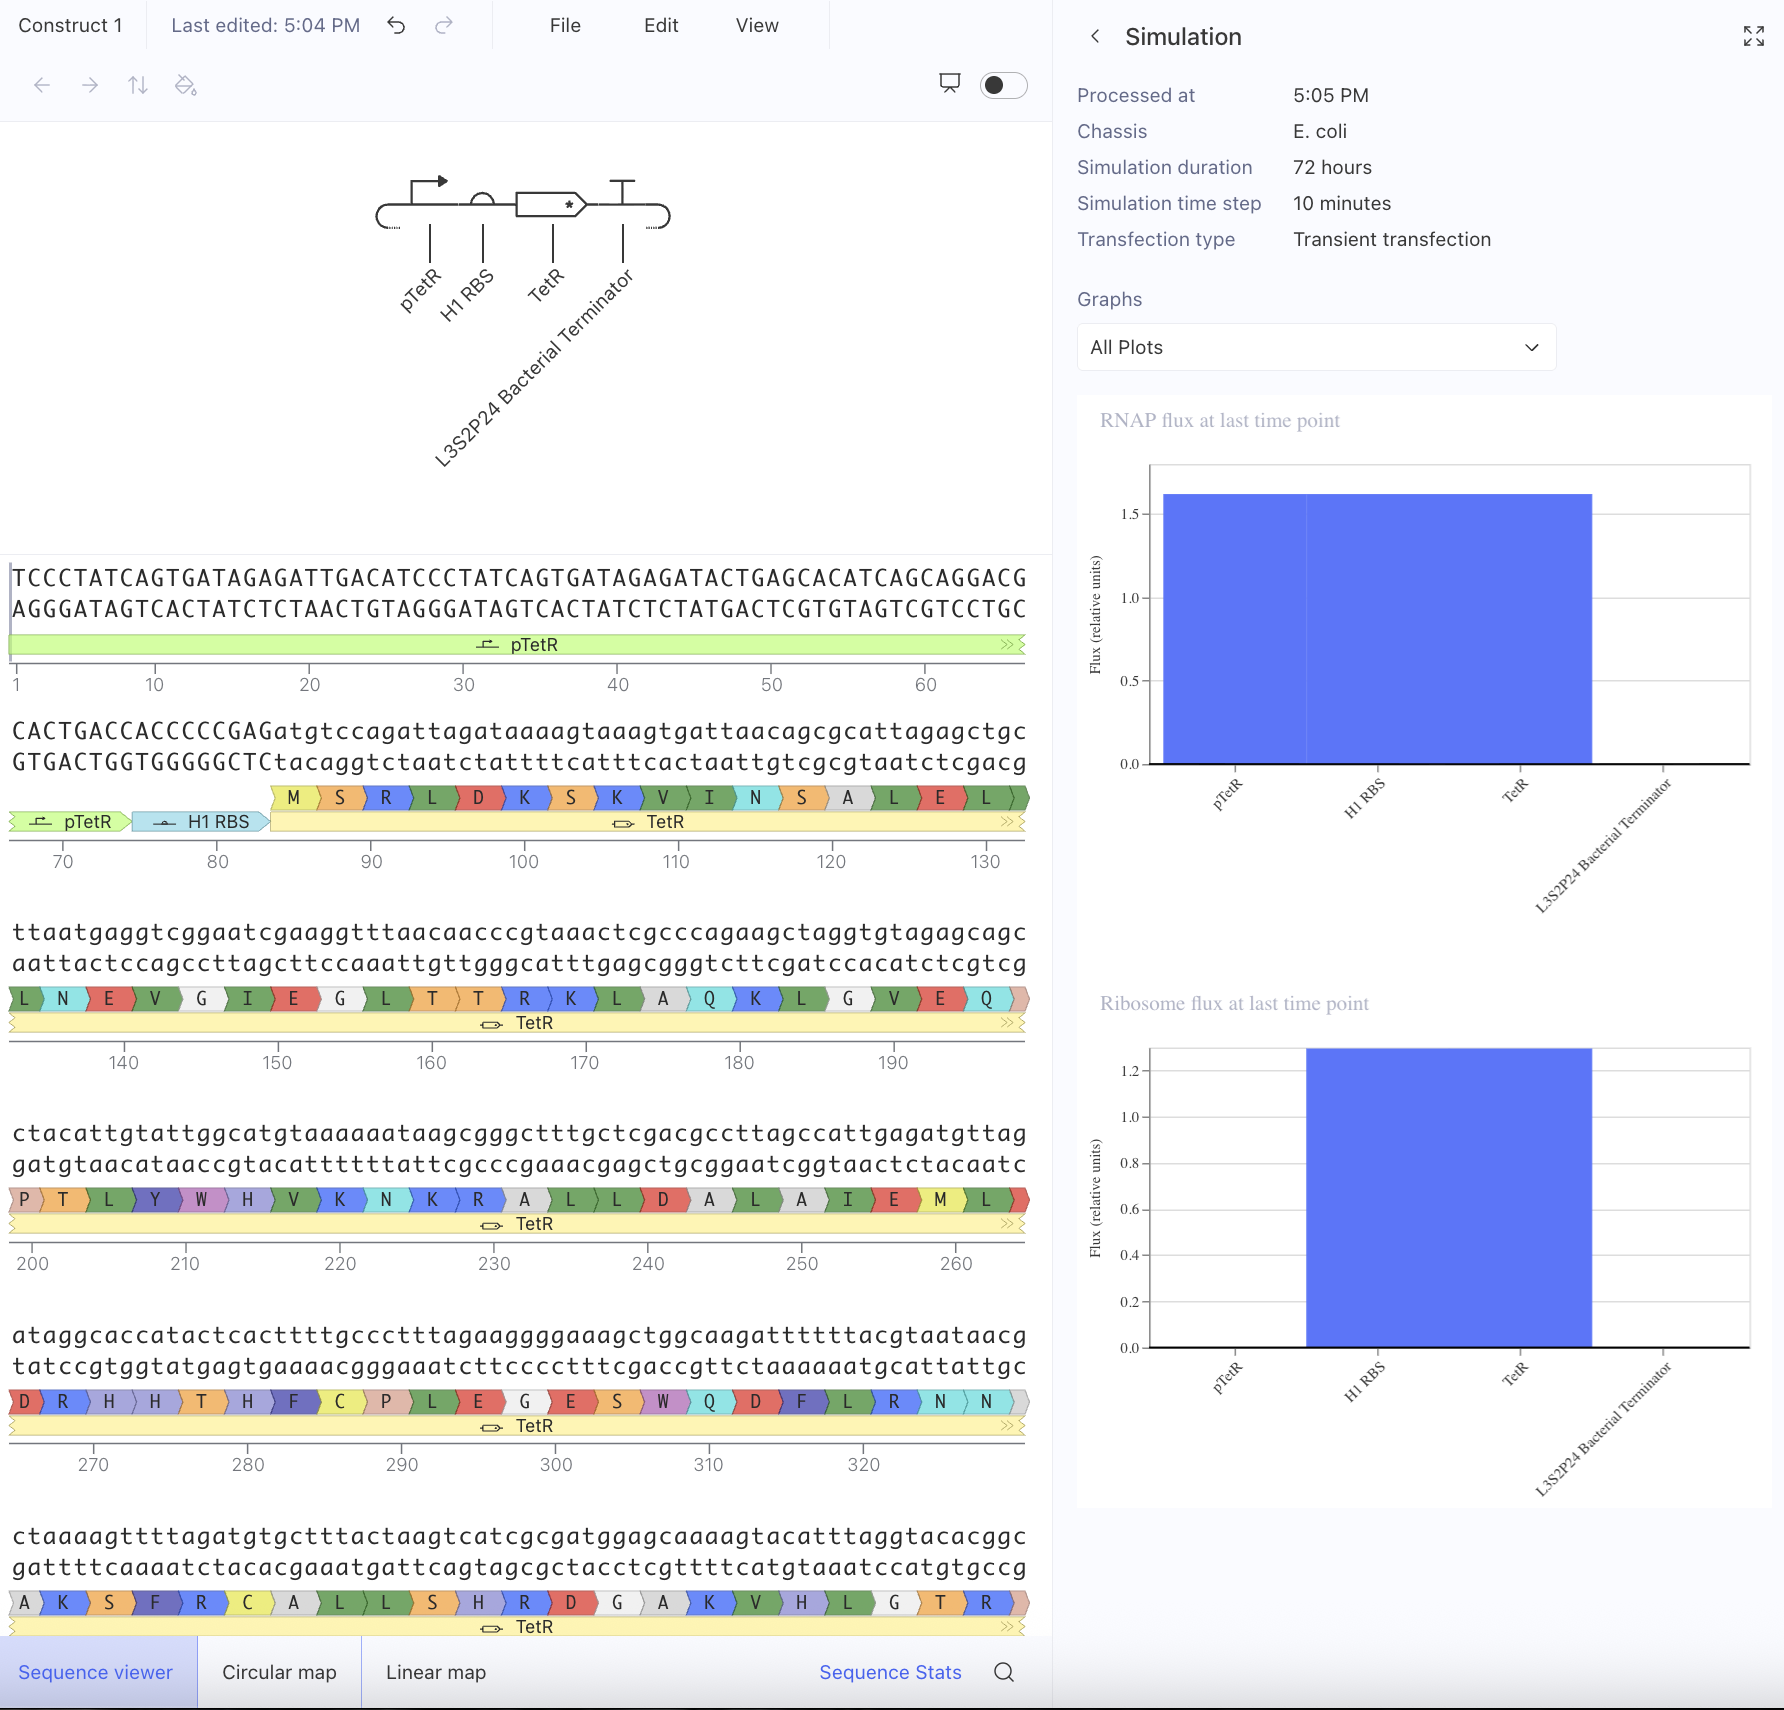
First, I just messed around with the Bacterial Demos Repository, and clicked o random parts to see what the platform felt like to me. i then went to the J23117 Promoter and viewed what was going on there. I went to the simulate button to simulate the process at a random timestep and duration of my choosing, with E. Coli as the chassis. Here is a screenshot of my results:
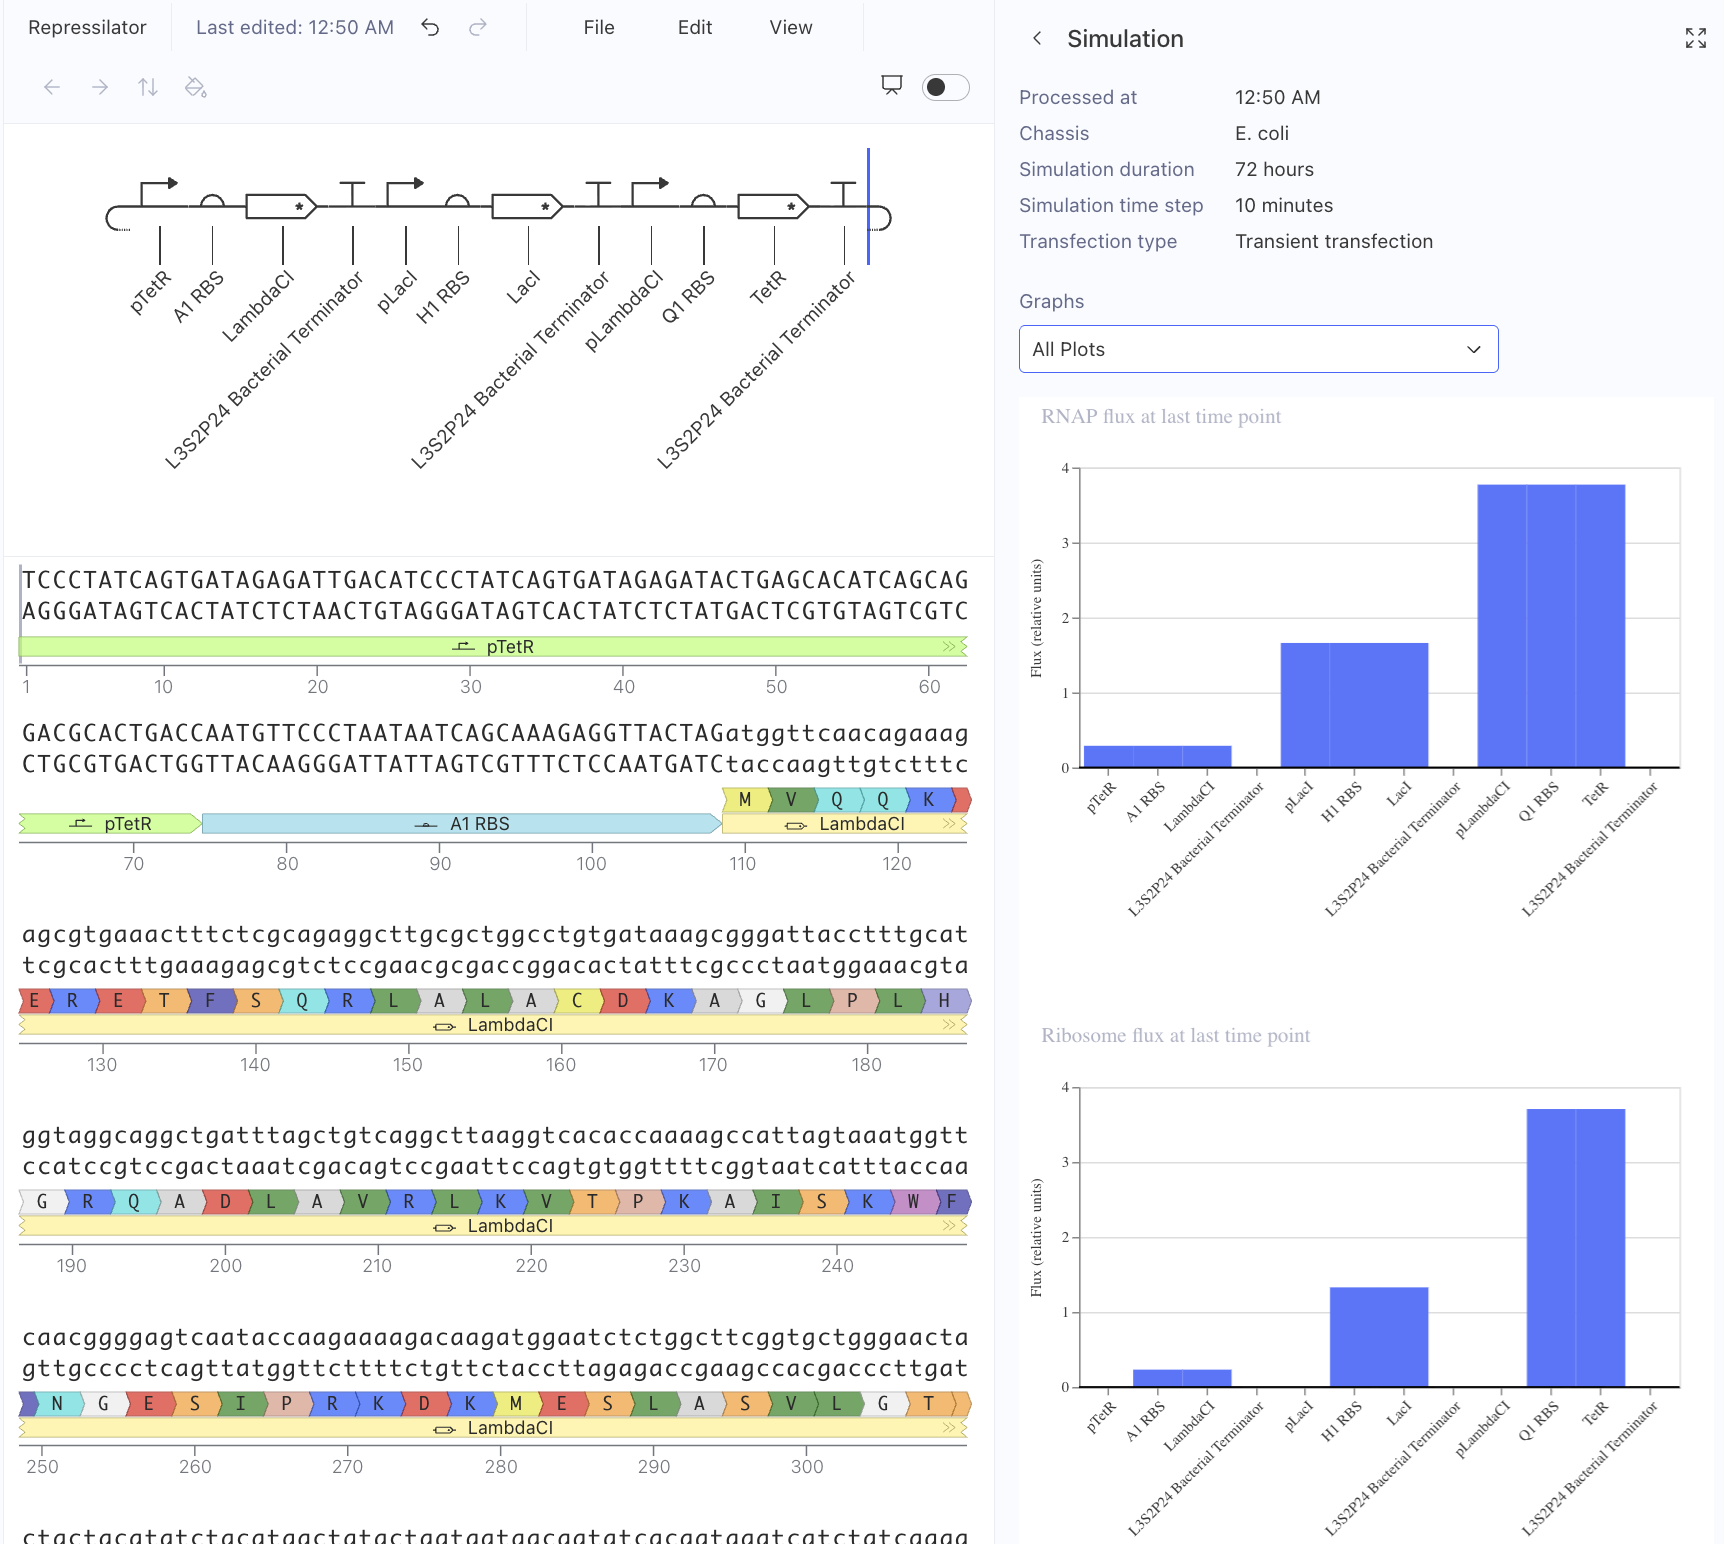
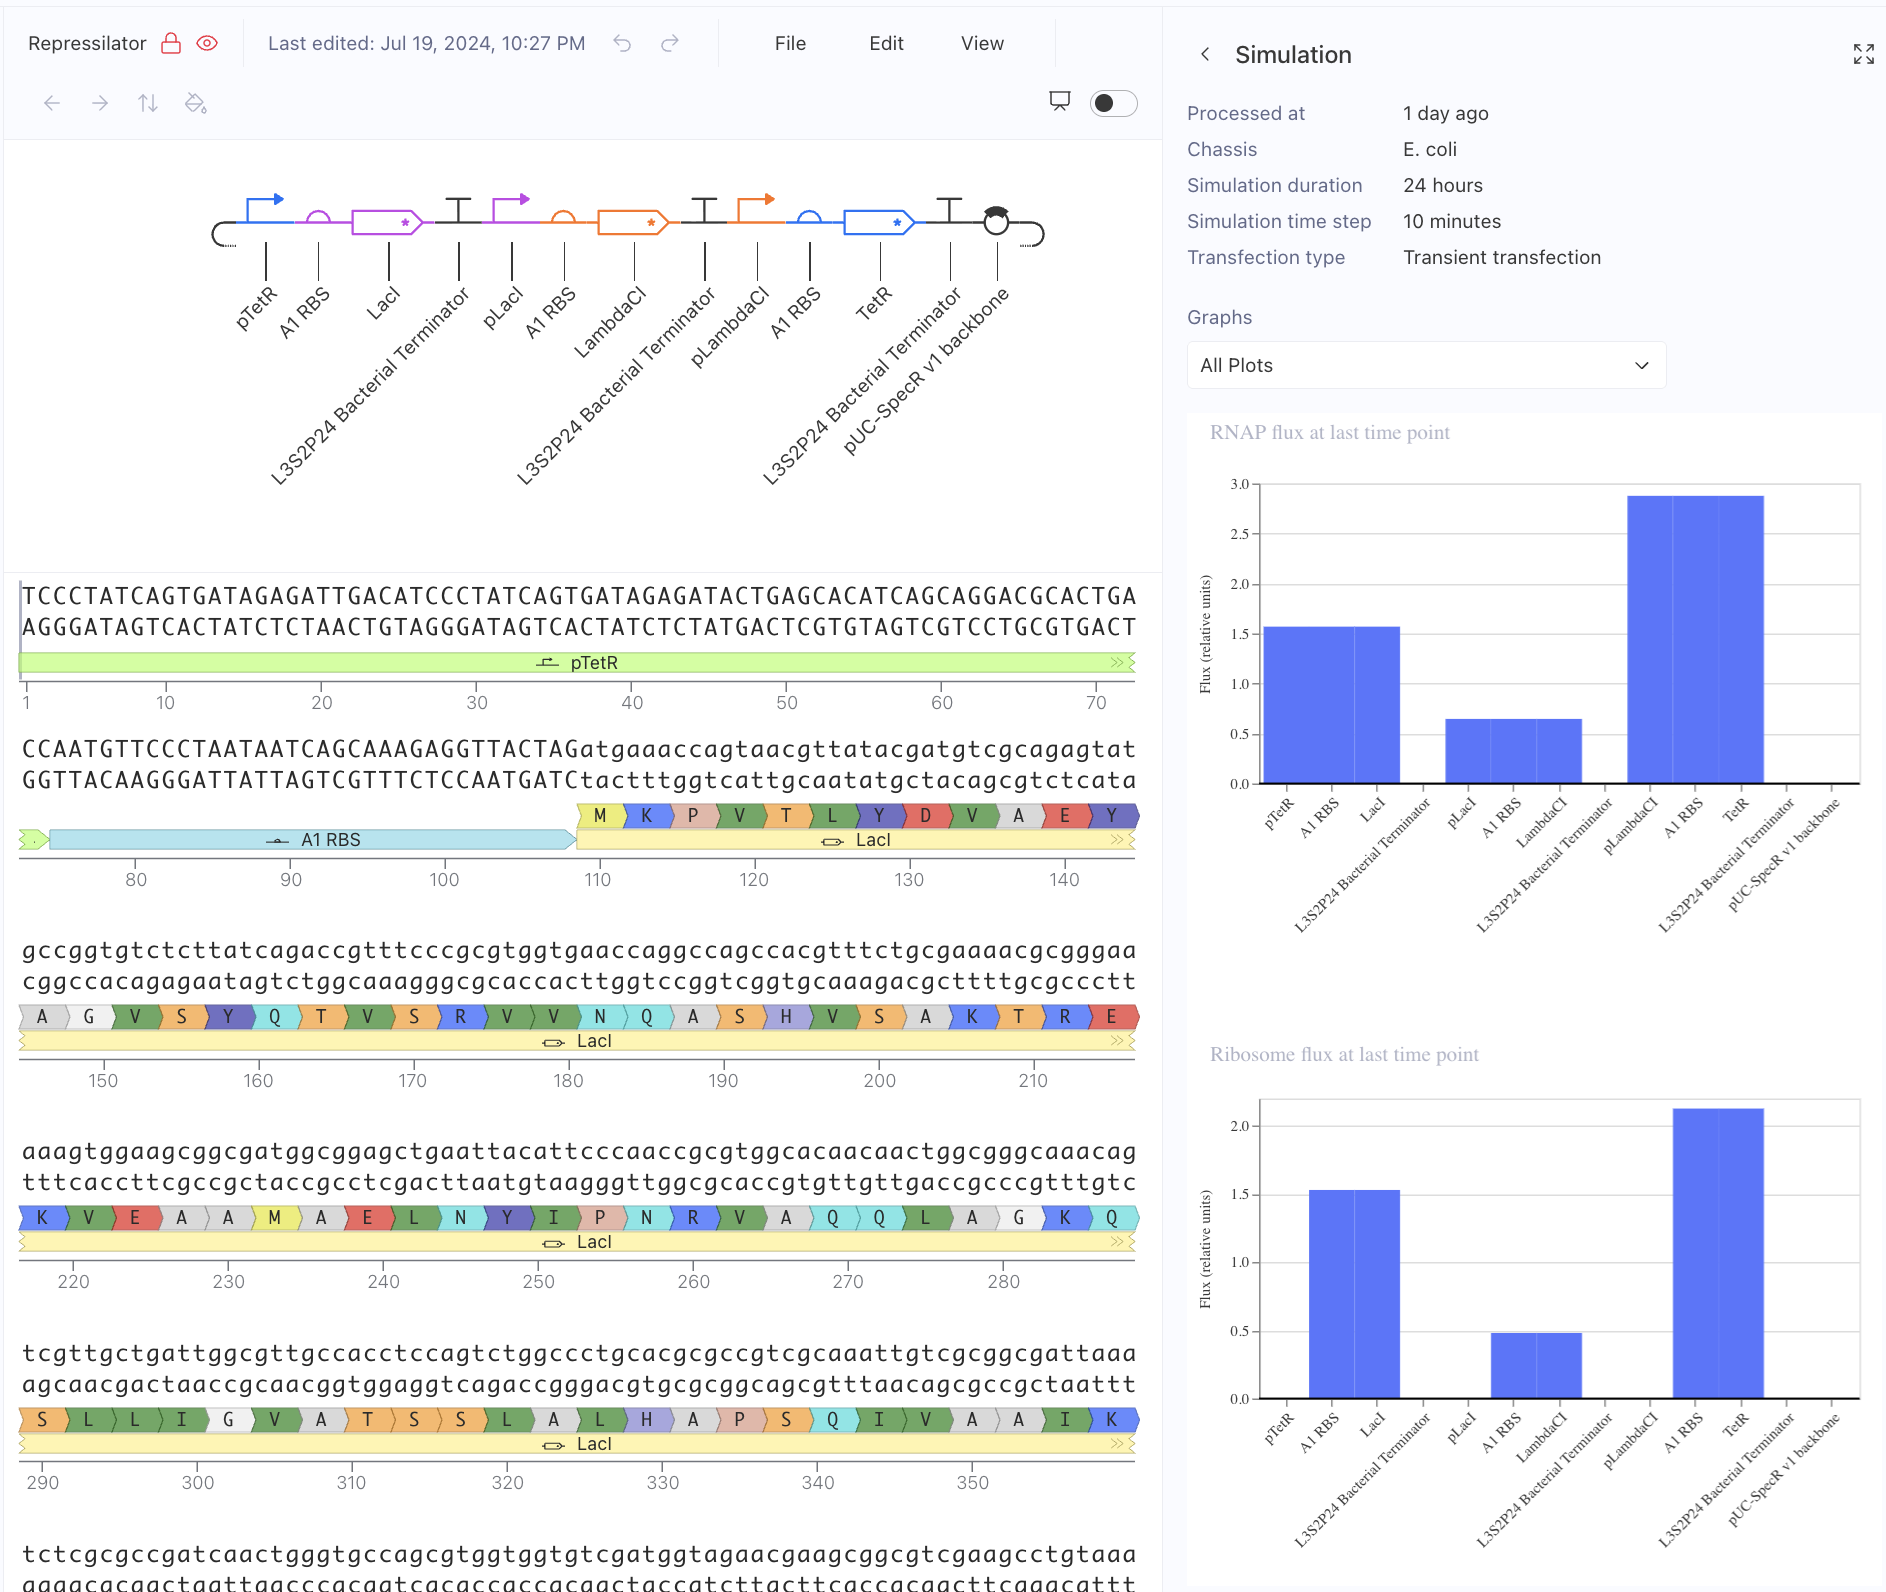
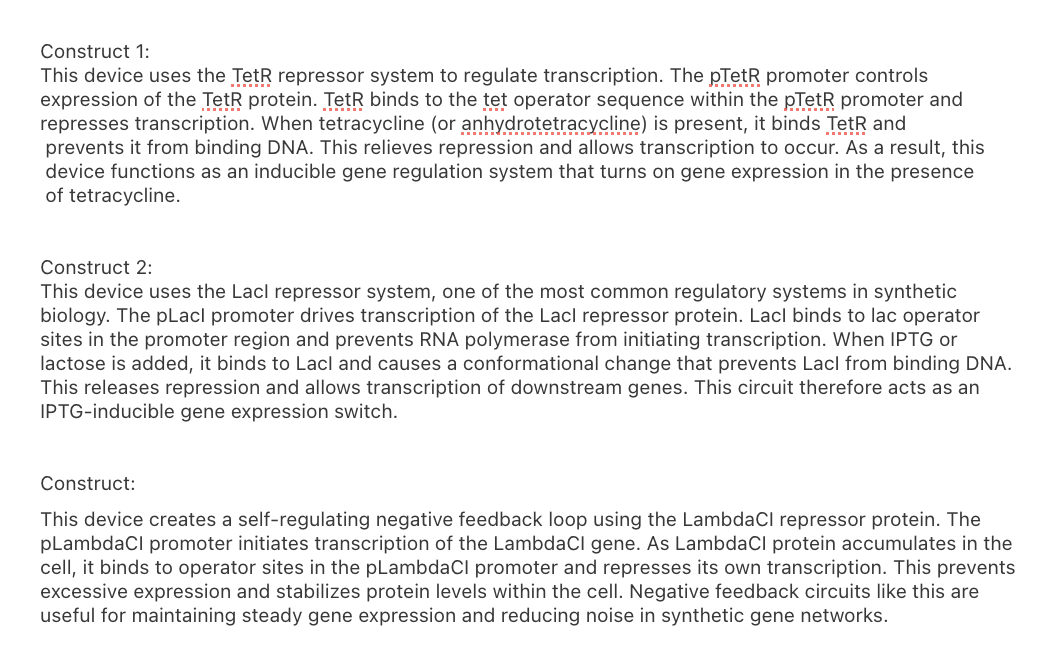
Then, I created a repressilator, with the comparison below of the one located in bacterial demos:
I’m fairly confident that I did mine correctly as the simulations look quite similar, and the overall set-up contains similar components.
Afterwards, I just put together some random constructs after fumbling around Kernel forever. Not sure if there were guidelines but I thought they would be cool.
Predictions here:
I think overall, the simulations have similar outputs as to what my predictions are. Not very much to comment on either!
Week 7 HW: Genetic Circuits Part II
Part 1: Homework Questions
IANNs allow cells to perform analog, weighted, decision-making rather than simple binary logic. Traditional genetic circuits usually implement Boolean gates, where inputs are treaed as on/ofof signals and outputs are discrete. In contrast, IANNS use components whose activities can vary continuously, allowing inputs to contribute different weights to a final output. This allows cells to integrate multiple signals simultaneously, filter noise and produce grade responses. IANNs overall can scale more easily to complex behaviors, making them better suited for biological environments with continuos noisy signals.
A useful application of IANN would be a smart probioitic diagnostic cell that detects complex disease states in the gut. Inputs: The circuit could receive several molecular signals associatied with inflammation, such as nitric oxide levels, reactive oxygen species or other responsive promoters. Each input drives production of regulators that act with different weights on the expression of a reporter gene.
Processing: Each regulator modifies the stability or translation of the reporter mRNA. If the combined signal exceeds a threshold, the cell expresses a fluorescent protein or therapeutic molecule. This allows the cell to classify complex physiological states, rather than triggering on a single biomarker that might fluctuate naturally. Output: Low combined signal → little or no reporter expression. Moderate signal → weak expression. High combined signal → strong reporter or drug release.
Limitations: There are several constraints that could limit implementation. For example, gene expression fluctuations can distort weights and thresholds, making outputs inconsistent. Promoters and translation systems may saturate, preventing precise analog weighting. Large networks can slow cell grwoth or destabilize circuits. Furhtermore, large networks could slow cell growth or dsetabilize circuits and tuning these weights rqequires iterative experimental optimization.
stuff
Part 2: Fungal Materials
Several commercial materials are made from fungal mycelium. One example is mycelium-based packaging produced by Ecovative, which grows fungal mycelium through agricultural waste to create molded protective packaging that replaces polystyrene foam. Mycelium composites are also used for insulation panels and structural building materials, such as mycelium bricks and boards that can be grown into shape. Another emerging product is mycelium leather, developed by companies like MycoWorks and Bolt Threads, which produces flexible sheet materials that mimic animal leather for fashion products. These fungal materials offer several advantages over traditional materials. They are renewable and biodegradable, can be grown from agricultural waste, and require much lower energy input than plastics or synthetic foams. Mycelium materials can also be grown directly into molds, reducing manufacturing steps and waste. However, they also have disadvantages: mechanical strength and durability are generally lower than plastics or synthetic composites, they can be sensitive to moisture, and scaling production with consistent material properties remains challenging.
One useful direction would be engineering fungi to produce stronger or more functional mycelium materials. For example, genes could be modified to increase chitin or glucan crosslinking in the cell wall to improve stiffness and toughness of mycelium composites used in construction or packaging. Fungi could also be engineered to produce functional biomaterials, such as mycelium that incorporates conductive proteins for bioelectronics or that secretes adhesives or antimicrobial compounds. Another application could be fungi engineered to capture pollutants, such as heavy metals or microplastics, allowing grown fungal materials to act as environmental filtration systems. Fungi offer several advantages as engineering hosts compared with bacteria. Because fungi are eukaryotes, they perform complex post-translational modifications and protein folding, which are necessary for many enzymes and biomaterials that bacteria cannot produce efficiently. Filamentous fungi naturally grow large structural networks (mycelium), allowing them to form macroscopic materials without external scaffolds, something bacteria generally cannot do. Fungi also secrete large amounts of enzymes and proteins, making them good platforms for producing extracellular biomolecules or structural polymers. However, fungi are generally harder to genetically manipulate than bacteria: transformation efficiencies are lower, genetic tools are less standardized, and growth is typically slower.
Part 3: Proposal
Draft Aim 1:
The first aim of my final project is to engineer and fabricate a proof-of-concept nacre-inspired layered bacterial cellulose composite that can restore cohesion after mechanical damage by utilizing bacterial cellulose growth, layer-by-layer composite assembly, embedded microbe or biomaterial healing phases, and mechanical/visual crack-healing assays.
For this aim, I will create a bioinspired “brick-and-mortar” composite in which the rigid brick phase is composed of bacterial cellulose or cellulose nanocrystal-rich sheets and the softer mortar phase contains a living or biologically derived healing component. The experimental objective is not to fully optimize a load-bearing structural material within one class term, but rather to demonstrate that a biologically fabricated layered composite can be assembled under ambient conditions and can show measurable post-damage recovery compared with a non-healing control. This makes the aim achievable while still testing the central concept of self-reinforcing nacre-mimetic materials.
The first part of the work will focus on producing the structural phase. I will culture a cellulose-producing bacterium, such as Komagataeibacter xylinus or a related strain commonly used for bacterial cellulose production, under static growth conditions to generate thin cellulose pellicles. If full bacterial cellulose growth is too slow or inconsistent for the class timeline, I will use commercially available cellulose nanocrystals, cellulose sheets, or pre-grown bacterial cellulose as a backup platform so that the layered composite architecture can still be constructed and tested. These cellulose layers will serve as the nacre-like “bricks,” and I will characterize their thickness, handling properties, and ability to be stacked into a laminated structure.
The second part of the work will focus on designing the healing-enabled mortar phase. My preferred strategy is to incorporate embedded microbes that can secrete adhesive extracellular matrix or biofilm-associated polymers after damage. A practical initial system would use a safe laboratory strain such as E. coli engineered or selected to overproduce curli, polysaccharides, or another extracellular adhesive component in response to induction or environmental stress. If engineering a full damage-responsive gene circuit is too ambitious within the course timescale, I will instead begin with a simpler proof-of-concept approach in which embedded cells constitutively produce adhesive matrix, or I will use a nonliving but biologically relevant healing phase such as alginate, gelatin, extracellular polysaccharide extracts, or secreted biofilm material harvested from cultures. This fallback preserves the core hypothesis that a soft biologically active interlayer can improve crack bridging and recovery.
To fabricate the composite, I will assemble alternating layers of cellulose “brick” sheets and soft “mortar” layers containing either living cells in a hydrogel matrix or a biologically derived adhesive phase. I plan to use simple layer-by-layer casting or lamination methods, with compression or air-drying steps to improve interfacial contact while preserving viability where needed. I will build at least three sample classes: a layered cellulose-only control, a layered cellulose composite with inert polymer mortar, and a layered cellulose composite with the healing-enabled biological mortar. This comparison is important because it will distinguish the effect of architecture alone from the effect of the active healing component.
After fabrication, I will introduce controlled damage to the samples using a reproducible method such as a razor notch, compression-induced cracking, or bending-induced delamination. I will then incubate the damaged composites under conditions that allow the biological phase to respond, such as nutrient supplementation, moisture exposure, or inducer addition if an engineered secretion system is used. Recovery will be evaluated using simple but informative readouts: optical imaging of crack closure, microscopy of the damaged interface, qualitative flexural handling tests, and, if feasible, a basic mechanical assay such as tensile strip testing, puncture resistance, or three-point bending on small samples. The key success metric for Aim 1 will be whether the bioactive composite shows better post-damage integrity, adhesion, or retained mechanical performance than the non-healing controls.
The main tools and resources I expect to use include bacterial cellulose growth protocols, hydrogel encapsulation or biofilm culture methods, sterile culture workflows, plate reader or microscopy-based visualization, simple mechanical testing setups, and DNA/protein design tools if I pursue an engineered secretion module. For design work, I may use Benchling for plasmid design, Addgene parts or literature-based extracellular matrix constructs for candidate secretion systems, and standard cloning workflows such as Gibson assembly or Golden Gate if a genetic build is included. If ordering DNA is feasible, I would prioritize a minimal construct enabling production of an adhesive extracellular component rather than a fully damage-sensing circuit, since secretion itself is the most important first milestone.
Overall, Aim 1 is designed to establish a feasible experimental foundation for the project by demonstrating that a nacre-inspired bacterial-cellulose composite can be biologically fabricated and that incorporation of a living or biologically derived healing phase improves recovery after damage. Even if the final system does not yet achieve full autonomous self-repair, successfully fabricating the layered architecture and observing enhanced post-crack cohesion would provide strong proof of concept for future iterations of a low-energy, biodegradable, self-reinforcing structural material.
Part 4: DNA Order
To put things together, I had to first find a simple backbone, and ended up going with the pUC19 backbone, as I found it in the directoy. A google search told me it was pretty simple and standard, so I decided to trust that. ONce I opened this backbone, I had to insert my repari circuit into the cloning region.
My genetic circuit:
promoter → RBS → repair gene → terminator
Components I chose and why:
j23100 promoter
RBS B0034
Adhesive Plaque Protein (FP1) –> Provides adhesiveness to the mussel’s foot. It seems pretty related and applicable to my end goal
Terminator
Week 9 HW: Cell Free Systems
Part 1: General Homework Questions
Cell’s survival is the priority. In CFPS, the “cell” is broken open, leaving only the machinery. The advantages include more direct access (adding non-canonical AA, detergents, chaperones) or an open system to monitor the reaction in real-time and adjust variables. One case where this is more beneificial would be in toxic proteins; if the protein kills a living host, it can still be produced in a cell-free system because there’s no “life” to extinguish. Another case could be for rapid prototyping, where CFPS allows for cycles in hours rather than the days required for usual cell transformation and growth.
Major components: crude extract provides things like ribosomes, RNA polymerase, translation factors, the DNA template encodes the protein, the energy mix provides energy, amino acids provide building blocks for proteins and cofactors/salts provide ions that help stability and enzyme activity.
Energy provision regeneration is critical because translation is energy-intensive. Every peptide bond requires the hydrolysis of multiple high-energy phosphate bonds. Without regeneration, ATP levels plummet in minutes, and the accumulation of inorganic phosphate inhibits the reaction. Something possible for continuous supply would be to use Secondary Energy Source, such as the Creatine Phosphate/Creatine Kinase system. Creatine kinase transfers a phosphate group from creatine phosphate back to ADP, maintaining a steady-state concentration of ATP throughout the batch reaction.
Prokaryotic: High yield, fast and cheap. A protein that might be produced is GFP, that is simple and doesn’t require complex folding or glycolysations. Eukaryotic systems provide lower yield but are capable of complex post-translational modifications like glycosylation and proper disulfide bond formation. A protein that might be produced in one of these systems is human insulin, which requires specific folding and bridges that the eukaryotic machinery handles better.
When encountering low protein yields in a cell-free system, the first step is often to investigate template stability. In many extracts, endogenous nucleases are present that can rapidly degrade linear DNA templates. A common troubleshooting strategy is to switch to a circular plasmid or supplement the reaction with nuclease inhibitors like Gam protein. A second common culprit is codon bias, where the genetic sequence of the target protein utilizes codons that are rare within the organism from which the extract was derived. This can be addressed through synonymous gene sequence optimization or by using specialized extracts supplemented with rare-target tRNAs. Finally, the concentration of magnesium ions is a critical variable that often requires a titration experiment. Because magnesium is essential for ribosome assembly but inhibitory at high concentrations, performing a series of reactions across a gradient is a standard strategy to find the “sweet spot” for a specific proteins.
Part 2: Homework Questions from Kate Adamala
Designing a cell-free experiment for membrane proteins introduces the unique challenge of hydrophobicity, as these proteins often aggregate or misfold without a lipid environment. To address this, one can incorporate synthetic surfactants or detergents into the reaction to keep the protein soluble during synthesis. Alternatively, a more biomimetic approach involves adding nanodiscs or liposomes directly into the cell-free mix, providing a membrane-like scaffold for the protein to insert into co-translationally. The primary advantage here is that the open nature of the system allows you to precisely control the lipid composition to optimize the stability and activity of the membrane protein without the toxicity issues often seen in living hosts.
The structural components of this synthetic cell would include a liposome membrane composed of POPC and Cholesterol to ensure durability and prevent leakage. Inside, we would encapsulate an E. coli S30 extract to provide the metabolic hardware, along with an energy regeneration system like phosphoenolpyruvate (PEP) and the necessary amino acids. A bacterial Tx/Tl system is ideal here because it is compatible with well-characterized, small-molecule-modulated promoters. To allow communication with the environment, the cell must express a membrane channel; specifically, the GlpF gene (glycerol facilitator), which is naturally permeable to arsenite, would be integrated into the design.
From an experimental standpoint, the “genetic software” inside the liposome would consist of a circuit including the arsR repressor gene, a corresponding Pars promoter, and a reporter gene such as Firefly Luciferase (luc). When arsenic enters through the GlpF channels, it binds to the ArsR protein, releasing it from the DNA and allowing the cell-free machinery to transcribe and translate the luciferase protein. The function of the system is then easily measured using a luminometer or a dark-box camera; the intensity of the light emitted serves as a direct, quantifiable proxy for the concentration of arsenic in the water sample.
Part 3: Homework Questions from Peter Nguyen
I propose “Genetic Glass,” a bio-integrated window coating containing freeze-dried cell-free systems that produce UV-blocking pigments in response to high-intensity solar radiation.
The concept involves incorporating lyophilized cell-free machinery into a transparent, porous polymer film applied to building facades. When the humidity in the air or a specialized hydration channel activates the system, it remains “primed” to sense specific environmental triggers. In this design, a light-sensitive protein initiates the expression of melanin or a high-density chromogenic protein. As the sun hits its peak intensity, the window film darkens or becomes opaque, providing dynamic, biological shading that reduces the building’s solar heat gain without requiring mechanical shutters or electricity.
This addresses the massive energy consumption associated with HVAC systems in glass-heavy urban architecture. Traditional “smart glass” requires complex wiring and rare-earth metals; a cell-free biological coating offers a sustainable, “grown” alternative that can be retrofitted onto existing structures to improve energy efficiency and reduce the carbon footprint of cooling large commercial buildings,
To address the one-time use limitation, the design utilizes a “layered capsule” approach within the polymer matrix. Instead of all reagents activating at once, different micro-pockets are engineered to degrade at different rates or under different osmotic pressures, allowing for multiple “cycles” of pigment production over a season. Furthermore, the use of extremophile-derived extracts can ensure that the transcription-translation machinery remains functional even under the high-heat and high-radiation conditions typical of a building’s exterior.
Part 4: Homework Questions from Ally Huang
As we look toward Moon bases and Mars colonies, growing our own food is non-negotiable, but microgravity and cosmic radiation can trigger “silent” plant diseases that ruin a harvest before symptoms are visible.
In closed-loop life support systems, a single fungal or bacterial outbreak could compromise an entire mission’s food supply. Microgravity alters plant immune responses and can increase the virulence of certain opportunistic pathogens. Detecting these threats early is difficult because traditional visual inspections only catch infections once physical damage is done. Developing a rapid, molecular-based detector for plant pathogens using the BioBits® system would allow astronauts to quarantine infected crops and save the rest of the habitat’s yield.
The target is the 16S rRNA sequence (for bacteria) or ITS (Internal Transcribed Spacer) RNA (for fungi) specific to common greenhouse pathogens like Pseudomonas syringae.
Pathogens shed genetic material into the hydroponic water or onto leaf surfaces long before the plant wilts. By targeting highly conserved but genus-specific RNA sequences, we can identify exactly which “hitchhiker” microbe is multiplying in the space farm. This is scientifically interesting because it explores how microbial “shedding” occurs in microgravity and provides a low-resource way to maintain the delicate microbiome balance required for space-based agriculture.
Hypothesis: A BioBits® cell-free reaction, triggered by a pathogen-specific RNA toehold switch, will provide a visible fluorescent “warning light” in less than 60 minutes when exposed to contaminated plant swabs.
Reasoning: In space, we cannot afford the power or mass of a full diagnostic lab. BioBits® is ideal because it is shelf-stable at room temperature and only requires rehydration. By engineering a “toehold switch”—an RNA sensor that only allows a fluorescent protein to be translated when it binds to the pathogen’s RNA—we create a binary (Yes/No) sensor. If the sample contains the pathogen’s genetic “signature,” the BioBits® pellet will glow, providing an immediate, actionable result for the crew.
The experiment will use three sets of BioBits® pellets containing the RNA sensor for P. syringae. Sample 1 (Negative Control): Rehydrated with sterile water. Sample 2 (Positive Control): Rehydrated with a solution containing synthetic target RNA. Sample 3 (Test): Rehydrated with a “leaf wash” from a simulated infected plant. All samples will be incubated in the miniPCR® at $37. After one hour, the tubes will be placed in the P51 Viewer. We will collect qualitative visual data (presence/absence of light) and quantitative data by photographing the tubes and measuring fluorescence intensity.
Overview Materials: The following items were used in the lab:
P200 Pipette: 20-200uL Pipette tips Eppendorf tubes PCR Tubes Petri dish Sharpie Tube holder invitrogen E-Gel EX: Agarose 1% Solutions I used included:
Blue & Red food dye solutions DNA ladder solution (I was not able to get the exact details as the photo of the tube I took was blurry) H2O Machines I used included:
This laboratory module introduces Liquid Chromatography-Mass Spectrometry (LC-MS) as a premier tool for protein characterization, focusing on enhanced Green Fluorescent Protein (eGFP). The experiment follows a logical progression from “minimally perturbative” measurements to increasingly disruptive techniques, allowing students to determine three critical pieces of information: molecular weight, protein folding/structure, and primary amino acid sequence. By moving from intact protein analysis under both native and denaturing conditions to bottom-up peptide mapping, the lab demonstrates how a protein’s physical state directly influences its behavior in a mass spectrometer.Beyond standard eGFP analysis, the curriculum highlights the biochemical nuances of the protein, such as the autocatalytic self-cyclization of its fluorophore which involves a specific $20\text{ Da}$ mass loss. As a specialized bonus, the lab introduces Charge Detection Mass Spectrometry (CDMS) to analyze macromolecular structures that are too large for conventional MS. Students will use this technology to investigate the quaternary structure of Keyhole Limpet Hemocyanin (KLH), a massive complex that exists in multiple oligomeric states within the megadalton range.
Overview Materials: The following items were used to prepare the agarose gel:
Microwavable media storage bottles Agarose TAE buffer SYBR Safe DNA stain Gel tray & comb Eppendorf tubes PCR Tube rack Blue light transilluminator Imaging device Biological material I used included:
Overview Pre-Lab Process The idea of having to write my own code to create this art sounded terrifying at first given that I probably barely passed 6.100A. Then I found out a lot of it was written in Google Colab and felt relieved, until I kept running into issues so I decided to give up and just use Ronan’s code from his website: https://opentrons-art.rcdonovan.com/
Day One Materials: The following items were used:
PCR tubes Centrifuge tubes P200 pipette with 200uL tips P20 pipette with 20uL tips Nuclease-free water Sharpie Tube holder invitrogen E-Gel EX: Agarose 1% Biological material I used included:
Protocol For this section, I had to first download Neuromorphic Wizard, which was a whole process but I managed. I just filled out the Genetic Circuit Design Template with a design of my choice: My group mates decided to do something pretty similar, so we went with the same overall ERN and ERN_rec_ERNs. These were the predictions and experimental set-up that Neuromorphic Wizard came up with.
DNA ladder solution (I was not able to get the exact details as the photo of the tube I took was blurry)
H2O
Machines I used included:
invitrogen E-Gel PowerSnap
Pipette Art
In this part, I created artworks using food dye solutions in a petri dish. The methodology was as follows:
Grab a petri dish and draw a design (in my case, flowers with some geometric components).
Attach pipette tip to the pipette
Draw 150 uL of chosen solution into pipette
Pipette out droplets in pattern and shapes of choice
Dispose of tip when finished
Repeat steps 2-5 until satisfied
Admire artwork!
Gel Electrophoresis
In this part, I tried running an electrophoresis machine for the first time! My methodology was as follows:
Turn on invitrogen E-Gel PowerSnap
Remove invitrogen E-Gel EX: Agarose 1% from packet
Assemble package into machine
Attach pipette tip to the pipette
Open PCR tube of DNA ladder solution
Draw 15 uL of DNA ladder Solution
Pipette out complete volume into chosen wells
Dispose of pipette tip when finished and attach a new one
Draw 15 uL of H2O
Pipette out complete volume into remaining wells
Close lid of machine
Run for 15 minutes
Admire the process!
Pictures
Week 10 Lab: Mass Spectrometry
This laboratory module introduces Liquid Chromatography-Mass Spectrometry (LC-MS) as a premier tool for protein characterization, focusing on enhanced Green Fluorescent Protein (eGFP). The experiment follows a logical progression from “minimally perturbative” measurements to increasingly disruptive techniques, allowing students to determine three critical pieces of information: molecular weight, protein folding/structure, and primary amino acid sequence. By moving from intact protein analysis under both native and denaturing conditions to bottom-up peptide mapping, the lab demonstrates how a protein’s physical state directly influences its behavior in a mass spectrometer.Beyond standard eGFP analysis, the curriculum highlights the biochemical nuances of the protein, such as the autocatalytic self-cyclization of its fluorophore which involves a specific $20\text{ Da}$ mass loss. As a specialized bonus, the lab introduces Charge Detection Mass Spectrometry (CDMS) to analyze macromolecular structures that are too large for conventional MS. Students will use this technology to investigate the quaternary structure of Keyhole Limpet Hemocyanin (KLH), a massive complex that exists in multiple oligomeric states within the megadalton range.
Station 1:
The first stage involves a baseline analysis of the eGFP standard using LC-MS (Liquid Chromatography-Mass Spectrometry). During this process, the LC conditions convert the protein into its denatured form. The goal is to determine the protein’s overall molecular weight by measuring its mass-to-charge (m/z) ratio and charge (z) using the Waters Xevo G3 QTof system.
In this step, we didn’t really get to do much hands-on activity, or really get to enter things into the system. There was one step where someone in my group got to pipette a sample.
Station 2:
This was the second station for us, but technically the last stage. The final stage utilizes a “bottom-up” proteomics approach. The eGFP is enzymatically digested by trypsin, which cleaves the protein chain at specific Lysine and Arginine residues. The resulting peptides are fragmented in a collision cell using nitrogen gas. By measuring these fragments, the researchers can determine the precise amino acid sequence (primary structure) of the protein, a process known as peptide mapping.
Station 3:
Unfortunately, I had to leave by this time. In this step, chromatography is bypassed for direct infusion via a syringe pump to compare the protein’s physical states. Students compare “native” eGFP (folded and compact) with eGFP denatured by formic acid (unfolded and elongated). Because folded proteins have fewer solvent-accessible sites, they exhibit lower charge states, while unfolded proteins produce higher charge states, allowing the mass spectrometer to act as a tool for measuring protein folding and structural integrity.
Week 11: Cloud Lab
No real lab for this :D
Week 13 Lab: Golden Gate Assembly
I was in person! Impromptu so I don’t really have a lot of background information. We had like a Golden-Gate Assembly introduction
Week 2 Lab: DNA Gel Art
Overview
Materials:
The following items were used to prepare the agarose gel:
Microwavable media storage bottles
Agarose
TAE buffer
SYBR Safe DNA stain
Gel tray & comb
Eppendorf tubes
PCR Tube rack
Blue light transilluminator
Imaging device
Biological material I used included:
Lambda DNA
Nuclease-free water
Enzyme buffer
Restriction Enzymes: EcoRV, SacI, BamHI, KpnI
Machines I used included:
Voltage output source
Microwave
Buffer Preparation
In this part, we had to create the buffer. We wanted to achieve 400mL and calculations were done accordingly.
Pour 8 mL of [50] TAE Buffer into storage bottle
Pour 492 mL of water into storage bottle to dilute it.
Add dye
Gel Preparation
Add 0.75g of agarose powder and 75mL of the TAE buffer to a microwaveable bottle.
Heat the flask with the lid loosened in pulses of 15-20
Remove once the solution is bubbling and homogeneous
Once cooled, add 7.5 uL of SYBR Safe DNA stain to the solution
Pour the gel into the gel tray
Insert the comb into the gel tray
Allow gel to solidfy at room temperature
Restriction Digest
While the gel was solidifying, we created the digests. The following table (referenced from the Lab guide provided by HTGAA) was used to create the correct mixtures. We used EcoRV, SacI, BamHI, KpnI. The solution volume should add up to 20 uL total.
After the mixtures were created, the tubes were placed in an incubator for 30 minutes at 37ºC.
Gel Run
This part of the experiment should be done once the gel has set
Add loading dye into each of the Eppendorf tubes
Remove the comb carefully
Fill the casting wells with TAE so that it goes just barely over the gel
Load 20 uL of solution into each of the wells according to the pattern
Attach the red/black lead & make sure the red lead is placed opposite to the loading wells
Run the gel at 80-115V for around 45 minutes and check that everything looks to be correct.
Imaging Results
Once the electrophoresis is complete, remove the gel from the gel box
Place the gel onto the blu light transilluminator
Turn on the blue light transilluminator
Make sure the imaging device sees the gel clearly
Final Results:
To be honest, I’m not really sure why our sample was messed up. It’s possible there was error at very important steps, like running the gel, incubating the mixtures or even formulating them correctly. It looks nothing like our proposed pattern.
The idea of having to write my own code to create this art sounded terrifying at first given that I probably barely passed 6.100A. Then I found out a lot of it was written in Google Colab and felt relieved, until I kept running into issues so I decided to give up and just use Ronan’s code from his website: https://opentrons-art.rcdonovan.com/
This was a pretty chill session. To be honest, I don’t know the details of how running the program works, but I was allowed to hit the start button! It was fascinating watching the robot do it’s thing. Because people came before me, if there was any troubleshooting that had to go on, it was done by the time I arrived.
Post Lab
My design turned out super cute! I’m not super sure why there are tiny dots that appeared which don’t pertain to my design, perhaps this is contamination?
Post-Lab Reflection
I think I’m a materials major for a reason.
Code:
from opentrons import types

import string

metadata = {
    'protocolName': '{YOUR NAME} - Opentrons Art - HTGAA',
    'author': 'HTGAA',
    'source': 'HTGAA 2026',
    'apiLevel': '2.20'
}

Z_VALUE_AGAR = 2.0
POINT_SIZE = 0.75

mscarlet_i_points = [(-8.8,17.6), (0,17.6), (-11,15.4), (-6.6,15.4), (-2.2,15.4), (2.2,15.4), (-11,13.2), (-6.6,13.2), (-2.2,13.2), (2.2,13.2), (-11,11), (-6.6,11), (-2.2,11), (2.2,11), (13.2,11), (15.4,11), (19.8,11), (22,11), (24.2,11), (26.4,11), (28.6,11), (-11,8.8), (-6.6,8.8), (-2.2,8.8), (2.2,8.8), (13.2,8.8), (15.4,8.8), (19.8,8.8), (22,8.8), (24.2,8.8), (26.4,8.8), (28.6,8.8), (-11,6.6), (-6.6,6.6), (-2.2,6.6), (2.2,6.6), (13.2,6.6), (15.4,6.6), (26.4,6.6), (28.6,6.6), (-11,4.4), (-6.6,4.4), (-2.2,4.4), (2.2,4.4), (13.2,4.4), (15.4,4.4), (26.4,4.4), (28.6,4.4), (-11,2.2), (-6.6,2.2), (-2.2,2.2), (2.2,2.2), (13.2,2.2), (15.4,2.2), (22,2.2), (24.2,2.2), (26.4,2.2), (28.6,2.2), (-11,0), (-6.6,0), (-4.4,0), (-2.2,0), (2.2,0), (13.2,0), (15.4,0), (22,0), (24.2,0), (26.4,0), (28.6,0), (-13.2,-2.2), (4.4,-2.2), (13.2,-2.2), (15.4,-2.2), (22,-2.2), (24.2,-2.2), (-15.4,-4.4), (6.6,-4.4), (13.2,-4.4), (15.4,-4.4), (22,-4.4), (24.2,-4.4), (-15.4,-6.6), (-8.8,-6.6), (0,-6.6), (6.6,-6.6), (-15.4,-8.8), (6.6,-8.8), (13.2,-8.8), (15.4,-8.8), (22,-8.8), (24.2,-8.8), (-15.4,-11), (6.6,-11), (13.2,-11), (15.4,-11), (22,-11), (24.2,-11), (-13.2,-13.2), (4.4,-13.2), (-11,-15.4), (-8.8,-15.4), (-6.6,-15.4), (-4.4,-15.4), (-2.2,-15.4), (0,-15.4), (2.2,-15.4)]
mko2_points = [(15.4,33), (17.6,33), (13.2,30.8), (17.6,30.8), (19.8,30.8), (17.6,28.6), (19.8,28.6), (17.6,26.4), (19.8,26.4), (13.2,24.2), (17.6,24.2), (19.8,24.2), (15.4,22), (17.6,22), (-28.6,19.8), (-28.6,17.6), (-26.4,17.6), (-28.6,15.4), (-26.4,15.4), (-24.2,15.4), (-22,15.4), (-19.8,15.4), (-17.6,15.4), (-35.2,13.2), (-33,13.2), (-30.8,13.2), (-28.6,13.2), (-26.4,13.2), (-24.2,13.2), (-22,13.2), (-33,11), (-30.8,11), (-28.6,11), (-26.4,11), (-24.2,11), (-22,11), (-19.8,11), (-28.6,8.8), (-26.4,8.8), (-24.2,8.8), (-22,8.8), (-19.8,8.8), (-17.6,8.8), (-28.6,6.6), (-26.4,6.6), (-28.6,4.4), (-28.6,2.2), (19.8,-17.6), (19.8,-19.8), (19.8,-22), (17.6,-24.2), (19.8,-24.2), (22,-24.2), (13.2,-26.4), (15.4,-26.4), (17.6,-26.4), (19.8,-26.4), (22,-26.4), (24.2,-26.4), (26.4,-26.4), (17.6,-28.6), (19.8,-28.6), (22,-28.6), (19.8,-30.8), (19.8,-33)]

point_name_pairing = [("mscarlet_i", mscarlet_i_points),("mko2", mko2_points)]

# Robot deck setup constants
TIP_RACK_DECK_SLOT = 9
COLORS_DECK_SLOT = 6
AGAR_DECK_SLOT = 5
PIPETTE_STARTING_TIP_WELL = 'A1'

# Place the PCR tubes in this order
well_colors = {
    'A1': 'sfGFP',
    'A2': 'mRFP1',
    'A3': 'mKO2',
    'A4': 'Venus',
    'A5': 'mKate2_TF',
    'A6': 'Azurite',
    'A7': 'mCerulean3',
    'A8': 'mClover3',
    'A9': 'mJuniper',
    'A10': 'mTurquoise2',
    'A11': 'mBanana',
    'A12': 'mPlum',
    'B1': 'Electra2',
    'B2': 'mWasabi',
    'B3': 'mScarlet_I',
    'B4': 'mPapaya',
    'B5': 'eqFP578',
    'B6': 'tdTomato',
    'B7': 'DsRed',
    'B8': 'mKate2',
    'B9': 'EGFP',
    'B10': 'mRuby2',
    'B11': 'TagBFP',
    'B12': 'mChartreuse_TF',
    'C1': 'mLychee_TF',
    'C2': 'mTagBFP2',
    'C3': 'mEGFP',
    'C4': 'mNeonGreen',
    'C5': 'mAzamiGreen',
    'C6': 'mWatermelon',
    'C7': 'avGFP',
    'C8': 'mCitrine',
    'C9': 'mVenus',
    'C10': 'mCherry',
    'C11': 'mHoneydew',
    'C12': 'TagRFP',
    'D1': 'mTFP1',
    'D2': 'Ultramarine',
    'D3': 'ZsGreen1',
    'D4': 'mMiCy',
    'D5': 'mStayGold2',
    'D6': 'PA_GFP'
}

volume_used = {
    'mscarlet_i': 0,
    'mko2': 0
}

def update_volume_remaining(current_color, quantity_to_aspirate):
    rows = string.ascii_uppercase
    for well, color in list(well_colors.items()):
        if color == current_color:
            if (volume_used[current_color] + quantity_to_aspirate) > 250:
                # Move to next well horizontally by advancing row letter, keeping column number
                row = well[0]
                col = well[1:]

                # Find next row letter
                next_row = rows[rows.index(row) + 1]
                next_well = f"{next_row}{col}"

                del well_colors[well]
                well_colors[next_well] = current_color
                volume_used[current_color] = quantity_to_aspirate
            else:
                volume_used[current_color] += quantity_to_aspirate
            break

def run(protocol):
    # Load labware, modules and pipettes
    protocol.home()

    # Tips
    tips_20ul = protocol.load_labware('opentrons_96_tiprack_20ul', TIP_RACK_DECK_SLOT, 'Opentrons 20uL Tips')

    # Pipettes
    pipette_20ul = protocol.load_instrument("p20_single_gen2", "right", [tips_20ul])

    # PCR Plate
    temperature_plate = protocol.load_labware('opentrons_96_aluminumblock_generic_pcr_strip_200ul', 6)

    # Agar Plate
    agar_plate = protocol.load_labware('htgaa_agar_plate', AGAR_DECK_SLOT, 'Agar Plate')
    agar_plate.set_offset(x=0.00, y=0.00, z=Z_VALUE_AGAR)

    # Get the top-center of the plate, make sure the plate was calibrated before running this
    center_location = agar_plate['A1'].top()

    pipette_20ul.starting_tip = tips_20ul.well(PIPETTE_STARTING_TIP_WELL)

    # Helper function (dispensing)
    def dispense_and_jog(pipette, volume, location):
        assert(isinstance(volume, (int, float)))
        # Go above the location
        above_location = location.move(types.Point(z=location.point.z + 2))
        pipette.move_to(above_location)
        # Go downwards and dispense
        pipette.dispense(volume, location)
        # Go upwards to avoid smearing
        pipette.move_to(above_location)

    # Helper function (color location)
    def location_of_color(color_string):
        for well,color in well_colors.items():
            if color.lower() == color_string.lower():
                return temperature_plate[well]
        raise ValueError(f"No well found with color {color_string}")

    # Print pattern by iterating over lists
    for i, (current_color, point_list) in enumerate(point_name_pairing):
        # Skip the rest of the loop if the list is empty
        if not point_list:
            continue

        # Get the tip for this run, set the bacteria color, and the aspirate bacteria of choice
        pipette_20ul.pick_up_tip()
        max_aspirate = int(18 // POINT_SIZE) * POINT_SIZE
        quantity_to_aspirate = min(len(point_list)*POINT_SIZE, max_aspirate)
        update_volume_remaining(current_color, quantity_to_aspirate)
        pipette_20ul.aspirate(quantity_to_aspirate, location_of_color(current_color))

        # Iterate over the current points list and dispense them, refilling along the way
        for i in range(len(point_list)):
            x, y = point_list[i]
            adjusted_location = center_location.move(types.Point(x, y))

            dispense_and_jog(pipette_20ul, POINT_SIZE, adjusted_location)

            if pipette_20ul.current_volume == 0 and len(point_list[i+1:]) > 0:
                quantity_to_aspirate = min(len(point_list[i:])*POINT_SIZE, max_aspirate)
                update_volume_remaining(current_color, quantity_to_aspirate)
                pipette_20ul.aspirate(quantity_to_aspirate, location_of_color(current_color))

        # Drop tip between each color
        pipette_20ul.drop_tip()
Week 4 HW: Protein Design Part I
This lab is embedded into Part 3 of my Homework for Week 4
Week 6: Gibson Assembly
Day One
Materials:
The following items were used:
PCR tubes
Centrifuge tubes
P200 pipette with 200uL tips
P20 pipette with 20uL tips
Nuclease-free water
Sharpie
Tube holder
invitrogen E-Gel EX: Agarose 1%
Biological material I used included:
Backbone fragment purified
Color fragment(s) purified in Light Pink, Blue, Purple
Backbone Forward Primer
Backbone Reverse Primer
Color Reverse Primer
Template mUAV Plasmid
Phusion HF PCR Mix
DNA Binding Buffer
Machines I used included:
Centrifuge
invitrogen E-Gel PowerSnap
PCR Incubator
Part 1: PCR
First, we created PCR mixtures according to the following table, using Light Pink, Purple and Blue as our color primers of choice. So total, there should be 4 PCR tubes: Backbone, Light Pink, Purple and Blue.
We then ran the PCR reaction with the following settings:
Both of these tables were pulled from the HTGAA lab handout.
Part 2: Gel Diagnostic
After the PCR reaction was complete, we had to run a gel diagnostic to ensure this reaction was completed correctly. The protocol was as follows:
Take 2uL of each mixture and transferit into new PCR tubes (labeled).
Pipette 2uL of mUVA into new tube.
Add 20uL of water to each PCR tube.
Unpack gel electrophoresis cassette
Load into machine
Pipette DNA Ladder into first well
Pipette 20uL of mixture from each NEW PCR tube into the correct wells. In total, there were 6 full wells.
Use the automatic setting for 1%, and wait 10 minutes.
Thankfully, it was successful!
Part 3: DNA Purification and Quantification
Pipette 100uL of DNA Binding Buffer into a centrifuge tube
Add 20uL of PCR product
Mix briefly by vortexing
Transfer 120uL of the mixture into separate columns with a collection tube
Centrifuge for 1 minute
Discard the flowthrough
Add 200 uL of DNA wash buffer to the column
Centrifuge for 1 min
Repeat the last two steps
Transfer the column to new tube
Discard flow through
Add 6uL of nuclease free water to the column matrix
Allow it to sit for 2 min
Centrifuge for 1 min
Store and save
Day Two
Materials
Items Used:
P1000 pipette with 1000uL tips
P20 pipette with 10uL tips
PCR Tubes
Biological Materials Used:
Purified Fragments
Gibson Assembly Master Mix
Nuclease Free Water
LB-Agar plates with Chioramphenicol
SOC Growth Medium
DH5α competent cells
Machines Used:
Thermal Cycler
Shaking Incubator
Waterbath set to 42C
Part 1: Setting Up Gibson Assembly
Set up reaction in proportions according to the table below, for each color fragment
Incubate the reaction at 50 C for 30 minutes in a heat block
Add 100 uL of nuclease-free water to dilute sample
Part 2: Transformation
Transfer 20uL of competent cells to each tube
Transfe purified assembly products into each tube (8 total, 3 Light Pink, 3 Blue, 3 Purple)
Incubate on ice for 30 min
Shock the cells by keeping tubes at 42 C for 45 seconds, immediately after the ice bath
Add 100uL of SOC media to each tube
Allow growth in a shaking incubator for 1 hour
Transfer 100uL from each tube to appropriate plate and use plating beads / plastic spreader as needed
Incubate the plates at 37°C for 72 hours
Part 3: Results
All colonies exhibited an indigo color that’s consistent with wildtype amilCP. The red circle is an interesting occurence of a colorless colony.
What may have happened is that there was not the correct molar ratio of insert to backbone, which may have occurred after purification. This meant that the backbone might have ended up in excess and annealed to each other rather than the insert. This explanation also explains why this would have been consistent across all the different volume groups. Had there been too much insert, there would have been mostly colorness colonies. These colonies survive selection and express a wildtype indigo color.
With regards to the transparent colony, it signals that the backbone reassembled without the color insert and does not have the amilCP CDS.
This colony is evidence that the Gibson Assembly process was occuring, just not as we intended.
Week 7: Neuromorphic Circuits
Protocol
For this section, I had to first download Neuromorphic Wizard, which was a whole process but I managed.
I just filled out the Genetic Circuit Design Template with a design of my choice:
My group mates decided to do something pretty similar, so we went with the same overall ERN and ERN_rec_ERNs.
These were the predictions and experimental set-up that Neuromorphic Wizard came up with.
I will say overall this was one of the more conceptually difficult labs for me. I think overall, I could understand the general flow that X1 and X2 were some input, and the colors were to help track these ERNs and ERN_rec_ERNs, but I think it was difficult for me to intuitively choose a pattern and then fill in the template based on what I want my pattern to be. So instead, I worked the unconventional way as I felt I had a solid enough understanding and what I wanted to focus on was hte product.
In the future, it is something I would like to learn about, but I don’t know that I have the capacity to do so given my lack of computer science background.
Running the Robot
These are some photos from watching the robot run:
Running the Robot
I didn’t know we were supposed to do Low, Medium, High (?), or at least that part was not clear to me. Here is what came out of our experiment.