Week 2 Lab: DNA Gel Art
Overview
Materials:
The following items were used to prepare the agarose gel:
- Microwavable media storage bottles
- Agarose
- TAE buffer
- SYBR Safe DNA stain
- Gel tray & comb
- Eppendorf tubes
- PCR Tube rack
- Blue light transilluminator
- Imaging device
Biological material I used included:
- Lambda DNA
- Nuclease-free water
- Enzyme buffer
- Restriction Enzymes: EcoRV, SacI, BamHI, KpnI
Machines I used included:
- Voltage output source
- Microwave
Buffer Preparation
In this part, we had to create the buffer. We wanted to achieve 400mL and calculations were done accordingly.
- Pour 8 mL of [50] TAE Buffer into storage bottle
- Pour 492 mL of water into storage bottle to dilute it.
- Add dye
Gel Preparation
- Add 0.75g of agarose powder and 75mL of the TAE buffer to a microwaveable bottle.
- Heat the flask with the lid loosened in pulses of 15-20
- Remove once the solution is bubbling and homogeneous
- Once cooled, add 7.5 uL of SYBR Safe DNA stain to the solution
- Pour the gel into the gel tray
- Insert the comb into the gel tray
- Allow gel to solidfy at room temperature
Restriction Digest
While the gel was solidifying, we created the digests. The following table (referenced from the Lab guide provided by HTGAA) was used to create the correct mixtures. We used EcoRV, SacI, BamHI, KpnI. The solution volume should add up to 20 uL total.
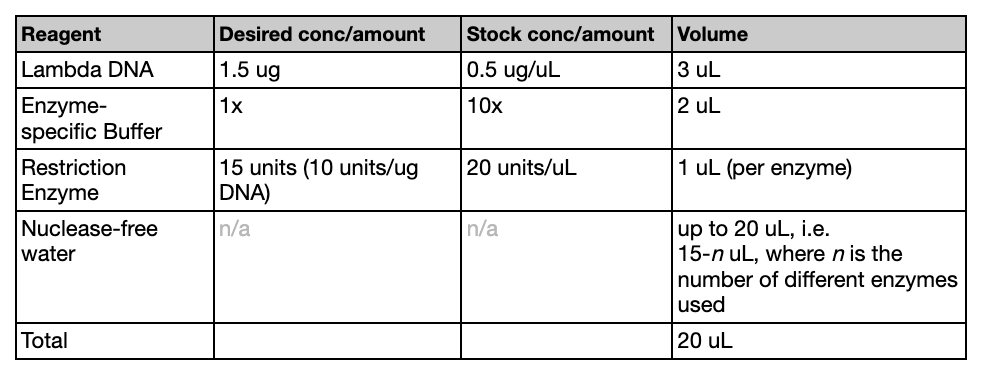
After the mixtures were created, the tubes were placed in an incubator for 30 minutes at 37ºC.
Gel Run
This part of the experiment should be done once the gel has set
- Add loading dye into each of the Eppendorf tubes
- Remove the comb carefully
- Fill the casting wells with TAE so that it goes just barely over the gel
- Load 20 uL of solution into each of the wells according to the pattern
- Attach the red/black lead & make sure the red lead is placed opposite to the loading wells
- Run the gel at 80-115V for around 45 minutes and check that everything looks to be correct.
Imaging Results
- Once the electrophoresis is complete, remove the gel from the gel box
- Place the gel onto the blu light transilluminator
- Turn on the blue light transilluminator
- Make sure the imaging device sees the gel clearly
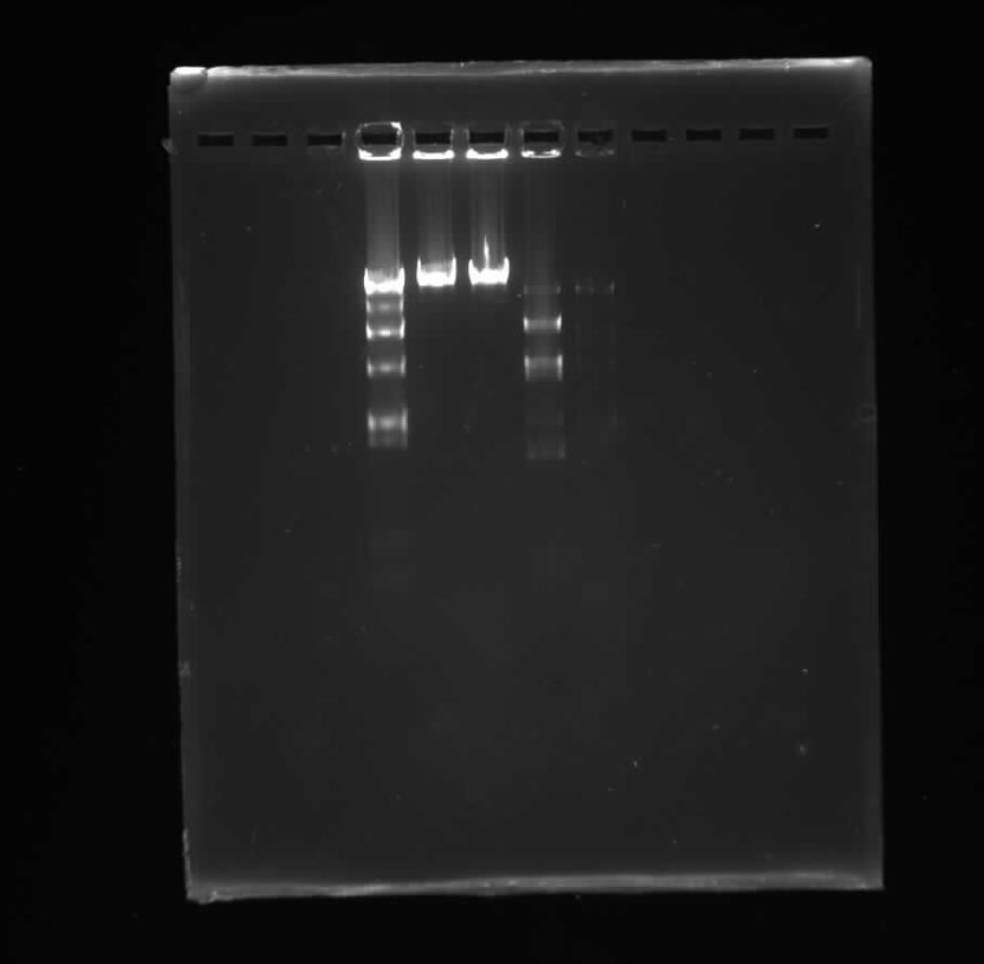
Final Results:
To be honest, I’m not really sure why our sample was messed up. It’s possible there was error at very important steps, like running the gel, incubating the mixtures or even formulating them correctly. It looks nothing like our proposed pattern.
Here are images from the process.
https://docs.google.com/presentation/d/197zyQaHdYCrGTj2cPRf4c-JaEqSb2jiO7plQ-QzTDjk/edit?usp=sharing