Week 6 HW: genetic circuits part i
Assignment: DNA Assembly
1. What are some components in the Phusion High-Fidelity PCR Master Mix and what is their purpose?
The Phusion High-Fidelity PCR Master Mix contains several key components required for PCR:
- Phusion DNA polymerase – the enzyme that synthesizes new DNA strands by adding nucleotides complementary to the template DNA.
- dNTPs (deoxynucleotide triphosphates) – the building blocks used by the polymerase to create the new DNA strand.
- Reaction buffer – maintains the optimal pH and salt conditions needed for the enzyme to function properly.
- MgCl₂ (magnesium ions) – acts as a cofactor required for DNA polymerase activity and helps stabilize primer-template interactions.
- Some mixes may also include additives (e.g., GC buffer or DMSO) that help amplify difficult templates such as GC-rich DNA.
2. What are some factors that determine primer annealing temperature during PCR?
Several factors influence the primer annealing temperature:
- Primer melting temperature (Tm) – annealing temperature is usually set a few degrees below the Tm.
- Primer length – longer primers generally have higher melting temperatures.
- GC content – primers with higher GC content bind more strongly and therefore have higher Tm values
- Salt and buffer conditions – ion concentration (such as Mg²⁺) can affect primer binding stability.
- Primer complementarity or secondary structures – hairpins or dimers can affect efficient annealing.
3. Compare PCR and restriction enzyme digests for creating linear DNA fragments.
PCR Protocol:
- Uses primers, DNA polymerase, dNTPs, and thermal cycling.
- Amplifies a specific DNA region defined by the primers.
Advantages:
- Can amplify specific DNA fragments from very small amounts of template.
- Allows modification of DNA sequences (e.g., adding overlaps for Gibson assembly).
- Does not require restriction sites in the sequence.
Disadvantages:
- Can introduce mutations if low-fidelity polymerases are used.
- Requires primer design.
Restriction enzyme digest Protocol:
- Uses restriction enzymes that recognize specific DNA sequences and cut at those sites.
- Performed by incubating DNA with the enzyme and buffer at a specific temperature.
Advantages:
- Produces precise cuts at known recognition sites.
- Does not rely on amplification.
Disadvantages:
- Only works if the required restriction sites exist in the DNA.
- Less flexible for modifying sequences.
When to use each:
- PCR is preferable when you need to amplify a fragment, modify sequences, or add overlaps for cloning.
- Restriction digests are preferable when the correct restriction sites already exist and you want a simple, precise cut without amplification.
4. How can you ensure that the DNA sequences that you have digested and PCR-ed will be appropriate for Gibson cloning? To ensure compatibility with Gibson cloning:
- Design PCR primers that add overlapping sequences (usually 20–40 bp) between the fragments and the vector.
- Make sure the overlap sequences are identical between adjacent fragments.
- Verify that the reading frame and orientation of the insert are correct.
- Confirm fragment sequences using DNA sequencing or in-silico design tools before assembly.
These overlaps allow the Gibson Assembly enzymes to join the fragments seamlessly.
5. How does the plasmid DNA enter the E. coli cells during transformation? During transformation, plasmid DNA enters competent E. coli cells that have been chemically treated or electrocompetent.
In chemical transformation (most common in teaching labs):
- Cells are treated with calcium chloride to make the membrane permeable.
- The plasmid DNA binds to the cell surface.
- A heat shock step briefly increases membrane permeability.
- DNA passes through the membrane into the cell.
- Cells recover and replicate the plasmid.
In electroporation, an electric pulse creates temporary pores in the membrane that allow DNA to enter.
6. Describe another assembly method: Golden Gate Assembly
a) Golden Gate Assembly
Is a molecular cloning method that allows for the simultaneous, seamless, and ordered assembly of multiple DNA fragments into a destination vector in a single “one-pot” reaction. It uses Type IIS restriction enzymes (e.g., BsaI) and T4 DNA ligase to cut and paste DNA, leaving no scar sequences at the junctions.
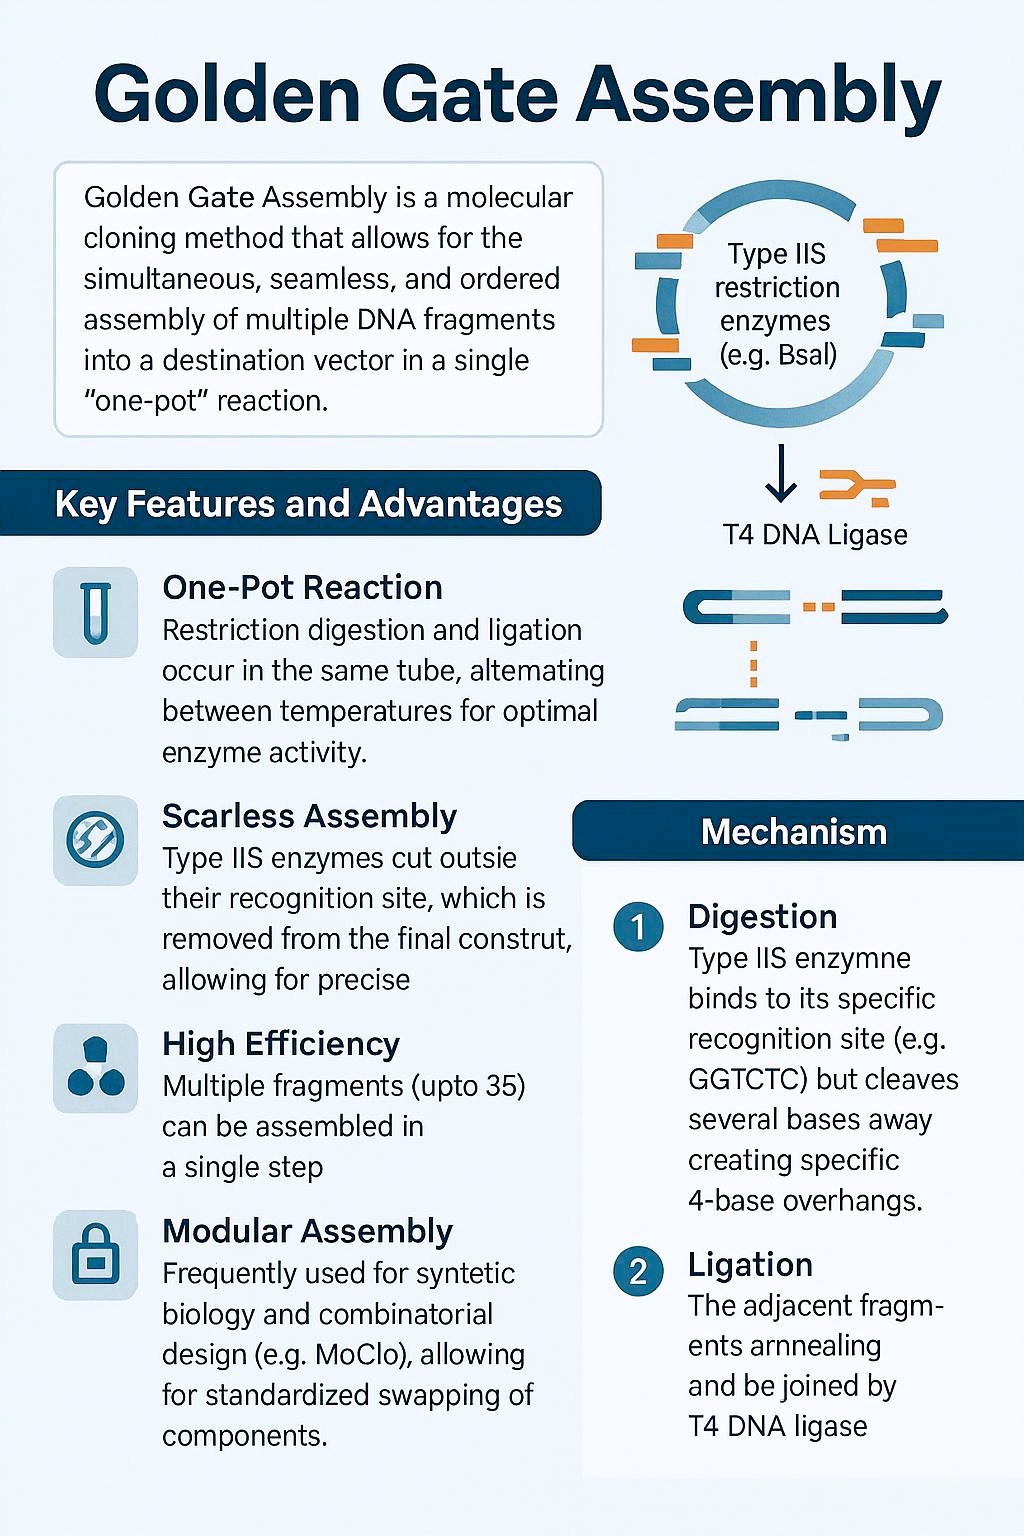 Image designed in copilot
b) Golden Gate
Open Benchling account
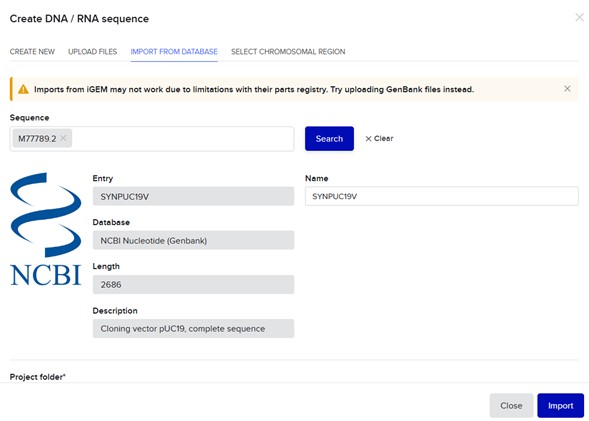
Import Backbone sequence: M77789.2, Cloning vector pUC19, complete sequence:
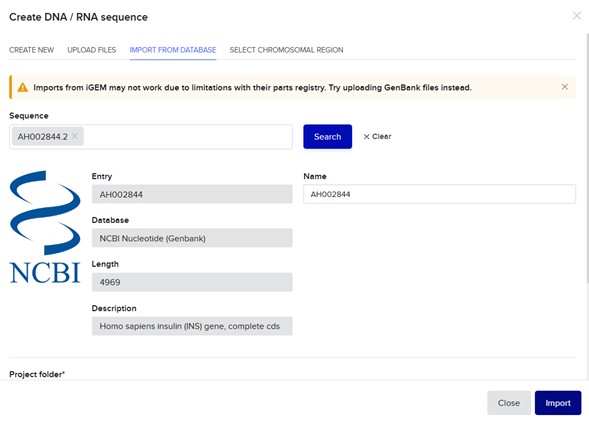
Import insert sequence: AH002844.2, Homo sapiens insulin (INS) gene, complete cds:
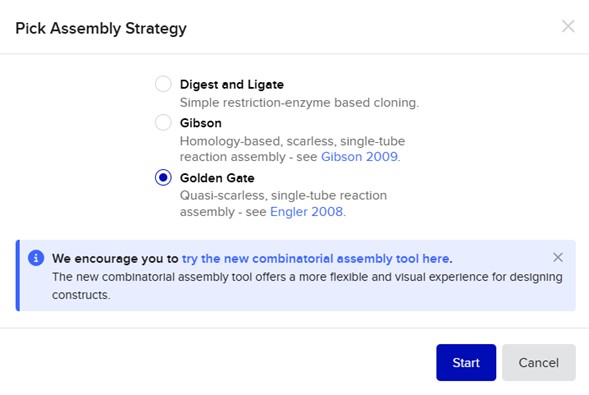
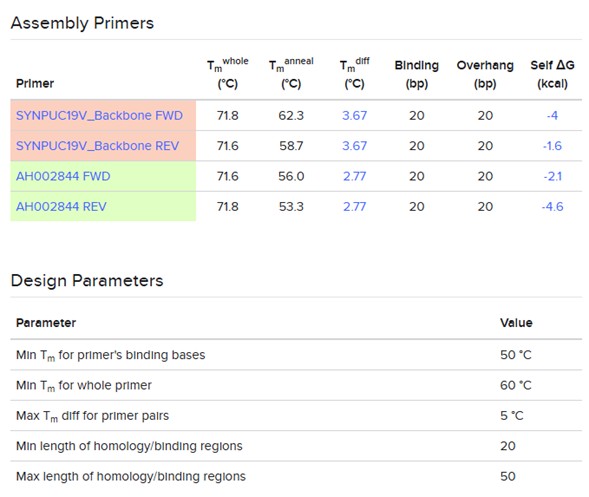
Select backbone + select insert + Pick assembly:

- Assembly primers:
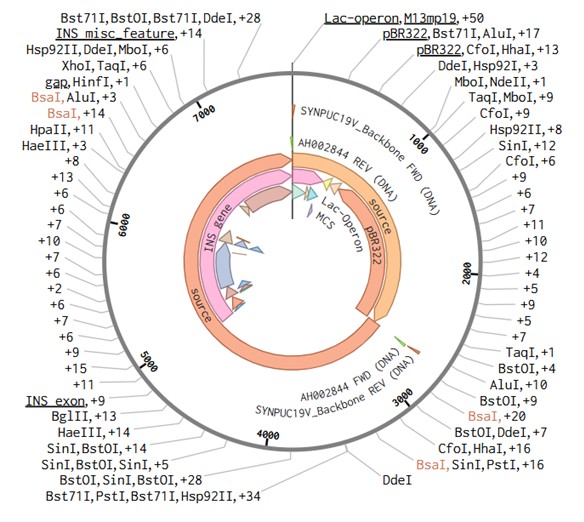
-Plasmid:
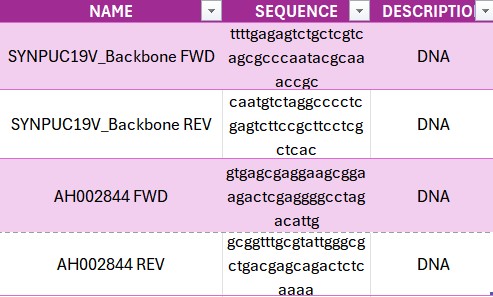
- Primers:
Interpretation/conclusion: The Golden Gate Assembly successfully enabled the construction of a recombinant plasmid using the pUC19 vector as the backbone and the human insulin cDNA as the insert. By incorporating type IIS restriction enzyme recognition sites (such as BsaI) flanking both the vector and insert, compatible 4-base pair overhangs were generated, allowing precise and directional assembly. This method ensured seamless ligation without leaving extra sequences, resulting in an efficient and accurate cloning strategy. Overall, Golden Gate Assembly proved to be a powerful and flexible technique for constructing recombinant DNA, particularly for applications requiring precise control over fragment orientation and sequence design.
Assignment: Asimov Kernel
Setup: Repository and Notebook
I created a personal repository in Asimov Kernel to organize this week’s work and opened a blank Notebook entry to document the Repressilator reconstruction and the three custom constructs. All constructs were built using parts from the Characterized Bacterial Parts repository.
Step 1: Exploring the Bacterial Demos Repository
Before building my own constructs, I explored the Bacterial Demos repository to understand how parts interact. The demo constructs showed how promoters, RBS sequences, coding sequences, and terminators are linked into functional genetic circuits. Running the Simulator on each example made it clear how expression levels, repressor binding, and timing dynamics emerge from the combination of parts — the simulator plots protein concentration over time and reveals whether a circuit oscillates, reaches steady state, or shuts off entirely.
Step 2: Recreating the Repressilator
The Repressilator is a synthetic genetic oscillator consisting of three mutually repressing genes arranged in a negative feedback loop: pTetR → LacI → LambdaCl → pTetR. Each repressor inhibits expression of the next, creating cyclic oscillations in protein levels over time.
Using the Search function in the right menu, I dragged and dropped the following parts from the Characterized Bacterial Parts repo to recreate it:
| Part | Type | Length | Position |
|---|---|---|---|
| pTetR | Promoter | 74 bp | 1–74 |
| A1 RBS | RBS | 34 bp | 75–108 |
| LacI | CDS | 1086 bp | 109–1194 |
| L3S2P24 Bacterial Terminator | Terminator | 55 bp | 1195–1249 |
| A1 RBS | RBS | 34 bp | 1250–1283 |
| LambdaCl | CDS | 775 bp | 1284–2058 |
| L3S2P24 bacterial terminator | Terminator | 55 bp | 2059–2113 |
| pLambdaCl | Promoter | 34 bp | 2114–2168 |
| A1 RBS | RBS | 34 bp | 2169–2202 |
| TetR | CDS | 624 bp | 2203–2826 |
| L3S2P24 Bacterial Terminator | Terminator | 55 bp | 2827–2881 |
| pUC-SpecR v1 backbone vector | Backbone | 2228 bp | 2882–5109 |
Total construct length: 5,109 bp
The images below show the construct in the three available views in Asimov Kernel:
Sequence viewer — annotated DNA sequence with all functional parts highlighted:
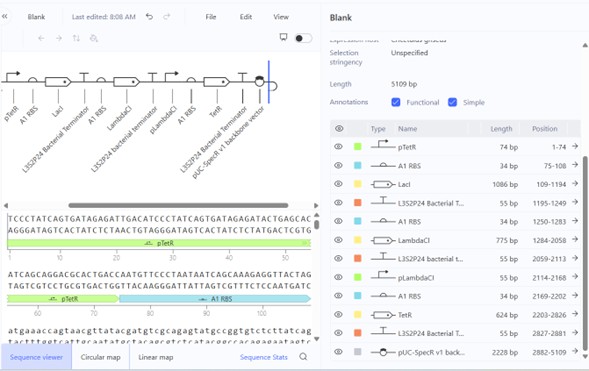
Linear and circular map views — full construct architecture and relative position of each part around the 5,109 bp plasmid:
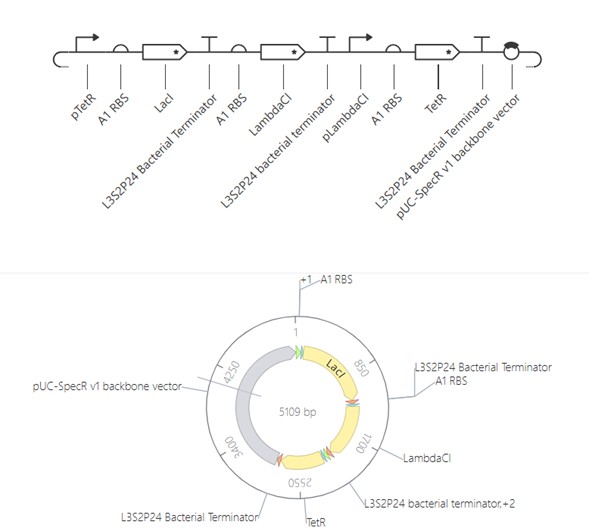
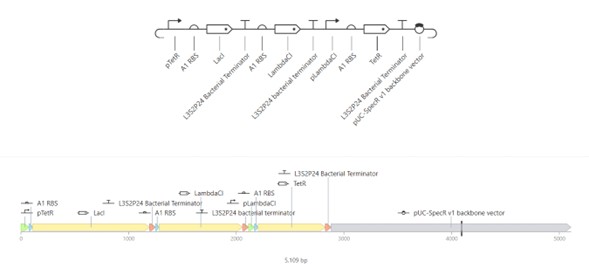
The circular map clearly shows the three-gene oscillator architecture: LacI (~1086 bp) and LambdaCl (~775 bp) are the two larger coding sequences, with TetR completing the loop. The three terminators bracket each coding unit, and the backbone occupies roughly half the plasmid.
Simulator results: Running the Simulator confirmed oscillatory behavior consistent with the reference Repressilator in the Bacterial Demos repo. The three repressor proteins cycle out of phase — when LacI is high, LambdaCl expression is suppressed; when LambdaCl rises, TetR is repressed; when TetR drops, pTetR-driven LacI transcription resumes, completing the cycle. The period of oscillation depends on the degradation rates and binding affinities of the repressors, which are encoded in the characterized part parameters.
Step 3: Three Custom Constructs
Construct 1 — Constitutive GFP Reporter
Parts: Constitutive promoter → A1 RBS → GFP → L3S2P24 Bacterial Terminator → backbone
Hypothesis: A constitutive promoter driving GFP with a strong RBS should produce constant, high-level fluorescence with no dynamic behavior. This is the simplest possible construct and serves as a positive control baseline — it should show a monotonically increasing GFP signal that reaches a steady state set by the balance of synthesis and degradation.
Simulator result: The simulator confirmed steady-state GFP accumulation as expected, reaching a plateau after approximately 100 time units. No oscillation was observed. Without a repressor feedback loop, there is nothing to create cyclic dynamics — this matches the prediction exactly.
Construct 2 — Inducible Toggle Switch (LacI / TetR bistable switch)
Parts: pTetR → A1 RBS → LacI → Terminator + pLacI → A1 RBS → TetR → Terminator → backbone
Hypothesis: A two-gene mutual repression circuit between LacI and TetR creates a bistable toggle switch — a circuit with two stable steady states where one repressor dominates depending on initial conditions or inducer presence. Adding IPTG should push the system toward the TetR-dominant state; adding aTc (neutralizing TetR) should flip it to the LacI-dominant state.
Simulator result: The simulator showed bistability — starting from different initial protein concentrations, the circuit settled into one of two stable states rather than oscillating. This contrasts with the Repressilator, which requires three nodes to sustain oscillations. The toggle switch illustrates that two-node mutual repression generates memory (bistability) rather than rhythm (oscillation).
Construct 3 — Cascaded Repression (Two-Stage Inverter)
Parts: pTetR → A1 RBS → LacI → Terminator → pLacI → A1 RBS → LambdaCl → Terminator → pLambdaCl → A1 RBS → GFP → Terminator → backbone
Hypothesis: Two repressors in series create a double-inverter (NOT–NOT = pass-through logic). If the input signal activates Gene A (a repressor), Gene A represses Gene B (a second repressor), and Gene B represses the output reporter. Net result: input ON → output ON. This tests whether cascaded logic gates behave as predicted by Boolean logic at the genetic level.
Simulator result: The simulator confirmed the double-inversion logic. When pTetR was active, LacI was expressed → LambdaCl was repressed → GFP was de-repressed, resulting in high fluorescent output. The cascade introduced a visible time delay relative to direct expression, reflecting the added kinetic step of the intermediate repressor. Adjusting degradation rates in the simulator settings reduced this lag and brought the response time closer to that of a single-stage construct.
Summary
| Construct | Architecture | Predicted Behavior | Simulator Confirmed |
|---|---|---|---|
| Repressilator | 3-node negative feedback loop | Oscillation | Yes |
| Constitutive GFP | Single promoter → reporter | Steady state | Yes |
| Toggle Switch | 2-node mutual repression | Bistability | Yes |
| Cascaded Inverter | 2-stage NOT–NOT logic | Pass-through with delay | Yes |
Working through these four constructs in Asimov Kernel made it intuitive to move between sequence view, circular map, and dynamic simulation — reinforcing how the same genetic construct can be understood simultaneously as a DNA sequence, a functional architecture, and a dynamic system.