Week 6 HW: Genetic Circuits Part I: Assembly Technologies
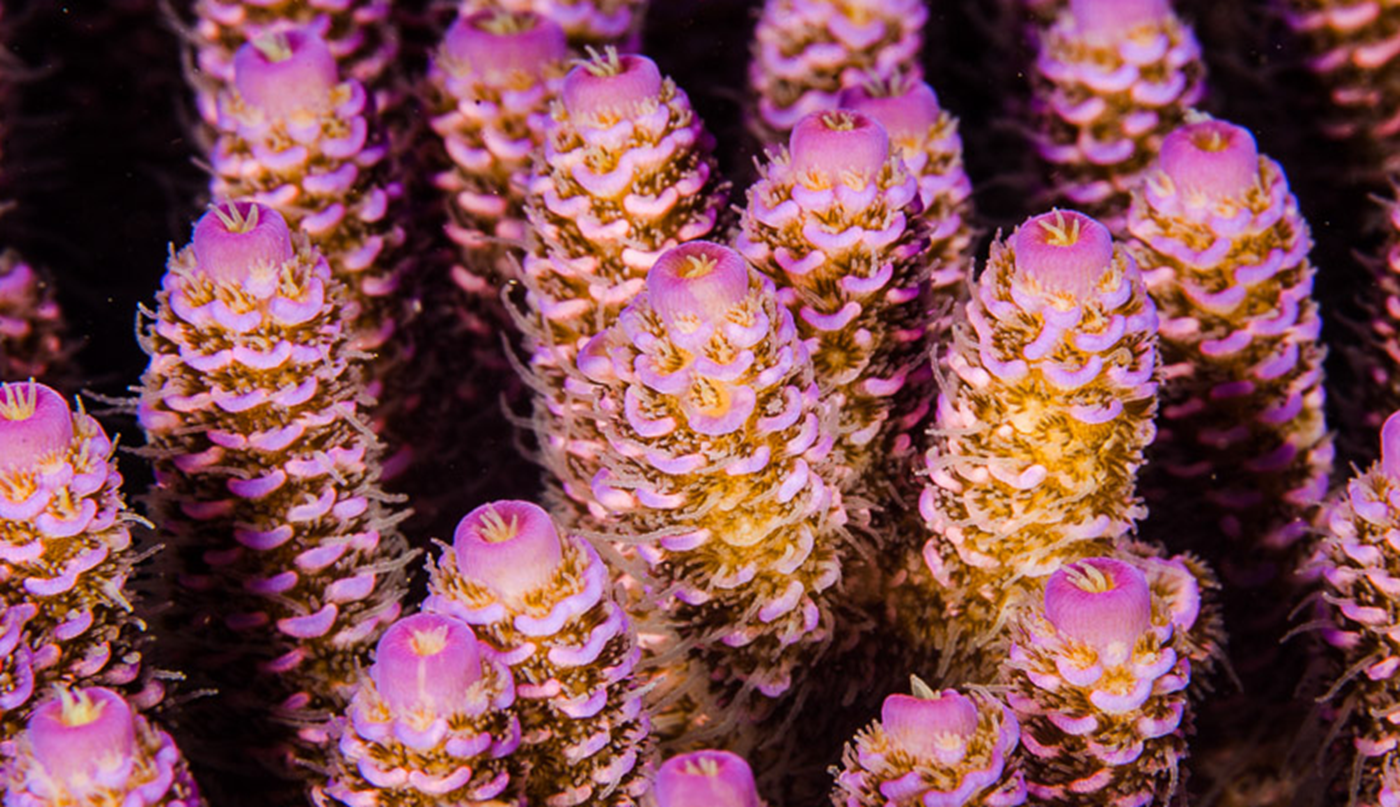
Acropora Millepora, Photo from Reefbuilders
This week we learn core molecular biology tools and techniques for processing and assembling DNA, including PCR and Gibson Assembly. Here is the updated HTGAA2026 Gibson assembly lab protocol document.


Homework PART A: PCR and DNA Assembly
1. What are some components in the Phusion High-Fidelity PCR Master Mix and what is their purpose?
Phusion High-Fidelity PCR Master Mix is a 2X, ready-to-use mixture where the exact formulation is partly proprietary, but the functional components are documented in the manufacturer’s manual:
| Component (Phusion 2X Master Mix) | Purpose |
|---|---|
| Phusion High-Fidelity DNA Polymerase | DNA synthesis with high fidelity + proofreading |
| dNTPs (dATP, dCTP, dGTP, dTTP) | Building blocks for new DNA strands |
| HF reaction buffer (salts + pH buffer) | Maintains optimal pH/ionic strength for enzyme function |
| Mg2+ (via buffer system; often MgCl2-derived) | Essential polymerase cofactor |
| Stabilizers / additives (partly proprietary) | Improve enzyme stability and consistency |
| Nuclease-free water | Solvent to reach correct 2X working concentrations |
Thermo Fisher Phusion High–Fidelity DNA Polymerase Product Information Sheet, standard biochemistry manuals (e.g., Sambrook & Russell).
2. What are some factors that determine primer annealing temperature during PCR?
Key Factors Determining Phusion Annealing Temperature ( Tα )
- Primer Melting Temperature (Tm): The primary determinant, usually calculated using the nearest-neighbor method.
- Primer Length: For primers >20 nt, Ta = Tm + 3 degrees celcius. For primers < 20 nt, Ta equals the Tm of the lower primer.
- Buffer Choice: Phusion HF Buffer generally provides higher fidelity, while GC Buffer is optimized for high-GC or complex templates, which may require higher.
- Method of Calculation: results vary by method; Thermo Fisher Scientific recommends specific tools, as Phusion requires higher than many other polymerases.
- Template Complexity: High-GC or complex templates often require higher temperatures for specificity, whereas longer, lower-concentration targets may need optimization.
- Gradient Optimization: For challenging PCRs, a temperature gradient is recommended to find the best for both specificity and yield.
From New England Biolabs.
Typical Phusion Cycling Parameters
Source
Thermo Fisher Phusion High–Fidelity DNA Polymerase Product Information Sheet
- There are two methods from this class that create linear fragments of DNA: PCR, and restriction enzyme digests. Compare and contrast these two methods, both in terms of protocol as well as when one may be preferable to use over the other.
| FEATURE | PCR | RESTRICTION ENZYME DIGEST |
|---|---|---|
| MECHANISM | DNA amplification using primers and polymerase | DNA cutting using sequence-specific enzymes |
| PROTOCOL | Thermal cycling -> Denaturation, Annealing, extension | Incubation with restriction enzyme at constant temperature |
| AMOUNT OF DNA REQUIRED | Very small amount | Sufficient amount of PLASMID DNA |
| FLEXIBILIY | Can introduce mutations on new sequences | Limited to enzyme recognition sites |
| SPEED | 1-2 hours | 30-60 mins digestion |
| PRECISION | Depends on primer design | Cuts exactly at recognition sequence |
| When restriction digest is preferable | When PCR is preferable |
|---|---|
| Cloning using existing restriction sites | Introducing mutations |
| Cutting large plasmids | Creating new overlaps |
| Avoiding PCR errors | Amplifying small fragments |
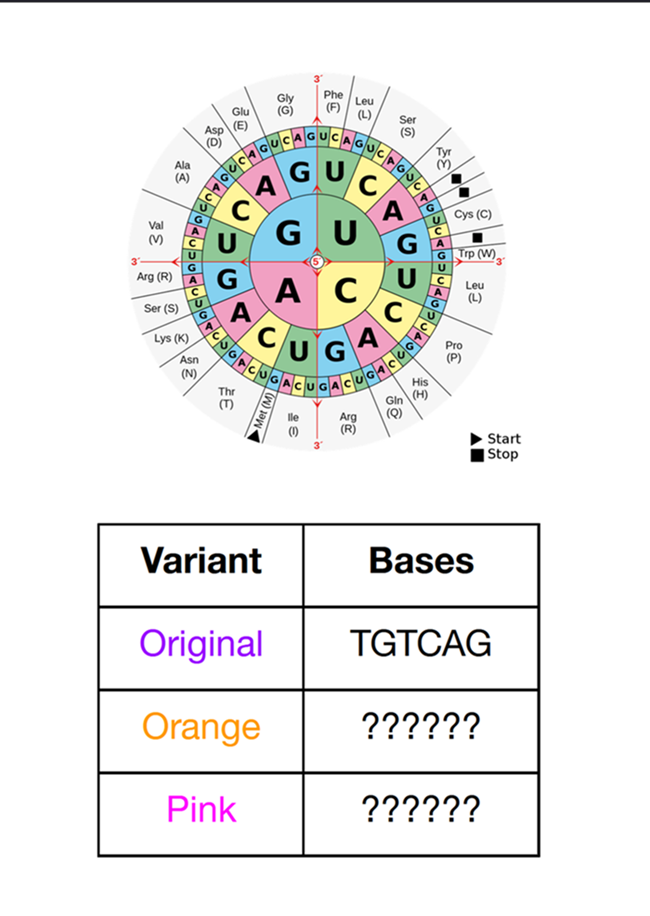
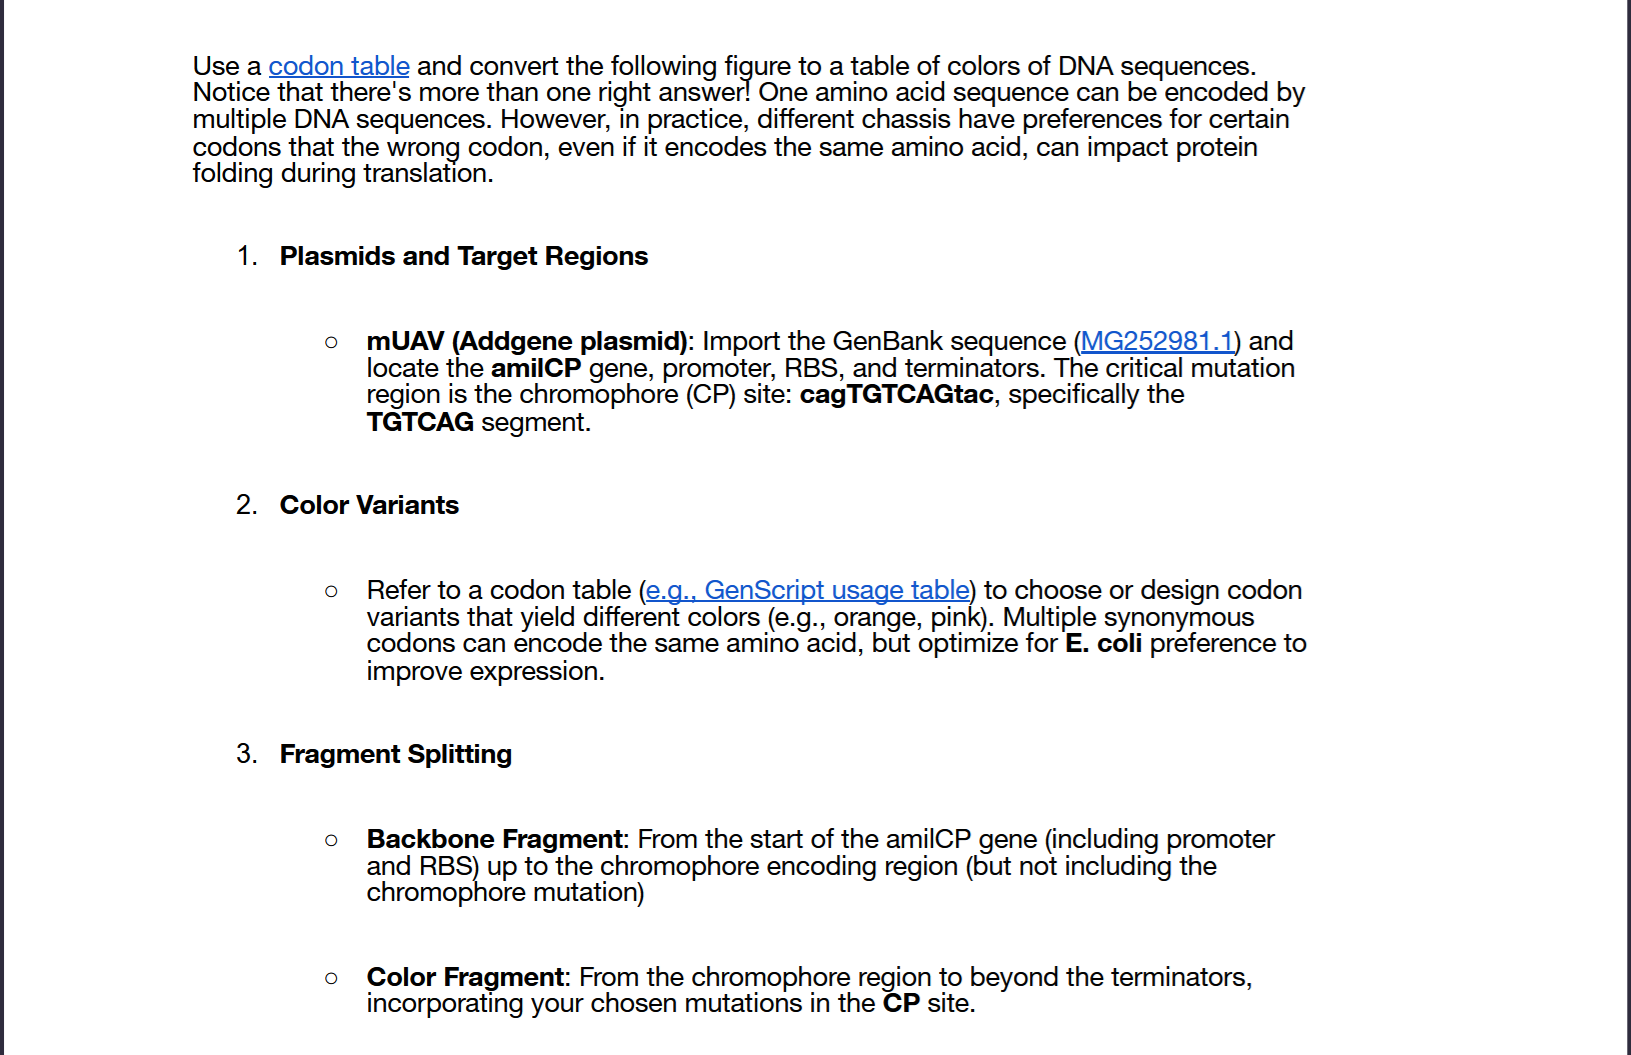
4. How can you ensure that the DNA sequences that you have digested and PCR-ed will be appropriate for Gibson cloning?
To ensure DNA sequences are appropriate for Gibson Assembly, you must:
- Ensure of overlapping ends -> design primers that create specific overlaps
- Precise preparation of fragmens usually via PCR
- amplify with high-fidelity polymerase
- purify the resulting DNA
- ensure correct molar ratios of the fragments.
The success of Gibson Assembly relies on creating overlapping, complementary ends (15–40 bp) that allow the T5 exonuclease to chew back the 5′ ends and the Taq ligase to join them.
Here is the step-by-step guide to preparing your DNA
- Primer Design and Amplification
- Create Overlaps: Design primers for your insert (or backbone) to have a 5′ tail (15–40 bp) that is identical to the end of the adjacent fragment.
- Melting Temperature (Tm): Ensure the Tm of the overlapping region is >50 degrees to facilitate stable annealing at 50 degrees celcius. .
- High-Fidelity PCR: Use a high-fidelity DNA polymerase (e.g., Phusion, Q5) to minimize mutations during amplification.
- Avoid Secondary Structures: Use software tools like SnapGene or NEBuilder to ensure the overlap regions do not form hairpins or dimers.
- Post-PCR Processing and Purification
- Gel Electrophoresis: Always verify the size and yield of your PCR product on an agarose gel.
- DpnI Treatment: If your template was a circular plasmid, treat the PCR product with DpnI to degrade the template plasmid, which significantly reduces background colonies.
-> Purification:
- Gel Extraction: Highly recommended if the PCR produces non-specific bands.
- PCR Cleanup Column: If only one clean band is present, a standard column cleanup is fine. This is preferred over gel extraction to avoid contamination with salts that inhibit the reaction.
- Elution Buffer: Elute the DNA in water or Tris-HCl, as EDTA in TE buffer can inhibit the enzyme mix.
- Optimization and Quantification
- Quantify DNA: Use a spectrophotometer (e.g., NanoDrop, Qbit) to determine the concentration of your purified fragments.
- Molar Ratios: Use an equimolar ratio for optimal assembly. A common ratio is 2-3 fold molar excess of insert over a 50–100 ng vector. Use the NEBioCalculator to calculate the precise amounts based on length and nanograms.
- Minimize Contaminants: Ensure that total unpurified PCR product in the assembly reaction does not exceed 20% of the total reaction volume.
- Final Verification
- Colony PCR/Sequencing: Screen colonies for the correct assembly using PCR or restriction digests, followed by sequencing to confirm the seams between fragments.
Sources
Thermofisher expert cloning tips
- How does the plasmid DNA enter the E. coli cells during transformation?
During E. coli transformation , plasmid DNA (usually double-stranded and circular) enters competent cells via heat shock (42°C) or electroporation, which temporarily increase membrane permeability. The plasmid remains distinct from the chromosome, replicates independently, and expresses selective markers like antibiotic resistance.
E. coli transformation is the process where bacteria take up external plasmid DNA, usually facilitated by making cells “competent” via chemical (CaCl2 or electrical treatment.
The steps include (1) Ice Incubation to mix plasmid with cells (2) Heat Shock (42 degrees celcius) to create membrane pores for DNA entry (3) Recovery in nutrient broth (4) Selection on antibiotic plates.
Step-by-Step Mechanism of Plasmid Transformation
E. coli cells are treated with a chilled calcium chloride solution. This makes the cell membrane porous and permeable to DNA. The calcium ions neutralize the negative charges on both the phosphate backbone of the plasmid DNA and the phospholipids of the cell membrane, reducing repulsion.
Incubation with DNA: The plasmid DNA is added to the competent cells on ice. The mix is incubated on ice for 20-30 minutes, allowing the plasmid to adhere to the outside of the E. coli cells.
Heat Shock: The tube is quickly transferred to a water bath for 30–60 seconds. This sharp temperature change causes a convection current that pulls the DNA through the adhesion sites/pores created by the and heat treatment, allowing the plasmid to enter the cytoplasm.
Recovery Step: Immediately after heat shock, the cells are returned to ice for 2 minutes, then transferred to a nutrient-rich medium (like LB or SOC) and incubated at for 45–60 minutes. This allows the bacteria to recover and, importantly, begin expressing the antibiotic resistance gene (e.g. ) carried on the plasmid.
Selection (Plating): The cells are spread on an agar plate containing a selective antibiotic. Only those E. coli cells that successfully took up the plasmid (transformants) will survive and grow into colonies, while untransformed cells die.
Key Factors for Success
- Competence: Using high-efficiency competent cells is crucial.
- Heat Shock Time: Exactly 45 seconds at is often optimal.
- Recovery time: Allowing enough time (typically 1 hour) for the resistance gene to express.
Sources
Ecoli adapted calcium chloride.
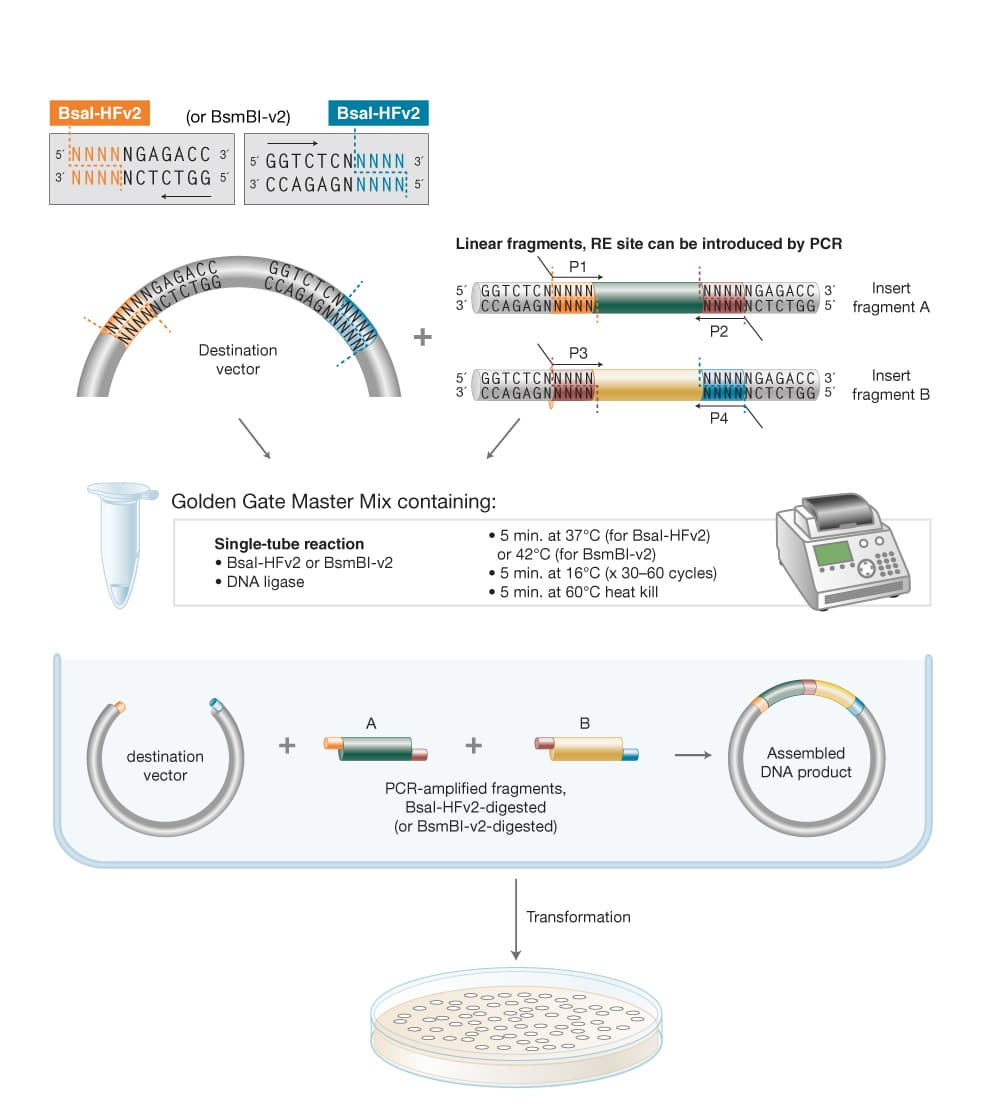
- i. Describe another assembly method in detail (such as Golden Gate Assembly) 5 - 7 sentences w/ diagrams (either handmade or online). and ii. Model this assembly method with Benchling or Asimov Kernel!
Golden Gate Assembly (GGA) is an extremely powerful modular assembly technique in synthetic biology that allows for the efficient and precise assembly of multiple DNA fragments into a single construct. It can be used to create complex DNA constructs, such as expression plasmids, circuits or gene clusters.
The power of Golden Gate Assembly permits the creation of off the shelf libraries of DNA parts that can be used for single construct assembly or multiplexed assembly of many constructs. This technique also shines in its ease of multiplexing using automation.
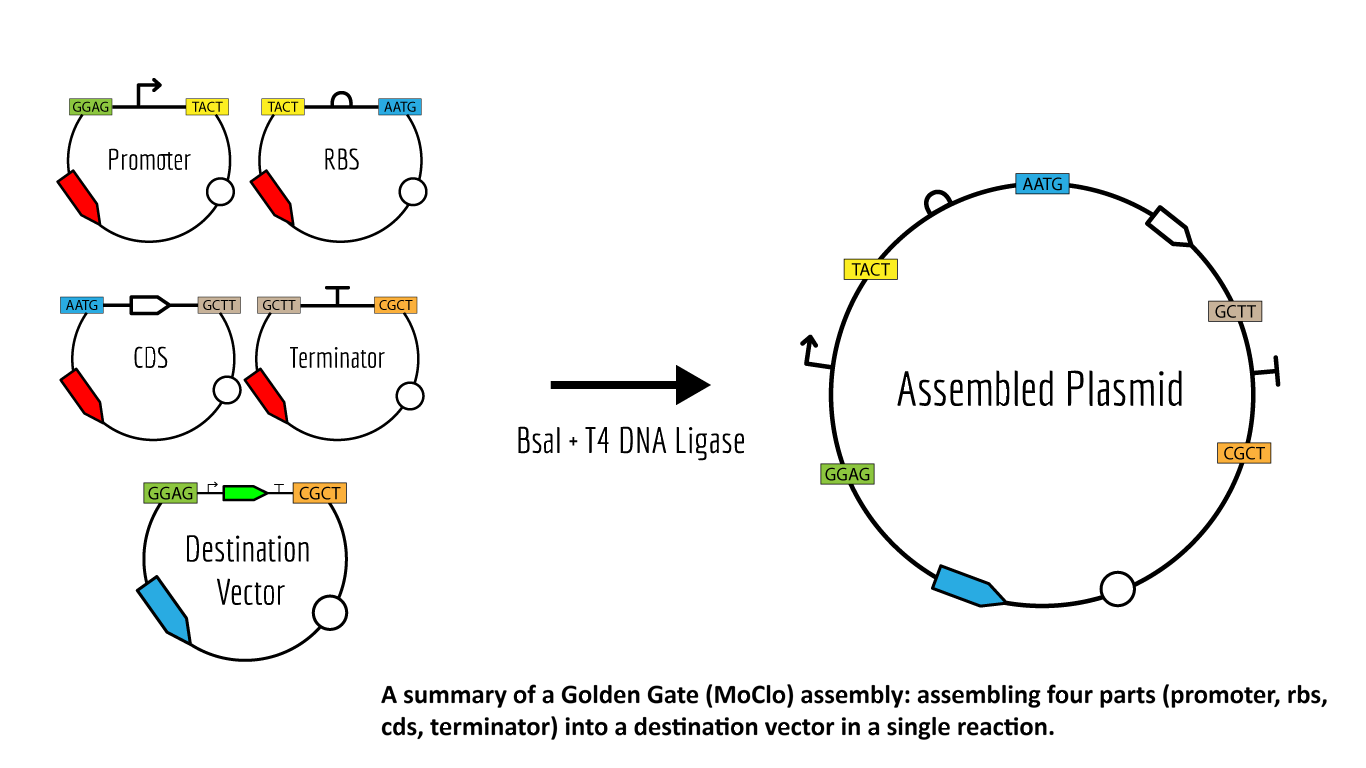
Image from iGEM
Golden Gate Assembly comprises a number of constituent elements: Type IIS Restriction Enzymes, Parts and Plasmids, and Assembly Standards.
From New England Biolabs
Multiple inserts could be assembled into a vector backbone using only the sequential (3) or simultaneous (4) activities of a single Type IIS restriction enzyme and T4 DNA ligase. Golden Gate Assembly and its derivative methods exploit the ability of Type IIS restriction endonucleases (REases) to cleave DNA outside of the recognition sequence. The inserts and cloning vectors are designed to place the Type IIS recognition site distal to the cleavage site, such that the Type IIS REase can remove the recognition sequence from the assembly. The advantages of such an arrangement are three-fold:
  1. The overhang sequence created is not dictated by the REase, and therefore no scar sequence is introduced.
  2. The fragment-specific sequence of the overhangs allows orderly assembly of multiple fragments simultaneously.
  3. The restriction site is eliminated from the ligated product, so digestion and ligation can be carried out simultaneously. [NEb](https://www.neb.com/en/applications/cloning-and-synthetic-biology/dna-assembly-and-cloning/golden-gate-assembly)

Golden Gate Assembly workflow for both simple and complex assemblies,Golden Gate Assembly, NEB.
ii. Golden gate assembly on Benchling!
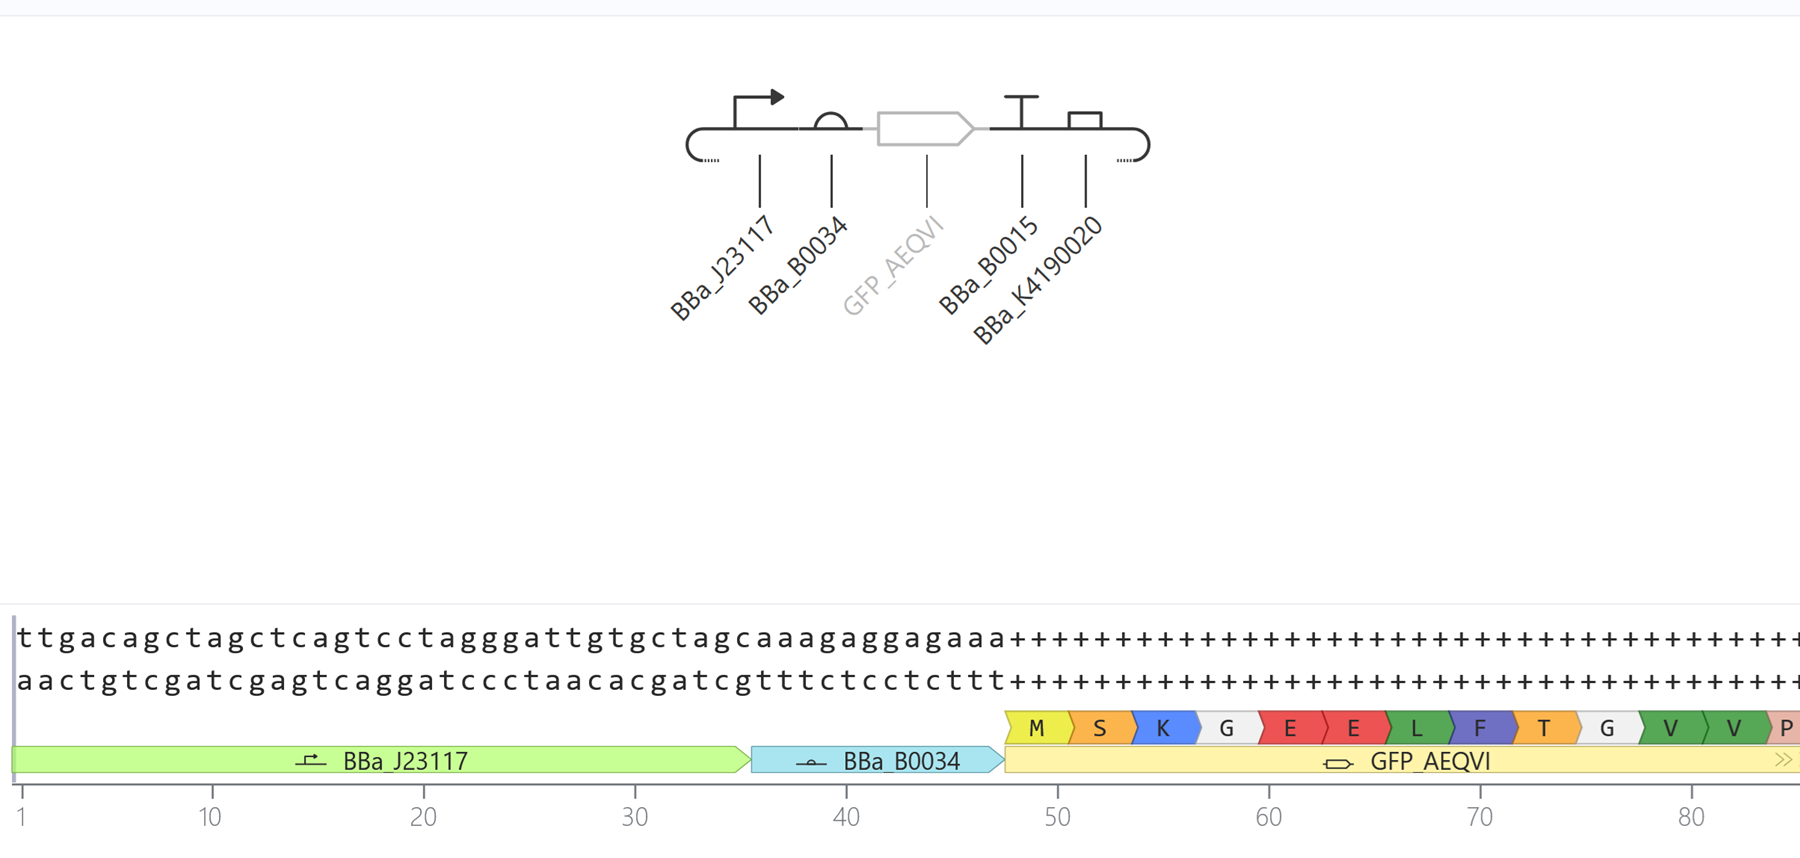
Soooo I will attempt to do the lab on the top of the page (in silico) using benchling. I got totally confused whether this part of the assignment is asking me to do golden gate assembly or gibson and I noticed a lot of my classmates went with gibson so I will do that too. I followed what Nourelden did.
Backbone DNA Sequence: pUC19.
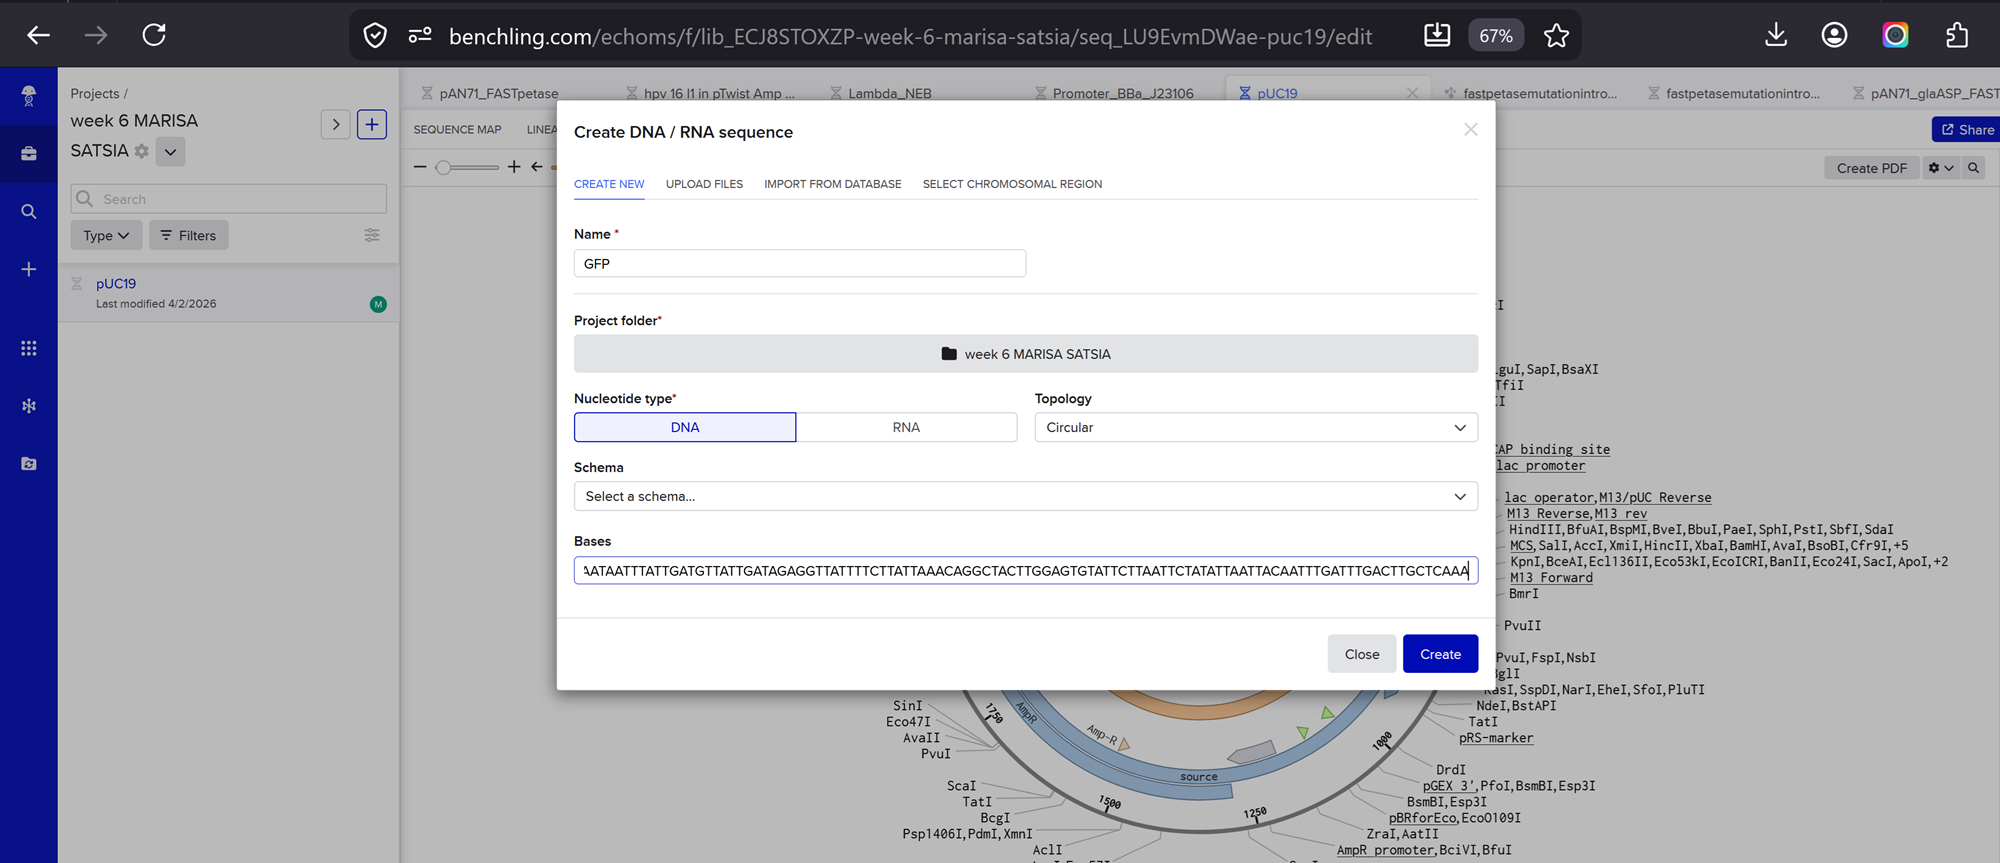
I will just try it by stitching a gfp into the puc19 cloning vector.

The GFP INSERT SEQUENCE is:
I then added added this gfp sequence on benchling manually!
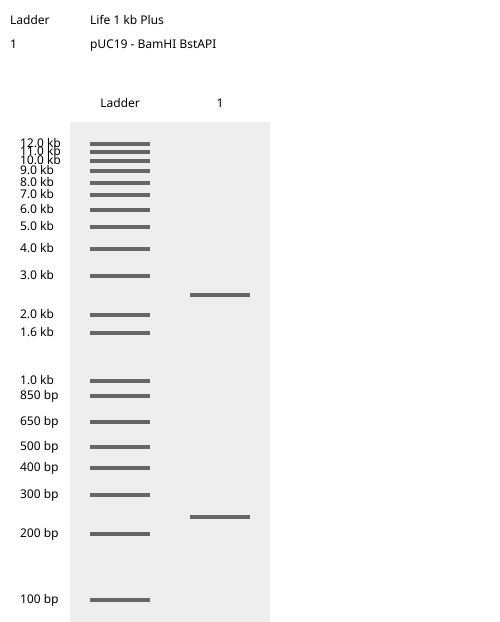
I chose 2 restriciton enzymes, BamHI, and BstAPI inside the puc19 plasmid so I can linearize my vector and proceed with gibsol assembly.

And here is the virtual digest ladder!
Then I went to the assembly wizard on the bottom right of the page and i selected gibson!
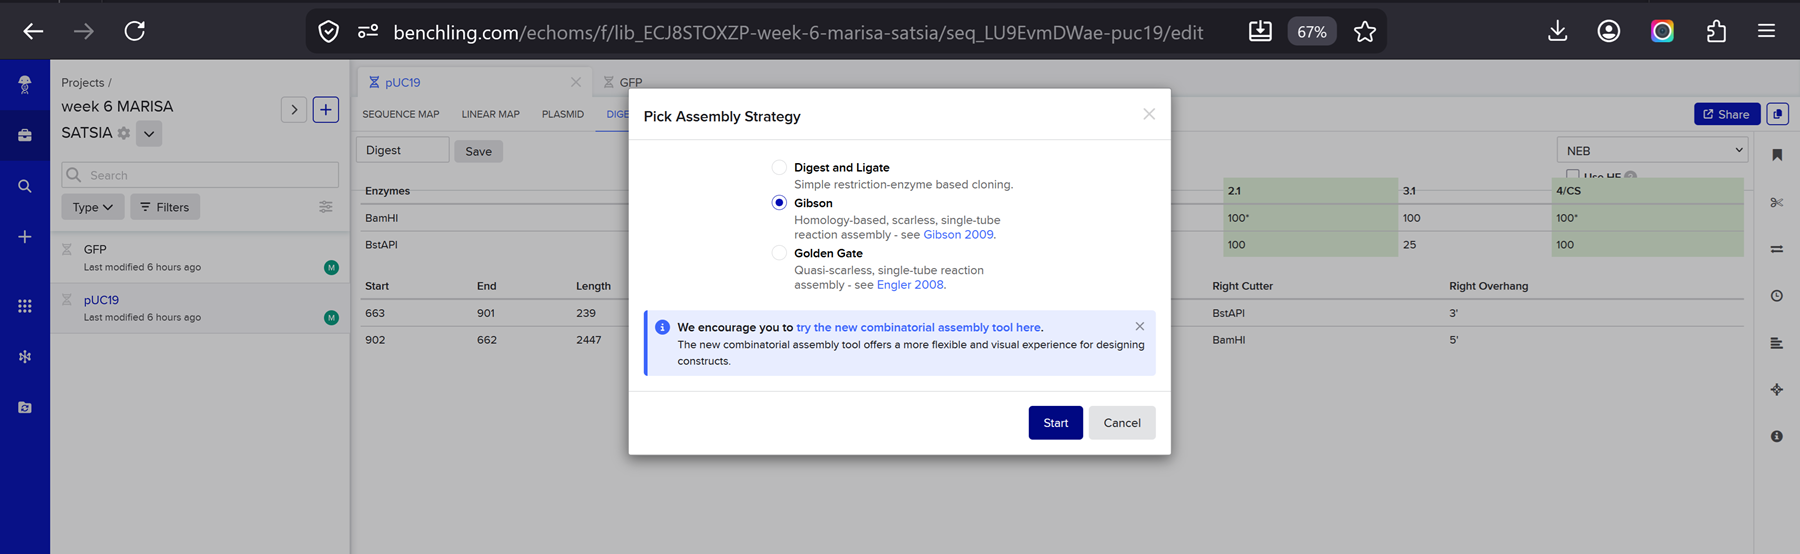
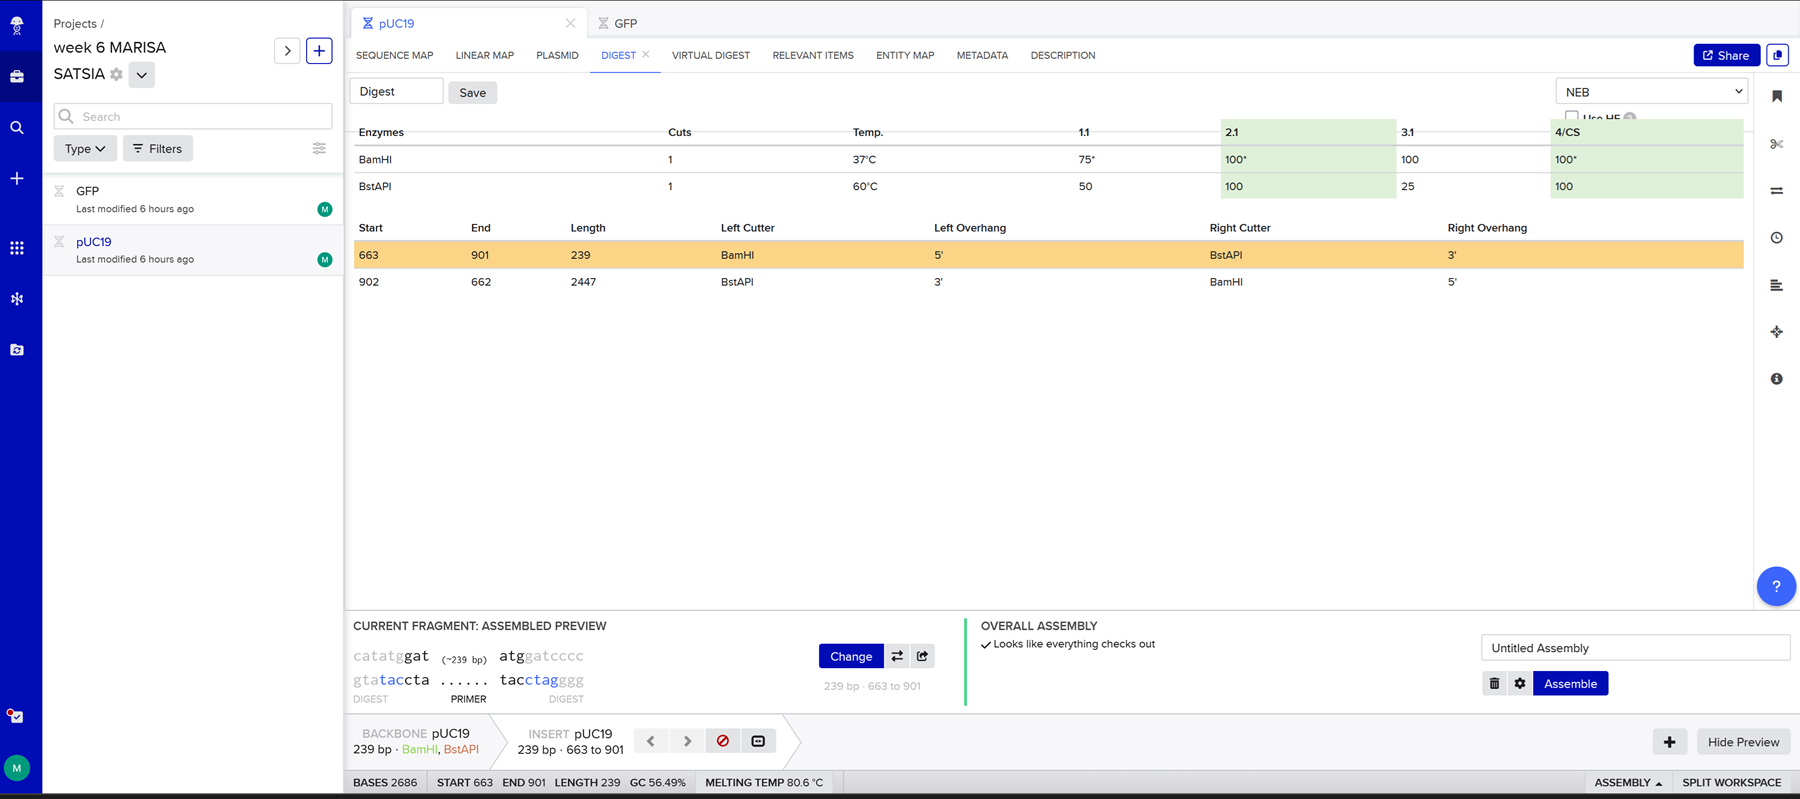
And then I realised I made a mistake because I chose puc19 as both the backbone and the insert instead of selecting the gfp sequence for the insert so I corrected it.
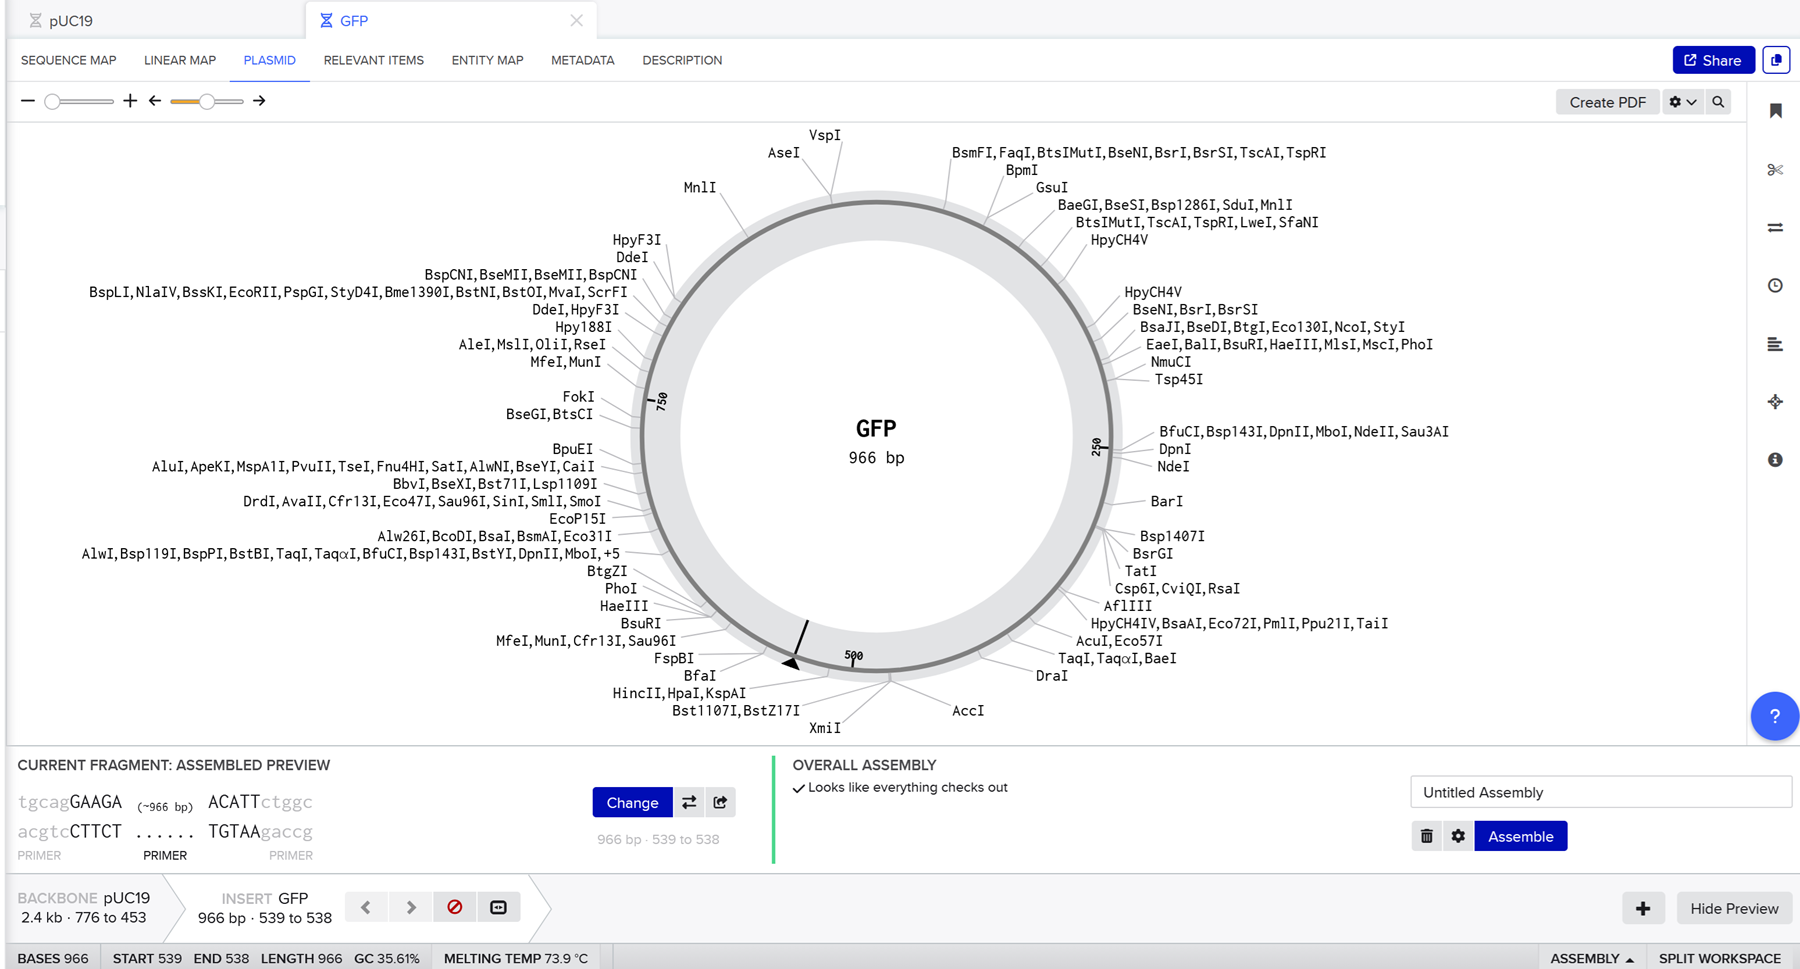
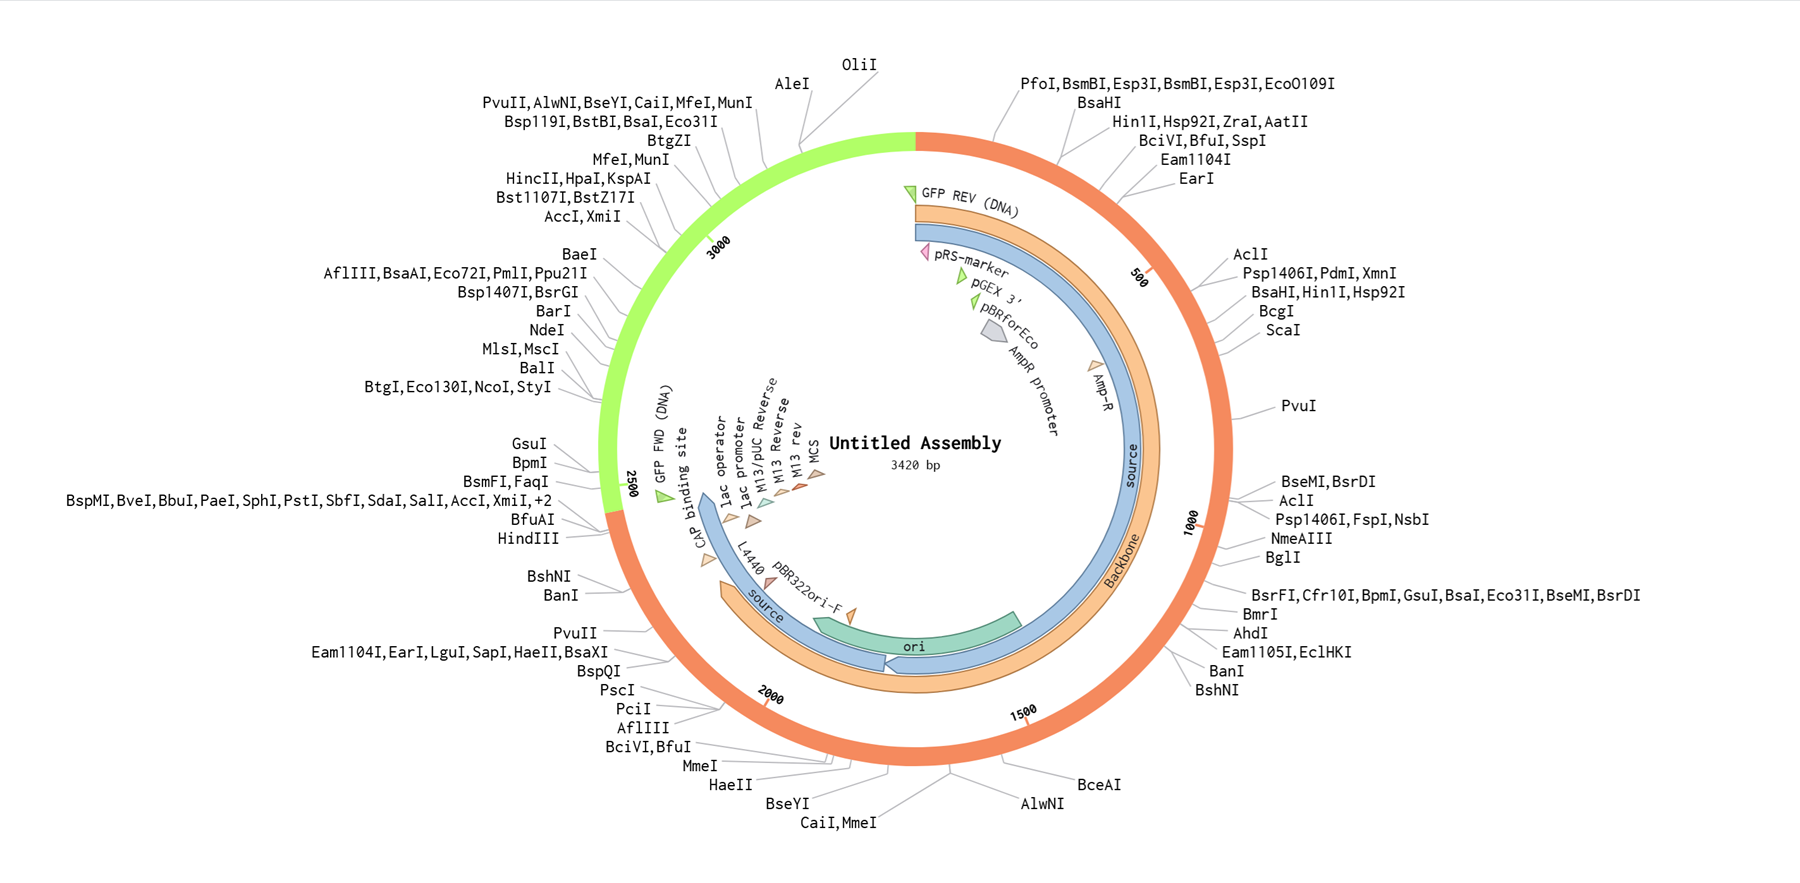
I realised I was not selecting all of the gpf sequence so I did it again and again until it selected the whole gfp sequence as an insert. Then I hit assembly and benchling generates the final construct.
Unfortunately this does not seem right to me and it is a bit embarassing because I did it at least 10 times and I keep doing it wrong. There is a gap where the gfp was supposed to be.
Homework PART B: Asimov Kernel
1. Create a Repository for your work
2. Create a blank Notebook entry to document the homework and save it to that Repository
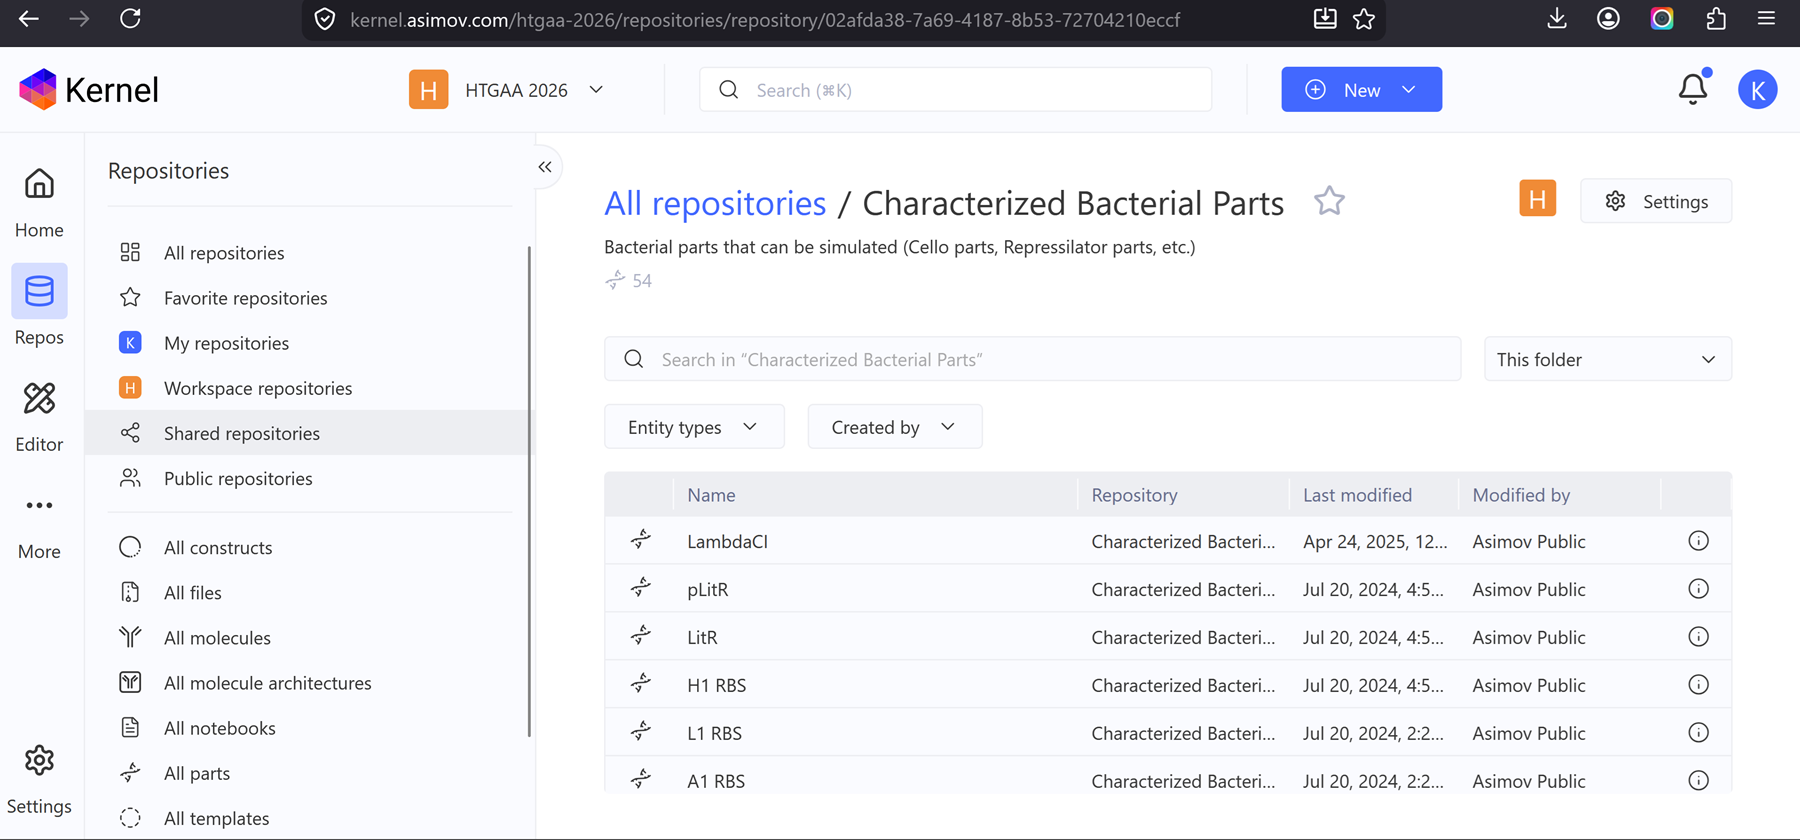
3. Explore the devices in the Bacterial Demos Repo to understand how the parts work together by running the Simulator on various examples, following the instructions for the simulator found in the “Info” panel (click the “i” icon on the right to open the Info panel)
4. Create a blank Construct and save it to your Repository
i. Recreate the Repressilator in that empty Construct by using parts from the Characterized Bacterial Parts repository
ii. Search the parts using the Search function in the right menu
iii. Drag and drop the parts into the Construct
iv. Confirm it works as expected by running the Simulator (“play” button) and compare your results with the Repressilator Construct found in the Bacterial Demos repository
v. Document all of this work in your Notebook entry - you can copy the glyph image and the simulator graphs, and paste them into your Notebook
5. Build three of your own Constructs using the parts in the Characterized Bacterials Parts Repo
i. Explain in the Notebook Entry how you think each of the Constructs should function
ii. Run the simulator and share your results in the Notebook Entry
iii. If the results don’t match your expectations, speculate on why and see if you can adjust the simulator settings to get the expected outcome
I finally got the chance to look into doing this and managed to navigate it. I made a blank notebook entry and made some constructs and simulated them!
I recreated the repressilator from the class by using the characterized bacterial parts repository and dragged and dropped the components to create this repressilator construct.
Construct 1
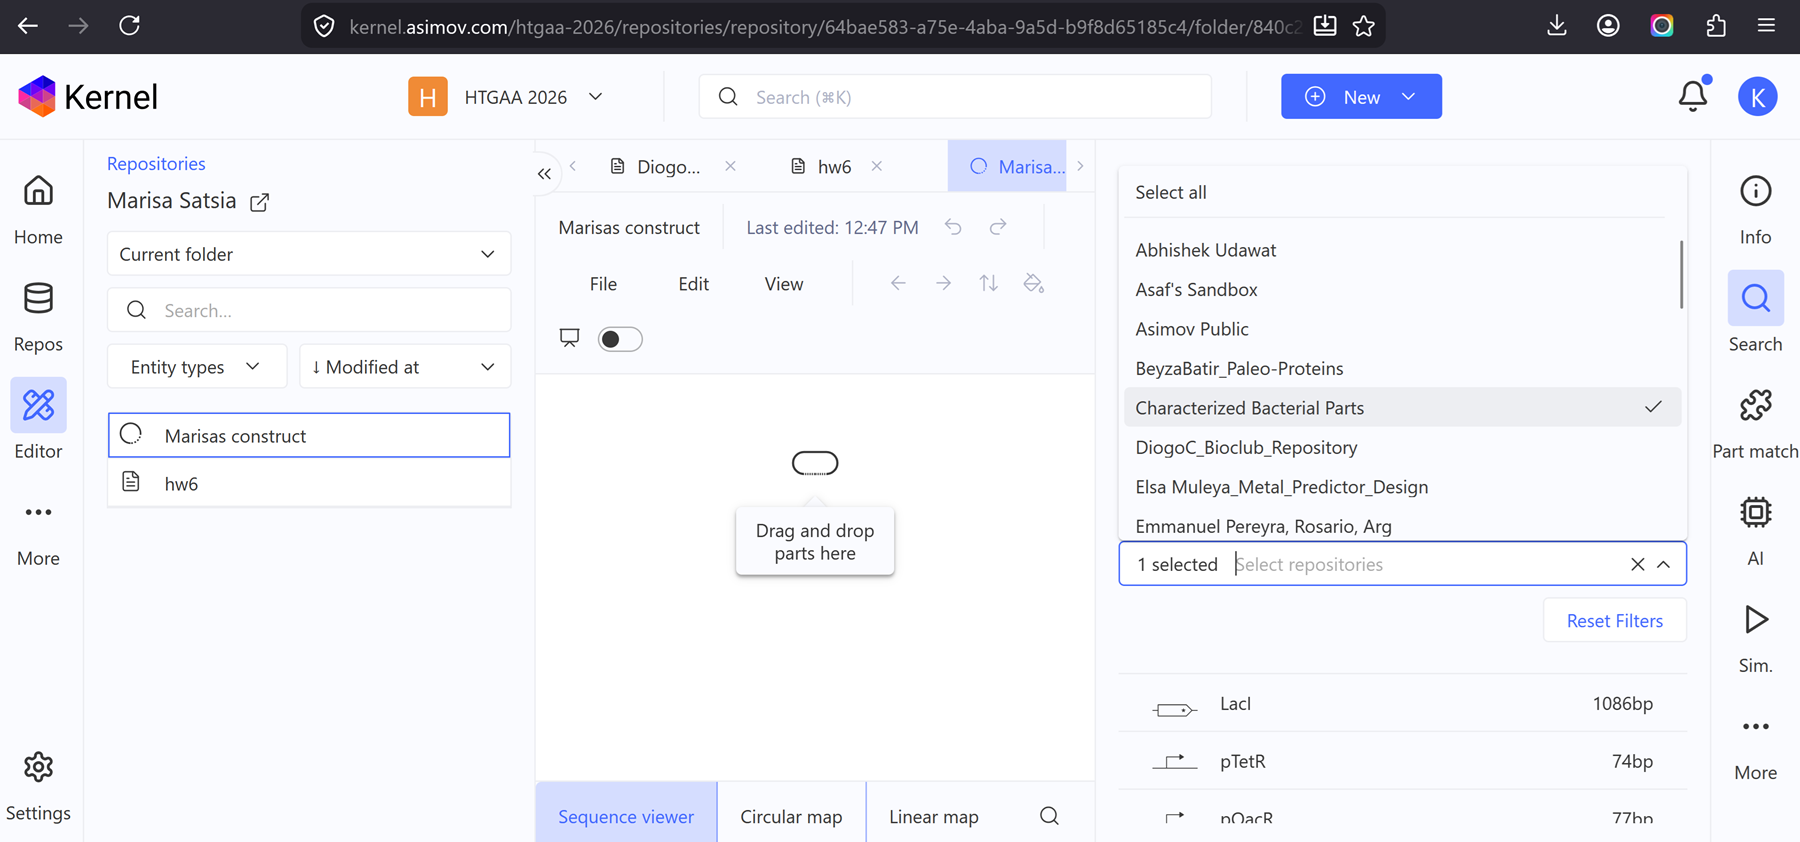
After dragging and dropping all the components I made this!
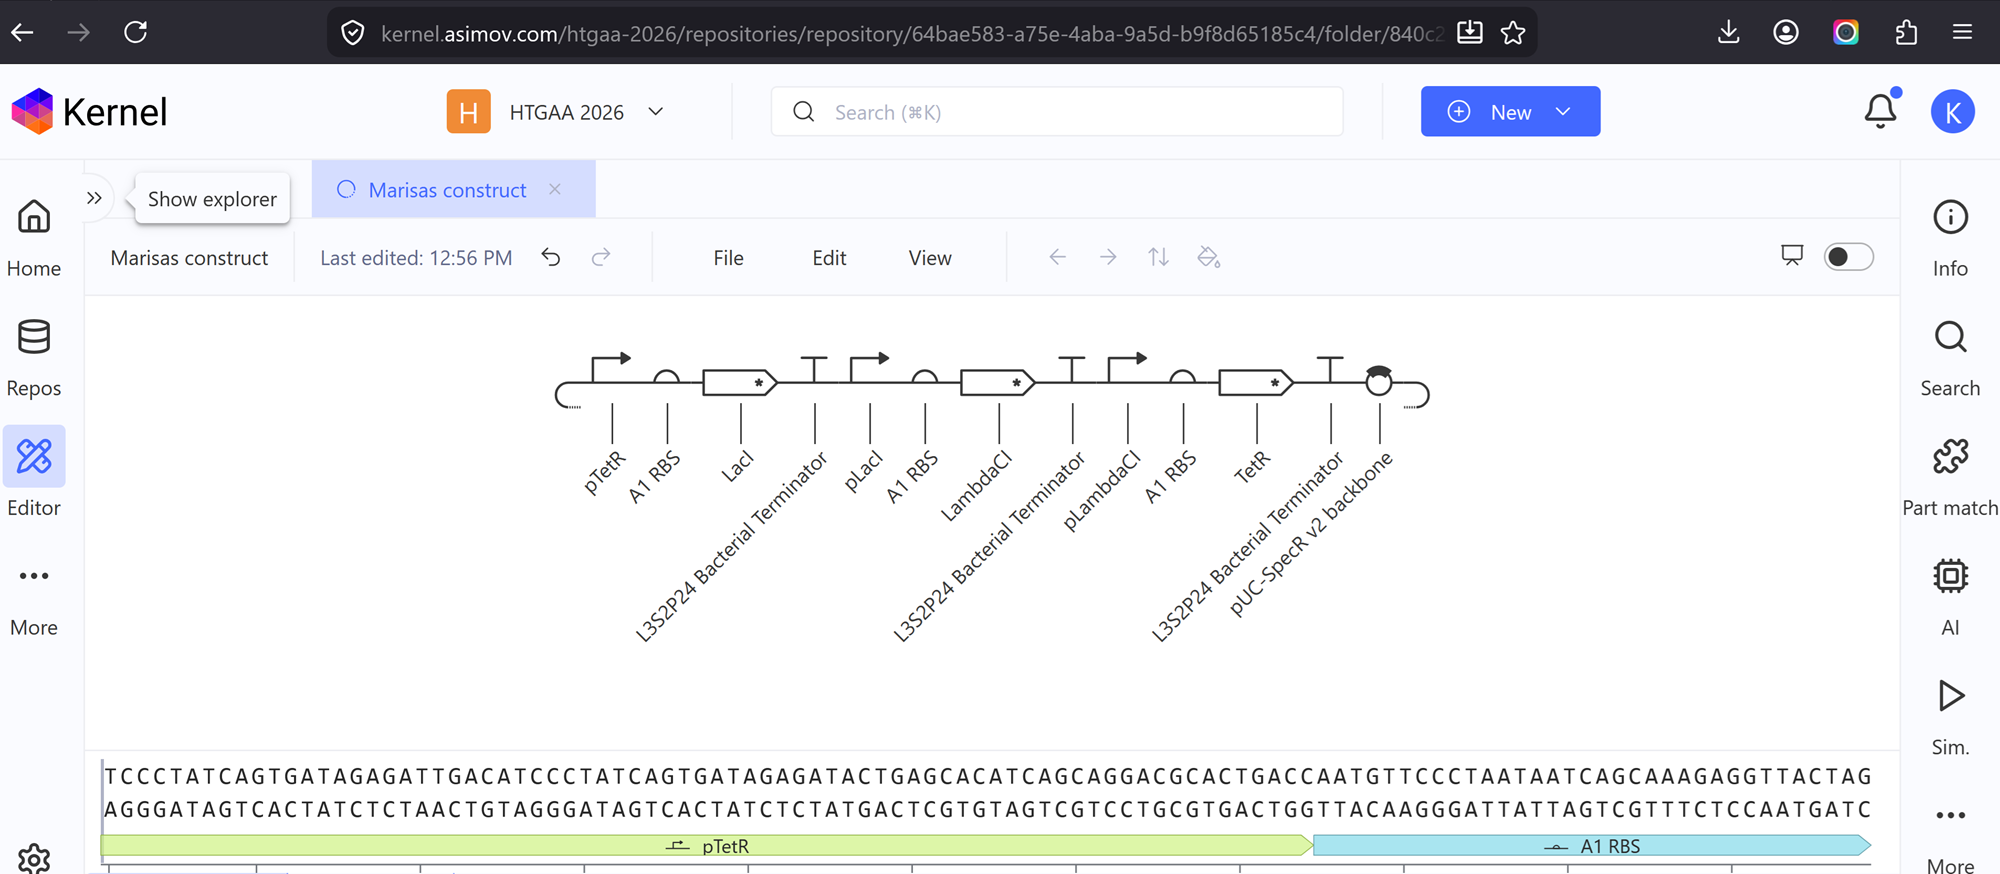
I then run the simulator.
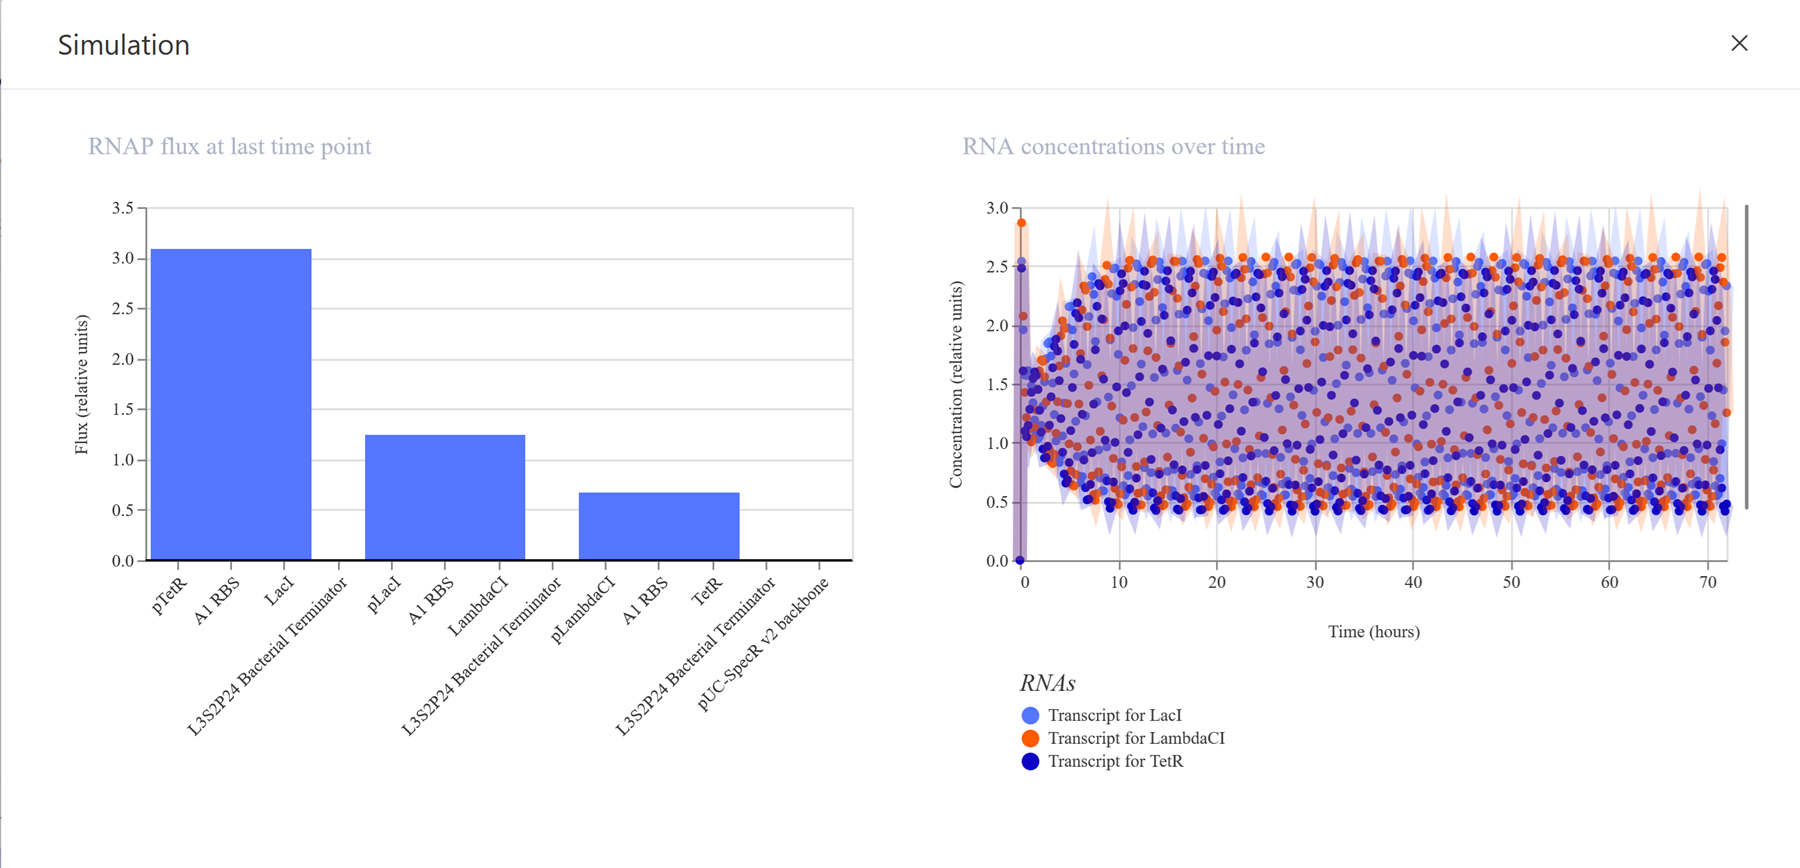
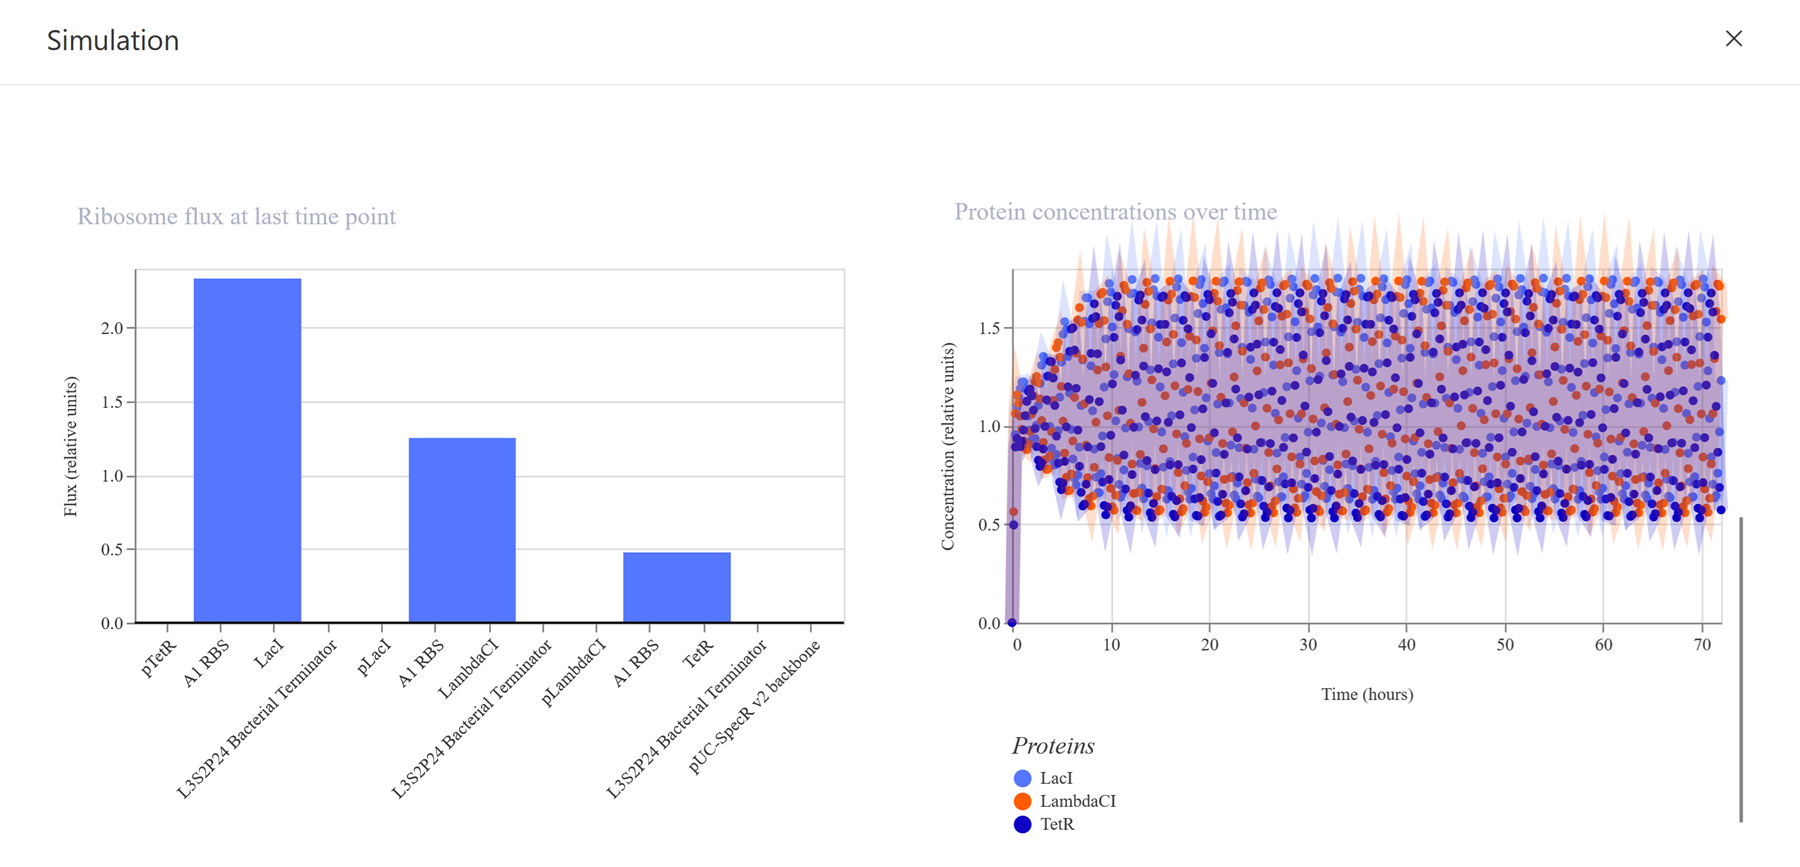
I also shared the results in my the Notebook entry.
Construct 2
I then decided to make a simple construct for red fluorescent protein expression.
The simulations:
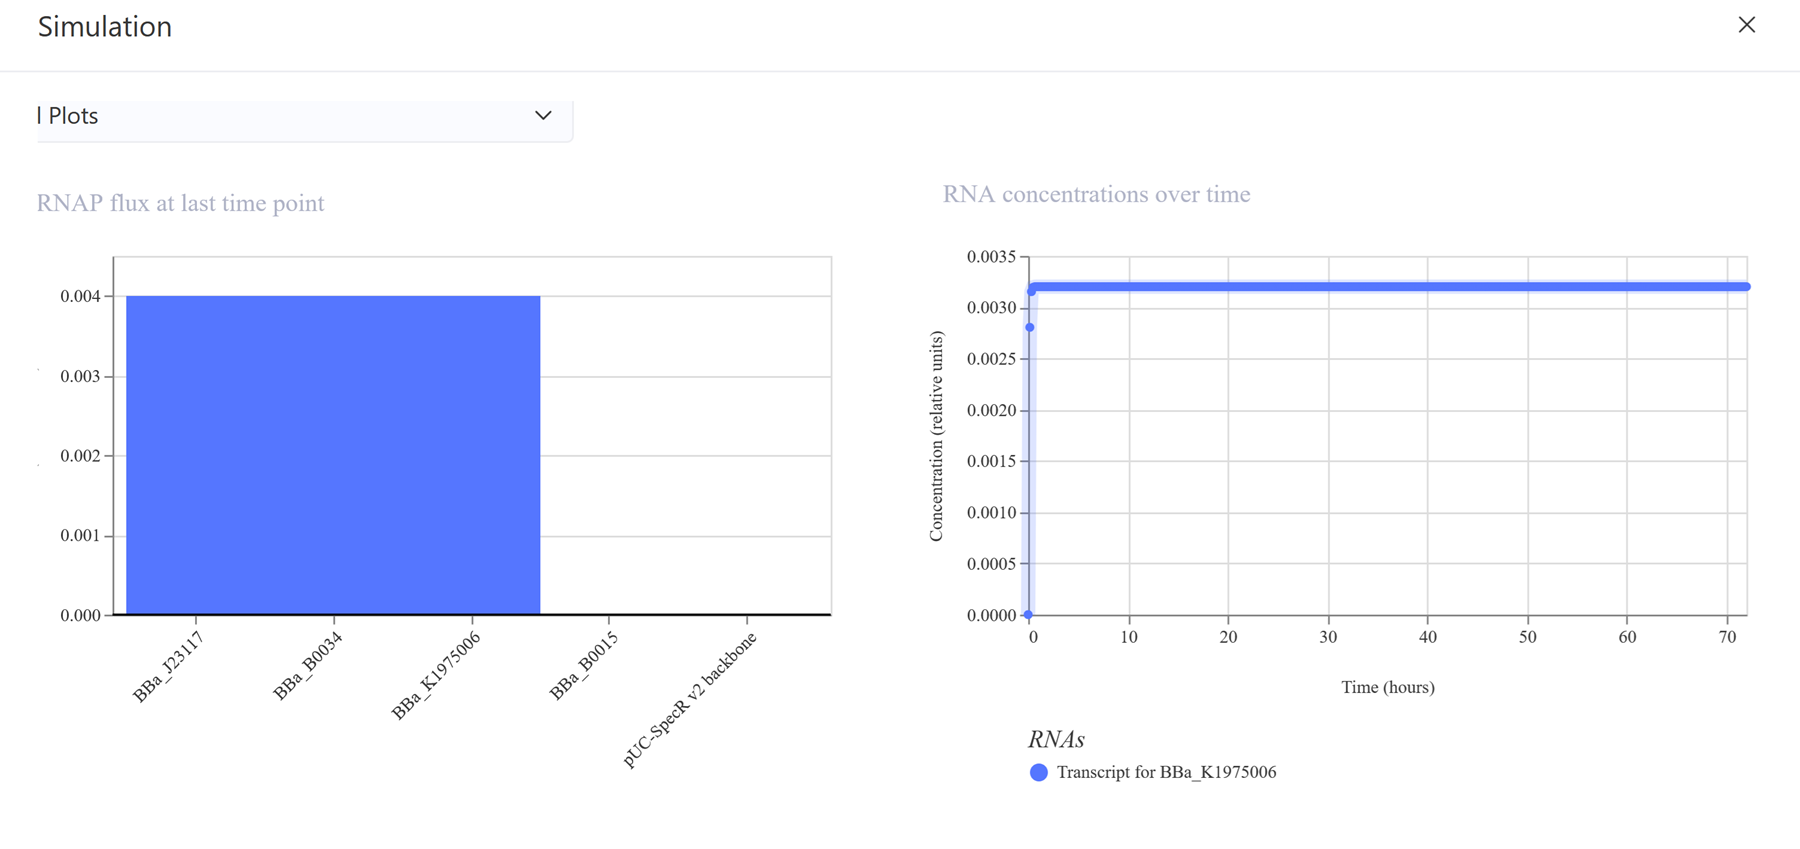
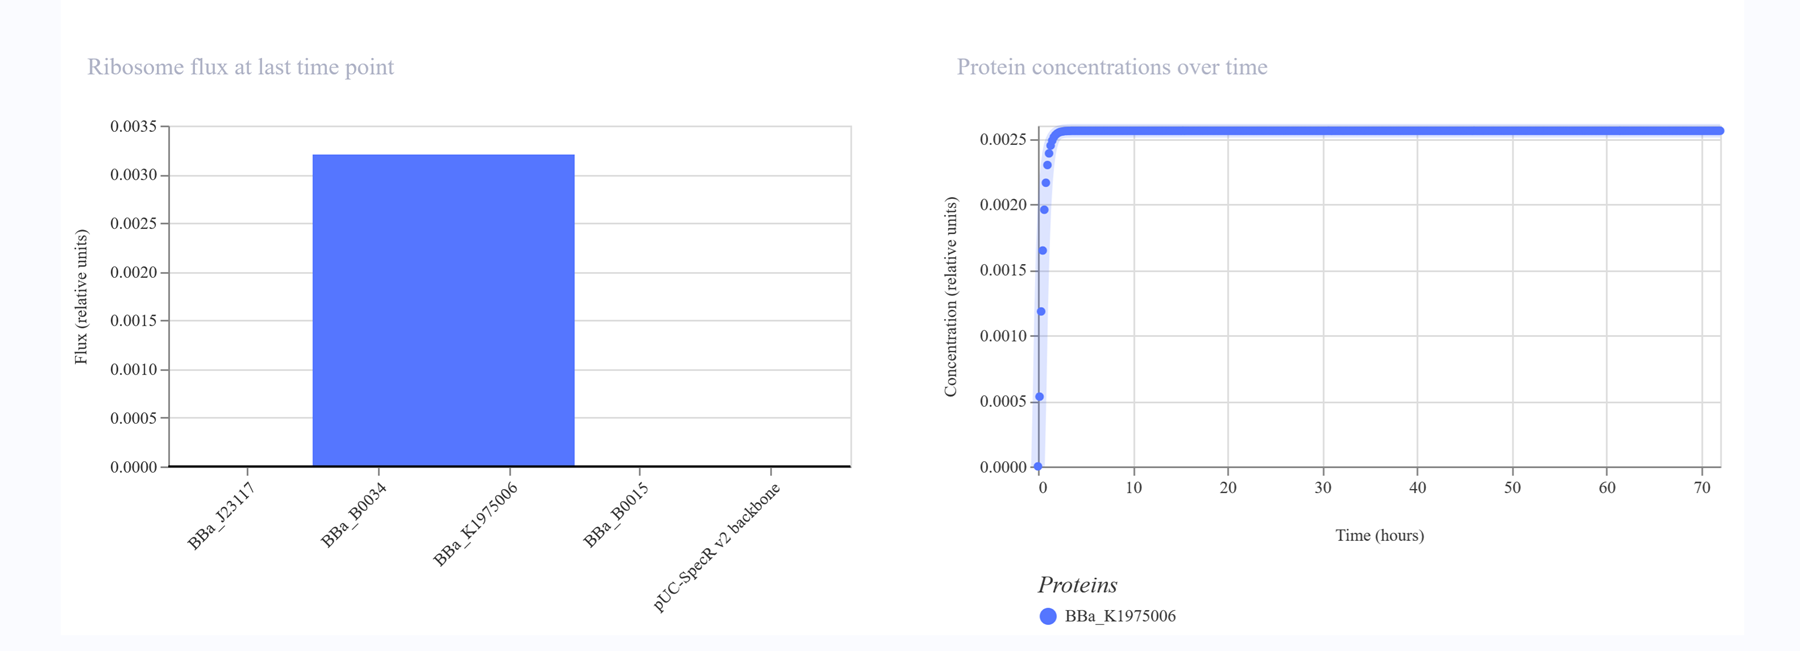
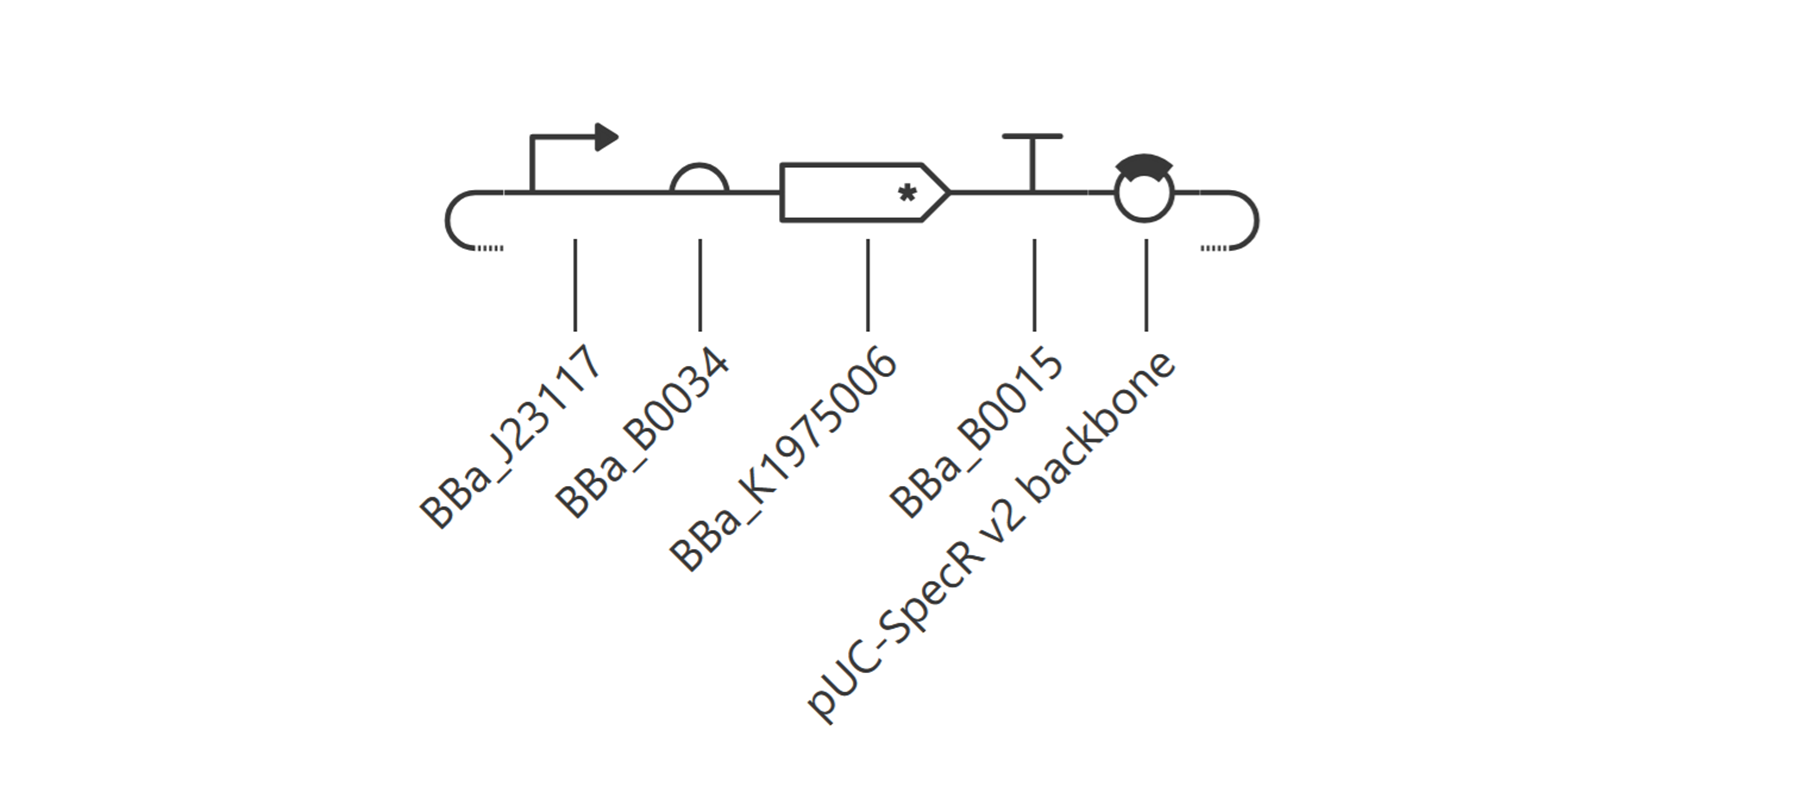
Construct 3
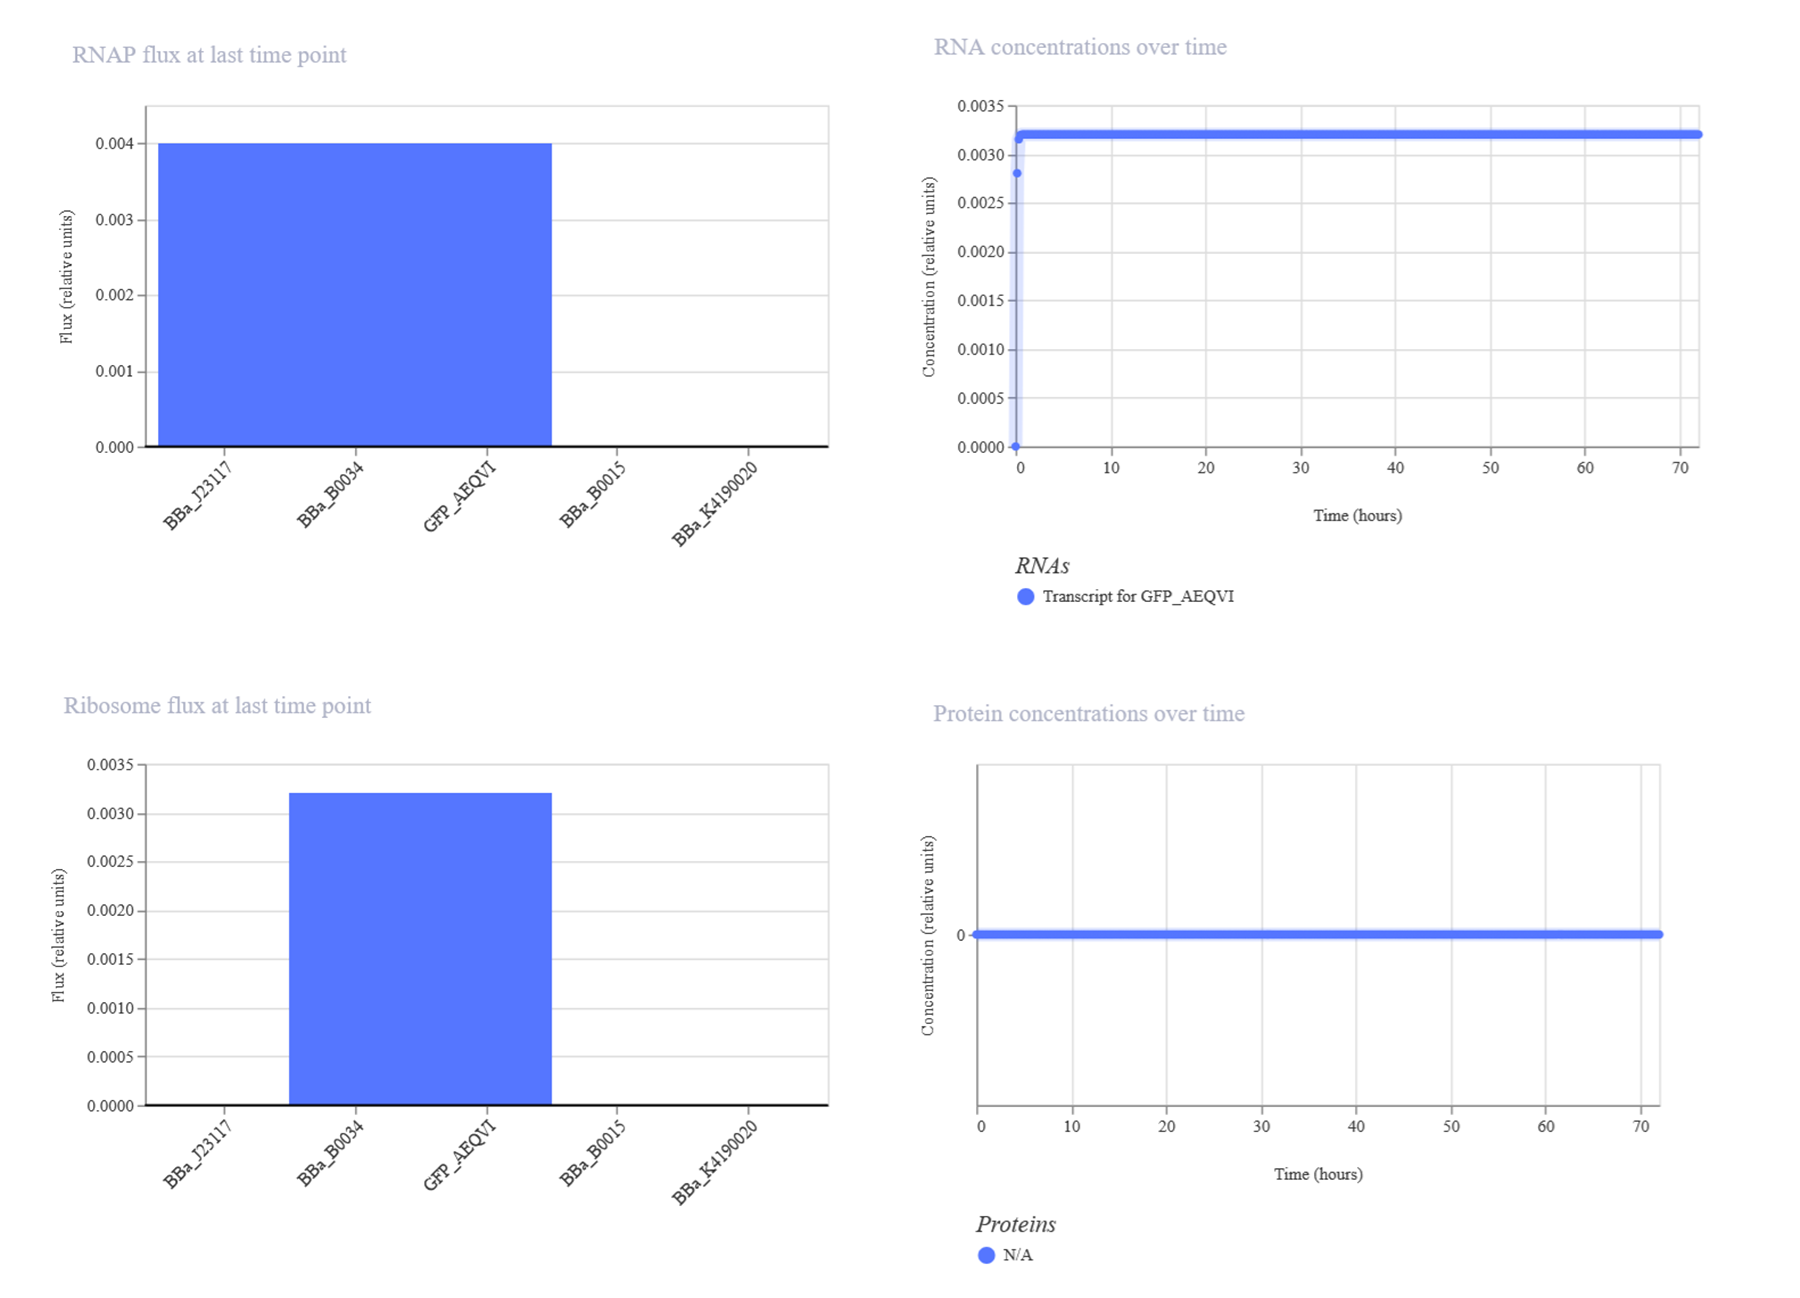
Made another simple construct to express the green fluorescen protein this time.
Resources