Week 6 HW: Genetic Circuits Part 1
Assignment: DNA Assembly
Answer these questions about the protocol in this week’s lab:
What are some components in the Phusion High-Fidelity PCR Master Mix and what is their purpose? The Phusion High-Fidelity PCR Master Mix (NEB #M0531) is supplied as a convenient 2× pre-formulated reagent containing all reaction components except template DNA, primers, and water. Its key constituents and their functions are as follows.
Phusion DNA Polymerase is the catalytic engine of the mix. It is a chimeric enzyme comprising a Pyrococcus-like thermostable polymerase core fused to a processivity-enhancing domain (derived from the Sso7d protein family), which allows the enzyme to remain bound to the DNA template for longer stretches and amplify fragments at higher speed and with greater fidelity than standard Taq polymerase. Crucially, Phusion carries a 3′→5′ proofreading exonuclease activity that removes incorrectly incorporated nucleotides, giving it an error rate more than 50-fold lower than Taq and roughly 6-fold lower than Pfu polymerase — making it the appropriate choice whenever sequence accuracy matters, such as for cloning (NEB, 2024). Deoxynucleotide triphosphates (dNTPs) — dATP, dCTP, dGTP, and dTTP — are the building blocks that the polymerase incorporates into the nascent DNA strand. They are pre-included in the master mix at a balanced concentration to minimise pipetting error.
MgCl₂ (magnesium chloride) is an essential cofactor. Mg²⁺ ions coordinate with the phosphate groups of the incoming dNTP in the polymerase active site, enabling the phosphodiester bond-forming reaction. The concentration of free Mg²⁺ also influences polymerase processivity and primer–template specificity; the HF Buffer formulation has been optimised to include the appropriate Mg²⁺ concentration for standard templates. Reaction buffer (HF Buffer) maintains the correct pH and ionic strength for optimal polymerase activity. The buffer stabilises the enzyme during the high-temperature denaturation steps and helps establish reproducible annealing conditions. An alternative GC Buffer formulation is available for GC-rich or otherwise difficult templates, optionally supplemented with DMSO to reduce secondary structure in the template.
Together, these components mean the researcher only needs to add template, primers, and water — dramatically reducing pipetting steps and the risk of component-level errors.What are some factors that determine primer annealing temperature during PCR?
The annealing temperature (T_a) is the step in the PCR cycle at which primers bind to the single-stranded template, and setting it correctly is one of the most important parameters for obtaining specific, high-yield amplification. Several interrelated factors govern the optimal T_a. GC content of the primers is the dominant determinant. Guanine–cytosine base pairs form three hydrogen bonds versus the two formed by A–T pairs, so primers with higher GC content have higher melting temperatures (T_m). The classical Wallace rule estimates T_m as 4°C per G/C + 2°C per A/T for short oligonucleotides, though more accurate nearest-neighbour thermodynamic models are preferred for primers longer than ~14 nt (SantaLucia, 1998).
Primer length also matters: longer primers have more base pairs contributing to stability, raising T_m. Primers used in the HTGAA Gibson Assembly lab are typically 18–25 nt in their annealing region, with additional 5′ homology overhangs (which do not contribute to T_m at the annealing step).
The specific polymerase used shifts the required T_a. Phusion polymerase, due to its Sso7d processivity domain binding non-specifically to double-stranded DNA, stabilises primer–template duplexes and therefore typically requires annealing temperatures 3–5°C higher than what a standard Taq-based Tm calculator recommends. NEB provides the Phusion-specific Tm Calculator (www.neb.com/tmcalculator) to account for this. Salt (Mg²⁺ and monovalent cation) concentration in the buffer affects the stability of the primer–template duplex. Higher ionic strength stabilises the negatively charged DNA backbone, raising T_m slightly.
Template secondary structure and GC-richness can indirectly affect effective annealing by reducing the accessibility of the target site; using a slightly lower T_a or adding DMSO can mitigate this. Finally, primer–dimer formation or 3′ self-complementarity can compete with productive annealing — poorly designed primers may force a lower T_a that sacrifices specificity. NEB’s Tm Calculator and tools like Primer3 or HTGAA’s own Gibson Assembly supplement are valuable resources for rational primer design.There are two methods from this class that create linear fragments of DNA: PCR, and restriction enzyme digests. Compare and contrast these two methods, both in terms of protocol as well as when one may be preferable to use over the other.
Both PCR and restriction enzyme (RE) digestion produce linear DNA fragments suitable for downstream cloning, but they differ substantially in how the fragment boundaries are defined, what the resulting ends look like, and when each is the better tool.
- Protocol comparison:
PCR begins with designing two oligonucleotide primers that flank the desired sequence. The reaction cycles through denaturation (~98°C for Phusion), annealing, and extension steps, exponentially amplifying the target sequence from as little as a few nanograms of template. The researcher has complete control over where amplification begins and ends — simply by choosing primer binding positions — and can append any desired sequence (e.g., homology overhangs for Gibson Assembly) to the 5′ end of each primer. The product is a double-stranded fragment with blunt ends when using Phusion (or 3′ A-overhangs with Taq). PCR requires sequence knowledge at both termini but otherwise introduces no sequence constraints on the interior of the fragment. - RE digestion, by contrast, requires that the target DNA already contains the appropriate recognition sites for the chosen restriction enzyme at the desired cut points — or that these sites were engineered in at the cloning stage. Digestion is carried out by incubating the DNA with the enzyme in its optimised buffer, typically at 37°C, for 15–60 minutes. Depending on the enzyme, the resulting ends are blunt, 5′ overhang (sticky), or 3′ overhang (sticky). Sticky ends are highly useful for directional ligation because complementary overhangs guide fragment orientation. However, the set of available cut sites is limited to the enzyme’s recognition sequence, so fragment boundaries cannot be arbitrarily chosen.
When to prefer PCR:
PCR is preferred when (1) you need to add sequence information to the fragment ends (e.g., homology overhangs for Gibson Assembly, or a promoter element), (2) the target sequence does not naturally contain convenient restriction sites, (3) you want blunt ends for isothermal assembly methods, or (4) you are working from genomic DNA where cutting to the exact desired boundary would otherwise require engineering new sites. PCR is also faster when only one or a few copies of template are available.
When to prefer RE digestion:
Restriction digestion is preferred when (1) working with existing plasmid libraries or vectors that were designed with standardised cloning sites (e.g., BioBrick or MCS vectors), (2) you need highly directional ligation via compatible sticky ends without a ligase-independent step, (3) the insert is already in a plasmid and simply needs to be excised, or (4) when PCR fidelity is a concern for very long fragments (though modern HF polymerases largely address this). RE digestion also scales easily to large amounts of DNA and requires no thermocycler. In summary, PCR offers flexibility in defining sequence boundaries and is essential for adding new sequence elements, while RE digestion is efficient and directional when working within an existing restriction site framework.
How can you ensure that the DNA sequences that you have digested and PCR-ed will be appropriate for Gibson cloning? Gibson Assembly relies on three enzymes acting sequentially on overlapping linear DNA fragments: a 5′ exonuclease chews back the 5′ ends to expose single-stranded 3′ tails, a DNA polymerase fills in gaps between annealed fragments, and a DNA ligase seals the nicks. For this to work correctly, several conditions must be met in the design of your PCR products and RE-digested fragments.
Design overlapping homology sequences of appropriate length. Each pair of adjacent fragments must share 15–30 bp of identical sequence at their junction. For PCR products, this is achieved by appending the appropriate homology sequence to the 5′ end of each primer. For RE-digested fragments, you must verify that after digestion, the fragment ends share sequence with the adjacent insert or vector — this usually requires that the vector was originally designed with those overlaps or that an intermediate PCR step adds them.
Verify the absence of internal restriction sites (if using RE digestion). If you are opening a vector by RE digestion and the enzyme cuts elsewhere in the backbone or insert, you will generate unintended fragments that can interfere with assembly efficiency. Run a virtual digest in silico (e.g., in Benchling or SnapGene) before proceeding.
Check for absence of repeat sequences at junctions. The T5 exonuclease in the Gibson mix cannot distinguish between the intended overhang and any other region of the same sequence. Internal repeats of ≥15 bp near the junction can cause mis-assembly or deletion artefacts.
Gel-purify or column-purify all fragments. After PCR, gel extraction removes primer dimers, residual template, and off-target amplicons. After RE digestion, gel purification removes the small excised stuffer fragment and inactivated enzyme. Clean fragments improve assembly efficiency.
Verify fragment sizes and quality. Run all fragments on an agarose gel to confirm they are the expected size. Faint bands may indicate degradation or low yield, both of which reduce assembly efficiency. Quantify DNA concentration (e.g., by NanoDrop or Qubit) so that correct molar ratios of vector to insert can be set up in the assembly reaction (typically 1:2 to 1:5 molar ratio).
Confirm that terminal sequences are internally consistent. Use in-silico assembly tools (Benchling, SnapGene, or Geneious) to simulate the final assembled product before running the reaction. Confirm that the reading frame, promoter orientation, and any regulatory elements are correct in the predicted assembly.
How does the plasmid DNA enter the E. coli cells during transformation? The process of introducing foreign DNA into bacterial cells is called transformation, and in standard molecular biology protocols it occurs via one of two mechanisms: heat-shock transformation of chemically competent cells, or electroporation of electrocompetent cells.
- In heat-shock transformation, E. coli cells are first made chemically competent by treatment with divalent cations — most commonly calcium chloride (CaCl₂). The Ca²⁺ ions are thought to neutralise the repulsive negative charges on both the bacterial outer membrane (lipopolysaccharide and phospholipid headgroups) and the DNA backbone, allowing DNA to associate with the cell surface (Mandel & Higa, 1970). The cells are then incubated on ice with the plasmid DNA, and then subjected to a brief heat shock (typically 42°C for 30–45 seconds). The sudden temperature shift is believed to create transient disruptions or pores in the membrane, allowing plasmid DNA to enter the cytoplasm — though the precise molecular mechanism remains incompletely understood. Following heat shock, cells are returned to ice and then allowed to recover in rich medium (SOC broth) at 37°C for 45–60 minutes to allow expression of any antibiotic resistance gene encoded on the plasmid before plating on selective media.
- In electroporation, a brief high-voltage electrical pulse (typically 1.8 kV for E. coli) is applied across a suspension of cells mixed with DNA. The electric field transiently creates electropores — nanoscale hydrophilic pores in the lipid bilayer — through which DNA can pass. Electroporation generally achieves higher transformation efficiencies and is particularly useful for large plasmids or low-concentration DNA. Once inside the cell, the circular plasmid is not integrated into the chromosome (unless it carries specific recombination sequences); instead, it replicates autonomously using its own origin of replication (ori) and the host cell’s replication machinery. Selection on antibiotic-containing agar plates then ensures that only cells which successfully took up and maintained the plasmid survive.
Describe another assembly method in detail (such as Golden Gate Assembly)
Explain the other method in 5 - 7 sentences plus diagrams (either handmade or online).
Golden Gate Assembly is a seamless, scarless DNA assembly method developed by Engler et al. (2008) that exploits Type IIS restriction enzymes — enzymes that cut outside their recognition sequence at a defined offset — to generate custom 4 bp overhangs from any desired position in the DNA. The defining principle is that the recognition site for the Type IIS enzyme (commonly BsaI or Esp3I) is placed adjacent to the junction of interest, oriented so that the enzyme cuts into — and through — the actual sequence junction. When the enzyme cuts, it removes the recognition site itself from the end of the fragment, leaving a short custom 4-nucleotide 3′ overhang that is sequence-specific to the junction. Because these 4 bp overhangs are designed by the researcher, adjacent fragments can be engineered to carry perfectly complementary, unique overhangs — ensuring directional, ordered ligation in a single tube. The BsaI digestion and T4 DNA ligase step are performed simultaneously and cyclically in the same tube (alternating 37°C digestion and 16°C ligation cycles), meaning that mis-ligated products are re-cut and re-ligated until the correct thermodynamically stable final construct accumulates. This makes Golden Gate highly efficient for assembling 3–10 (or more) fragments simultaneously with very high accuracy and minimal background, and it leaves no scar sequence at the junctions beyond the 4 bp overhang itself, which becomes part of the final sequence.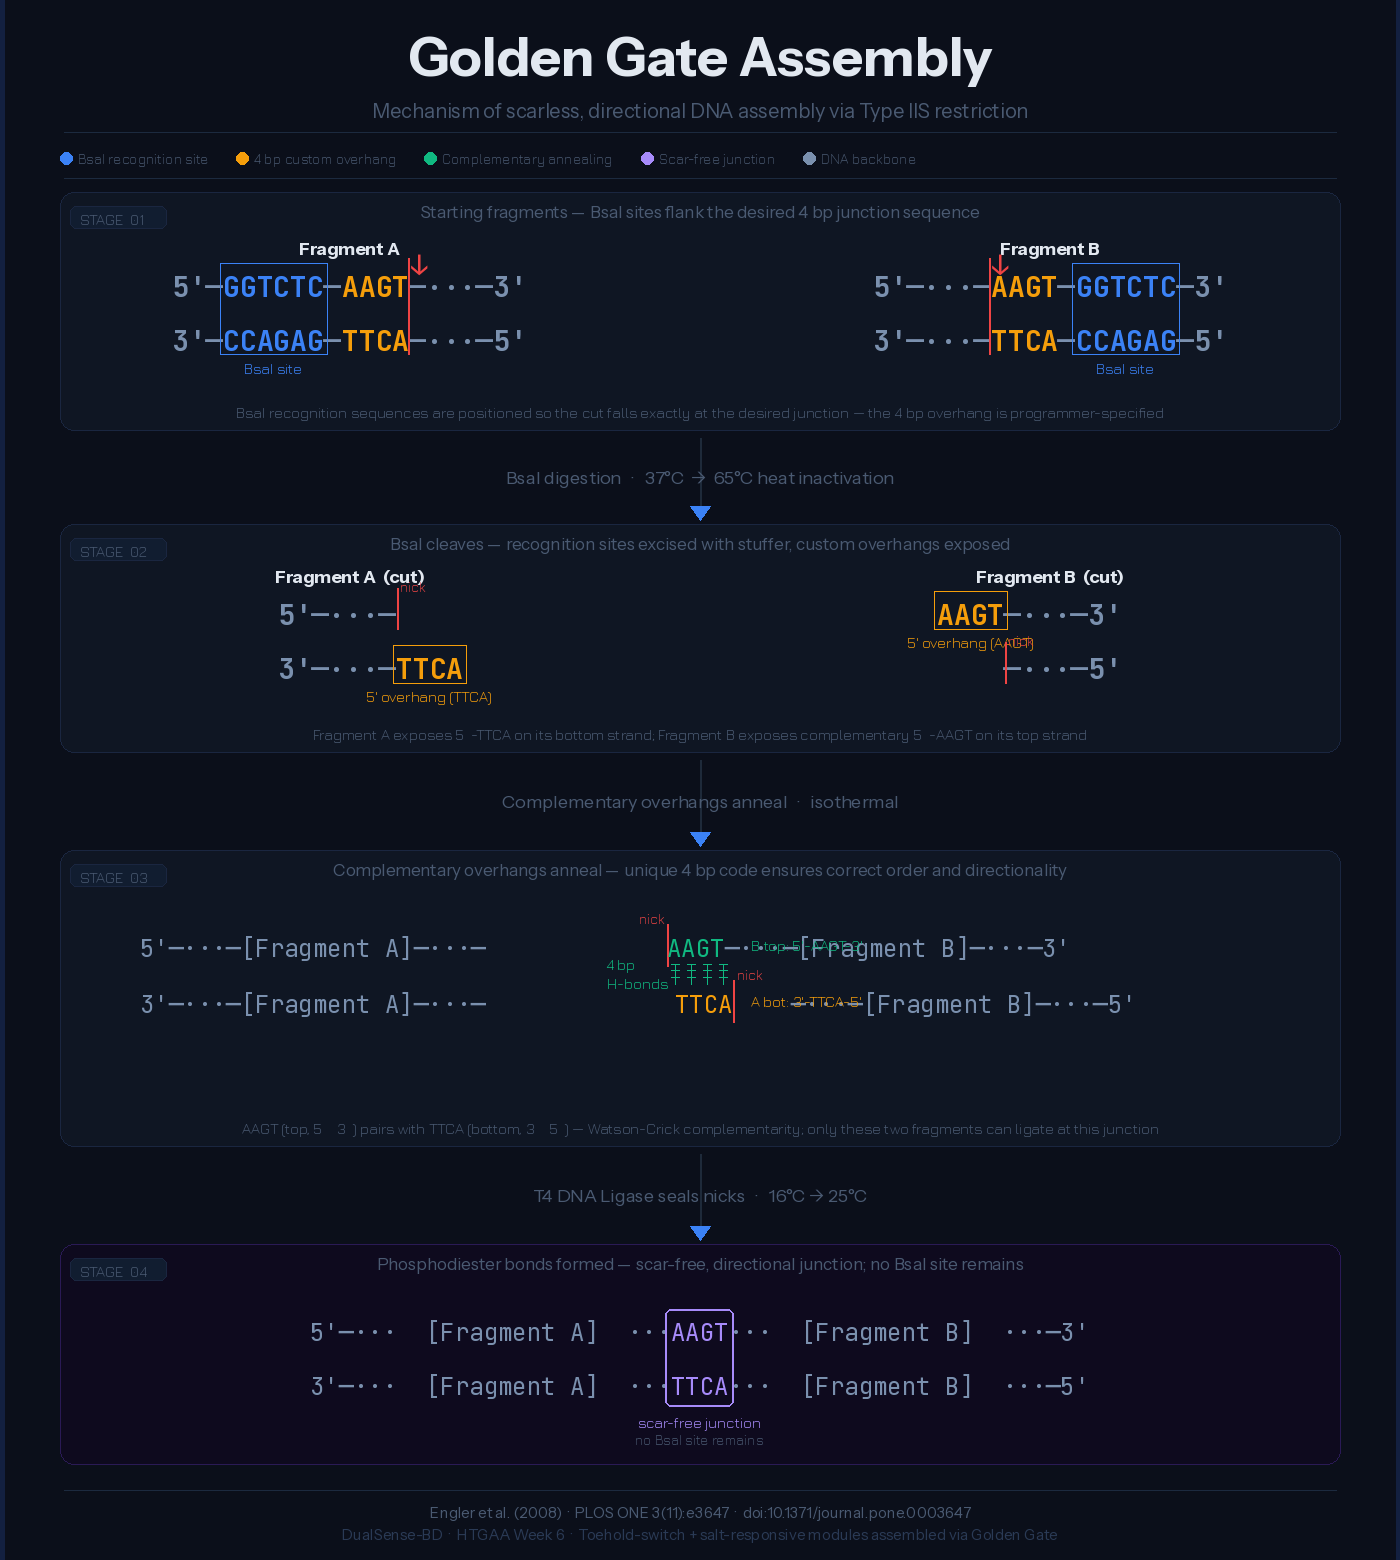 Golden Gate is particularly powerful for combinatorial library construction — for example, assembling promoter, RBS, coding sequence, and terminator parts from a standardised library (e.g., the MoClo or Loop assembly systems) in a single reaction.
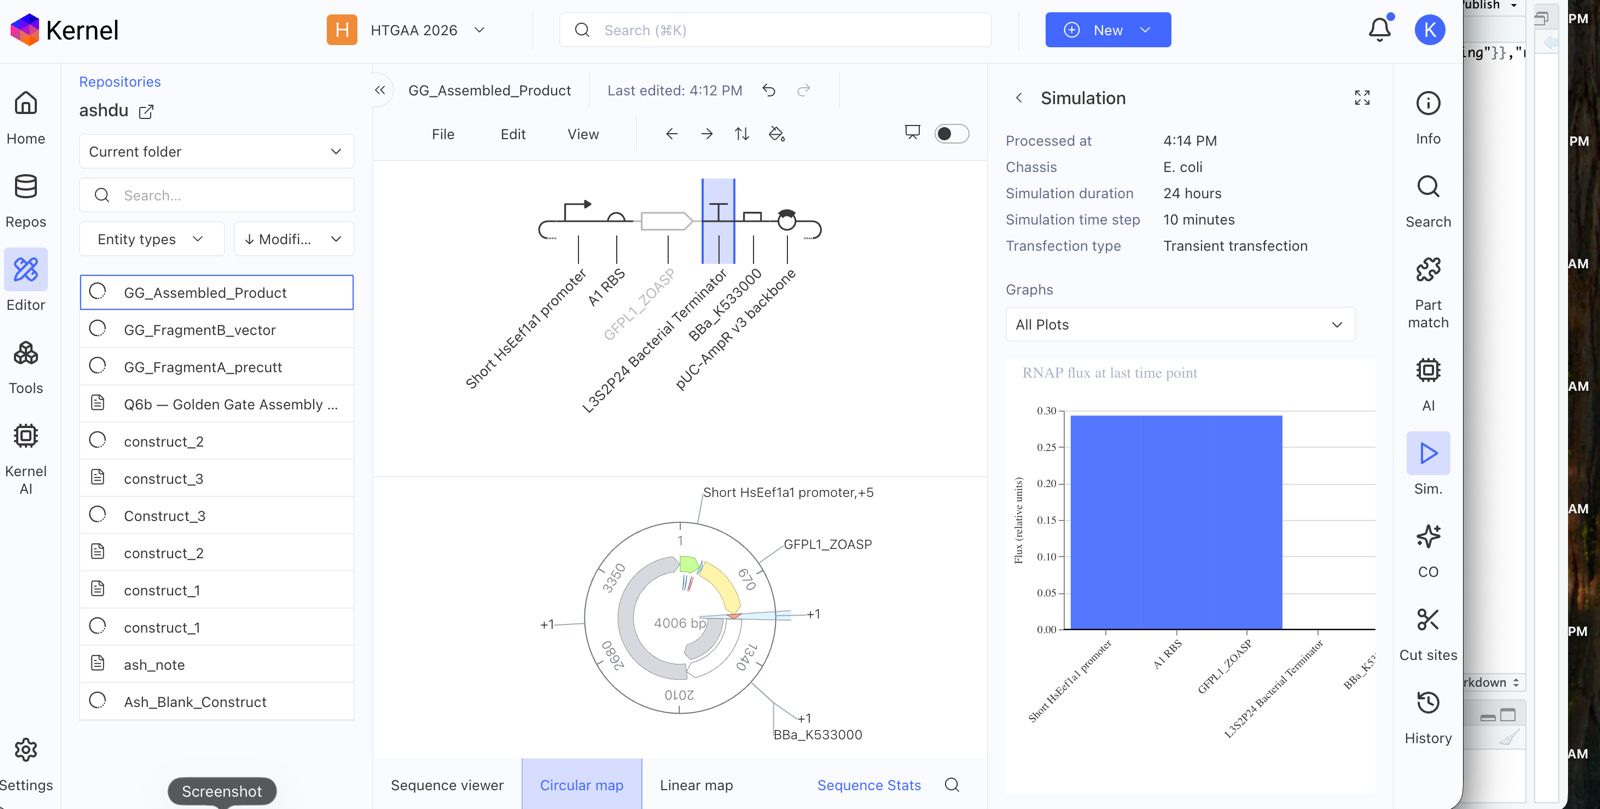
- Model this assembly method with Benchling or Asimov Kernel!
Assignment: Asimov Kernel
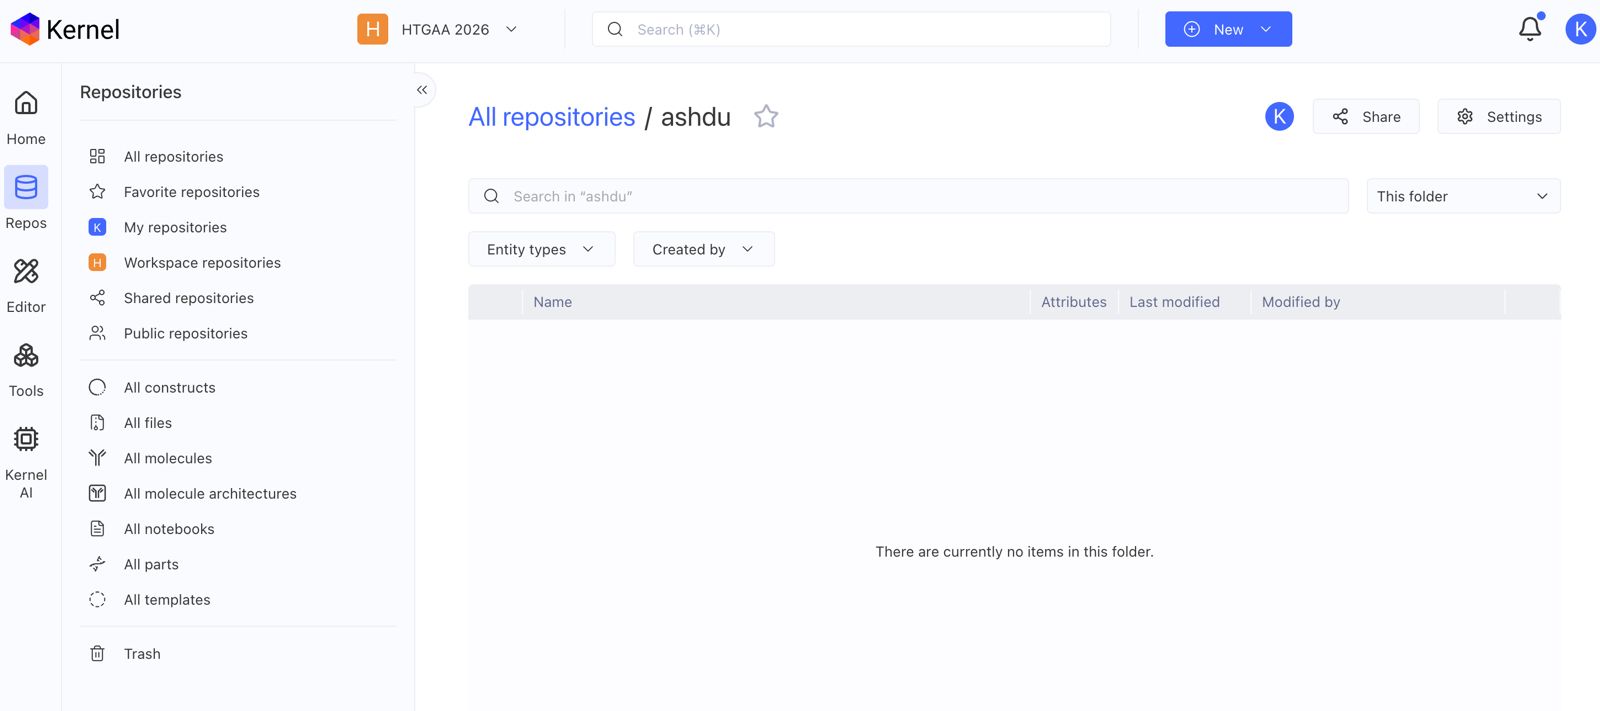
Create a Repository for your work
Create a blank Notebook entry to document the homework and save it to that Repository
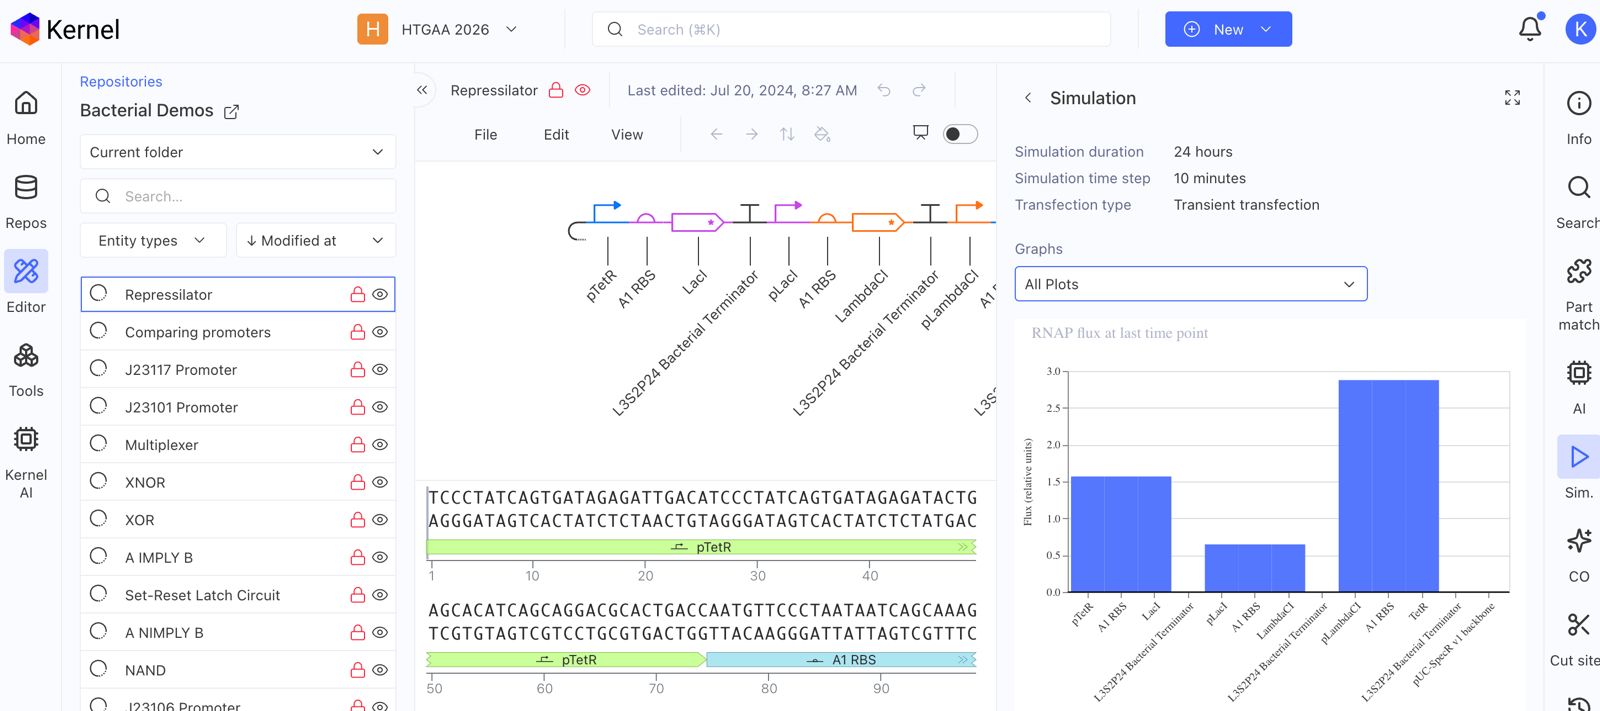
Explore the devices in the Bacterial Demos Repo to understand how the parts work together by running the Simulator on various examples, following the instructions for the simulator found in the “Info” panel (click the “i” icon on the right to open the Info panel)
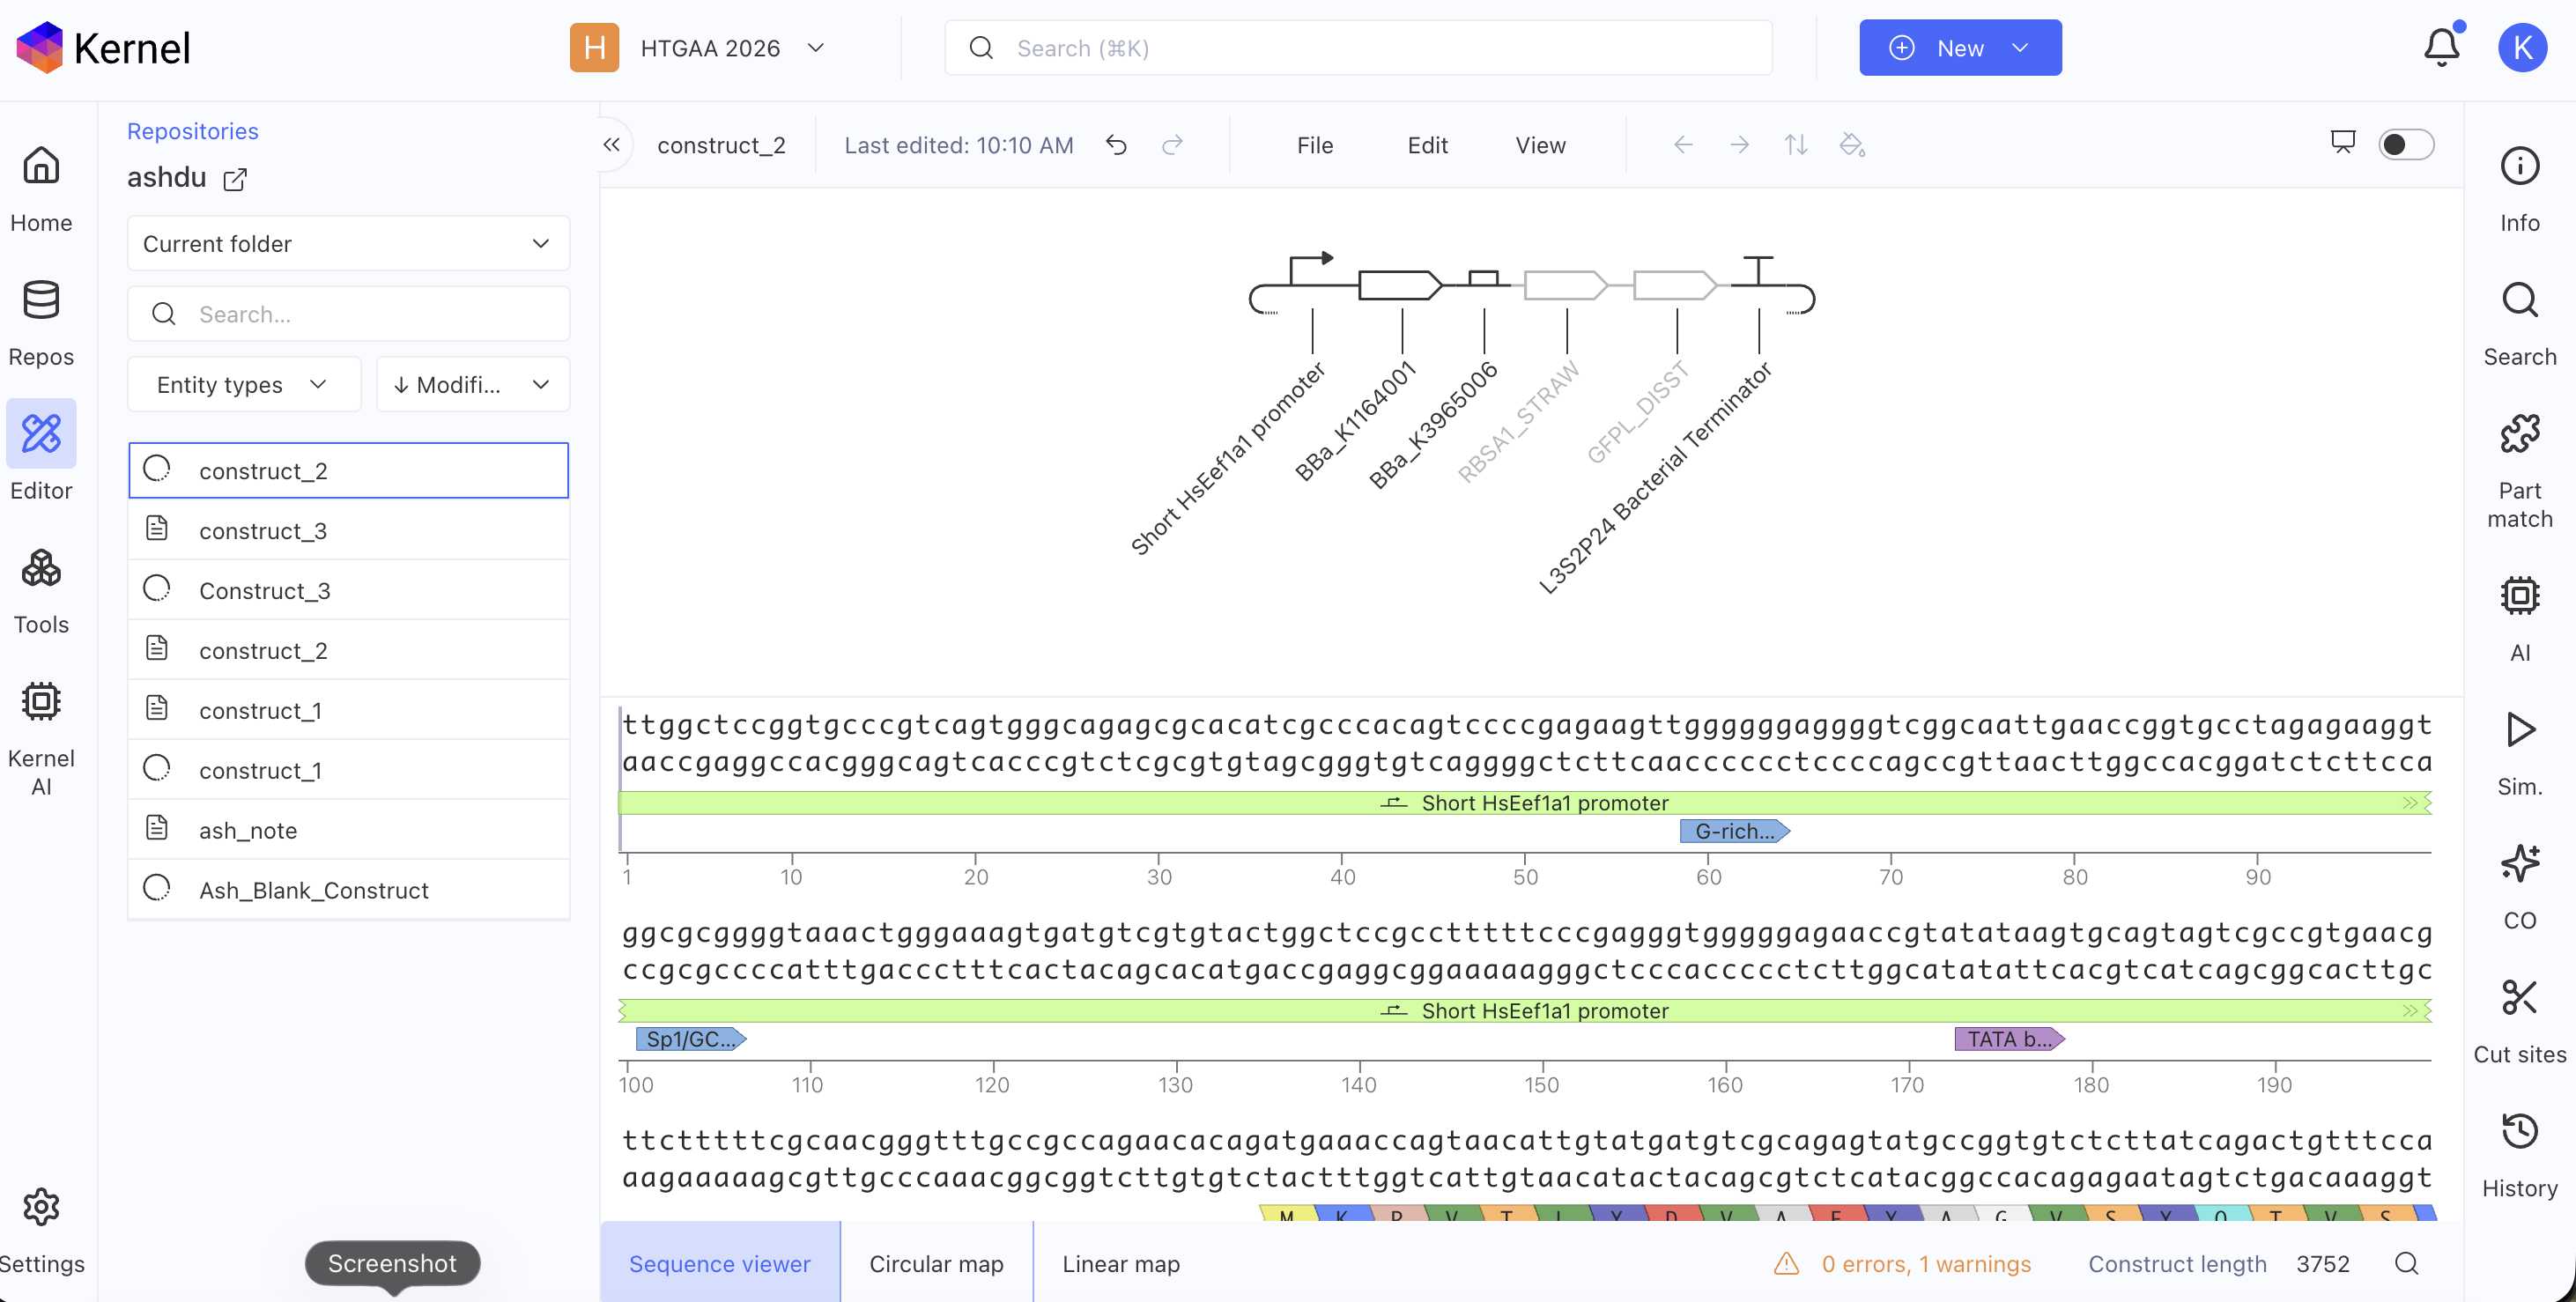
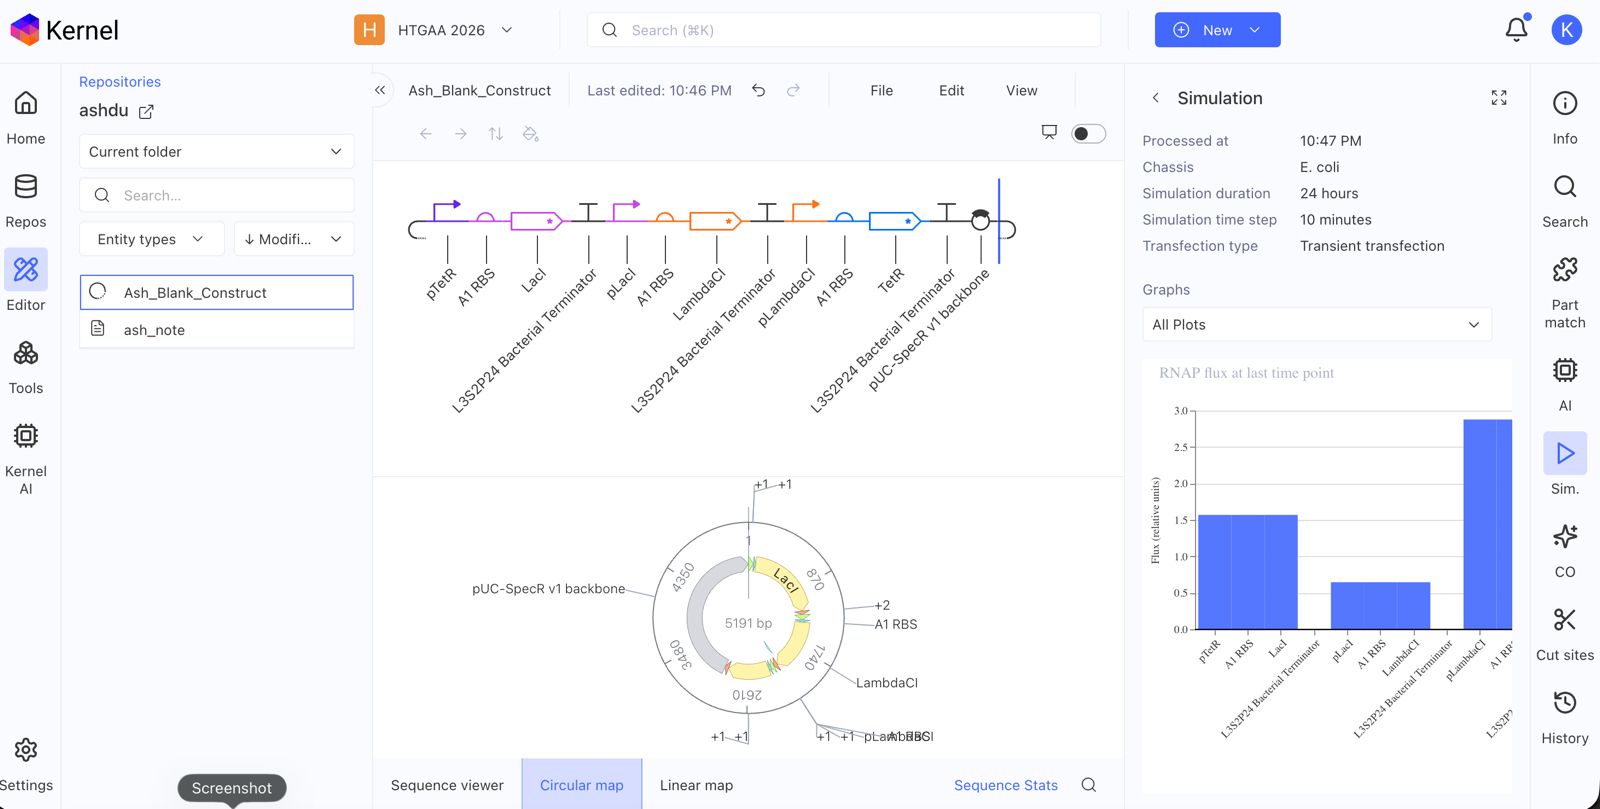
Create a blank Construct and save it to your Repository
Recreate the Repressilator in that empty Construct by using parts from the Characterized Bacterial Parts repository
Search the parts using the Search function in the right menu
Drag and drop the parts into the Construct
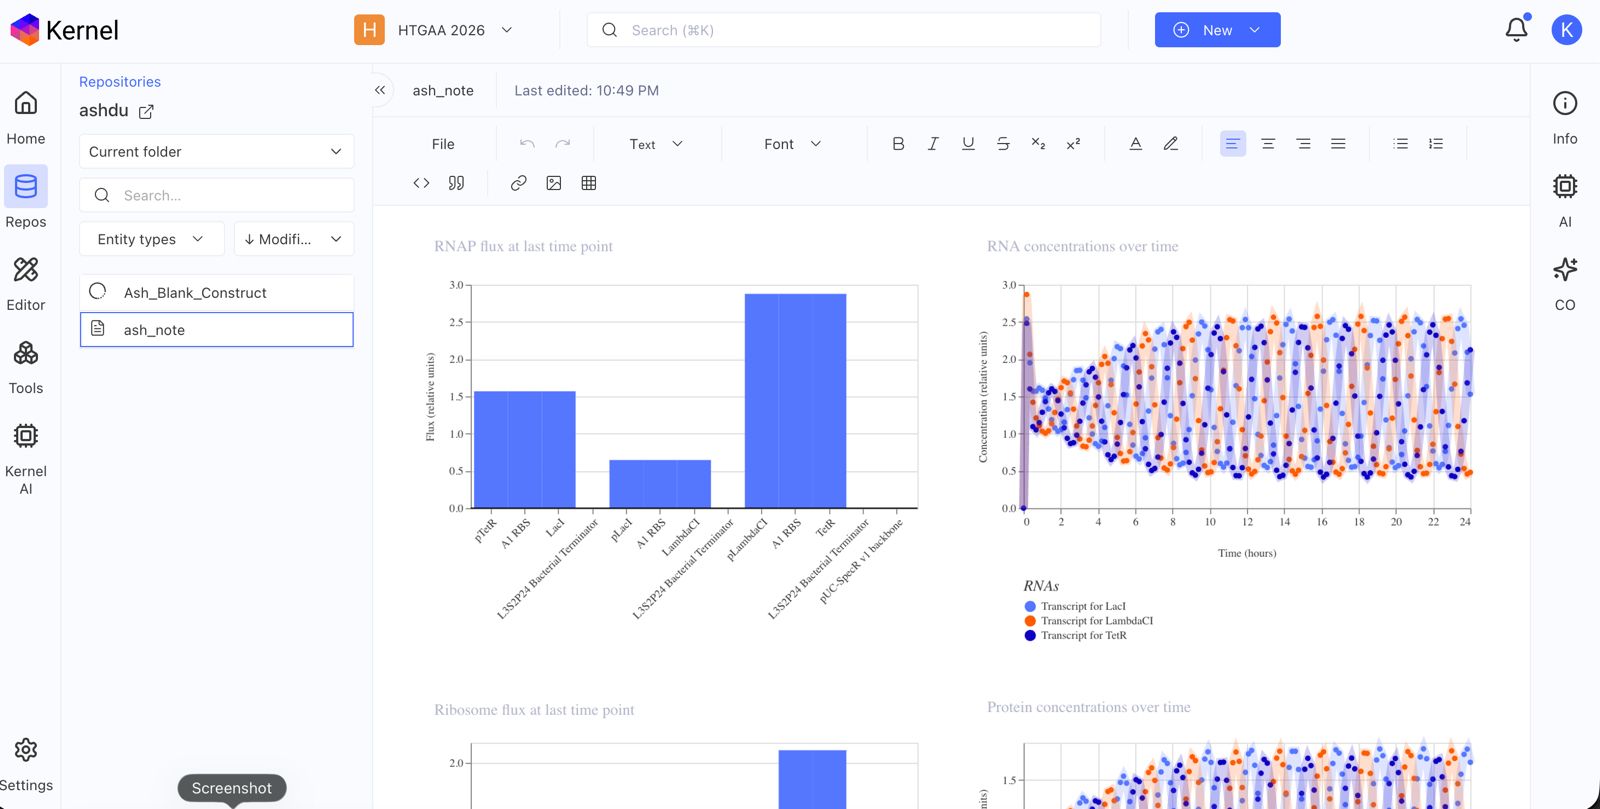
Confirm it works as expected by running the Simulator (“play” button) and compare your results with the Repressilator Construct found in the Bacterial Demos repository
Document all of this work in your Notebook entry - you can copy the glyph image and the simulator graphs, and paste them into your Notebook
Build three of your own Constructs using the parts in the Characterized Bacterials Parts Repo
Explain in the Notebook Entry how you think each of the Constructs should function
Run the simulator and share your results in the Notebook Entry
If the results don’t match your expectations, speculate on why and see if you can adjust the simulator settings to get the expected outcome