Week 6 HW: Genetic Circuit Part 1
What are some components in the Phusion High-Fidelity PCR Master Mix and what is their purpose?
- Phusion DNA Polymerase - this is for amplifying the DNA by polymerisation. It is special because when used with its special buffer, it has up to 52× higher fidelity rate than ordinary Taq polymerase
- dNTPs- These are the building blocks that are used in the polymersiation by the DNA polymerase
- MgCl₂ - DNA polymerase enzyme needs magnesium ions to function properly (they are necessary cofactors for the thermostable enzyme)
- Optimized buffer - Phusion needs an optimized buffer because it uses a highly processive and high-fidelity DNA polymerase (originally a Pfu-like enzyme fused to a processivity domain) that is very sensitive to Mg²⁺, ionic strength, pH, and additives. Therefore these components must be balanced perfectly for the PCR not to fail in terms of processivity or fidelity. These items are added to the PCR: template DNA, primers, and molecular water.
What are some factors that determine primer annealing temperature during PCR? Here’s the table simplified into bullet points:
Primer length: Longer primers have higher melting temperature (Tm), so it is necessary to use a higher annealing temperature for longer ones.
GC content: More G–C pairs (3 H-bonds each) increase Tm, so higher GC → higher annealing temperature.
Primer sequence (especially 3′ end): Stronger matches at the 3′ end increase effective Tm and allow higher annealing temperature.
Mg²⁺ concentration: Higher free Mg²⁺ stabilizes DNA duplexes, increasing Tm and annealing temperature; Mg²⁺ is also bound by dNTPs and DNA.
Monovalent cations (Na⁺, K⁺): Higher salt stabilizes DNA and increases Tm, but can compete with Mg²⁺ binding.
Buffer additives (DMSO, formamide, glycerol): These destabilize DNA and lower Tm (e.g., 10% DMSO lowers Tm by ~5.5–6°C), so annealing temperature must be reduced.
Polymerase and buffer system: Different polymerases and buffers (e.g., Phusion HF vs. GC) have different optimal annealing temperatures and salt/Mg²⁺ conditions.
Amplicon (product) Tm: The product’s Tm also affects optimal annealing temperature
Specificity vs. yield trade-off:
Lower annealing temperature may lead to more non-specific binding, primer dimers, lower yield of correct product.
Higher annealing temperature may lead to higher specificity but may reduce yield if too high.
There are two methods from this class that create linear fragments of DNA: PCR, and restriction enzyme digests. Compare and contrast these two methods, both in terms of protocol as well as when one may be preferable to use over the other.
| Restriction digestion | PCR | |
|---|---|---|
What it does | Cuts existing DNA at specific restriction sites to release a linear fragment | Synthesises a new linear DNA fragment by amplifying a target region from a template |
| Flexibility | Limited to fragments bounded by existing (or engineered) sites | Very flexible: any region, any length (within polymerase limits), with custom ends |
| Sequence requirements | Needs restriction sites at desired boundaries; otherwise you must engineer them first | Only needs primer-binding sites; you can design primers anywhere |
| Flexibility | Limited to fragments bounded by existing (or engineered) sites | Very flexible: any region, any length (within polymerase limits), with custom ends |
| Fidelity | No new synthesis, so no new errors | Depends on polymerase; high-fidelity enzymes (e.g., Phusion) give very low error rates but ordinary Taq can introduce errors |
| Yield | Typically moderate, limited by starting DNA amount | Can generate high yield from very little template |
| Time | Usually up to 3 hrs for incubation + purification | upt to 3 hrs to run a full program of 33 cycles + purification. Involves more steps |
| Complexity | Simple mix-and-incubate; fewer optimisation parameters | Requires primer design, sometimes gradient PCR is needed to optimise primers for correct annealing temperature |
| Risk of unwanted changes | No sequence change (except if partial digestion or star activity. Buffer choice and incubation must be done carefully) | Risk of polymerase errors are there but these can be lowered with high-fidelity enzymes). Sometimes primer-dimer artifacts may be there. |
How can you ensure that the DNA sequences that you have digested and PCR-ed will be appropriate for Gibson cloning?
To be “Gibson-ready,” digested fragments and PCR products must meet
- Have correct overlap design,
- Have correct ends, and
- Have clean, intact DNA
1) Confirm overlaps are designed correctly
Gibson assembly needs homology overlaps between adjacent fragments.
- Overlap length: typically 20–40 bp per junction (this may vary for GC-poor or repetitive sequences).
- Orientation: overlaps must match the intended adjacency (5′ end of one fragment overlaps the 3′ end of the next).
- Sequence content: overlaps that are extremely GC-rich must be avoided, also highly repetitive, or form strong hairpins/dimers.
- Reading frame / features: if coding regions are to be fused, then checks must be made for:
- frame continuity
- start/stop codons
- linkers/tags
- RBS/promoter boundaries
2) Make sure the ends produced are compatible with Gibson
Gibson relies on 5′ exonuclease activity to create 3′ single-stranded overhangs from double-stranded DNA ends—so linear DNA is needed with the correct overlap sequences at the ends.
If inserts are PCR-ed
- Overlaps are directly added in the 5′ tails of primers (the template-binding region is only part of the primer; the overlap tail becomes part of the product).
- A high fidelity must be used
- Leftover primers/dNTPs/polymerase must be removed using a cleanup kit.
If a vector is restriction-digested
- The vector must be confirmed to be fully linearized by running a gel and if two enzymes were used, it is necessary to confirm they cut exactly where desired.
Critical for correct ends
- If the PCR was done with a polymerase that leaves 3′ A-overhangs (like Taq), that’s not ideal for Gibson. A proofreading polymerase (Q5/Phusion) should be used or a reaction must be done to polish the ends.
- For vectors, DpnI treatment can be used if the vector template was amplified by PCR (to remove methylated parental plasmid).
3) Clean Intact DNA and Wrong Concentrations
These issues commonly break Gibson:
- Wrong concentration ratio (too much vector or too much insert).
Typical starting point is 2–3× molar excess insert over vector for 2-piece assemblies. - Residual salts/ethanol/guanidine from cleanup columns, this inhibits enzymes.
- Primer dimers / nonspecific bands, this causes parts to assemble into junk.
If there are multiple bands, it is simpler to gel-purify the correct band for use. - Incomplete digestion, this gives uncut plasmid which increases background colonies.
This is fixed by longer digest, fresh enzyme, gel-purified linear bands, or additon of a negative control (digested vector-only Gibson).
How does the plasmid DNA enter the E. coli cells during transformation? Transformation can be done using different ways: Chemical competence Electro competence
Barrier: E. coli has a double memberance (an outer membrane and inner membrane leaflets). DNA normally can’t cross because it’s large and negatively charged.
Charge repulsion: DNA and the bacterial surface are both largely negative, so if there is no assitance, they repel .
Chemical competence—binding step: Divalent cations (e.g., Ca²⁺) shield/bridge charges, letting DNA stick to the cell surface.
Chemical competence—entry step: A brief heat shock creates a temporary membrane permeability change, helping surface-bound DNA move into the cell.
Electrocompetence—pore creation: A strong, brief electric pulse causes transient nanopores in the membrane(s) (dielectric breakdown).
Electrocompetence—DNA movement: The electric field helps drive DNA toward/through these pores (field-driven transport + diffusion).
Recovery: In both methods, membranes reseal, and cells need recovery time to repair stress and begin expressing traits like antibiotic resistance (if relevant).
Establishment: Successful transformation means DNA reaches the cytoplasm and avoid degradation—plasmids replicate; linear DNA is often degraded (unless recombined).
Describe another assembly method in detail (such as Golden Gate Assembly)
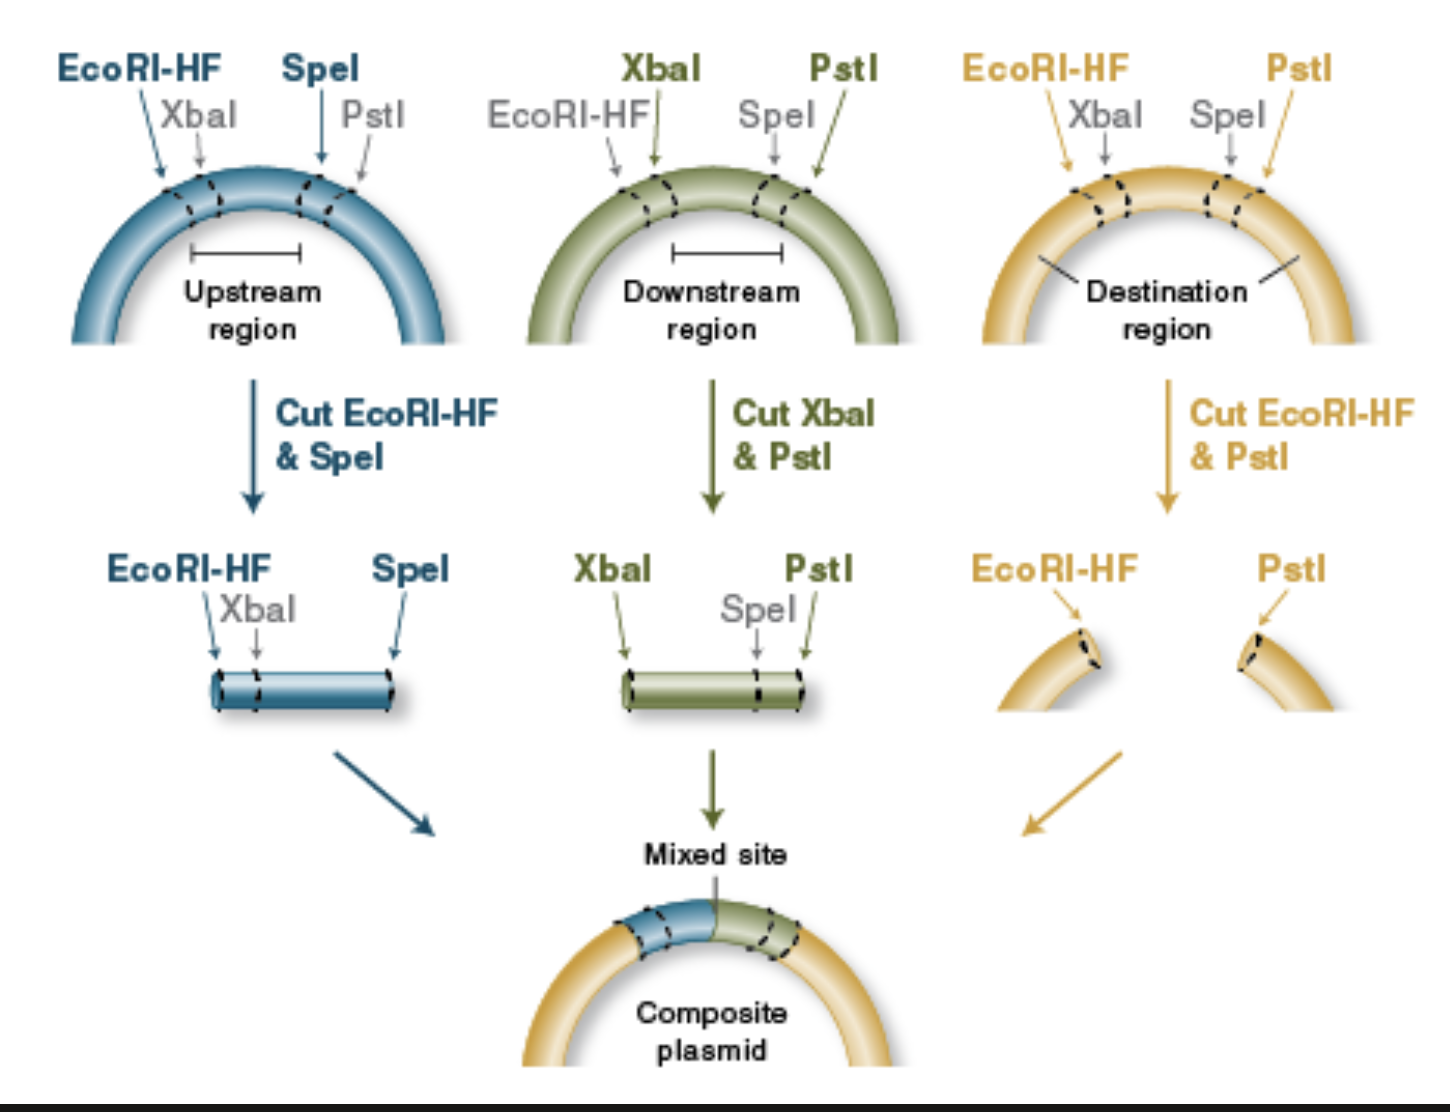
BioBrick Assembly
Standardized parts: BioBrick assembly uses DNA “parts” (promoters, RBSs, CDSs, terminators, etc.) that are flanked by a standard prefix and suffix containing specific restriction sites, so different labs can combine parts predictably.
Restriction enzymes define the join: Classic BioBrick (RFC10) uses four key restriction enzymes—EcoRI and XbaI in the prefix, SpeI and PstI in the suffix—so you can cut parts and vectors in a consistent way to prepare compatible ends.
Digest donor insert and recipient vector: To add a new part downstream of an existing part, you typically digest:
the insert (new part) with enzymes that expose the correct ends, and
the destination plasmid with the matching enzymes to open it at the insertion point.
Compatible “mixed” ends enable ligation: A key trick is that XbaI and SpeI generate compatible overhangs; that means a fragment cut with XbaI can ligate to one cut with SpeI, allowing ordered assembly of part A + part B.
Scar formation: When an XbaI end ligates to a SpeI end, the junction becomes a short “scar” sequence that is no longer recognized by either XbaI or SpeI. This “locks” the assembly and allows further rounds of building.
Idempotent design enables iterative building: After ligation, the combined part is still flanked by the standard prefix and suffix at the outer ends, so it can be treated like a new BioBrick part and assembled again with the same rules.
Verification: After transformation, you confirm correct assembly using colony PCR / diagnostic restriction digest and usually Sanger sequencing across junctions (especially important if coding sequences must stay in-frame, since the scar can affect protein fusions).
From New England Biolabs
Asimov Kernal