Week 6: Genetic Circuits - part I
Assignment: DNA Assembly
Answer these questions about the protocol in this week’s lab:
- What are some components in the Phusion High-Fidelity PCR Master Mix, and what is their purpose?
Elements:
- Pyrococcus-like enzyme fused with a processivity-enhancing domain that increases fidelity and speed.
- 5
3polymerase activity, 35exonuclease activity, and generates blunt-ended products. - Phusion DNA Polymerase, deoxynucleotides, and reaction buffer that has been optimized and includes MgCl2
- Requirements to be added: template, primers, and water.
Purpose:
- DNA needs to be correct after amplification
- Cloning and long or difficult amplicons
- What are some factors that determine primer annealing temperature during PCR?
Annealing temperature:
- The temperature used during the primer annealing step of a PCR, which depends on the primer melting temperature
- Usually lower than the melting temperature
- Too high Ta: the primer will not anneal to the template, and the amplification will not proceed
- Too low Ta: nonspecific binding of the primers to the template or each other can occur, causing:
- increased likelihood of nonspecific product formation
- decreased formation of the intended product due to inefficient reaction conditions.
Factors of primer annealing temperature:
- Base composition (proportion of ATCG nucleotides)
- Primer concentration
- Ionic reaction environment
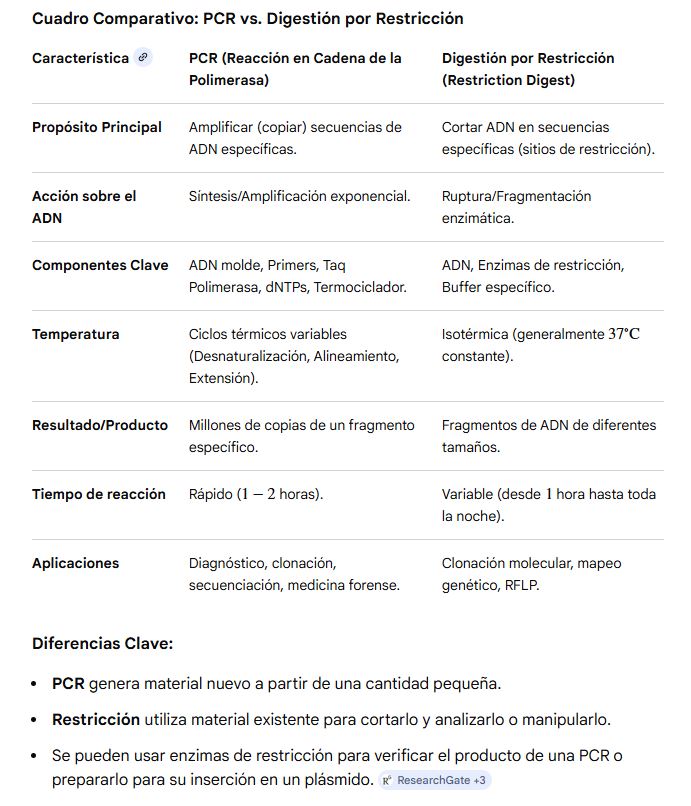
- Two methods from this class create linear DNA fragments: PCR and restriction enzyme digestion. Compare and contrast these two methods, both in terms of protocol and in terms of when one may be preferable to the other.
PROTOCOLS PCR vs RESTRICTION ENZYME DIGESTION:
PCR is the technique for mainly DNA amplification.
RESTRICTION ENZYME DIGESTION is the technique for cutting specific sections of DNA.
Both act in different temperatures and procedures, but the final applications are varied: for PCR, there is DNA amplification, cloning, sequencing, etc, while for Restriction enzyme digestion, there are DNA-specific cutting, cloning, etc.
In the table below, the comparison between protocols can be better understood:
How can you ensure that the DNA sequences that you have digested and PCR-ed will be appropriate for Gibson cloning?
To ensure that the DNA sequences are appropriate for Gibson cloning, we need to verify the next steps:
Confirm the overlapping homologous regions: these overlaps must be from 20-40 bps and are important because they allow the fragments to anneal together during the assembly.
Design PCR fragments correctly: the PCR should amplify the correct fragment, including overlap extensions compatible with the neighboring fragment/vector.
Verify fragment size by electrophoresis: to confirm expected band size, clean amplification, and minimal non-specific products, run the PCR and digested products on an agarose gel to confirm.
Purify the DNA fragments: remove primers, nucleotides, enzymes, template DNA. Contaminants can inhibit Gibson enzymes.
Ensure compatible vector linearization: if using a plasmid backbone, it is important to confirm the vector is fully linearized, verify if the ends correspond to the designed overlaps.
Check the sequence orientation and reading frame: this avoids framshifts and truncated proteins
Sequence verification: after the assembly and transformation, perform a colony PCR and a Sanger sequencing so that it is confirmed that the sequence insertion, no mutations, and correct assembly junctions.
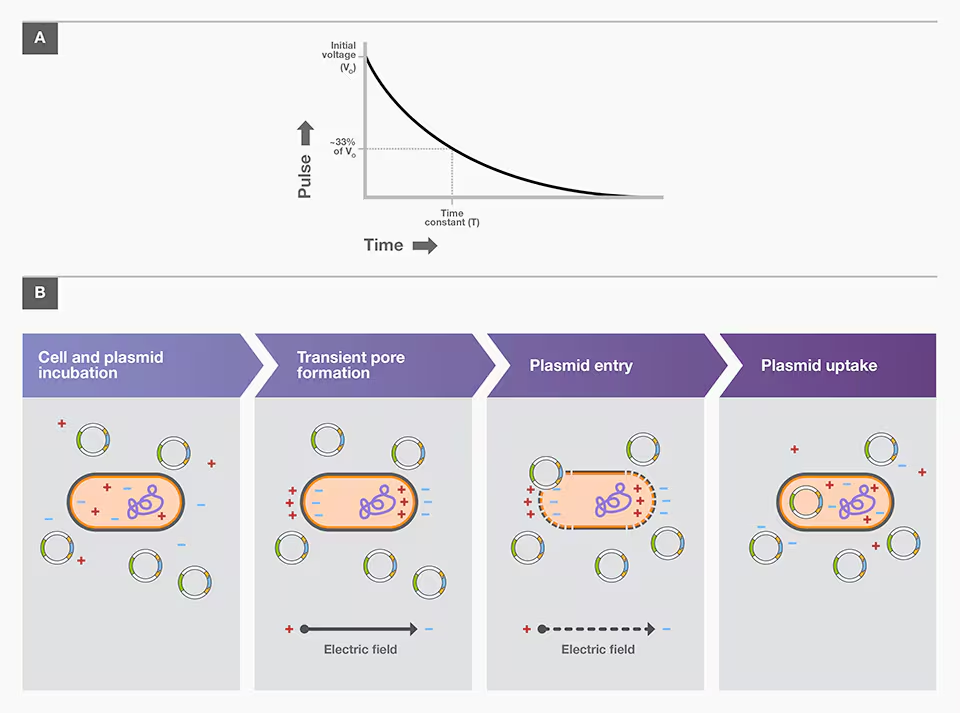
How does the plasmid DNA enter the E. coli cells during transformation?
Plasmid DNA enters the E.coli cells in two ways:
Chemical transformation
In chemical transformation, plasmid DNA is mixed with chemically competent cells, then briefly exposed to an elevated temperature (heat shock). The initial incubation of cells is carried out in a propylene tube on ice for durations ranging from 5 to 30 minutes.
Electrophoresis
Electroporation involves using an electroporator to subject competent cells and a plasmid-carrying DNA construct to a brief pulse of a high-voltage electric field. This treatment induces transient pores in cell membranes, which permit plasmid entry into cells. The most common type of electric pulse in bacterial transformation is exponential decay, where a set voltage is applied and allowed to decay over a few milliseconds, called the time constant. The applied voltage is determined by field strength (V/cm), where V is the initial peak of voltage and cm is the measurement of the gap between the electrodes of the cuvette used.
| Feature | Chemical Transformation | Electroporation |
|---|---|---|
| Definition | Introduction of plasmid DNA into chemically competent cells using cations and heat shock | Introduction of plasmid DNA into competent cells using a high-voltage electric pulse |
| Main Mechanism | Mg²⁺ or other cations help neutralize charges, and heat shock creates temporary membrane permeability | Electric field creates transient pores in the cell membrane allowing DNA entry |
| Key Steps | DNA mixed with competent cells → incubation on ice → heat shock at 42°C → recovery on ice | DNA mixed with competent cells → electric pulse applied with electroporator → recovery |
| Typical Conditions | 42°C for ~30 seconds after 5–30 min incubation on ice | Field strength >15 kV/cm using 0.1 cm cuvettes |
| DNA Amount Required | 1–10 ng plasmid DNA | Usually small amounts of plasmid DNA are sufficient |
| Cell Volume | 50–100 µL competent cells | 20–80 µL in electroporation cuvettes |
| Equipment Needed | Water bath or heat block | Electroporator and specialized cuvettes |
| Transformation Efficiency | Lower efficiency, especially with ligation mixtures | Generally higher efficiency |
| Advantages | Simple, inexpensive, does not require special equipment | Highly efficient and suitable for difficult transformations |
| Disadvantages | Lower efficiency; ligation mixtures may reduce success to 1–10% | Risk of arcing, which decreases viability and efficiency |
| Sensitivity to Buffers | Less sensitive to buffer composition | Conductive buffers (MgCl₂, phosphates) can cause arcing |
| Membrane Permeabilization Method | Heat shock | Electric pulse |
| Post-transformation Handling | Cells returned to ice before recovery | Cells recovered immediately after pulse |
| Storage of Competent Cells | Can be refrozen, but efficiency drops ~50% per freeze/thaw cycle | Same limitation applies; best stored in single-use aliquots |
| Best Use Cases | Routine cloning and simple plasmid transformations | High-efficiency cloning or transformation of difficult cells/plasmids |
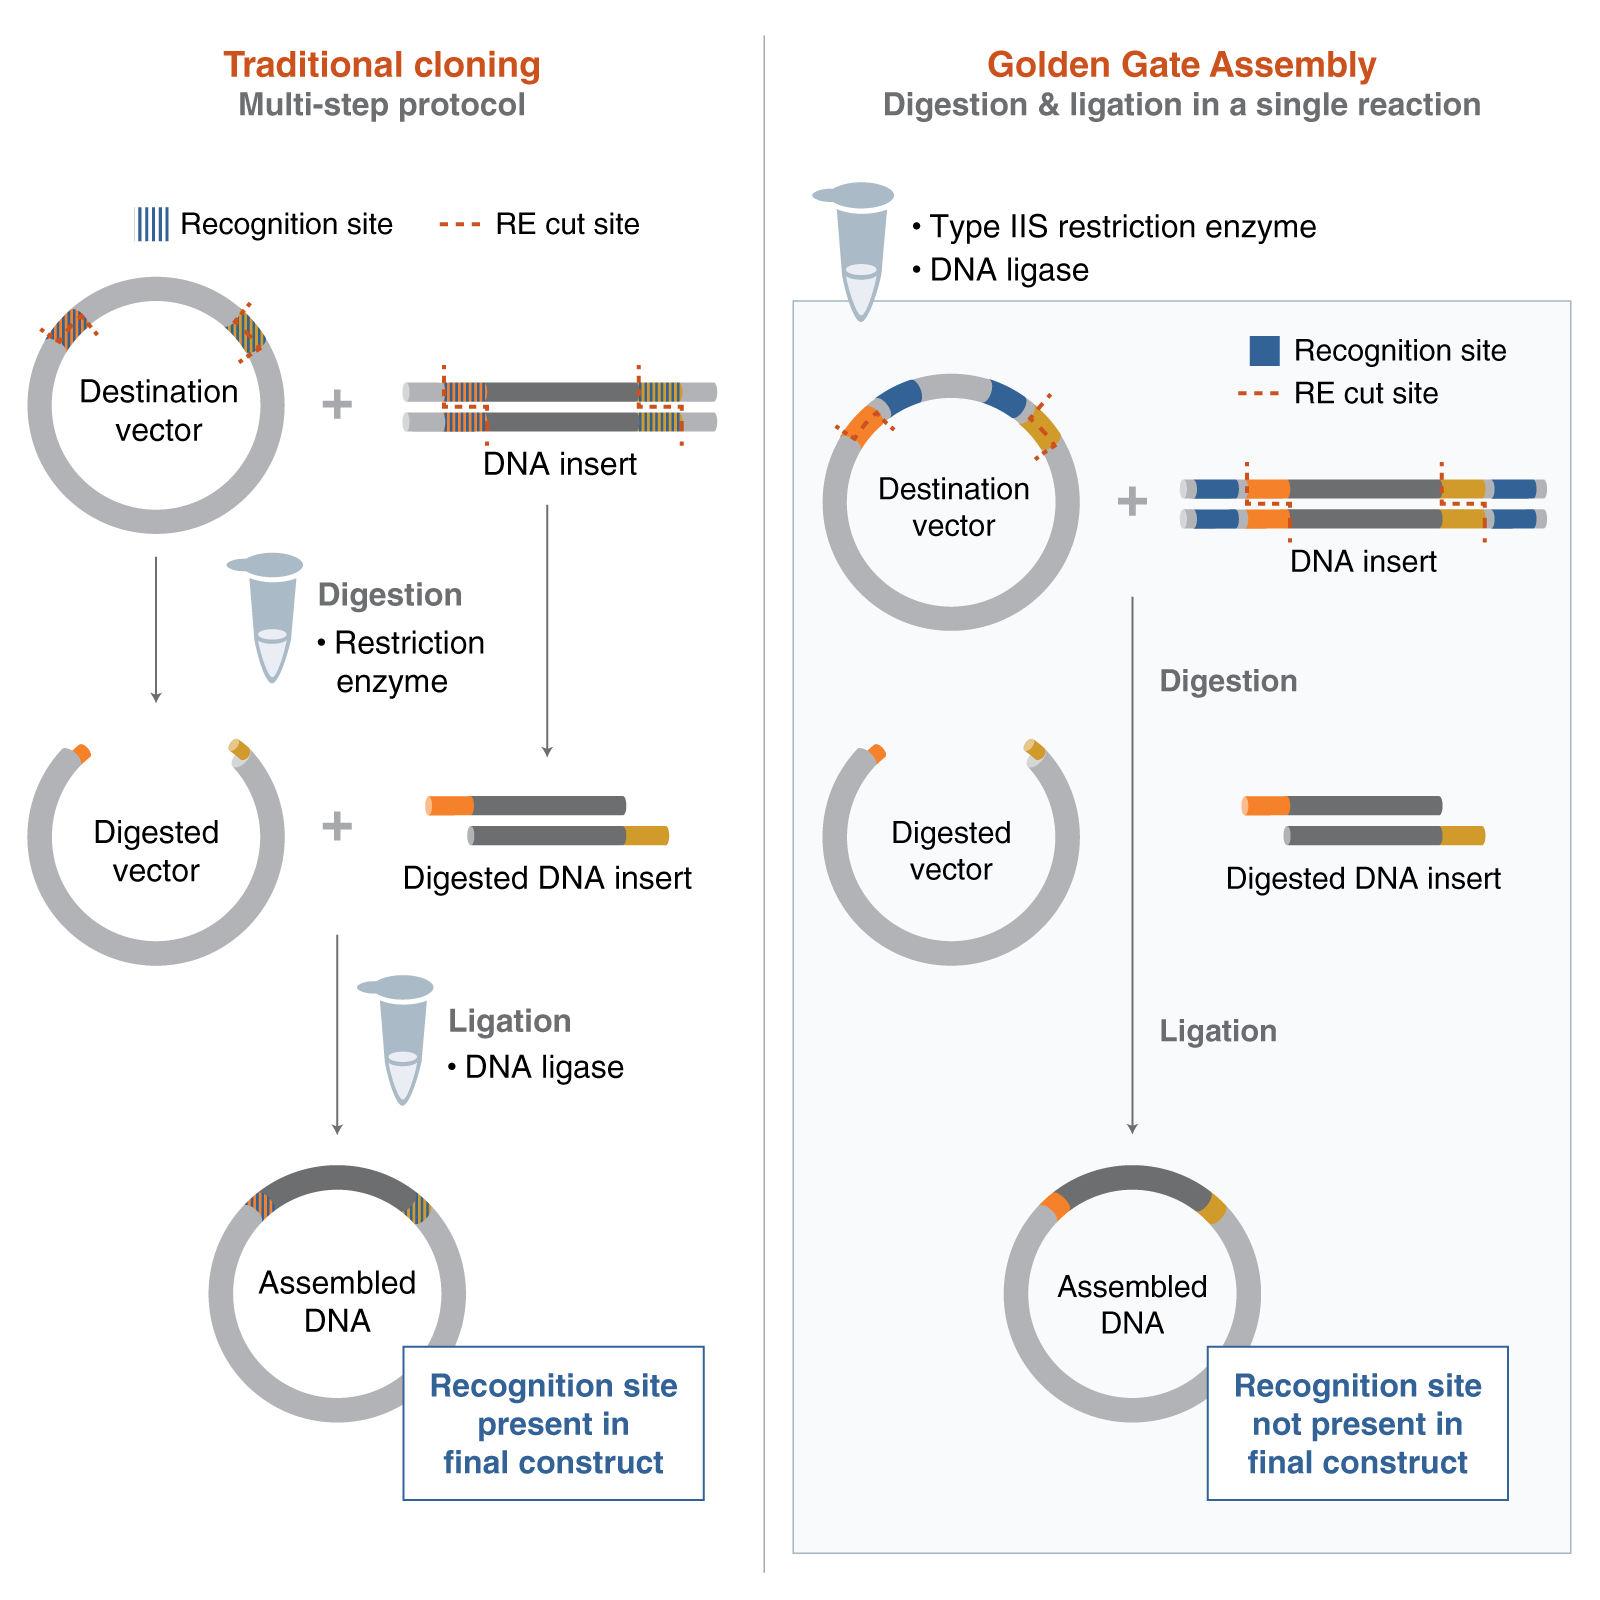
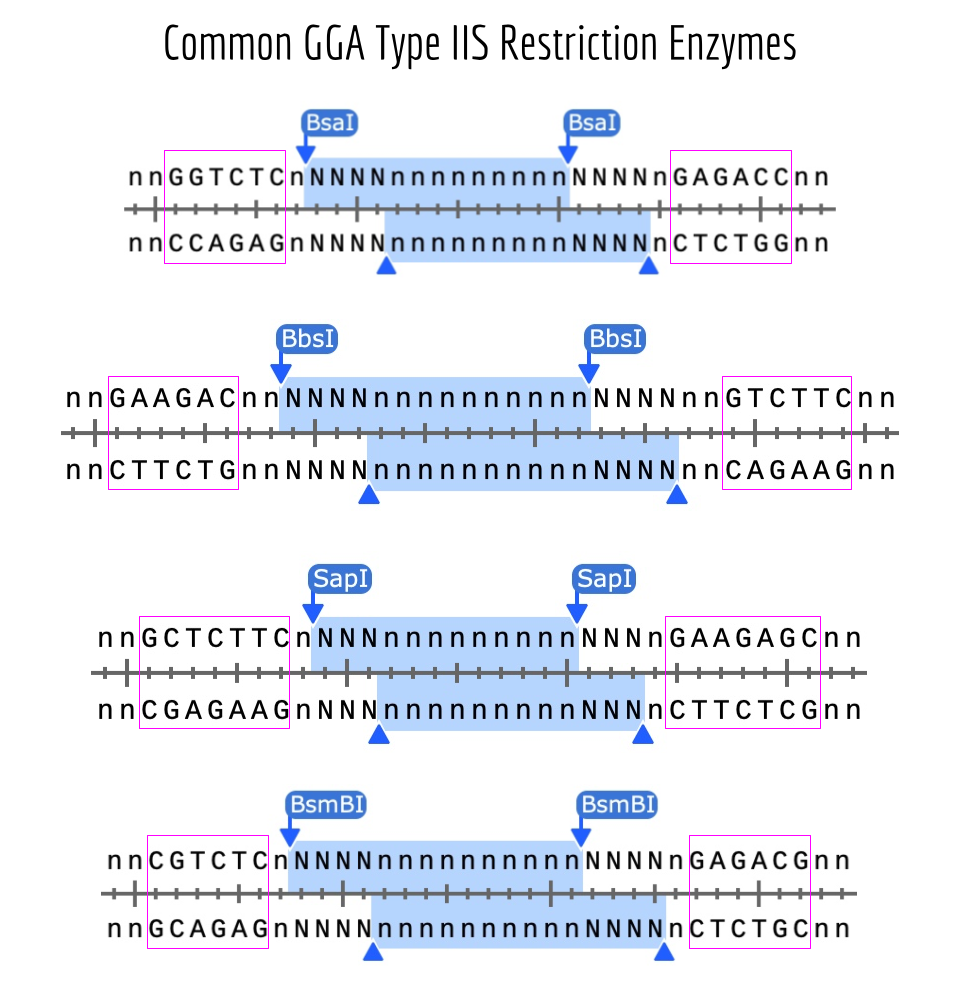
- Describe another assembly method in detail (such as Golden Gate Assembly)
Explain the other method in 5 - 7 sentences plus diagrams (either handmade or online).
Golden Gate Assembly is a molecular cloning method that allows multiple DNA fragments to be assembled in a specific order in a single reaction tube. The method uses type IIS restriction enzymes, such as Bsal, which cut DNA outside of their recognition site and generate custom overhangs. These overhangs are designed so that each DNA fragment joins only to the correct neighboring fragment. During the reaction, the DNA is repeatedly digested and ligated using DNA ligase, producing a seamless final construct without extra restriction sites. One major advantage is that many DNA fragments can be assembled simultaneously, making the process faster than traditional cloning methods.
- Model this assembly method with Benchling or Asimov Kernel!
Assignment: Asimov Kernel
- Create a Repository for your work
- Create a blank Notebook entry to document the homework and save it to that Repository
- Explore the devices in the Bacterial Demos Repo to understand how the parts work together by running the Simulator on various examples, following the instructions for the simulator found in the “Info” panel (click the “i” icon on the right to open the Info panel)
- Create a blank Construct and save it to your Repository
- Recreate the Repressilator in that empty Construct by using parts from the Characterized Bacterial Parts repository
- Search the parts using the Search function in the right menu
- Drag and drop the parts into the Construct
- Confirm it works as expected by running the Simulator (“play” button) and compare your results with the Repressilator Construct found in the Bacterial Demos repository
- Document all of this work in your Notebook entry - you can copy the glyph image and the simulator graphs, and paste them into your Notebook
- Build three of your own Constructs using the parts in the Characterized Bacterials Parts Repo
- Explain in the Notebook Entry how you think each of the Constructs should function
- Run the simulator and share your results in the Notebook Entry
- If the results don’t match your expectations, speculate on why and see if you can adjust the simulator settings to get the expected outcome
For this assignment, I took notes in the Notebook as suggested. Here are the images of it, in which I registered every step:
For the first part: represillator construct, the process was smooth, as well as the results compared to the reference. For the second part of constructs 1, 2, and 3. I designed a simple protein expression of GFP; the results were in a steady state. After this construct, I tried a repressilator using GFP, BFP, and RFP, the first simulation was pretty good, but I noticed that fluorescent proteins were not expressing, so I made a few changes. The result I obtained was not what I was expecting because the oscillations did not appear as steady as I thought they were going to. Instead, I obtained a few oscillations at the beginning of the simulations, and the expression was steady. For the last construct, I tried to use GFP and RFP with a TetR protein and a Ligand. The results of the simulation without the ligand were successful after a few iterations. Although the ligand did not work out, I tried many options.