Week 6 HW: Genetic Circuits: Part I
✨ DNA Assembly ✨
Question 1: What are some components in the Phusion High-Fidelity PCR Master Mix and what is their purpose?
Since the protocol didn’t list the exact ingredients, I looked up the standard components of a Phusion Master Mix from a supplier like New England Biolabs. A PCR Master Mix is basically a pre-mixed tube of everything needed to copy DNA, minus the specific template and primers. The main components are:
- Phusion DNA Polymerase: This is the actual enzyme that copies and builds the new DNA. The ‘High-Fidelity’ part means it has a proofreading feature to catch and fix its own mistakes.
- dNTPs: These are the free-floating A, T, C, and G building blocks that the polymerase uses to assemble the new DNA strands.
- Reaction Buffer: This keeps the pH and environment stable so the enzyme doesn’t break down during the extreme heating and cooling cycles.
- Magnesium Chloride: This provides magnesium ions, which the polymerase enzyme physically requires as a ‘helper’ to function and connect the DNA letters.
Question 2: What are some factors that determine primer annealing temperature during PCR?
The annealing temperature is usually set just a few degrees below the primer’s melting temperature ($T_m$).
The annealing temperature is based on the primer’s melting temperature ($T_m$), which is the temperature where the primer binds to the template DNA. A few main factors determine this:
- Primer Length: The protocol says the binding region should be 18–22 base pairs long. Just like a longer piece of Velcro is harder to pull apart, a longer primer forms more connections with the DNA, so it requires a higher temperature to separate.
- GC Content: The protocol mentions aiming for a 40–60% GC content. This is because the DNA letters G and C are held together by three hydrogen bonds, while A and T are only held together by two. So, a primer with a lot of Gs and Cs is bonded much tighter and needs a higher temperature to melt.
- Salt Concentration: The salts in the PCR buffer help stabilize the DNA strands, which can also affect the temperature needed for the primers to stick properly.
Question 3: There are two methods from this class that create linear fragments of DNA: PCR, and restriction enzyme digests. Compare and contrast these two methods, both in terms of protocol as well as when one may be preferable to use over the other
Both PCR and restriction enzyme digests create linear DNA fragments, but they work in fundamentally different ways: PCR builds new DNA, while a restriction digest cuts existing DNA.
Protocol Differences:
- PCR: The protocol involves mixing a DNA template with primers, dNTPs, and a polymerase, then running it through rapid heating and cooling cycles in a thermocycler to amplify specific regions.
- Restriction Digest: The protocol is generally simpler. It involves mixing existing DNA with specific restriction enzymes and a buffer, then incubating the mixture at a steady, warm temperature (usually 37°C) while the enzymes act like molecular scissors to cut the DNA at specific recognition sequences.
When to Use Which:
- PCR is preferable when you need to actively modify, build onto, or amplify a DNA sequence. Because you design the primers yourself, you have complete control over the final product. You can add extra sequences to the ends of your primers, which become permanent overlapping tails on your new DNA fragments and this is essential for seamless cloning methods like Gibson Assembly. PCR is also the go-to method for site-directed mutagenesis (like swapping out a few base pairs to change a protein’s color). You simply build the mutation into the primer, and the polymerase incorporates it into every new copy. Finally, if you only have a microscopic amount of starting DNA, PCR is necessary because it amplifies the target into billions of copies.
- Restriction digests are preferable when you want to work with the exact DNA sequence you already have without risking any copying errors. Even the best “high-fidelity” PCR polymerases can occasionally make random mistakes while building new strands, but restriction enzymes just cut the existing DNA exactly as it is. If your plasmid already contains convenient restriction cut sites surrounding the gene you want to move, doing a simple digest to cut and paste that fragment into a new plasmid backbone is much cheaper, faster, and safer than running a PCR. Digests are also the standard method for a “diagnostic check.” After assembling a new plasmid, you can cut it with specific enzymes and check the fragment sizes on an agarose gel to quickly verify that your cloning experiment actually worked.
Question 4: How can you ensure that the DNA sequences that you have digested and PCR-ed will be appropriate for Gibson cloning?
To make sure our DNA pieces are ready to be glued together in Gibson Assembly, we have to clean them up and check that we actually made the right thing. We do this in four main steps:
- DpnI Digest (Destroying the original template): Right after PCR, our tube contains our newly built mutated DNA, but it also still contains the original, non-mutated plasmid we used as a template. We add an enzyme called DpnI, which specifically hunts down and chops up the original template DNA but leaves our new PCR copies alone. This ensures we don’t accidentally assemble the old, wrong DNA.
- DNA Purification (Washing away the junk): The PCR tube is also full of leftover ingredients like the old polymerase enzyme, unused DNA building blocks (dNTPs), and buffer salts. We use a spin column kit to wash all that junk away and trap just our pure DNA fragments. If we skip this, those leftover chemicals can actually block the Gibson Assembly enzymes from working properly.
- Quantification (Measuring the concentration): We need to know exactly how much DNA we successfully made, so we measure the concentration using a machine like a Nanodrop. Gibson Assembly works best when you mix the DNA pieces together in a very specific ratio (the protocol says 2 parts color insert to 1 part backbone). We can’t calculate the right volumes to pipette if we don’t know our starting concentrations.
- Diagnostic Gel (Checking our work): Finally, we run a small sample of our cleaned DNA on an agarose gel. This lets us visually check the DNA bands to confirm they are the correct size we predicted. It also proves that our PCR didn’t accidentally build a bunch of random, wrong-sized DNA fragments that would ruin the final assembly.
Question 5: How does the plasmid DNA enter the E. coli cells during transformation?
Based on the protocol, the assembled plasmid DNA gets inside the E. coli bacteria through a process called heat shock transformation. Here is how it works:
- The Setup: First, I mix the ‘competent’ bacteria (which are specially prepped and kept super cold on ice) with our newly built plasmid DNA. At this point, the DNA is just floating in the liquid outside the bacterial cells.
- The Heat Shock: I take the tube directly from the ice and plunge it into a hot water bath (42°C) for exactly 45 seconds, and then immediately stick it back on the ice.
- Entering the Cell: This sudden, extreme shift from cold to hot physically stresses the bacteria and causes tiny pores (holes) to temporarily open up in their cell walls and membranes. Because the plasmid DNA is floating right outside, it simply diffuses (flows) through these microscopic open pores and into the cell.
- Recovery: When the tube goes back on ice, the pores close up, trapping the DNA inside. After that, we just give the bacteria some nutrient-rich SOC broth and let them rest at a warm temperature for an hour so they can heal their cell walls and start reading the new color genes.
6. Describe another assembly method in detail (such as Golden Gate Assembly)
a. Explain the other method in 5 - 7 sentences plus diagrams (either handmade or online).
Golden Gate Assembly is another way to seamlessly join multiple DNA pieces together, but instead of using overlapping PCR primers like Gibson Assembly, it uses special restriction enzymes (like BsaI). These are called Type IIS enzymes because they physically cut the DNA a few steps away from their actual recognition sequence, leaving behind custom 4-letter sticky ends. By designing these 4-letter overhangs to match perfectly between our different fragments, we can mix multiple pieces into one tube and they will naturally assemble in the exact right order. The best part is that when the enzyme cuts the DNA, the original recognition sequence is completely chopped off and left behind. This means the DNA pieces get glued together ‘scarlessly’ and the enzyme can’t accidentally cut them apart again, allowing both the cutting and the gluing to happen simultaneously in a single tube.
 Thermo Fisher Scientific (Source Link)
b. Model this assembly method with Benchling or Asimov Kernel
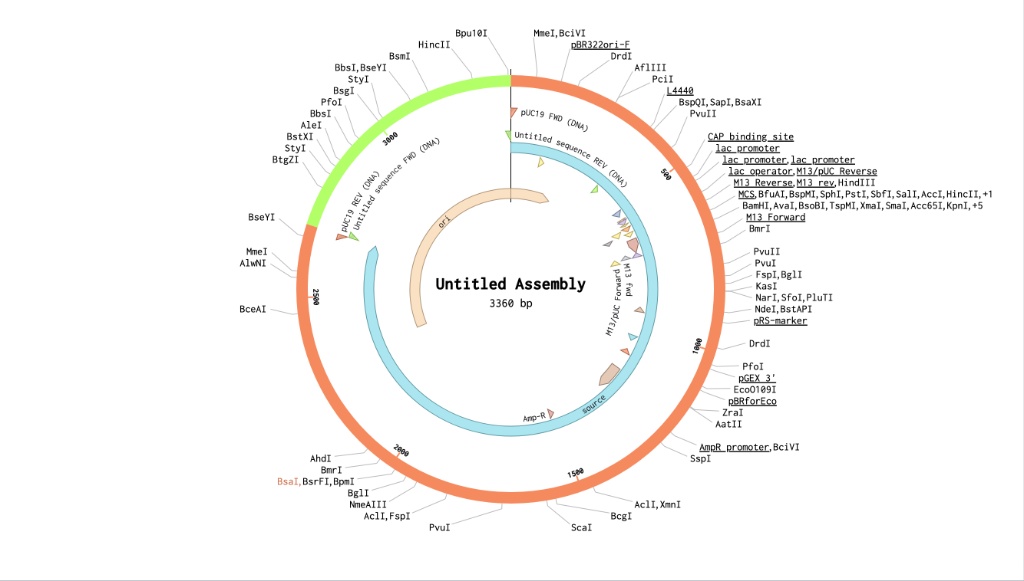
Basically, here is what I just did in Benchling:
First, I needed an empty delivery truck to hold my gene, so I imported the standard pUC19 plasmid. I noted that it was exactly 2686 base pairs long. Next, I had to go get my the purple color gene (amilCP). I pulled up a different plasmid (MG252981) just so I could copy that specific purple gene out of it. I didn’t need the whole circle, just that ~666 bp chunk of linear DNA. Then came the slightly annoying but super important part: the restriction enzyme I am using (BsaI) leaves a specific 4-letter sticky overhang when it cuts pUC19 open, and that overhang is GCCA. So, for my purple gene to fit perfectly into that gap like a puzzle piece, I literally just typed ‘GCCA’ onto the very beginning and the very end of my amilCP sequence. Finally, I opened the Assembly Wizard. I told Benchling that pUC19 was my ‘backbone’ (the truck) and my edited purple gene was the ‘insert’. The software saw those matching GCCA sticky ends, snapped them together automatically, and spit out my final circular plasmid. Because 2686 + ~674 = 3360, seeing that final size on the map was the proof that I did it right.