Week 6 HW: hw-genetic-circuits-part-i
Assignment: DNA Assembly
What are some components in the Phusion High-Fidelity PCR Master Mix and what is their purpose?
Phusion HF Master Mix contains several key components. The centerpiece is Phusion DNA Polymerase, a high-fidelity enzyme that includes a 3’ ti 5’ proofreading (exonuclease) activity, meaning it can detect and correct misincorporated bases during synthesis — this gives it roughly 50x lower error rates than standard Taq polymerase. The mix also contains dNTPs (dATP, dCTP, dGTP, dTTP), which are the nucleotide building blocks that the polymerase incorporates into the new strand. A reaction buffer (HF buffer) maintains the optimal pH and ionic conditions, and includes MgCl₂, a cofactor required for polymerase activity and primer-template stability. Finally, it contains stabilizers and enhancers that improve yield and specificity. Using a 2X master mix simply means all these components are pre-mixed at twice the working concentration, so you just add your template, primers, and water. To Summarize, DNA polymerase: extends primers to copy the template DNA. • dNTPs: raw materials for making the new DNA strands. • HF buffer: supports enzyme activity and specificity. • Mg²⁺: required for polymerase catalysis. • Water: brings the reaction to final volume. • Template + primers are added separately in the protocol. 
What are some factors that determine primer annealing temperature during PCR? The main factors are: • Primer Tm: the most direct determinant. • Primer length: longer binding regions usually raise Tm. • GC content: more G/C usually increases duplex stability and Tm. • 3′ end composition / GC clamp: affects binding stability and extension efficiency. • Primer-template complementarity: mismatches reduce effective annealing. • Secondary structure: hairpins or dimers can lower useful primer availability. • Reaction chemistry: buffer and salt conditions also affect effective annealing behavior.
There are two methods from this class that create linear fragments of DNA: PCR, and restriction enzyme digests. Compare and contrast these two methods, both in terms of protocol as well as when one may be preferable to use over the other. PCR: PCR creates a linear DNA fragment by enzymatically amplifying a chosen region using primers. In this lab, PCR is used to generate the backbone fragment and the color fragment, and the primers can also introduce mutations and Gibson overlaps. That makes PCR highly programmable. Protocol-wise, PCR requires template DNA, primers, polymerase mix, thermocycling, and then cleanup; here it is followed by DpnI digestion to remove methylated parental plasmid template.
Restriction digest: A restriction digest creates linear DNA by cutting DNA at specific enzyme recognition sites. In the primer-design prelab, we were asked to digest pUC19 with PvuII to define a backbone region containing the origin of replication and drug-resistance marker. This method depends on the relevant restriction sites already existing in the correct places. Protocol-wise, a digest uses DNA, restriction enzyme(s), buffer, incubation, and often gel purification.
PCR is better when you want to: • amplify a specific region, • introduce a designed mutation, • add Gibson overlap sequences, • or build fragments even when convenient restriction sites are absent.
Restriction digest is better when you want to: • cut a known plasmid cleanly at defined sites, • avoid primer design, • or reuse an existing cloning backbone with established enzyme sites.
In this lab context, PCR is preferable for the amilCP chromophore fragments because the forward primer can intentionally encode the desired color mutation, and the primers can also install the overlaps needed for Gibson assembly. Restriction digest is preferable when you want to excise or linearize a standard backbone like pUC19 using a known site such as PvuII. In other words, PCR offers design flexibility, while restriction digest offers site-defined cutting of existing DNA.
PCR vs. Restriction Enzyme Digests for Generating Linear DNA Fragments
Feature PCR Restriction Enzyme Digest How it works Exponential amplification using primers, polymerase, and dNTPs across thermocycler cycles Enzyme recognizes a specific short sequence and cuts both strands at or near that site Sequence specificity Defined entirely by where you design your primers to bind Defined by the restriction site(s) present in the DNA Ends produced Typically blunt ends (with Phusion); can include any overhang you encode in the primer Blunt or sticky ends depending on the enzyme (e.g., PvuII produces blunt ends) Ability to introduce mutations Yes — mismatches in primers are incorporated into the product No — digest is purely a cut, no sequence modification Template required Any DNA with known flanking sequence DNA must contain the correct restriction site Protocol complexity Thermocycler, ~90 min; requires primer design Simple incubation with enzyme in buffer, ~1–2 hrs Error risk Polymerase errors possible (minimized with Phusion) No new synthesis; no error introduced When to prefer PCR
Use PCR when you need to:
- Introduce specific mutations, as in this lab’s chromophore mutagenesis
- Add overhangs for Gibson Assembly
- Amplify a region from a complex template without a convenient restriction site
PCR is also more flexible since you’re not constrained by where restriction sites happen to fall in the sequence.
When to prefer restriction digests
Use restriction digests when you want to cut a known plasmid at precise, pre-existing sites to isolate a backbone or insert. In this lab, a PvuII digest of pUC19 generates the backbone fragment simply and reliably. Digests are also preferable when you want defined sticky ends for traditional ligation cloning, or when you need to process large amounts of plasmid DNA reproducibly.
How can you ensure that the DNA sequences that you have digested and PCR-ed will be appropriate for Gibson cloning?
For Gibson Assembly to work, the ends of your fragments must share 20–40 bp of identical overlapping sequence with their neighboring fragments. Several verification steps ensure this:
- In silico design check (Benchling): Before ordering primers, you map all four primers on the plasmid sequence and confirm that the overhang region of the Backbone Forward primer matches the end of the Color Reverse amplicon, and that the Backbone Reverse overhang matches the start of the Color Forward amplicon. The protocol explicitly says to use Benchling for this.
- Gel electrophoresis: After PCR and DpnI digest, running samples on an agarose gel confirms that each fragment is the expected size (calculated in Benchling). An unexpected band size indicates mispriming or incorrect amplification.
- Nanodrop/Qubit quantification: Gibson Assembly requires sufficient and accurately known DNA concentrations to set the correct 2:1 insert:vector molar ratio. Too little DNA or incorrect ratios reduces assembly efficiency.
- DpnI digest: This eliminates residual methylated template plasmid (mUAV), ensuring the only DNA entering the Gibson reaction is your newly PCR-amplified, potentially mutated fragments — not the original unmodified template, which would confound results.
- Orientation check: You verify all fragments are in the correct 5’→3’ orientation so that after exonuclease chew-back, the single-stranded overhangs are complementary and can anneal properly.
How does the plasmid DNA enter the E. coli cells during transformation? The protocol uses heat shock transformation. The key steps and mechanisms are: The competent DH5α cells have been chemically treated (typically with CaCl₂ during their preparation) to weaken their cell membrane and make it more permeable. When you briefly plunge the cells into a 42°C water bath for exactly 45 seconds, the sudden temperature change causes the lipid bilayer of the cell membrane to undergo a phase transition, transiently forming pores or disrupting membrane integrity. The plasmid DNA, which has been incubating with the cells on ice for 30 minutes, then diffuses passively through these transient pores and into the cytoplasm. The cells are immediately returned to ice to reseal the membrane and prevent damage. After heat shock, cells are recovered in nutrient-rich SOC media at 37°C for 60 minutes. This allows them to repair their membranes, begin expressing any plasmid-encoded genes (including the chloramphenicol resistance gene), and start dividing. Only cells that successfully took up the plasmid will survive when plated on chloramphenicol-containing agar. The alternative method mentioned in the protocol — electroporation — uses a brief high-voltage electrical pulse instead of heat to create the pores, and is generally more efficient but requires specialized equipment and electrocompetent (rather than chemically competent) cells.
Describe another assembly method in detail (such as Golden Gate Assembly)
- Explain the other method in 5 - 7 sentences plus diagrams (either handmade or online).
6. Golden Gate Assembly — An Alternative Cloning Method
Explanation
Golden Gate Assembly is a one-pot, seamless cloning method that uses Type IIS restriction enzymes (most commonly BsaI or Esp3I) to generate customized 4-base sticky ends, followed by T4 DNA ligase to join fragments. Unlike conventional restriction cloning, Type IIS enzymes cut outside their recognition sequence — typically 1–4 bases downstream — meaning the recognition site itself is not present in the final assembled product. This allows you to design any 4-base overhang you want simply by positioning the cut site appropriately in your primer.
Because the overhangs are unique and directional, multiple fragments can be assembled simultaneously in a single tube in the correct order with no scar sequence. The reaction is typically run as a series of alternating digestion and ligation cycles (e.g., 25–30 cycles of 37°C for 1 min, then 16°C for 1 min) so that incorrectly ligated products get re-cut and eventually all fragments assemble in the correct orientation.
Golden Gate is particularly powerful for multi-fragment assemblies and combinatorial library construction, since you can design overhangs such that fragments only ligate with their correct neighbors. It is the basis for standardized frameworks like MoClo and the Mobius Assembly system used in this lab — the mUAV plasmid is itself part of a Mobius Assembly framework.
Comparison to Gibson Assembly
Feature Golden Gate Gibson Assembly Key enzyme(s) Type IIS restriction enzyme + T4 ligase Exonuclease + polymerase + ligase Overlap length 4 bp (sticky ends) 20–40 bp Scar sequence None None Reaction format Thermocycling (alternating cut/ligate) Isothermal (50°C, 15–60 min) Error correction Built-in — mis-ligations get re-cut each cycle None — incorrect assemblies persist Best for 6+ fragments, combinatorial libraries 2–3 fragments, simpler assemblies Requires restriction site Yes, must be engineered into primers No How It Works — Step by Step
Design primers with a BsaI recognition sequence followed by a 4-nt spacer that defines your desired overhang. The enzyme cuts outside its recognition site, leaving a custom 4-base sticky end on each fragment.
BsaI digestion cleaves each fragment just outside the recognition sequence, generating unique 4-nt overhangs. Crucially, the recognition site itself is removed from the fragment, leaving no scar in the final product.
Annealing of complementary overhangs brings the correct fragments together. Because each junction has a unique 4-nt sequence, fragments can only join their intended neighbors — this enforces directionality and order.
Ligation by T4 DNA ligase seals the nicks to produce a covalently closed, circular plasmid.
Cycling the reaction (25–30 rounds of 37°C → 16°C) means any incorrectly ligated product is re-digested by BsaI and given another chance to assemble correctly, dramatically improving efficiency.
Transformation into E. coli and selection on antibiotic plates identifies colonies carrying the correctly assembled plasmid.
Diagram
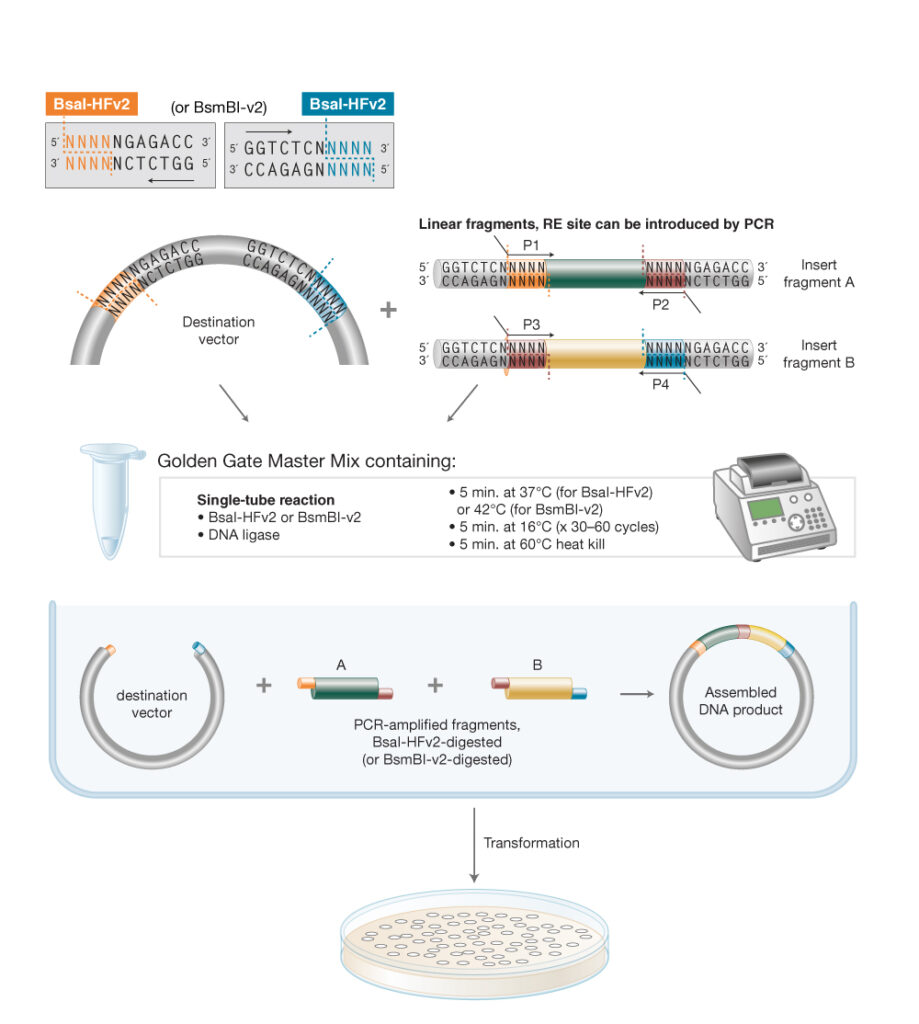
 The diagram illustrates all four steps: fragment design with BsaI sites, cleavage to produce 4-nt overhangs, overhang annealing, and ligation into a seamless circular plasmid — along with the thermocycling scheme and key advantages of the method.)
2. Model this assembly method with Benchling or Asimov Kernel!
The diagram illustrates all four steps: fragment design with BsaI sites, cleavage to produce 4-nt overhangs, overhang annealing, and ligation into a seamless circular plasmid — along with the thermocycling scheme and key advantages of the method.)
2. Model this assembly method with Benchling or Asimov Kernel!