Week 2 — DNA Read, Write, and Edit
Part 1: Benchling & In-silico Gel Art
Purpose
This exercise demonstrates applied understanding of restriction enzyme digestion and gel electrophoresis through in-silico modeling. The workflow emphasizes correct experimental logic, lane interpretation, and band pattern analysis using professional bioinformatics tools.
Platform and Workflow
All simulations were designed and executed using Benchling, a molecular biology platform widely used for DNA analysis, cloning design, and experimental planning. The use of Benchling enabled rapid iteration, accurate restriction mapping, and controlled visualization of gel electrophoresis outcomes.
DNA Sequence
- Template: Lambda phage DNA
- Length: 48,502 bp
- Topology: Linear
The sequence was imported directly into Benchling’s molecular biology workspace for downstream analysis.
Restriction Digest Design
Single-enzyme restriction digests were simulated using the following enzymes:
- EcoRI
- HindIII
- BamHI
- KpnI
- EcoRV
- SacI
- SalI
Each enzyme digest was treated as a discrete lane to preserve interpretability and allow controlled manipulation of band distributions.
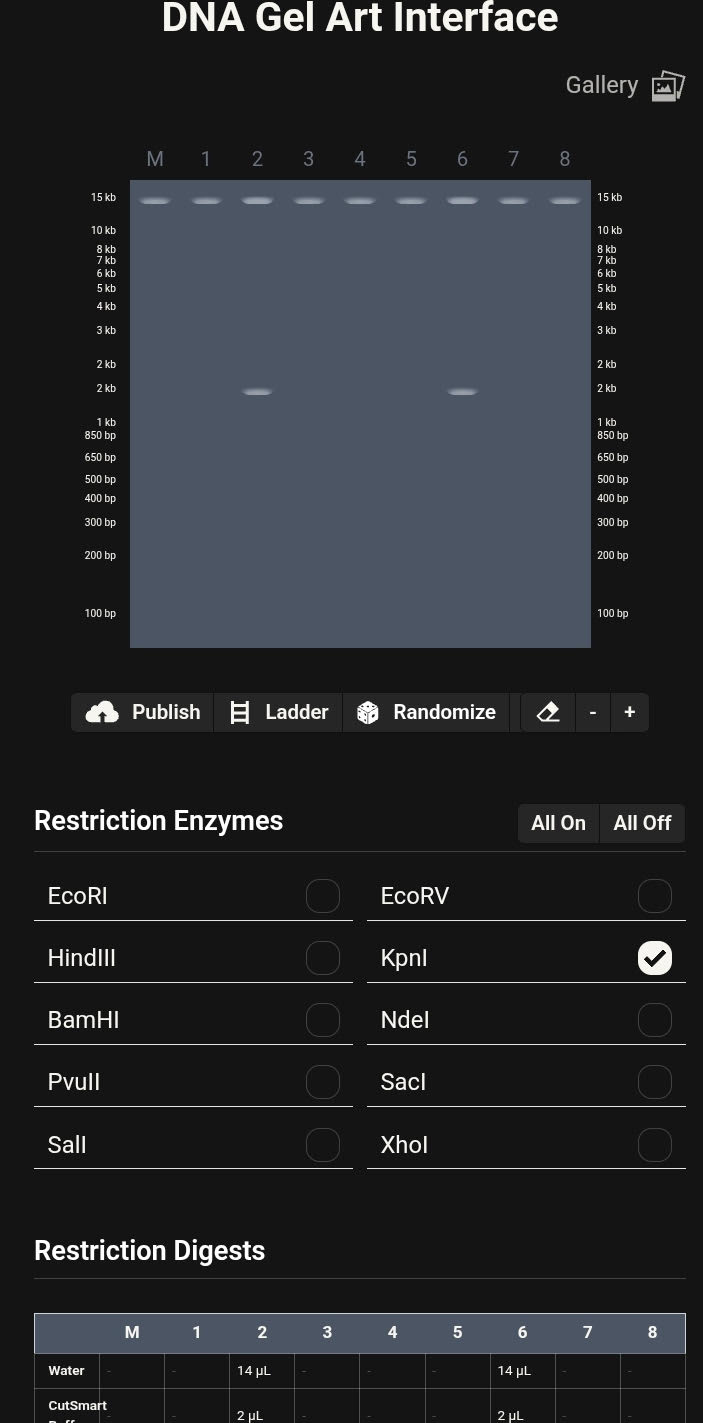
Gel Electrophoresis Simulation
Virtual agarose gel electrophoresis was generated within Benchling. Lane order was intentionally adjusted across multiple iterations to explore:
- Fragment size distribution
- Band density contrast
- Symmetry and spacing
- Use of negative space
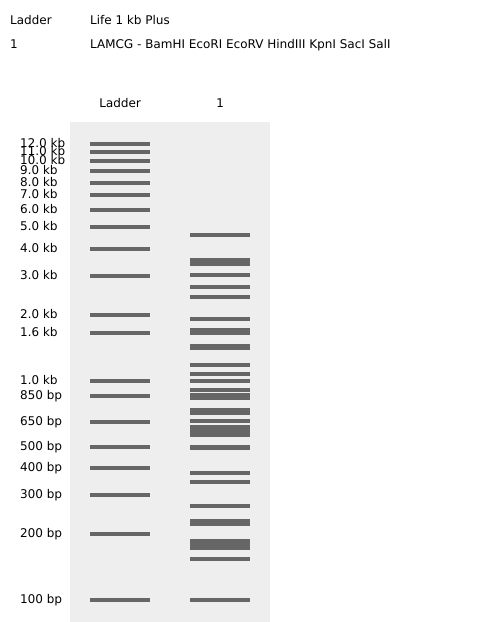
Iterative Design and Pattern Formation
Multiple gel configurations were evaluated. Early iterations did not produce coherent latent figures due to asymmetry or excessive band crowding. These attempts informed subsequent refinements in enzyme selection and lane arrangement.
Failed Iterations (Process Documentation)
Initial Draft/Notes:
Failed attempt 1:
Failed attempt 2:
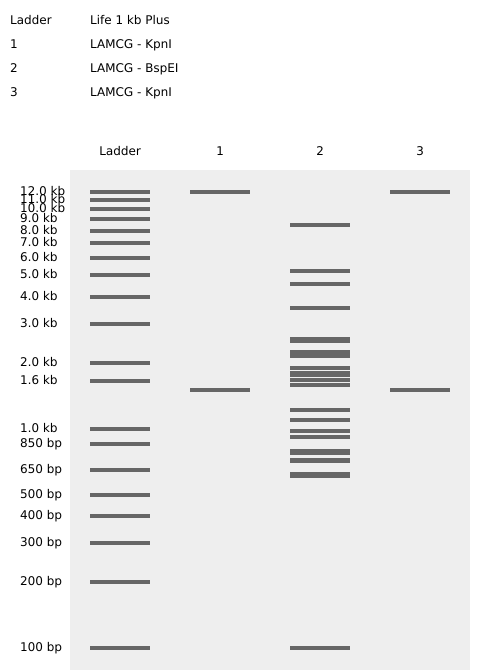
Failed attempt 3:
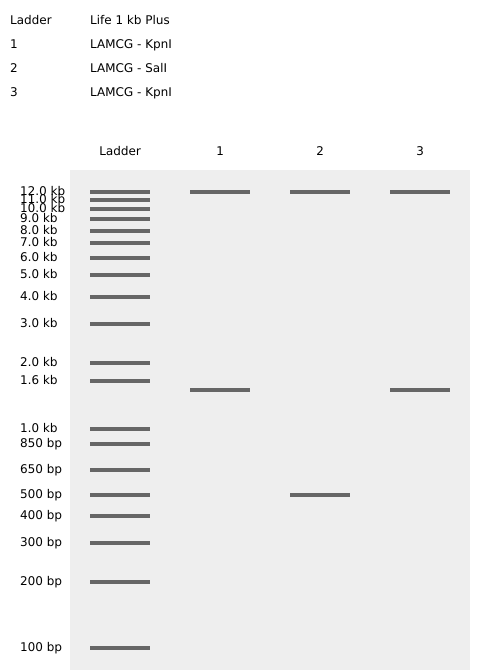
Final Gel Art Outcome
The finalized configuration produced a smiley-face latent figure, emerging entirely from restriction fragment patterns. The visual effect was achieved through bilateral lane symmetry and controlled band separation.
Final Gel Image

Skills Demonstrated
- Restriction enzyme selection and interpretation
- Gel electrophoresis logic and band analysis
- Proficient use of Benchling
- Iterative experimental design in a computational environment
Part 2: DNA Design Challenge — GFP Biosensor
3.1. Choose Your Protein
I have chosen Green Fluorescent Protein (GFP) from Aequorea victoria for this assignment. GFP is directly relevant to my final project—a bacterial biosensor for rapid detection of antibiotic-resistant pathogens. In my biosensor design, GFP serves as the fluorescent reporter that signals the presence of beta-lactamase activity from resistant bacteria. Understanding GFP’s sequence and optimizing its expression in E. coli is critical for maximizing detection sensitivity within my target 2-4 hour response time. GFP is also a foundational tool in synthetic biology and understanding its design will help me build more effective genetic circuits. Its well-characterized nature, robust fluorescence, and established expression protocols make it both educationally valuable and practically essential for my biosensor application.
UniProt ID: P42212 (Wild-type GFP from Aequorea victoria)
sp|P42212|GFP_AEQVI Green fluorescent protein OS=Aequorea victoria OX=6100 GN=GFP PE=1 SV=1 MSKGEELFTGVVPILVELDGDVNGHKFSVSGEGEGDATYGKLTLKFICTTGKLPVPWPTLVTTFSYGVQCFSRYPDHMKQHDFFKSAMPEGYVQERTIFFKDDGNYKTRAEVKFEGDTLVNRIELKGIDFKEDGNILGHKLEYNYNSHNVYIMADKQKNGIKVNFKIRHNIEDGSVQLADHYQQNTPIGDGPVLLPDNHYLSTQSALSKDPNEKRDHMVLLEFVTAAGITHGMDELYK
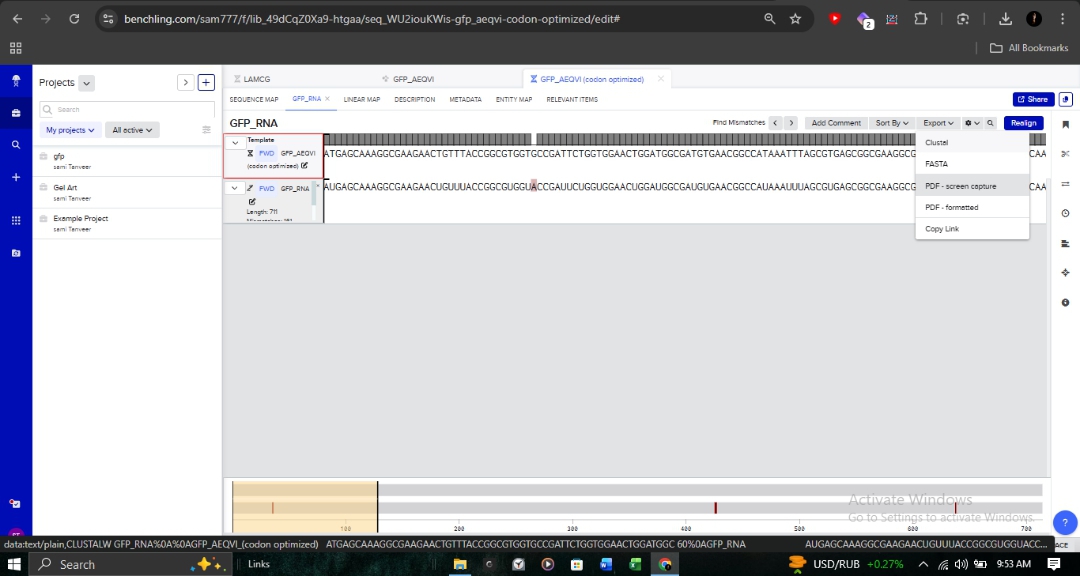
3.2. Reverse Translation: Protein to DNA
Using Benchling, I reverse-translated the primary amino acid sequence of GFP into its corresponding nucleotide sequence. This allows us to work backward from the functional protein to the genetic “blueprint” required for synthesis.

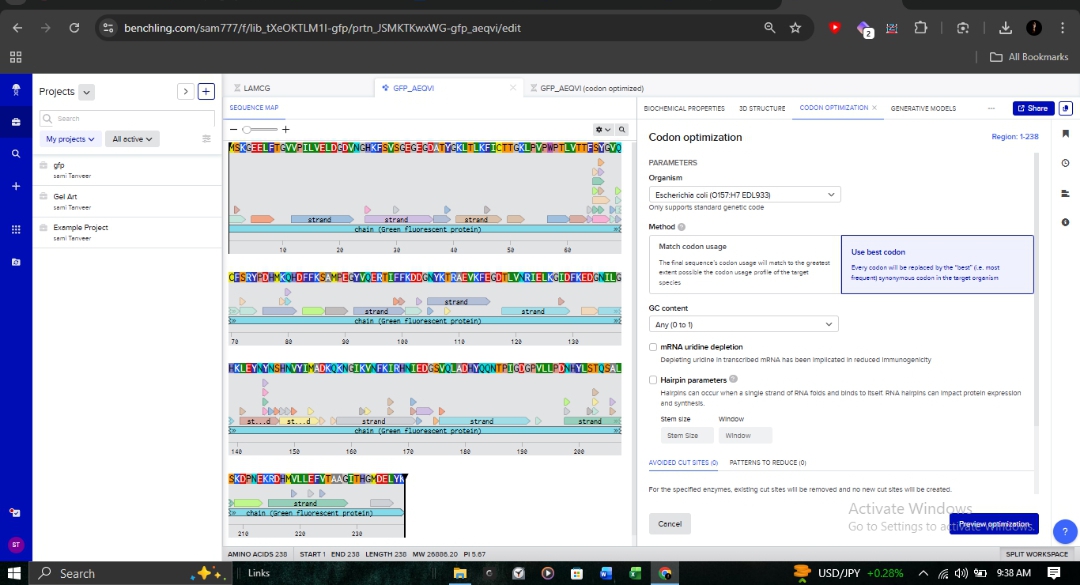
3.3. Codon Optimization for E. coli
Target Organism: Escherichia coli (Strain OVST1/FEDL903). Rationale: I optimized the sequence to align with the host’s tRNA availability (codon bias). This is critical in pharmaceutical R&D to prevent ribosome stalling and maximize protein yield.
- Parameters: As shown in the optimization interface, I utilized the “Match codon usage” method while maintaining ideal GC content and avoiding hairpins.
3.4. From Sequence to Synthesis: Production Workflow
To produce the GFP protein from this designed DNA, I would utilize a cell-dependent expression system.
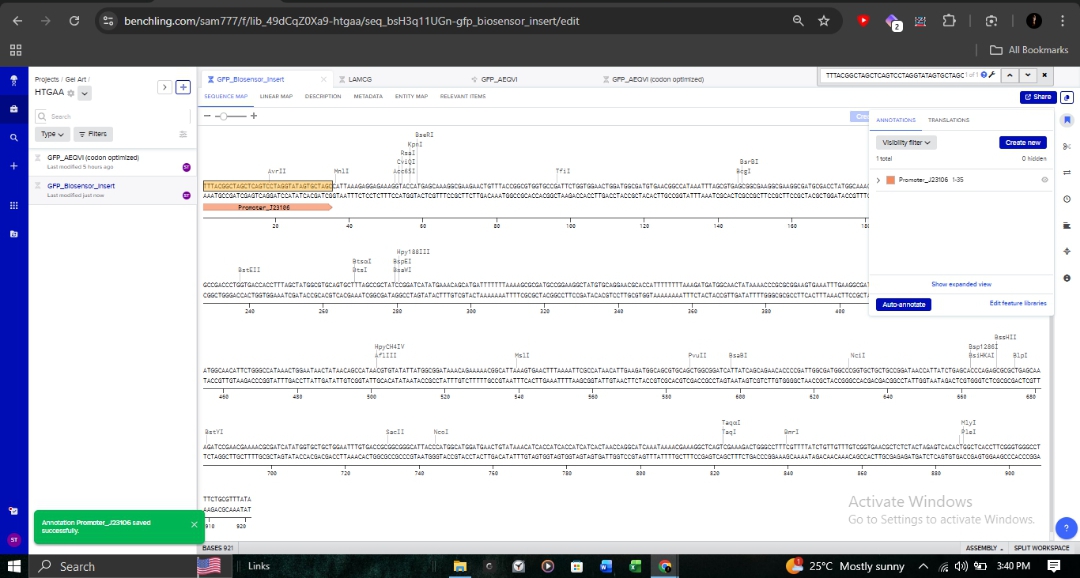
The full genetic construct, including the biosensor insert, is mapped below. This map includes critical regulatory elements such as the Promoter_J23106 and various reading frames.
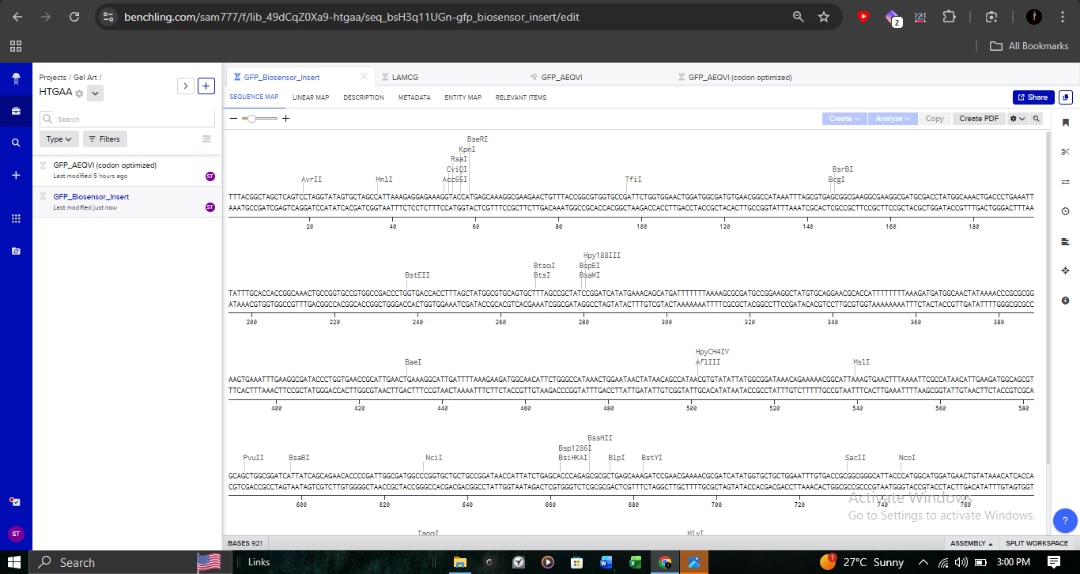
Molecular Validation
- Annotation: Detailed sequence annotations show restriction enzyme sites like BsaI and BseRI, which are essential for Goldengate assembly or standard cloning.

3.5. [Optional] How does it work in nature/biological systems?
This section demonstrates the Central Dogma in action. Each 3-nucleotide codon in the DNA is transcribed into an RNA codon, which is then translated by the bacterial ribosome into a specific amino acid.
Live Sequence Map: View GFP Biosensor Construct on Benchling
[Image of the central dogma of molecular biology]
Data & Sequence Repository
To ensure reproducibility and transparency, the following raw data and sequence files are available for review:
- Sequence Maps (PDF): Optimized GFP Sequence | Biosensor Insert Sequence | Alignment Report
- Primary Sequence Data: GFP Biosensor Insert (FASTA) | GFP RNA Sequence (FASTA)
Skills Demonstrated
- Bioinformatics: Sequence retrieval, reverse translation, and 3D structure validation.
- Synthetic Biology: Host-specific codon optimization and genetic circuit design.
- Pharmaceutical R&D: Designing reporter systems for diagnostic biosensors.
- Data Management: Systematic documentation and version control of genomic files.
Part 4: DNA Synthesis & Plasmid Construction
4.1. Account Setup & Design Environment
To transition from in-silico design to physical DNA synthesis, I established research accounts on Benchling (for sequence orchestration) and Twist Bioscience (for high-fidelity DNA synthesis). These platforms allow for a seamless transition between sequence design and manufacturing.
4.2. Building the Expression Cassette
I constructed a constitutive expression cassette for my biosensor. By substituting the generic sfGFP with my codon-optimized GFP sequence, I ensured the design is tailored for maximum expression in E. coli OVST1.
The cassette architecture includes:
- Promoter (J23106): To ensure continuous transcription.
- RBS (B0034): Optimized for bacterial translation initiation.
- CDS: My optimized GFP sequence.
- 7x His Tag: Appended at the C-terminus for downstream protein purification.
- Terminator (B0015): To define the transcription boundary.
4.3 – 4.5. Clonal Gene Selection & Import
I opted for Clonal Genes through Twist Bioscience. As a time-constrained researcher, this choice is strategic: clonal genes (circular DNA) arrive ready for direct transformation, typically reaching experimental results 1-2 weeks faster than linear gene fragments which require manual assembly.
I successfully converted my optimized amino acid sequence into a DNA FASTA file and imported it into the synthesis pipeline.
Primary Insert File: gfp_biosensor_insert.fasta
4.6. Vector Integration & Final Construct
I integrated my linear expression cassette into the pTwist Amp High Copy circular backbone. This backbone provides Ampicillin resistance and a high-copy origin of replication, which is essential for achieving the high fluorescent signal density required for a diagnostic biosensor.
The final plasmid was exported as a GenBank file and re-imported into Benchling for final validation of the reading frames and restriction sites.

Proof of Work: Design Files
The following files represent the finalized outputs of the DNA “Write” process:
- Full Construct Map: GFP Biosensor in pTwist Amp High Copy (PDF)
- Plasmid Data: Final Plasmid (GenBank)
- Insert Sequence: GFP Expression Cassette (FASTA)
Skills Demonstrated
- Synthetic Biology Workflow: Complete pipeline from protein sequence to “ready-to-order” plasmid.
- Strategic Vector Selection: Choosing backbones based on antibiotic markers and copy numbers.
- Molecular Documentation: Proficiency in GenBank and FASTA file management for R&D reproducibility.
Part 5: DNA Read, Write, and Edit — Strategic Applications
5.1 DNA Read (Sequencing)
To complement my biosensor, I must be able to verify the specific genetic drivers of the resistance it detects in real-time.
(i) What DNA to sequence and why?
- Target: Beta-lactamase resistance genes (blaTEM, blaCTX-M, blaKPC) from clinical bacterial isolates.
- Rationale: While my biosensor identifies enzymatic activity, sequencing confirms the exact resistance mechanism. This guides precise antibiotic selection (personalized treatment) and allows for tracking the epidemiological spread of resistance genes within hospital environments.
(ii) Technology: Oxford Nanopore MinION (3rd Generation)
Why MinION: It offers a 6–12 hour turnaround, matching the rapid 2–4 hour window of my biosensor. Its portability and long-read capability (>10 kb) allow for sequencing entire resistance operons.
Input Preparation (~1 hour): 1. DNA extraction and quick lysis. 2. End-repair and A-tailing (30 min). 3. Adapter ligation of motor proteins and tethers (15 min). 4. Magnetic bead cleanup (10 min).
Mechanism & Base Calling: DNA is threaded through a synthetic nanopore by a motor protein. As each base disrupts the ionic current uniquely, neural networks decode the “squiggles” into ATGC sequences at ~450 bp/second.
Output: FASTQ files providing 500–5000× coverage of resistance genes with 95–99% accuracy.
5.2 DNA Write (Synthesis)
Synthesis allows for the physical construction of the digital designs created in Benchling.
(i) What DNA to synthesize and why? I aim to synthesize a modular library of constructs (~5 kb total) to optimize biosensor performance:
- Construct 1: GFP Biosensor (927 bp) - My primary design (Promoter J23106 - RBS - GFP_CDS - His tag - Terminator).
- Construct 2: Beta-lactamase Inducible Promoter (~500 bp) - Ensures GFP is only expressed when resistance is detected, reducing false positives.
- Constructs 3-4: Multi-color Reporters - Utilizing mCherry to detect aminoglycoside resistance simultaneously with beta-lactamase.
- Constructs 5-6: Positive Controls - TEM-1 and CTX-M-15 sequences to validate biosensor sensitivity.
(ii) Technology: Twist Bioscience (Silicon-based Synthesis)
Essential Steps: 1. Oligo Synthesis: Millions of 40-80 nt oligonucleotides synthesized on a silicon chip via photolithography. 2. Gene Assembly: Overlapping oligos joined via Gibson Assembly. 3. Error Correction: Mismatch-specific nucleases remove sequences with synthesis errors. 4. Cloning & QC: Insertion into pTwist vectors followed by Sanger sequencing verification.
Limitations: Turnaround time is 10–15 business days; currently optimized for constructs between 300 bp and 5 kb. Accuracy remains high with a <1:3,000 bp error rate.
5.3 DNA Edit (Genome Engineering)
Editing moves the focus from diagnosis (Read/Write) to direct therapeutic intervention.
(i) What DNA to edit and why?
- Target: Human CFTR gene to correct the ΔF508 mutation (a 3 bp deletion of CTT in exon 10).
- Rationale: This mutation causes ~70% of Cystic Fibrosis cases. Correcting this deletion in lung epithelial cells via aerosol delivery represents a shift from managing symptoms to curative “molecular pharmacology.”
(ii) Technology: Prime Editing (PE3)
How it works: Uses a Cas9 nickase fused to a Reverse Transcriptase (RT) and a pegRNA (prime editing guide RNA) which encodes the target site and the 3 bp “CTT” correction.
Essential Steps: 1. Design pegRNA targeting the ΔF508 locus. 2. Deliver PE machinery + pegRNA via Inhaled AAV vectors. 3. The Prime Editor nicks the DNA; RT copies the corrected sequence from the pegRNA into the genome. 4. DNA repair completes the edit, precisely inserting the missing CTT.
Limitations & Advantages: Prime Editing is safer as it avoids double-strand breaks. While in-vivo efficiency is currently 5–25%, its high precision makes it ideal for non-dividing lung cells.
Skills Demonstrated
- Clinical Bioinformatics: Metagenomic sequencing integration for diagnostic verification.
- Synthetic Biology: Modular circuit design and high-fidelity synthesis strategy.
- Molecular Pharmacology: Designing targeted gene-editing interventions for chronic genetic disease.