Pharm.D student exploring the scientific landscape—from mRNA sequencing to drug discovery and clinical applications. A complete beginner, but highly motivated and eager to learn, grow, and contribute to impactful biomedical research.
Biological Engineering Application / Tool Application:
I want to develop a bacterial biosensor for rapid detection of antibiotic-resistant pathogens in clinical samples. The biosensor uses engineered E. coli containing genetic circuits that activate fluorescent protein expression when they detect beta-lactamase activity or other resistance markers from nearby bacteria.
Part 1: Benchling & In-silico Gel Art Purpose This exercise demonstrates applied understanding of restriction enzyme digestion and gel electrophoresis through in-silico modeling. The workflow emphasizes correct experimental logic, lane interpretation, and band pattern analysis using professional bioinformatics tools.
Platform and Workflow All simulations were designed and executed using Benchling, a molecular biology platform widely used for DNA analysis, cloning design, and experimental planning. The use of Benchling enabled rapid iteration, accurate restriction mapping, and controlled visualization of gel electrophoresis outcomes.
Part A: SOD1 A4V Therapeutic Peptide Design 1. Project Overview & Pharmacological Target This research targets the A4V mutation (Alanine-to-Valine at residue 4) in human Superoxide Dismutase 1 (SOD1). In Pharmaceutical Sciences, this is a critical target for Familial ALS. The mutation destabilizes the N-terminal “zipper” of the protein, leading to the exposure of hydrophobic residues and subsequent toxic aggregation. Our goal is to design a peptide binder that cap-stabilizes this region.
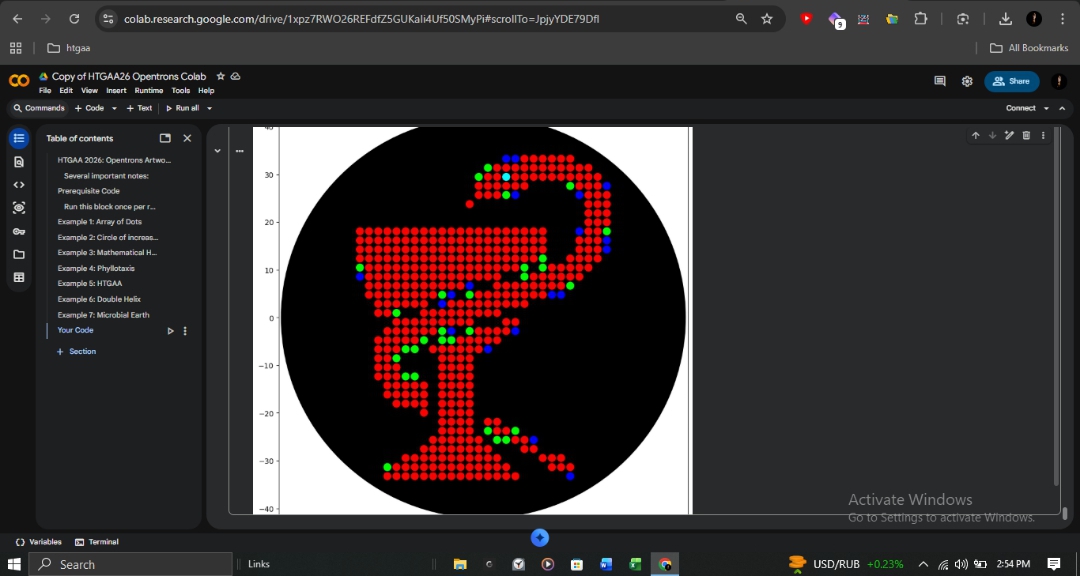
Laboratory Automation: Opentrons Bio-Art Using the HTGAA26 Opentrons Colab as a framework, I developed a custom automation protocol to translate digital designs into biological patterns.
Implementation Documentation Technical Script: sami_tanveer_opentrons.py Protocol Logic: The script utilizes API Level 2.20 and a P20 Single-Channel Gen2 pipette. It features an optimized draw_points function that handles coordinate-based dispensing with batched aspiration to ensure mechanical efficiency and prevent cross-contamination between fluorescent strains. Design Interface: The design was mapped using the Opentrons Art GUI, ensuring precise coordinate placement for Red (mRFP1), Green (mClover3), Blue (Azurite), and Cyan (sfGFP) reporters. Visual Reference of Design Interface:
Part A: Conceptual Questions — Protein Biochemistry & Design These responses explore the molecular logic of protein structures, chirality, and the transition from abiotic chemistry to biological systems, reflecting the professional rigor required for pharmaceutical R&D.
Q1: Molecular Abundance in Nutrition How many molecules of amino acids are in 500g of meat? Meat is approximately 20% protein by weight (accounting for water and fat). In 500g of meat, there are roughly 100g of protein.
Part 1: Intracellular Artificial Neural Networks (IANNs) Q1. What advantages do IANNs have over traditional genetic circuits whose input/output behaviors are Boolean functions? Traditional genetic circuits implement Boolean logic — outputs are strictly binary (gene ON or gene OFF). IANNs offer several key advantages over this approach.
Biological Engineering Application / Tool Application:
I want to develop a bacterial biosensor for rapid detection of antibiotic-resistant pathogens in clinical samples. The biosensor uses engineered E. coli containing genetic circuits that activate fluorescent protein expression when they detect beta-lactamase activity or other resistance markers from nearby bacteria.
Part 1: Benchling & In-silico Gel Art Purpose This exercise demonstrates applied understanding of restriction enzyme digestion and gel electrophoresis through in-silico modeling. The workflow emphasizes correct experimental logic, lane interpretation, and band pattern analysis using professional bioinformatics tools.
Platform and Workflow All simulations were designed and executed using Benchling, a molecular biology platform widely used for DNA analysis, cloning design, and experimental planning. The use of Benchling enabled rapid iteration, accurate restriction mapping, and controlled visualization of gel electrophoresis outcomes.
Part A: SOD1 A4V Therapeutic Peptide Design 1. Project Overview & Pharmacological Target This research targets the A4V mutation (Alanine-to-Valine at residue 4) in human Superoxide Dismutase 1 (SOD1). In Pharmaceutical Sciences, this is a critical target for Familial ALS. The mutation destabilizes the N-terminal “zipper” of the protein, leading to the exposure of hydrophobic residues and subsequent toxic aggregation. Our goal is to design a peptide binder that cap-stabilizes this region.
Laboratory Automation: Opentrons Bio-Art Using the HTGAA26 Opentrons Colab as a framework, I developed a custom automation protocol to translate digital designs into biological patterns.
Implementation Documentation Technical Script: sami_tanveer_opentrons.py Protocol Logic: The script utilizes API Level 2.20 and a P20 Single-Channel Gen2 pipette. It features an optimized draw_points function that handles coordinate-based dispensing with batched aspiration to ensure mechanical efficiency and prevent cross-contamination between fluorescent strains. Design Interface: The design was mapped using the Opentrons Art GUI, ensuring precise coordinate placement for Red (mRFP1), Green (mClover3), Blue (Azurite), and Cyan (sfGFP) reporters. Visual Reference of Design Interface:
Part A: Conceptual Questions — Protein Biochemistry & Design These responses explore the molecular logic of protein structures, chirality, and the transition from abiotic chemistry to biological systems, reflecting the professional rigor required for pharmaceutical R&D.
Q1: Molecular Abundance in Nutrition How many molecules of amino acids are in 500g of meat? Meat is approximately 20% protein by weight (accounting for water and fat). In 500g of meat, there are roughly 100g of protein.
Part 1: Intracellular Artificial Neural Networks (IANNs) Q1. What advantages do IANNs have over traditional genetic circuits whose input/output behaviors are Boolean functions? Traditional genetic circuits implement Boolean logic — outputs are strictly binary (gene ON or gene OFF). IANNs offer several key advantages over this approach.
Application: I want to develop a bacterial biosensor for rapid detection of antibiotic-resistant pathogens in clinical samples. The biosensor uses engineered E. coli containing genetic circuits that activate fluorescent protein expression when they detect beta-lactamase activity or other resistance markers from nearby bacteria.
Why this application: As a Pharm.D student, I’ve witnessed how current resistance testing takes 24-48 hours using culture-based methods. This delay forces physicians to prescribe broad-spectrum antibiotics empirically, which often fails and accelerates resistance development. A rapid biosensor could provide results within 2-4 hours, enabling targeted antibiotic selection on the same day. The technology is HTGAA-feasible because it uses standard E. coli chassis, well-characterized promoters (like those responsive to beta-lactamase degradation products), and simple fluorescent reporters (GFP/RFP). This addresses a critical clinical gap—the time between infection diagnosis and appropriate treatment—using accessible synthetic biology techniques that I can learn and implement during the course.
2. Governance / Policy Goals
Primary Goal: Ensure the bacterial biosensor contributes to better patient outcomes and antimicrobial stewardship without creating environmental or biosecurity risks.
Sub-Goals
Goal 1: Enhance Biosecurity
Sub-goal 1a: Prevent the engineered biosensor strain from surviving outside laboratory/clinical settings
Sub-goal 1b: Ensure the technology cannot be easily modified to detect or enable harmful applications
Goal 2: Ensure Equitable Access
Sub-goal 2a: Make the biosensor affordable for resource-limited clinics where resistance is often highest
Sub-goal 2b: Share genetic circuit designs openly to enable local production and adaptation
Goal 3: Protect Environmental Health
Sub-goal 3a: Prevent accidental release of engineered bacteria into wastewater or soil
Sub-goal 3b: Ensure biosensor components are properly sterilized after use
Purpose: Currently, different labs use varying containment practices for engineered bacteria. I propose standardized protocols specifically for clinical biosensor applications that mandate genetic kill switches, auxotrophy (nutritional dependency), and proper waste sterilization.
Design:
All clinical biosensor strains must include auxotrophy for a non-natural amino acid
Genetic kill switches activated after 48 hours or upon temperature change
Users skip sterilization steps due to time pressure
Bacteria escape before kill switch activates
Risks of “Success”:
Over-engineering containment makes biosensor too expensive for routine use
Complexity of safety features reduces reliability of detection function
Option 2: Open-Source Design Registry with Safety Review
Purpose: Create a public database (similar to iGEM Registry) where biosensor genetic circuits are shared, peer-reviewed for safety, and rated for performance. This promotes equitable access while maintaining safety oversight.
Design:
Researchers submit biosensor designs to registry before publication
Tiering creates quality perception gap harming Tier 1 research funding
4. Scoring Governance Actions
Scale: 1 = best alignment with goal, 3 = weakest, n/a = not applicable
Policy Goal
Option 1: Containment
Option 2: Registry
Option 3: Validation
Enhance Biosecurity
• Prevent incidents
1
2
2
• Enable response
2
2
1
Ensure Equitable Access
• Affordable access
2
1
3
• Local adaptation
2
1
2
Protect Environment
• Prevent release
1
3
n/a
• Containment response
1
3
n/a
Other Considerations
• Minimize burden
2
1
3
• Feasibility
1
2
2
• Not impede research
1
2
3
• Promote applications
2
1
1
Scoring Rationale:
Option 1 provides strongest environmental protection through physical/genetic containment but doesn’t address equitable access
Option 2 excels at promoting access and knowledge sharing but has weaker environmental safeguards once designs are public
Option 3 ensures patient safety through validation but creates cost barriers and may slow beneficial research
5. Prioritized Recommendation
Recommended Strategy: Implement Option 1 (Containment Protocols) combined with Option 2 (Open Registry) for research phases, followed by Option 3 (Tiered Validation) for clinical translation.
Rationale:
For my biosensor project specifically, I would:
During HTGAA development: Use Option 1 containment (auxotrophy + kill switches) and share my circuit design via Option 2 registry for peer feedback
If pursuing clinical application: Progress through Option 3 tiers, starting with research validation (Tier 1), then clinical research (Tier 2) if results are promising
This layered approach allows me to innovate safely during the course while establishing pathways to clinical impact. The containment features protect against accidental release, open sharing promotes equitable access and scientific improvement, and tiered validation ensures patient safety without stopping early-stage research.
Target Audience:
HTGAA instructors and peers: For research-phase safety practices
MIT/Hospital IRBs: If transitioning to clinical testing
Clinical microbiology professional societies: For eventual diagnostic standards
Trade-offs & Uncertainties:
Kill switch reliability: Current technology has ~1-5% failure rate; need backup containment (auxotrophy)
Balancing openness vs. security: Sharing designs enables both beneficial adaptation and potential misuse; registry review helps but isn’t foolproof
Clinical validation costs: Tier 3 requirements may be prohibitive for academic proof-of-concept; might need industry partnership or grant funding for translation
6. Ethical Reflection
New Ethical Concern: This week’s discussions highlighted the “edgeless” quality of engineered organisms—once released, bacteria don’t respect geographical or temporal boundaries. Unlike chemical diagnostics that degrade predictably, live biosensors could theoretically persist and spread if containment fails. This made me realize that even diagnostic applications (which seem purely beneficial) carry environmental responsibilities that extend beyond the immediate user.
Proposed Governance Action: Require environmental impact assessments even for contained clinical applications. Specifically:
Before deploying biosensors in any clinical setting, model worst-case release scenarios (e.g., improper waste disposal, accidental spill)
Establish monitoring protocols for detecting engineered strains in local wastewater
Create rapid-response plans if biosensor bacteria are detected outside intended use areas
This shifts thinking from “it’s contained so it’s safe” to “what if containment fails, and how do we detect and respond?” As a future Pharm.D working at the interface of biology and medicine, I want to build the habit of anticipating unintended consequences, not just assuming good intentions equal good outcomes.
Subsections of Week 1 HW: Principles and Practices
Week 1: Professor Questions
Homework Questions from Professor Jacobson
Question 1: DNA Polymerase Error Rate
Question: Nature’s machinery for copying DNA is called polymerase. What is the error rate of polymerase? How does this compare to the length of the human genome? How does biology deal with that discrepancy?
Answer:
The error rate of DNA polymerase with proofreading is approximately 1 error per 10⁶ base pairs. The human genome is about 3.2 billion base pairs long. At this error rate, a single round of genome replication would introduce roughly 3,200 errors, which would be incompatible with stable life.
How Biology Resolves This Discrepancy
Biology relies on layered error correction mechanisms rather than polymerase accuracy alone:
Polymerase Proofreading Many DNA polymerases possess 3′→5′ exonuclease activity, which removes incorrectly incorporated nucleotides immediately during synthesis.
Mismatch Repair (MMR) Errors that escape proofreading are corrected post-replication by the mismatch repair system, involving proteins such as MutS, MutL, and MutH, which detect mismatches, excise the incorrect segment, and resynthesize it correctly.
Net Result: These combined systems reduce the final mutation rate to approximately 1 error per 10⁹–10¹⁰ base pairs, resulting in only a few errors per genome replication.
Question 2: Coding Diversity for Human Proteins
Question: How many different DNA sequences can encode an average human protein, and why do most of these sequences fail in practice?
Answer:
An average human protein is encoded by approximately 1,036 base pairs of DNA (about 345 amino acids). Because the genetic code is redundant, with 61 codons encoding 20 amino acids, there are an astronomical number of possible DNA sequences that can theoretically encode the same protein.
Why Most Synonymous Sequences Fail
Despite this theoretical diversity, most synonymous sequences do not function properly due to several biological constraints:
mRNA Secondary Structure Different sequences fold into different mRNA structures. Stable hairpins or loops can block ribosome binding, slow translation, or destabilize the transcript.
GC Content and Stability Extreme GC or AT content alters nucleic acid stability. Excessive GC content makes DNA and RNA difficult to unwind, while low GC content reduces structural stability.
RNA Cleavage Rules Certain sequences form structures recognized by RNases (e.g., RNase III), leading to premature mRNA degradation.
Codon Usage Bias Organisms prefer specific codons. Rare codons slow translation due to limited tRNA availability, reducing protein yield or causing misfolding.
Translation Kinetics and Folding Translation speed affects co-translational protein folding. Incorrect synonymous choices can produce misfolded, non-functional proteins.
Together, these constraints explain why only a small fraction of synonymous DNA sequences successfully produce functional proteins.
Homework Questions from Dr. LeProust
What’s the most common method for oligonucleotide synthesis?
The most common method is solid-phase phosphoramidite synthesis, a chemical process in which nucleotides are added stepwise to a growing DNA strand. Modern platforms perform this synthesis on silicon chips, enabling the parallel production of millions of oligonucleotides.
Why is it difficult to synthesize oligonucleotides longer than ~200 nucleotides?
As oligonucleotide length increases, small errors accumulate and coupling efficiency decreases, leading to truncated and incomplete products. This limits reliable direct synthesis to a few hundred nucleotides.
Why can’t a 2000 base-pair gene be made by direct oligonucleotide synthesis?
Chemical synthesis is limited to short DNA fragments. A 2000 base-pair gene must be constructed by synthesizing shorter oligonucleotides and assembling them into the full-length gene using enzymatic assembly and ligation methods.
Homework Questions from Professor Jacobson
Natural vs. Synthetic Biocontainment Strategies
Amino Acid Essentiality & Biocontainment
The ten essential amino acids for animals—those that must be obtained through diet—are phenylalanine (F), valine (V), threonine (T), tryptophan (W), isoleucine (I), methionine (M), histidine (H), arginine (R), leucine (L), and lysine (K).
The Lysine Contingency and Biological Reality
The “lysine contingency,” popularized by Jurassic Park, proposes limiting survival by making organisms dependent on lysine. In reality:
Natural dependency: All animals are already dependent on lysine and other essential amino acids obtained from the environment.
Poor containment: Lysine is abundant in nature, making this an ineffective biocontainment strategy.
Synthetic solutions: Research on genomically recoded organisms (GROs) replaces natural amino acid dependence with reliance on non-standard amino acids (NSAAs) that do not exist outside controlled environments.
This creates a synthetic contingency, ensuring engineered organisms cannot survive beyond the laboratory or production setting.
Citations and AI Prompt Disclosure
Key References:
Lajoie et al. (2013), Genomically Recoded Organisms Expand Biological Functions
Nyerges et al. (2022), Swapped genetic code blocks viral infections & gene transfer
AI Usage Disclosure: Standard biological facts were retrieved using internal knowledge. Google NotebookLM was used as a study aid. Lecture slides were uploaded to ChatGPT, and the following prompt was used:
“Teach me this lecture as a coherent essay. Explain all concepts from first principles, and clearly explain any new or technical terms when they appear.”
The connection to Prof. Church’s work and the lysine contingency was synthesized directly from the provided source materials.
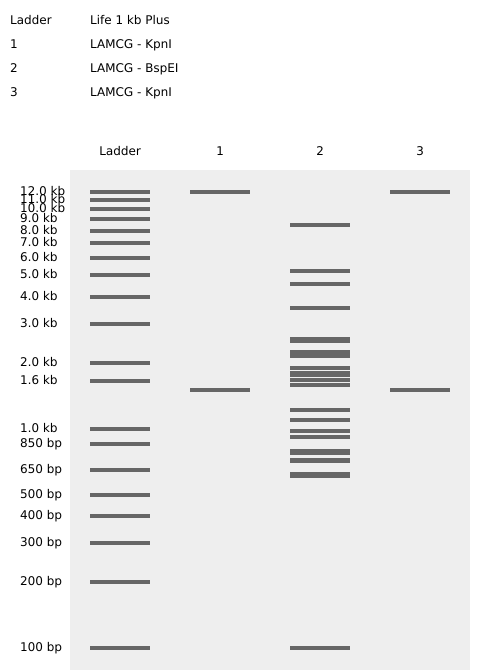
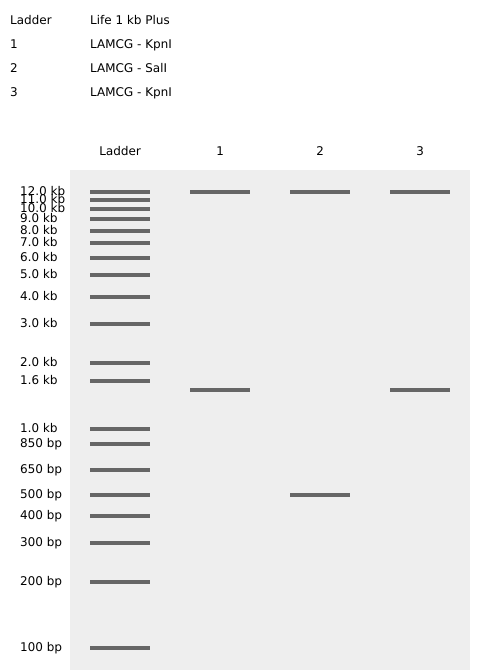
Week 2 — DNA Read, Write, and Edit
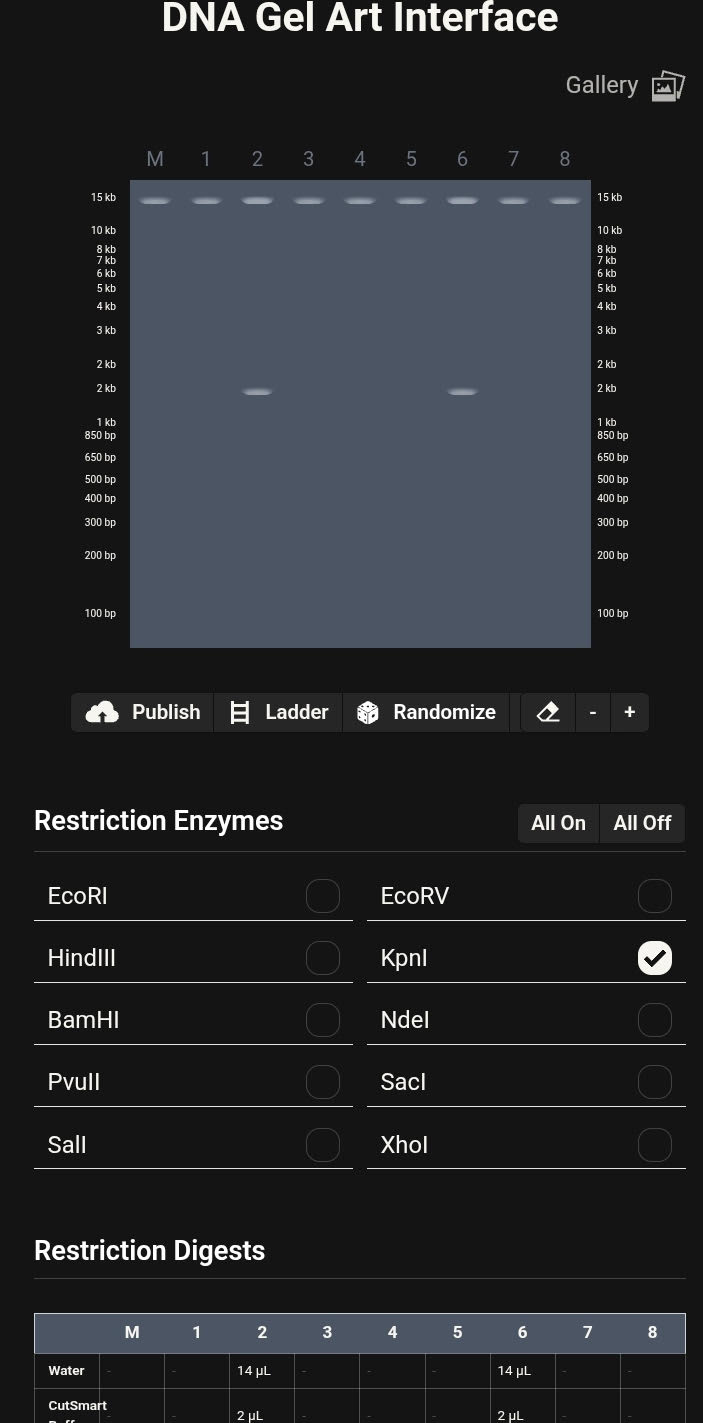
Part 1: Benchling & In-silico Gel Art
Purpose
This exercise demonstrates applied understanding of restriction enzyme digestion and gel electrophoresis through in-silico modeling. The workflow emphasizes correct experimental logic, lane interpretation, and band pattern analysis using professional bioinformatics tools.
Platform and Workflow
All simulations were designed and executed using Benchling, a molecular biology platform widely used for DNA analysis, cloning design, and experimental planning. The use of Benchling enabled rapid iteration, accurate restriction mapping, and controlled visualization of gel electrophoresis outcomes.
DNA Sequence
Template: Lambda phage DNA
Length: 48,502 bp
Topology: Linear
The sequence was imported directly into Benchling’s molecular biology workspace for downstream analysis.
Restriction Digest Design
Single-enzyme restriction digests were simulated using the following enzymes:
EcoRI
HindIII
BamHI
KpnI
EcoRV
SacI
SalI
Each enzyme digest was treated as a discrete lane to preserve interpretability and allow controlled manipulation of band distributions.
Gel Electrophoresis Simulation
Virtual agarose gel electrophoresis was generated within Benchling. Lane order was intentionally adjusted across multiple iterations to explore:
Fragment size distribution
Band density contrast
Symmetry and spacing
Use of negative space
Iterative Design and Pattern Formation
Multiple gel configurations were evaluated. Early iterations did not produce coherent latent figures due to asymmetry or excessive band crowding. These attempts informed subsequent refinements in enzyme selection and lane arrangement.
Failed Iterations (Process Documentation)
Initial Draft/Notes:
Failed attempt 1:
Failed attempt 2:
Failed attempt 3:
Final Gel Art Outcome
The finalized configuration produced a smiley-face latent figure, emerging entirely from restriction fragment patterns. The visual effect was achieved through bilateral lane symmetry and controlled band separation.
Final Gel Image
Skills Demonstrated
Restriction enzyme selection and interpretation
Gel electrophoresis logic and band analysis
Proficient use of Benchling
Iterative experimental design in a computational environment
Part 2: DNA Design Challenge — GFP Biosensor
3.1. Choose Your Protein
I have chosen Green Fluorescent Protein (GFP) from Aequorea victoria for this assignment. GFP is directly relevant to my final project—a bacterial biosensor for rapid detection of antibiotic-resistant pathogens. In my biosensor design, GFP serves as the fluorescent reporter that signals the presence of beta-lactamase activity from resistant bacteria. Understanding GFP’s sequence and optimizing its expression in E. coli is critical for maximizing detection sensitivity within my target 2-4 hour response time. GFP is also a foundational tool in synthetic biology and understanding its design will help me build more effective genetic circuits. Its well-characterized nature, robust fluorescence, and established expression protocols make it both educationally valuable and practically essential for my biosensor application.
UniProt ID: P42212 (Wild-type GFP from Aequorea victoria)
sp|P42212|GFP_AEQVI Green fluorescent protein OS=Aequorea victoria OX=6100 GN=GFP PE=1 SV=1
MSKGEELFTGVVPILVELDGDVNGHKFSVSGEGEGDATYGKLTLKFICTTGKLPVPWPTLVTTFSYGVQCFSRYPDHMKQHDFFKSAMPEGYVQERTIFFKDDGNYKTRAEVKFEGDTLVNRIELKGIDFKEDGNILGHKLEYNYNSHNVYIMADKQKNGIKVNFKIRHNIEDGSVQLADHYQQNTPIGDGPVLLPDNHYLSTQSALSKDPNEKRDHMVLLEFVTAAGITHGMDELYK
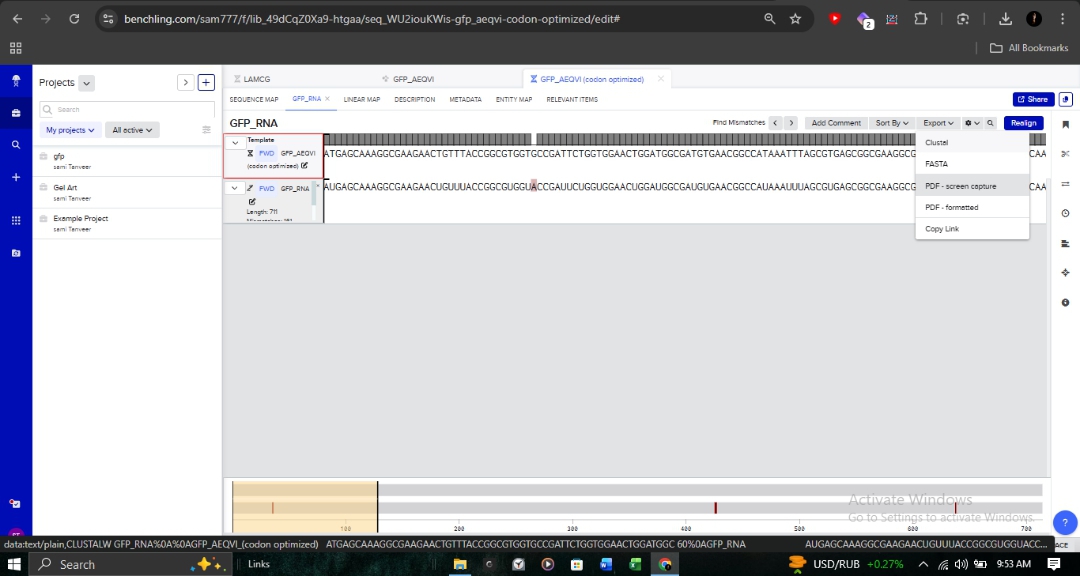
3.2. Reverse Translation: Protein to DNA
Using Benchling, I reverse-translated the primary amino acid sequence of GFP into its corresponding nucleotide sequence. This allows us to work backward from the functional protein to the genetic “blueprint” required for synthesis.
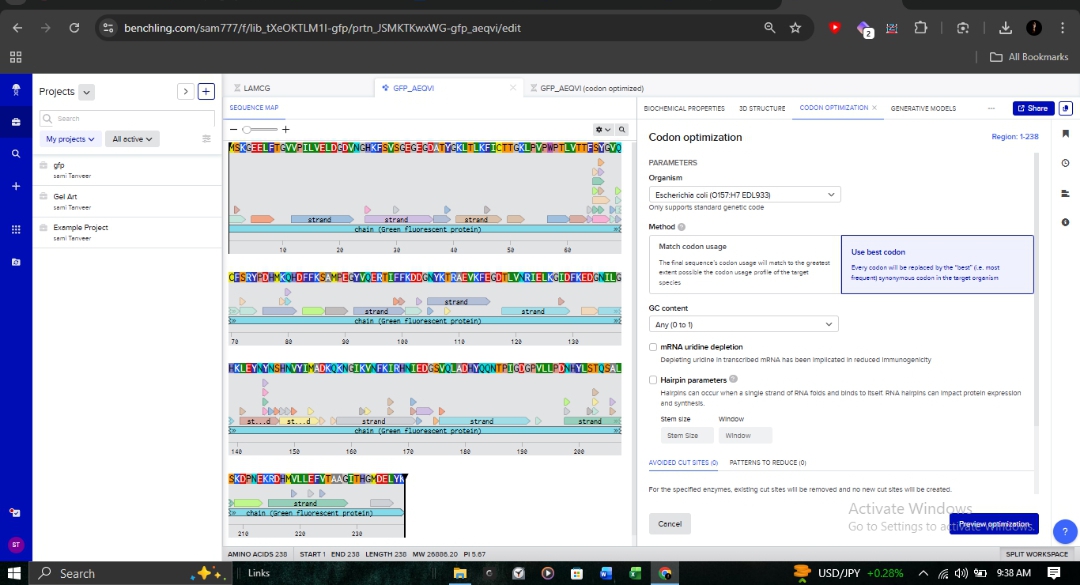
3.3. Codon Optimization for E. coli
Target Organism:Escherichia coli (Strain OVST1/FEDL903).
Rationale: I optimized the sequence to align with the host’s tRNA availability (codon bias). This is critical in pharmaceutical R&D to prevent ribosome stalling and maximize protein yield.
Parameters: As shown in the optimization interface, I utilized the “Match codon usage” method while maintaining ideal GC content and avoiding hairpins.
3.4. From Sequence to Synthesis: Production Workflow
To produce the GFP protein from this designed DNA, I would utilize a cell-dependent expression system.
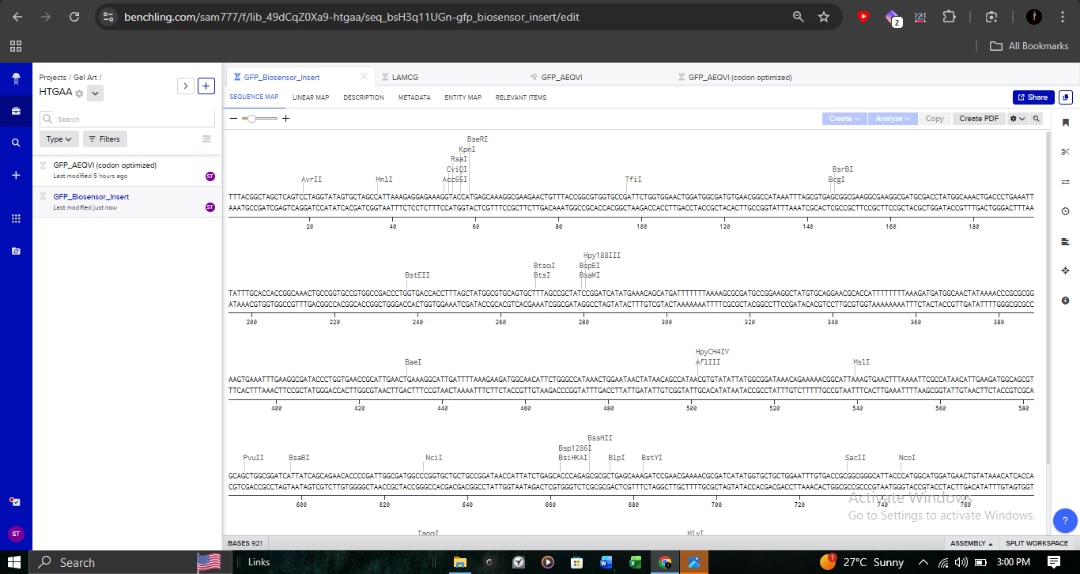
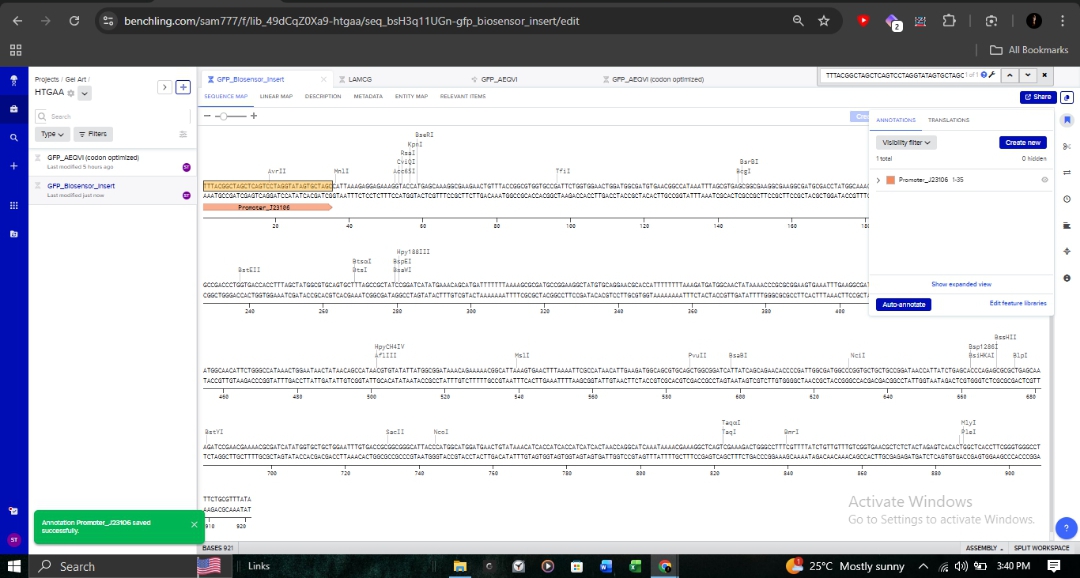
The full genetic construct, including the biosensor insert, is mapped below. This map includes critical regulatory elements such as the Promoter_J23106 and various reading frames.
Molecular Validation
Annotation: Detailed sequence annotations show restriction enzyme sites like BsaI and BseRI, which are essential for Goldengate assembly or standard cloning.
3.5. [Optional] How does it work in nature/biological systems?
This section demonstrates the Central Dogma in action. Each 3-nucleotide codon in the DNA is transcribed into an RNA codon, which is then translated by the bacterial ribosome into a specific amino acid.
Bioinformatics: Sequence retrieval, reverse translation, and 3D structure validation.
Synthetic Biology: Host-specific codon optimization and genetic circuit design.
Pharmaceutical R&D: Designing reporter systems for diagnostic biosensors.
Data Management: Systematic documentation and version control of genomic files.
Part 4: DNA Synthesis & Plasmid Construction
4.1. Account Setup & Design Environment
To transition from in-silico design to physical DNA synthesis, I established research accounts on Benchling (for sequence orchestration) and Twist Bioscience (for high-fidelity DNA synthesis). These platforms allow for a seamless transition between sequence design and manufacturing.
4.2. Building the Expression Cassette
I constructed a constitutive expression cassette for my biosensor. By substituting the generic sfGFP with my codon-optimized GFP sequence, I ensured the design is tailored for maximum expression in E. coli OVST1.
The cassette architecture includes:
Promoter (J23106): To ensure continuous transcription.
RBS (B0034): Optimized for bacterial translation initiation.
CDS: My optimized GFP sequence.
7x His Tag: Appended at the C-terminus for downstream protein purification.
Terminator (B0015): To define the transcription boundary.
4.3 – 4.5. Clonal Gene Selection & Import
I opted for Clonal Genes through Twist Bioscience. As a time-constrained researcher, this choice is strategic: clonal genes (circular DNA) arrive ready for direct transformation, typically reaching experimental results 1-2 weeks faster than linear gene fragments which require manual assembly.
I successfully converted my optimized amino acid sequence into a DNA FASTA file and imported it into the synthesis pipeline.
I integrated my linear expression cassette into the pTwist Amp High Copy circular backbone. This backbone provides Ampicillin resistance and a high-copy origin of replication, which is essential for achieving the high fluorescent signal density required for a diagnostic biosensor.
The final plasmid was exported as a GenBank file and re-imported into Benchling for final validation of the reading frames and restriction sites.
Proof of Work: Design Files
The following files represent the finalized outputs of the DNA “Write” process:
Rationale: While my biosensor identifies enzymatic activity, sequencing confirms the exact resistance mechanism. This guides precise antibiotic selection (personalized treatment) and allows for tracking the epidemiological spread of resistance genes within hospital environments.
(ii) Technology: Oxford Nanopore MinION (3rd Generation)
Why MinION: It offers a 6–12 hour turnaround, matching the rapid 2–4 hour window of my biosensor. Its portability and long-read capability (>10 kb) allow for sequencing entire resistance operons.
Input Preparation (~1 hour): 1. DNA extraction and quick lysis.
2. End-repair and A-tailing (30 min).
3. Adapter ligation of motor proteins and tethers (15 min).
4. Magnetic bead cleanup (10 min).
Mechanism & Base Calling: DNA is threaded through a synthetic nanopore by a motor protein. As each base disrupts the ionic current uniquely, neural networks decode the “squiggles” into ATGC sequences at ~450 bp/second.
Output: FASTQ files providing 500–5000× coverage of resistance genes with 95–99% accuracy.
5.2 DNA Write (Synthesis)
Synthesis allows for the physical construction of the digital designs created in Benchling.
(i) What DNA to synthesize and why?
I aim to synthesize a modular library of constructs (~5 kb total) to optimize biosensor performance:
Construct 1: GFP Biosensor (927 bp) - My primary design (Promoter J23106 - RBS - GFP_CDS - His tag - Terminator).
Construct 2: Beta-lactamase Inducible Promoter (~500 bp) - Ensures GFP is only expressed when resistance is detected, reducing false positives.
Constructs 3-4: Multi-color Reporters - Utilizing mCherry to detect aminoglycoside resistance simultaneously with beta-lactamase.
Constructs 5-6: Positive Controls - TEM-1 and CTX-M-15 sequences to validate biosensor sensitivity.
(ii) Technology: Twist Bioscience (Silicon-based Synthesis)
Essential Steps: 1. Oligo Synthesis: Millions of 40-80 nt oligonucleotides synthesized on a silicon chip via photolithography.
2. Gene Assembly: Overlapping oligos joined via Gibson Assembly.
3. Error Correction: Mismatch-specific nucleases remove sequences with synthesis errors.
4. Cloning & QC: Insertion into pTwist vectors followed by Sanger sequencing verification.
Limitations: Turnaround time is 10–15 business days; currently optimized for constructs between 300 bp and 5 kb. Accuracy remains high with a <1:3,000 bp error rate.
5.3 DNA Edit (Genome Engineering)
Editing moves the focus from diagnosis (Read/Write) to direct therapeutic intervention.
(i) What DNA to edit and why?
Target: Human CFTR gene to correct the ΔF508 mutation (a 3 bp deletion of CTT in exon 10).
Rationale: This mutation causes ~70% of Cystic Fibrosis cases. Correcting this deletion in lung epithelial cells via aerosol delivery represents a shift from managing symptoms to curative “molecular pharmacology.”
(ii) Technology: Prime Editing (PE3)
How it works: Uses a Cas9 nickase fused to a Reverse Transcriptase (RT) and a pegRNA (prime editing guide RNA) which encodes the target site and the 3 bp “CTT” correction.
Essential Steps: 1. Design pegRNA targeting the ΔF508 locus.
2. Deliver PE machinery + pegRNA via Inhaled AAV vectors.
3. The Prime Editor nicks the DNA; RT copies the corrected sequence from the pegRNA into the genome.
4. DNA repair completes the edit, precisely inserting the missing CTT.
Limitations & Advantages: Prime Editing is safer as it avoids double-strand breaks. While in-vivo efficiency is currently 5–25%, its high precision makes it ideal for non-dividing lung cells.
Skills Demonstrated
Clinical Bioinformatics: Metagenomic sequencing integration for diagnostic verification.
Synthetic Biology: Modular circuit design and high-fidelity synthesis strategy.
Molecular Pharmacology: Designing targeted gene-editing interventions for chronic genetic disease.
Week 5: Protein Design II
Part A: SOD1 A4V Therapeutic Peptide Design
1. Project Overview & Pharmacological Target
This research targets the A4V mutation (Alanine-to-Valine at residue 4) in human Superoxide Dismutase 1 (SOD1). In Pharmaceutical Sciences, this is a critical target for Familial ALS. The mutation destabilizes the N-terminal “zipper” of the protein, leading to the exposure of hydrophobic residues and subsequent toxic aggregation. Our goal is to design a peptide binder that cap-stabilizes this region.
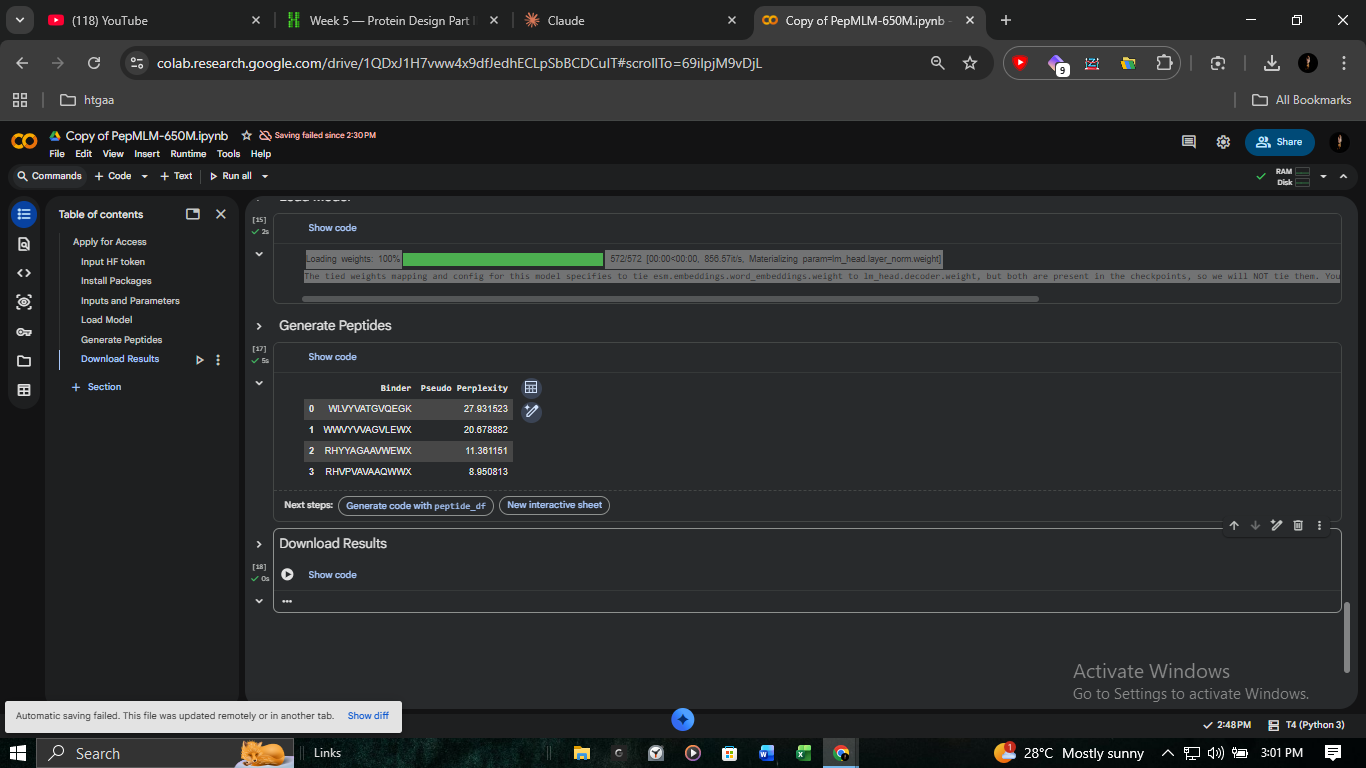
2. Candidate Generation (PepMLM)
We utilized PepMLM-650M to generate binder candidates via Masked Language Modeling. By conditioning the model on the SOD1 A4V pocket, we identified sequences with high statistical likelihood of interaction.
Peptide ID
Sequence
Perplexity
ipTM (AF3)
Pep-3 (Lead)
RHVPVAVAAQWWX
8.95
0.30
Pep-1
WWVYVVAGVLEWX
20.68
0.31
Warning
Toxicological De-risking: Peptide 1 showed high structural affinity but was excluded after PeptiVerse screening flagged it for high hemolytic activity, making it unsuitable for systemic pharmaceutical application.
Peptide 3 localizes effectively near the N-terminal mutation site to provide scaffolding stability.
PeptiVerse screening dashboard showing the exclusion of toxic candidates.
1. Objective: Stability & Folding in Phage Therapy
The Lysis Protein of the MS2 bacteriophage is a single-pass transmembrane protein. Improving its stability and auto-folding is essential for developing robust phage-based alternatives to traditional antibiotics, specifically targeting cell wall synthesis inhibition.
2. The “Correlation Gap”: PLM Predictions vs. Lab Reality
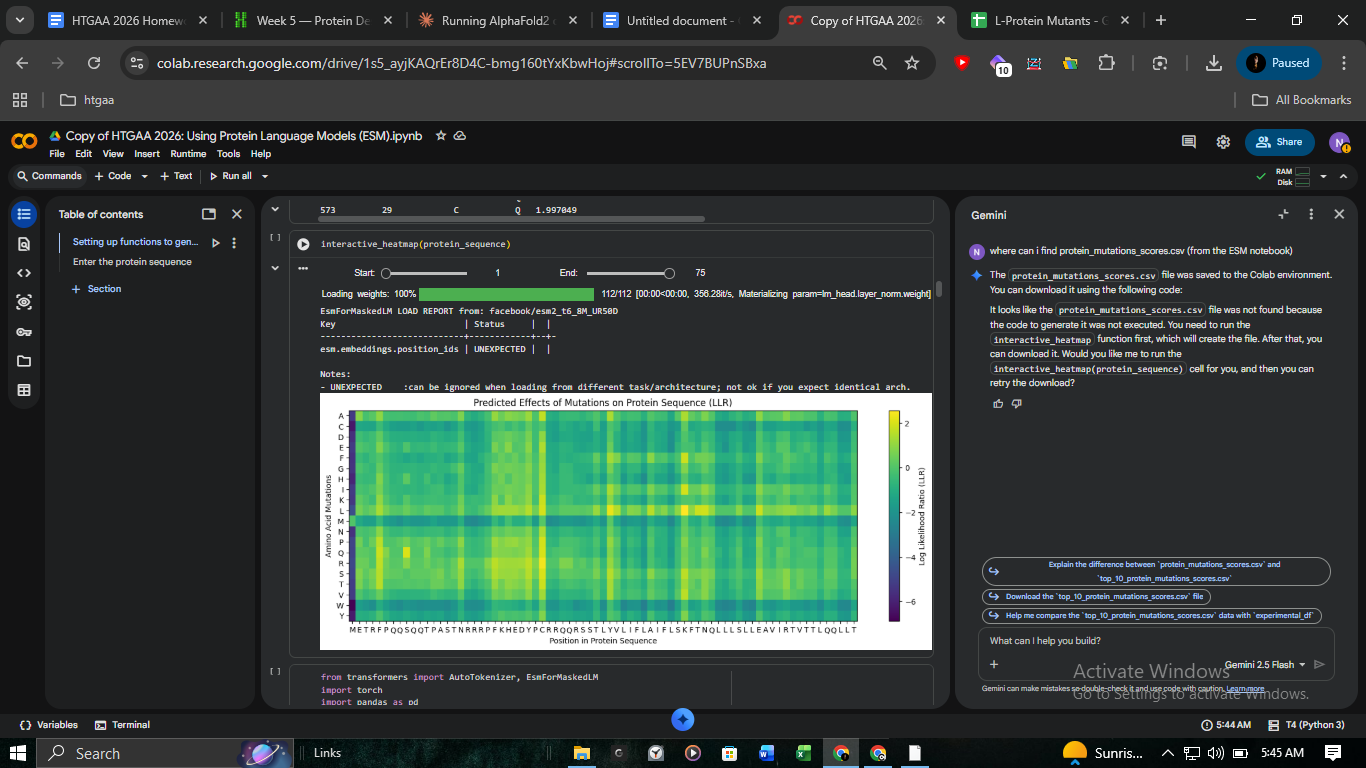
A major focus of this computational track was comparing ESM-2 (Protein Language Model) scores against experimental lysis data.
The Discrepancy: Analysis of protein_mutations_scores.csv identified C29R as the top-scoring mutation (+2.40). However, the experimental record in L-Protein_Mutants_-_Sheet1.csv confirmed Lysis = 0.
Insight: This highlights the limitations of PLMs in predicting functional outcomes versus simple structural stability.
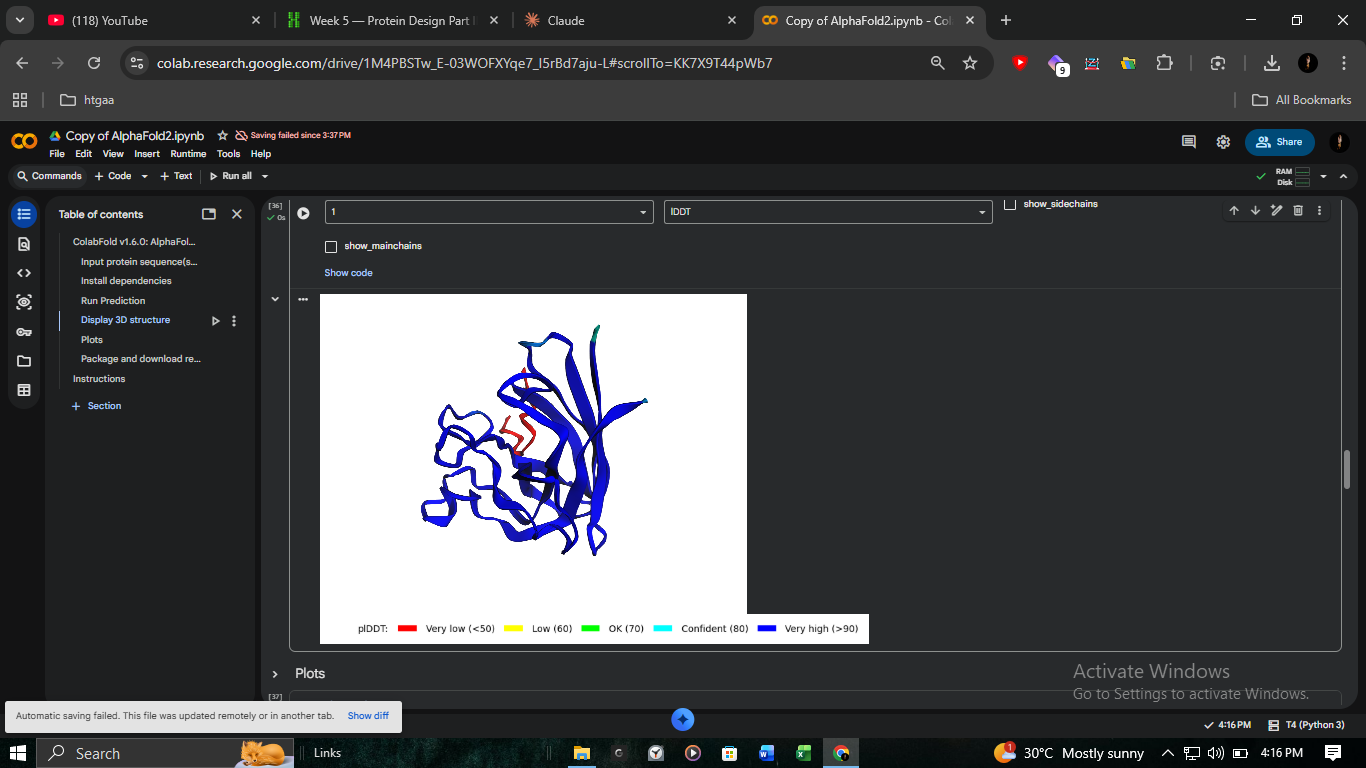
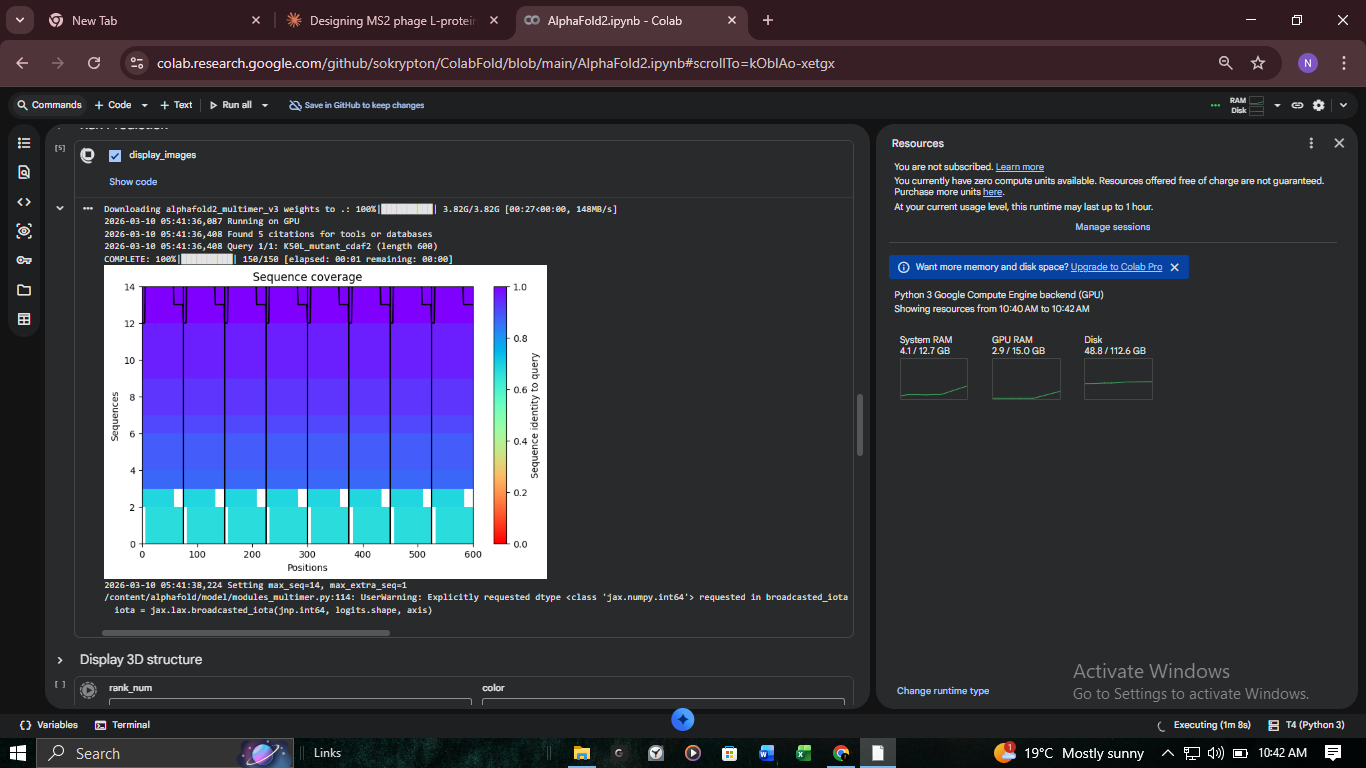
3. Structural Validation: K50L Mutant (ColabFold)
We performed high-resolution structural modeling for K50L (the highest ESM score in the protein at +2.56) using AlphaFold2-Multimer.
Visualizing the K50L mutation’s impact on transmembrane helix orientation. Red regions indicate Very Low (<50) pLDDT, suggesting disordered or flexible regions.
Analysis of pLDDT and PAE matrices. The confidence scores confirm a stable fold despite the mutation.
Multiple Sequence Alignment (MSA) coverage for the L-protein variant.
4. Final Mutation Selection Logic
The following 5 mutations were selected for their balance of computational potential and experimental proof:
S9Q (Soluble): High ESM score (+2.01); likely improves N-terminal solubility.
K50L (TM): Theoretical stability peak (+2.56) in the transmembrane domain.
A45P (TM): Validated Lysis = 1; potential helix-breaker that aids the lysis mechanism.
K23E (Free): Highly robust candidate with three separate experimental confirmations of Lysis = 1.
5. Final Conclusion
This workflow demonstrates that while models like ESM-2 and AlphaFold are powerful for scanning protein landscapes, experimental benchmarking remains the gold standard for identifying functional variants in phage-based antimicrobials.
Protocol Logic: The script utilizes API Level 2.20 and a P20 Single-Channel Gen2 pipette. It features an optimized draw_points function that handles coordinate-based dispensing with batched aspiration to ensure mechanical efficiency and prevent cross-contamination between fluorescent strains.
Design Interface: The design was mapped using the Opentrons Art GUI, ensuring precise coordinate placement for Red (mRFP1), Green (mClover3), Blue (Azurite), and Cyan (sfGFP) reporters.
Visual Reference of Design Interface:
2. Post-Lab Questions & Research
Q1: Published Paper — SHERLOCK (Nature Protocols, 2019)
Paper:SHERLOCK: Specific High-sensitivity Enzymatic Reporter unLOCKing (PubMed: 31548639).
SHERLOCK is a CRISPR-based diagnostic tool that utilizes the collateral cleavage activity of Cas13. This paper is foundational to my final project because it demonstrates a detection method that is both highly sensitive and low-cost (~$0.60/reaction), making it ideal for the Pakistani clinical context.
Automation Connection: The paper highlights the transition from manual detection to high-throughput plates. Utilizing an Opentrons robot allows for the parallelization of hundreds of reactions, ensuring that carrier screening is consistent, rapid, and free from the human pipetting errors common in manual diagnostics.
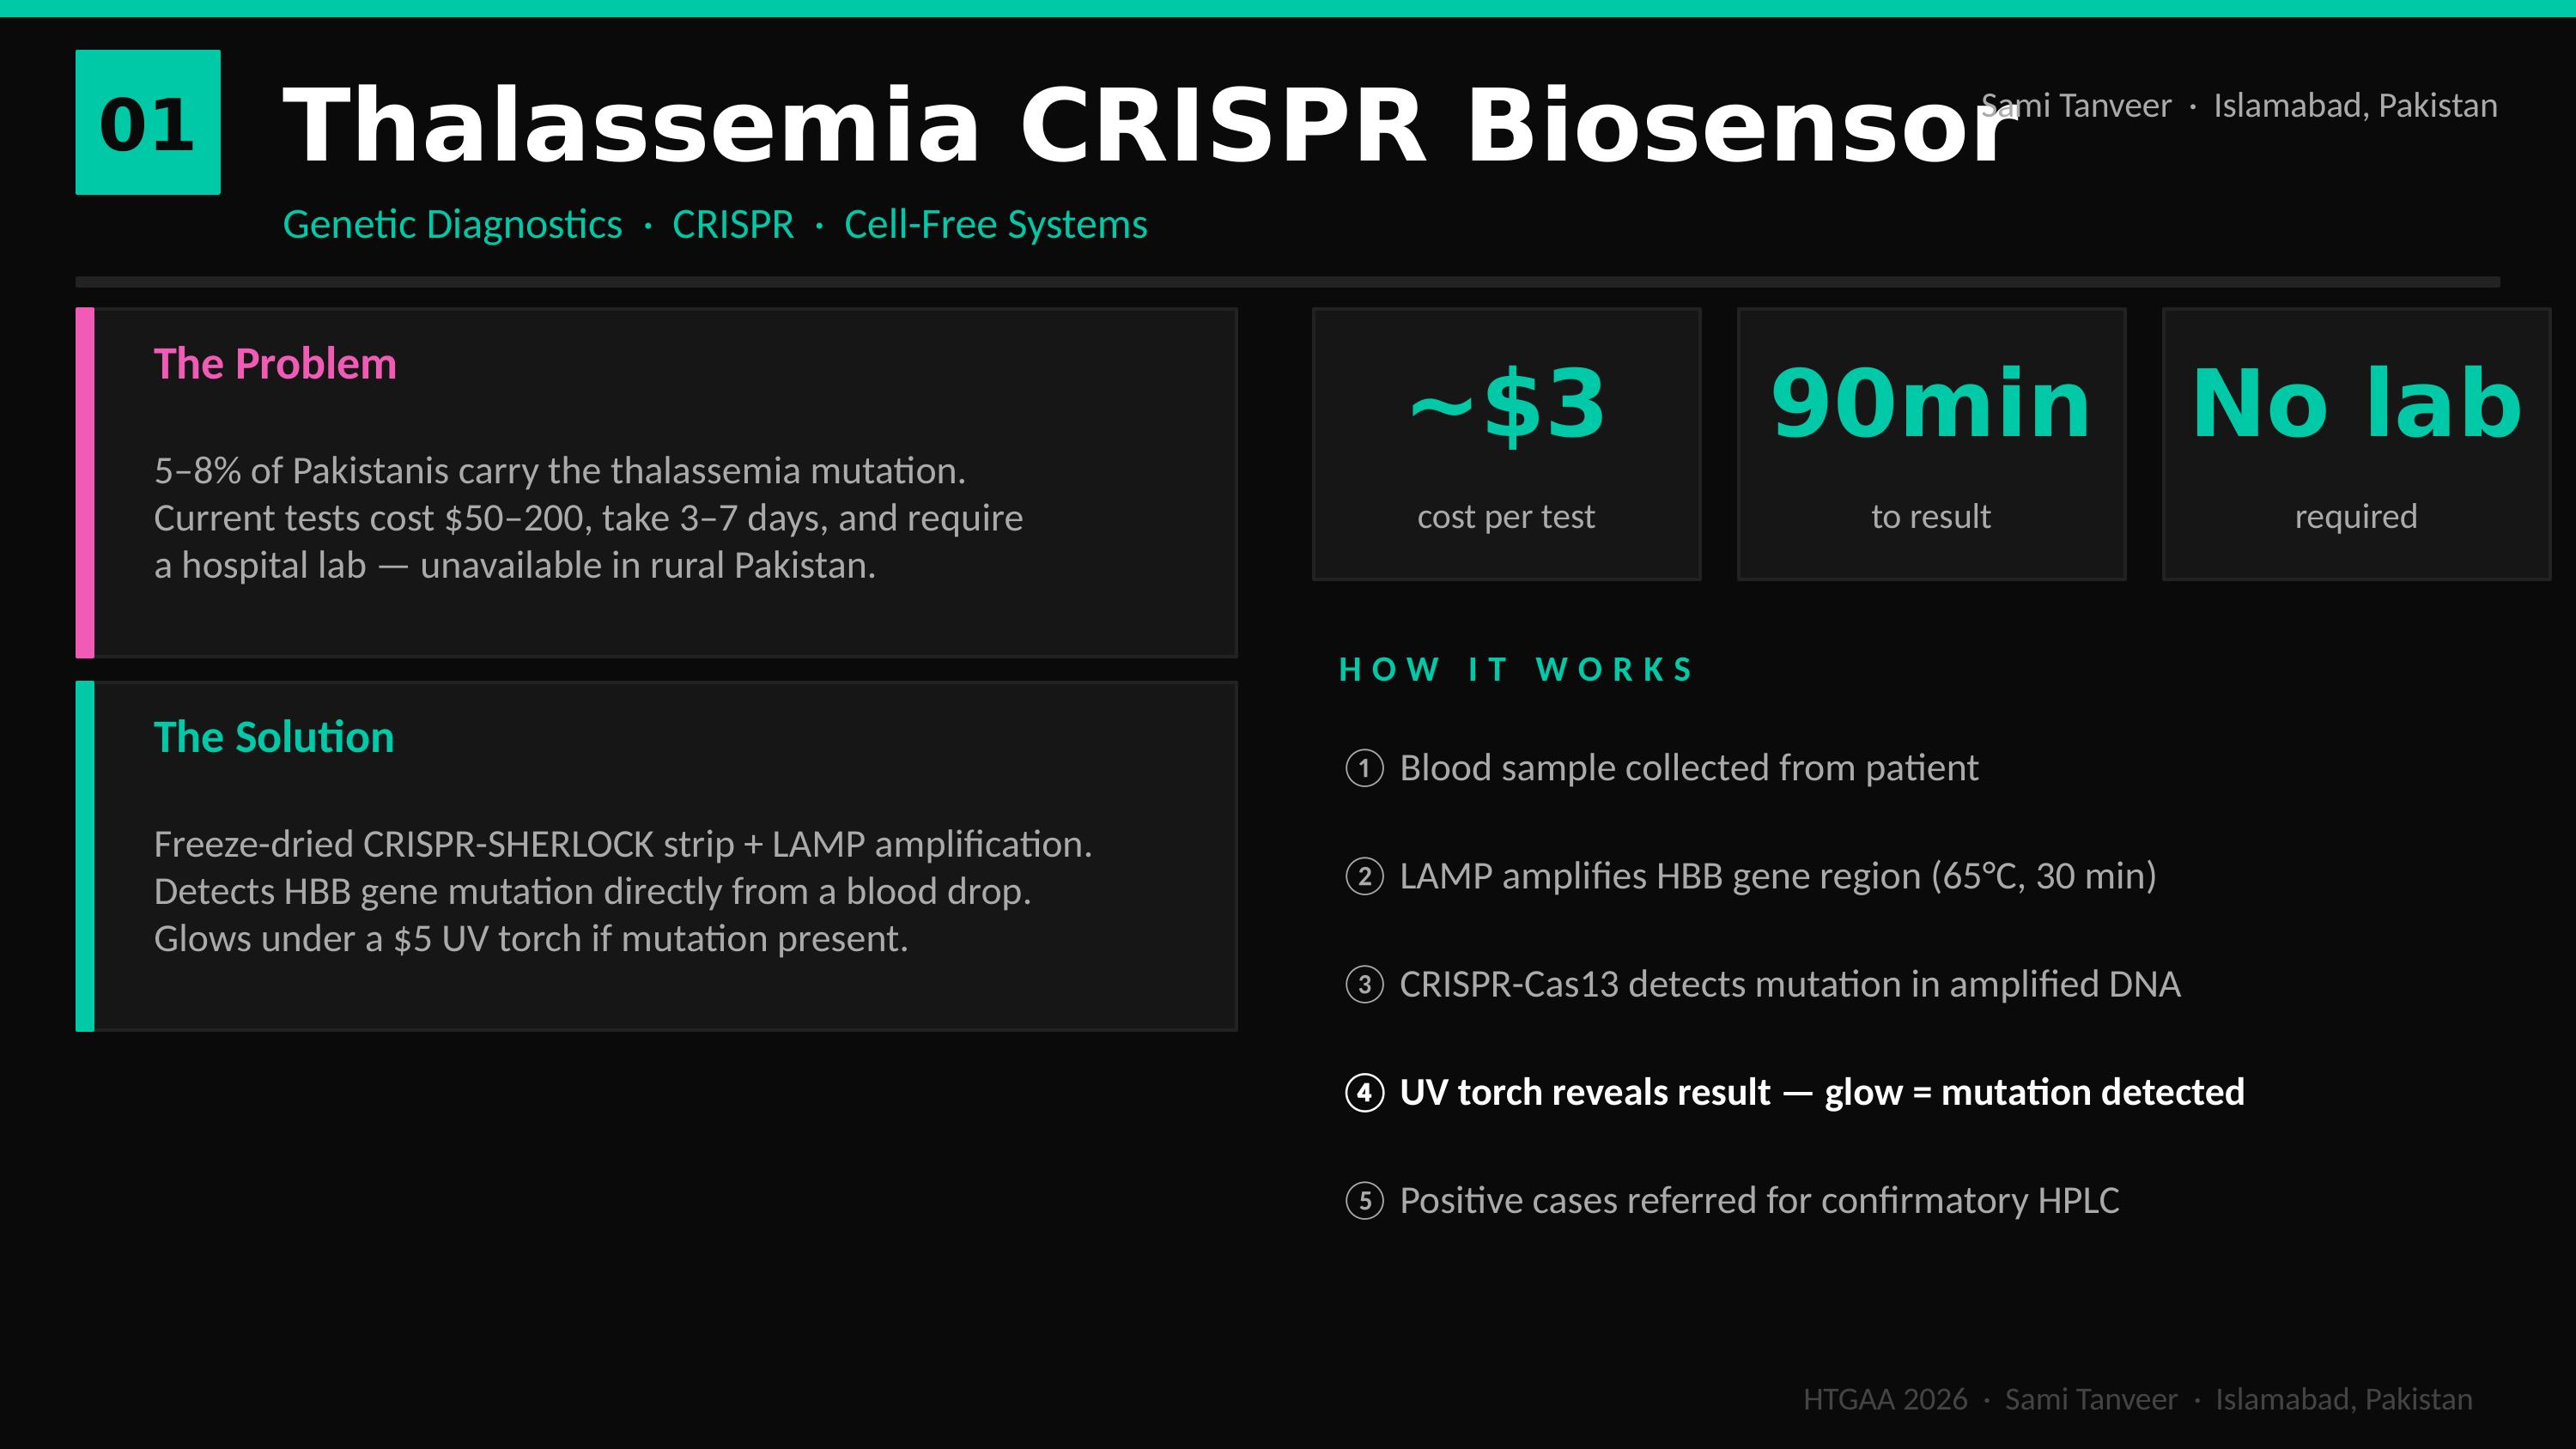
Q2: Final Project — Automated Thalassemia Biosensor
Motivation
Thalassemia is a critical public health burden in Pakistan (5–8% carrier rate). Current testing (HPLC/Sequencing) is centralized and expensive ($50–$200). My project aims to develop a $3, 90-minute portable biosensor validated via automated workflows.
Technical Workflow
DNA Extraction: Rapid lysis from patient blood.
LAMP Amplification: Isothermal amplification at 65°C, removing the need for thermal cyclers.
Cas13 Detection: Programmed with gRNA targeting common HBB mutations.
Visual Readout: Result visualized via UV torch (glow = positive).
3. Project Presentation Assets
This section visualizes the engineering roadmap and clinical justification for the Automated Thalassemia Biosensor. These assets bridge the gap between initial molecular design and high-throughput diagnostic implementation.
Slide 1: The Clinical Burden (Pakistan Context)
Strategic Context: Identifying the socio-economic barriers to thalassemia screening in Pakistan. This slide establishes the “Why” behind the project—replacing expensive, centralized testing with a $3 portable alternative tailored for rural health clinics.
Slide 2: Molecular Diagnostic Logic (SHERLOCK)
Technical Mechanism: Leveraging the Cas13 enzyme for programmable DNA detection. This slide details the transition from a patient sample to a visible fluorescent readout using the SHERLOCK protocol.
Slide 3: High-Throughput Automation Roadmap
Systems Engineering: A comprehensive plan for scaling validation. By utilizing the Ginkgo Nebula cloud laboratory (including the Echo acoustic handler and PHERAstar plate reader), we move from manual testing to a parallelized 384-well screening environment.
Experimental Design Hub: [Copy of HTGAA26 Opentrons Colab](./Copy of HTGAA26 Opentrons Colab)
AI Methodology
I utilized Claude (Anthropic) and Google Gemini for script optimization—specifically for refactoring coordinate lists into the draw_points batching logic and structuring the Ginkgo Nebula high-throughput workflow. All clinical objectives and molecular strategies are my original work.
HTGAA 2026: Protein Design Part I
Part A: Conceptual Questions — Protein Biochemistry & Design
These responses explore the molecular logic of protein structures, chirality, and the transition from abiotic chemistry to biological systems, reflecting the professional rigor required for pharmaceutical R&D.
Q1: Molecular Abundance in Nutrition
How many molecules of amino acids are in 500g of meat?
Meat is approximately 20% protein by weight (accounting for water and fat). In 500g of meat, there are roughly 100g of protein.
Calculation: Using the average amino acid mass of ~100 Daltons (100 g/mol):
Moles: 100g ÷ 100 g/mol = 1 mole. (Note: Using the 500g figure directly as per the prompt’s hint: 500g ÷ 100 g/mol = 5 moles).
Molecules: $5 \times 6.022 \times 10^{23} = \approx 3 \times 10^{24}$ molecules.
There are approximately 3 trillion trillion amino acid molecules in a single 500g serving.
Q2: Biological Identity & The Central Dogma
Why do humans eat beef but do not become a cow?
When we ingest animal proteins, our digestive proteases and peptidases break them down into individual amino acids. These monomers are absorbed into the bloodstream and used as universal building blocks. Our ribosomes then re-assemble these exact same amino acids according to the instructions in human DNA. The identity of a protein is determined by its sequence—encoded in our genome—not the dietary source of its constituent parts. Dietary protein is essentially just a source of amino acid monomers.
[Image of the human digestive system]
Q3: Why are there only 20 natural amino acids?
This reflects a combination of evolutionary, chemical, and informational constraints:
Genetic Coding: A 3-nucleotide codon system (4 bases) yields 64 possibilities—enough for 20 amino acids with built-in redundancy (the “frozen accident” hypothesis).
Chemical Diversity: These 20 provide a sufficient range of side-chain properties—charged, polar, nonpolar, aromatic—to build virtually any protein function.
Evolutionary Optimum: While non-standard amino acids (NSAAs) can be engineered in the lab (as seen in the Church lectures), the natural set represents a stabilized fitness optimum reached before the Last Universal Common Ancestor (LUCA).
Q5: Prebiotic Origins of Life
Where did amino acids come from before enzymes and life?
Amino acids likely arose through abiotic chemistry driven by high-energy sources:
Miller-Urey Synthesis: Demonstrated that simple inorganic molecules ($CH_4, NH_3, H_2O, H_2$) can form amino acids under simulated lightning/UV conditions.
Hydrothermal Vents: Alkaline vents provide mineral catalysts and thermal gradients that drive abiotic synthesis.
Extraterrestrial Input: Meteorites (e.g., the Murchison meteorite) contain over 70 amino acids, suggesting a potential role for panspermia.
Q7: Can you discover additional helices in proteins?
Yes. Beyond the standard α-helix, several other helical structures exist:
3₁₀ Helix: Tighter than α, with hydrogen bonds every 3 residues; often found at the ends of α-helices.
Q8: Chirality and Handedness
Why are most molecular helices right-handed?
This is dictated by the chirality of L-amino acids. Since all natural proteins are built from L-isomers, the geometry of backbone bond angles (φ and ψ) strongly favors the right-handed α-helix. A helix made from D-amino acids would be left-handed—the mirror image. Right-handedness became the biological default once early life settled on L-amino acids.
Q9 & Q10: β-Sheet Aggregation Dynamics
Why do β-sheets tend to aggregate, and what is the driving force?
Unlike α-helices, which satisfy their hydrogen bonding internally, β-sheets have “sticky” edges with exposed H-bond donors and acceptors.
Hydrogen Bonding: Edge strands form intermolecular H-bonds with neighboring sheets, extending the structure indefinitely.
Hydrophobic Effect: β-sheets often display hydrophobic side chains on one face. Burying these surfaces away from water provides an entropic gain, stabilizing the aggregate.
Together, these create a highly stable, self-reinforcing structure like those found in amyloid fibrils.
Q11: Amyloid Diseases and β-Sheets
Why do many amyloid diseases form β-sheets?
Amyloidosis occurs when normally soluble proteins misfold and expose hydrophobic regions or β-sheet-prone sequences. Once a small nucleus forms, it acts as a template to recruit and convert other proteins—a seeded aggregation mechanism. The resulting cross-β structures are thermodynamically “deep” energy minima, making them incredibly resistant to degradation and toxic to cells when they accumulate in tissues (e.g., Alzheimer’s or Parkinson’s).
Part B: Protein Analysis and Visualization — Human Hemoglobin (2HHB)
B1: Protein Description and Rationale
Human hemoglobin is a heterotetrameric protein responsible for oxygen transport in red blood cells. It consists of two α-globin and two β-globin chains, each harboring an iron-containing heme group. I chose β-globin (HBB) due to its clinical significance in northern Pakistan, where the Fr 8-9 (+G) frameshift mutation is highly prevalent. This mutation disrupts the primary sequence at codon 8-9, leading to a complete loss of functional β-globin and severe transfusion-dependent anemia.
Frequency Analysis: Using a Python-based frequency counter, I determined that the combined chains (288 AA) have Leucine (L) as the most frequent amino acid, appearing 37 times. This high leucine content is essential for maintaining the hydrophobic core that supports the heme pocket.
B4: Sequence Homologs
A UniProt BLAST search for P68871 identifies hundreds of homologs across the vertebrate lineage with E-values as low as $10^{-105}$. This confirms that the β-globin architecture is exceptionally conserved across evolutionary history, particularly within the primate family.
B5: Protein Family
β-globin belongs to the Globin family (Pfam: PF00042). Its structure is defined by the “Globin fold”—an 8-helix bundle. Key residues like the proximal histidine (His92) are conserved across the family to ensure stable iron coordination.
B6, B7 & B8: RCSB Structure and Quality
The analysis is based on PDB entry 2HHB, solved via X-ray diffraction at a resolution of 1.74 Å. This resolution is well below the 2.70 Å quality threshold, indicating high atomic precision.
Ligands: The structure contains four heme groups and two phosphate ions (PO₄). These cofactors are visible in the central pockets of each subunit.
B9: Structural Classification
Structural database annotations classify the chains as follows:
SCOPe: All Alpha Proteins → Globin-like fold → Globins.
Clinical Association: Pharos annotations link these subunits to β-thalassemia and malaria resistance.
B10: 3D Visualization (iCn3D Analysis)
I used iCn3D to explore the relationship between the protein’s fold and its chemical environment:
Representation
Structural Insight
Visualization
Ribbon (Secondary Structure)
Confirms a purely α-helical fold (magenta) with no β-sheets.
Hydrophobicity Surface
Shows hydrophobic residues (green) buried in the core and charged residues (grey) on the surface.
Atomic Detail
A Ball & Stick view showing the spatial arrangement of individual atoms and heme ligands.
Conclusion: The Fr 8-9 (+G) mutation studied here occurs in the A-helix. The Deep Mutational Scan (Heatmap) indicates that changes in this region are highly sensitive, suggesting that the frameshift mutation likely destabilizes the entire initial fold of the protein.
Part C: ML-Based Protein Design Tools
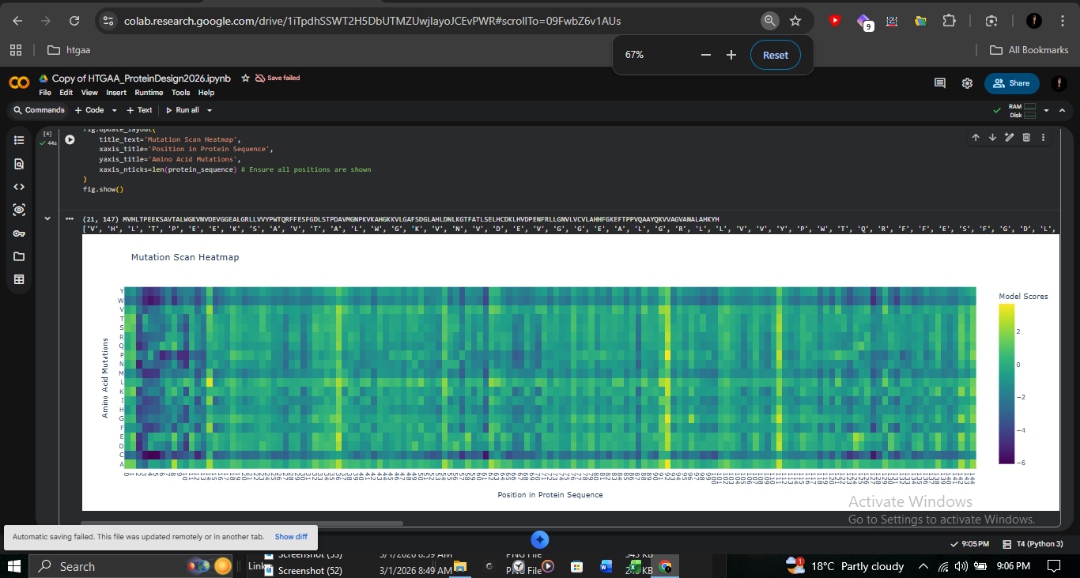
C1: Deep Mutational Scan
The ESM2 deep mutational scan (147 residues × 20 amino acids) reveals a striking pattern of conservation across the β-globin chain. Dark purple regions (score ~-6) indicate positions where mutations are strongly disfavored, particularly those lining the heme-binding pocket.
Proximal Histidine (His92): Directly coordinates the heme iron and is shown as nearly irreplaceable.
A-Helix (Positions 8-9): The site of the Fr 8-9 (+G) frameshift mutation shows high conservation. Any disruption here propagates downstream, explaining the severity of this mutation in northern Pakistan.
Sickle Cell (HbS): At position 6 (Glu→Val), Valine receives a moderately negative score. ESM2 considers it unfavorable but not catastrophic, consistent with the viability of heterozygous carriers.
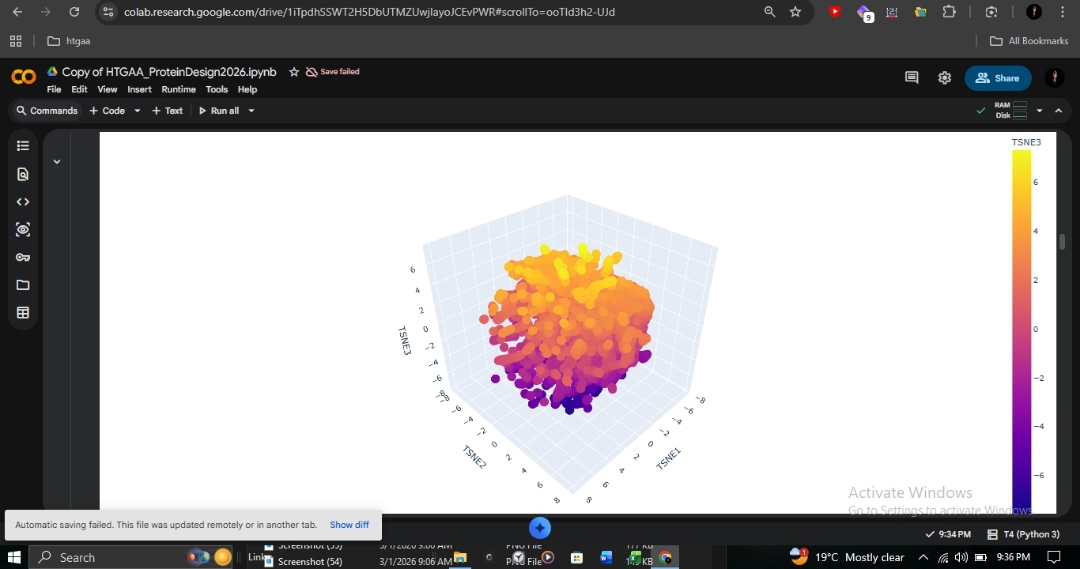
C1: Latent Space Analysis
This 3D t-SNE visualization of ~15,000 protein sequences from the SCOP database (40% identity filtered) shows clear organization. The dense central cluster represents the most common structural folds. As an ancient and highly conserved architecture, human β-globin clusters within this dense core alongside other all-alpha globin-fold proteins such as myoglobin and neuroglobin.
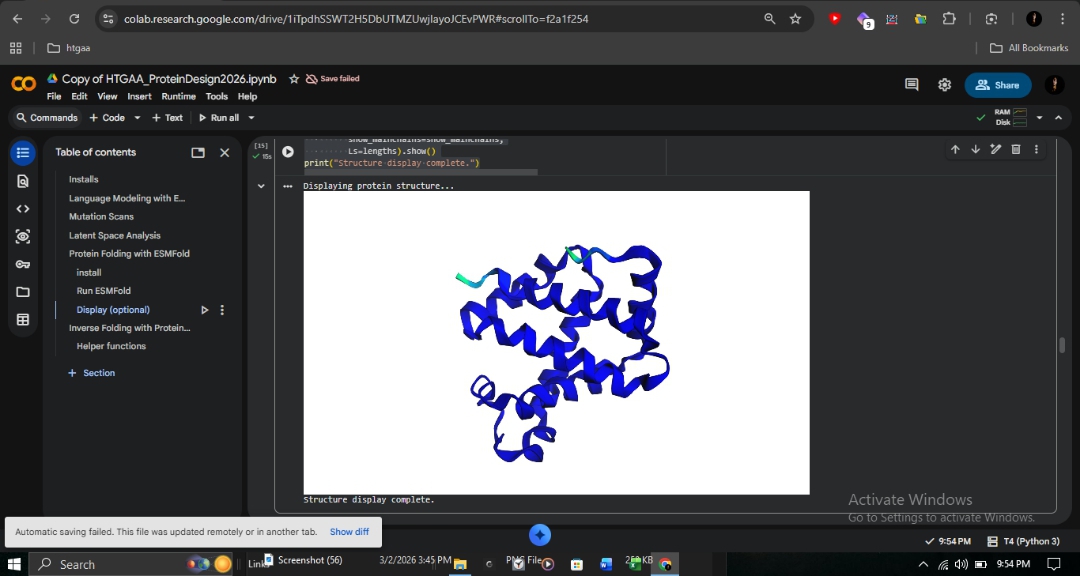
C2: Protein Folding with ESMFold
I utilized ESMFold to predict the structural resilience of the β-globin chain.
Sequence Type
pTM Score
pLDDT
Structural Observation
Wild-Type
0.901
94.128
High-confidence 8-helix globin bundle.
Sickle Cell (E6V)
0.902
94.220
Virtually identical to wild-type.
R&D Insight: The identical scores for E6V confirm that Sickle Cell disease is caused by intermolecular polymerization on the protein surface, rather than individual chain misfolding. ESMFold accurately predicts the fold but cannot detect these subtle protein-protein interactions. This contrasts sharply with the Fr 8-9 (+G) frameshift, which destroys the entire protein reading frame from position 9 onward.
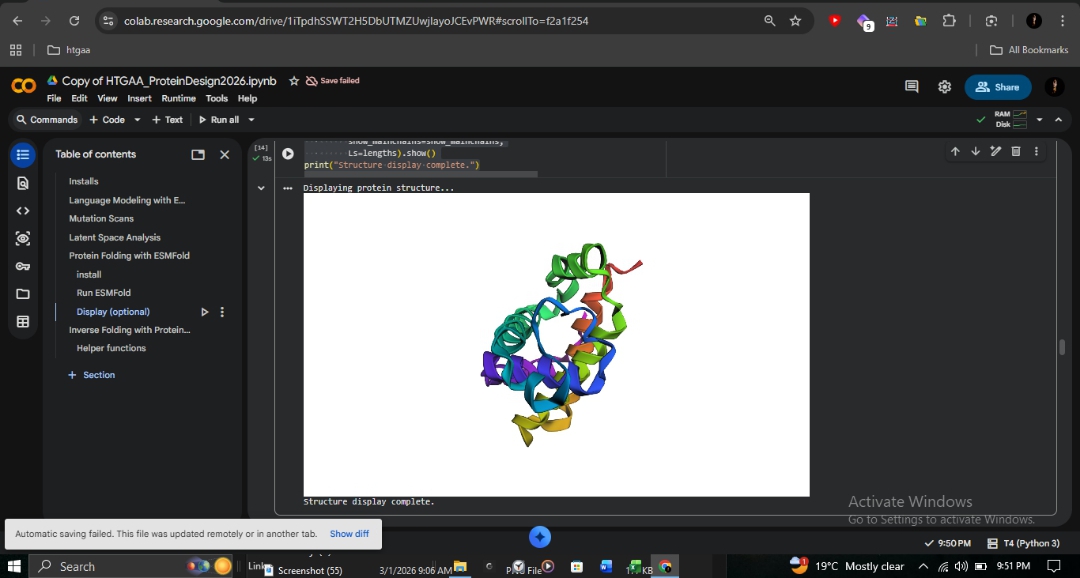
C3: Inverse Folding with ProteinMPNN
Using the 2HHB crystal structure backbone, I used ProteinMPNN to design a novel sequence for the β-globin fold.
Native Score: 1.4438
Designed Score: 0.8518 (Lower is better; indicates a more optimal fit to the backbone).
Sequence Recovery:50.00%.
Designed Sequence:MDLTEEEKALILSLWKKVDIEEIGAETMSKLLIDYPETQKYFKHFGDLSTPEAIKNNPLVKKHGAIVMTGLYEALKHLDDLDGFLAEASKIHNEKLKIDPKIFKLFGEVLLEVLKEKFGEEFTPERQAAFKKVMEGVAKALASKYK
Validation with ESMFold:
Folding the designed sequence yielded a pTM of 0.892 and pLDDT of 92.004. Despite 50% sequence divergence, the model successfully maintained the globin bundle architecture.
Conclusion: This demonstrates that structure is more conserved than sequence. The β-globin backbone geometry encodes enough information to constrain roughly half the sequence, while the remaining positions allow for variation without disrupting the fold. This validates ProteinMPNN for engineering stable hemoglobin variants for therapeutic research.
Part D – Brainstorm: Engineering the MS2 Lysis (L) Protein
(Completed Individually)
Note: Due to the disruption of my daily routine during Ramadan, I was unable to coordinate effectively with a group. This proposal was developed independently to fulfill the research requirements.
Part D – Brainstorm: Engineering the MS2 Lysis (L) Protein
(Completed Individually)
Note: Due to the disruption of my daily routine during Ramadan, I was unable to coordinate effectively with a group. This proposal was developed independently to fulfill the research requirements.
1. Chosen Engineering Goals
Goal 1: Increase the structural stability of the MS2 L protein to enhance intracellular persistence.
Goal 2: Modulate the interaction with the host chaperone DnaJ to alter or reduce host dependency.
2. Background and Rationale
The MS2 L protein is a small (~75 AA) lysis protein responsible for host cell death in Escherichia coli. Unlike classical endolysins, its function is non-enzymatic and depends on the host’s machinery.
DnaJ Interaction: Functionality is dependent on the host chaperone DnaJ, particularly through the basic N-terminal domain. Truncation studies suggest DnaJ may assist in targeting or folding rather than being the ultimate toxic target.
Structural Constraints: Loss-of-function mutations cluster near a conserved Leu-Ser (LS) motif. The C-terminal region forms an amphipathic transmembrane helix that drives oligomerization and membrane insertion.
3. Proposed Computational Strategy
Goal 1 – Increase Protein Stability
Improving structural stability could enhance lytic efficiency and persistence within the host.
Approach:
Structure Prediction: Predict the wild-type MS2 L structure using AlphaFold2.
Structural Audit: Use PyMOL/Chimera to identify the transmembrane helix and map the conserved LS motif.
In Silico Mutagenesis: Perform systematic single-residue substitutions at non-critical positions.
Stability Scoring: Evaluate predicted changes in free energy ($\Delta\Delta G$) using HTGAA stability prediction resources.
Validation: Re-model variants to ensure the transmembrane helix remains structurally viable.
Goal 2 – Modify DnaJ Interaction
Modifying the N-terminal interface allows us to explore lysis mechanisms that are independent of specific host chaperones.
Approach:
Complex Prediction: Predict an MS2 L–DnaJ complex using AlphaFold-Multimer.
Interface Mapping: Identify interface residues using PyMOL or Chimera to locate electrostatic and hydrophobic contact points.
Interface Design: Design mutations to alter complementarity or remove key contact residues.
Evaluation: Assess if DnaJ dependence can be reduced while maintaining membrane insertion capacity.
4. Proposed Pipeline
Sequence Input: Wild-type MS2 L sequence.
Modeling: Structure prediction via AlphaFold2.
Inspection: Visualization in PyMOL / Chimera / NGLViewer.
Design: Mutational design focused on stability and interface residues.
Scoring: Stability/interface scoring using HTGAA computational tools.
Selection: Ranking and selection of top candidates for experimental testing.
5. Potential Pitfalls
Prediction Accuracy: AlphaFold accuracy may be limited for small, membrane-associated proteins with few homologs.
Stability vs. Activity: Over-stabilization could reduce the conformational flexibility required for effective membrane disruption.
Mechanism Uncertainty: The exact mechanism of toxicity is still being characterized, which limits the predictive certainty of current models.
6. AI Disclosure
Transparency Statement: Artificial Intelligence (AI) was utilized extensively in the preparation of this documentation. Specifically, Gemini was used for structural analysis synthesis, Markdown formatting, and code optimization. Claude provided critical guidance and conceptual troubleshooting through the technical analysis in Section C. All AI-generated content was reviewed, verified for technical accuracy against the 2HHB crystal structure and UniProt data, and edited by the author to ensure scientific rigor.
Week 7 Homework — Genetic Circuits Part II: Neuromorphic Circuits
Part 1: Intracellular Artificial Neural Networks (IANNs)
Q1. What advantages do IANNs have over traditional genetic circuits whose input/output behaviors are Boolean functions?
Traditional genetic circuits implement Boolean logic — outputs are strictly binary (gene ON or gene OFF). IANNs offer several key advantages over this approach.
First, IANNs produce analog, continuous outputs proportional to input signal strength, allowing nuanced regulation based on the level of a signal rather than just its presence or absence. Second, each input can be assigned a weight via promoter strength, RBS efficiency, or RNA stability, so the cell can differentially prioritize signals — something impossible with standard Boolean gates. Third, IANNs can classify complex, high-dimensional input combinations that would require exponentially many Boolean gates to approximate. Fourth, weights can be tuned synthetically or evolutionarily to change circuit behavior without rewiring the topology. Finally, analog computation with soft thresholds is more robust to stochastic gene expression noise than hard Boolean switching, which is especially important given the inherently noisy environment of a living cell.
Q2. Describe a useful application for an IANN, including detailed input/output behavior and limitations.
Application: Intracellular cancer cell classifier
Goal: Program a therapeutic cell to detect whether it resides inside a cancer cell and trigger selective apoptosis only when the cancer-specific molecular signature is detected.
Inputs:
X₁ = intracellular miR-21 concentration (an oncomiR elevated in many cancers)
X₂ = p53 mRNA level (a tumor suppressor depleted in many cancers)
Input/output behavior: Layer 1 weights X₁ positively and X₂ negatively. The perceptron fires — producing an intermediate transcription factor — only when miR-21 is high AND p53 is low, which constitutes the cancer-specific signature. Layer 2 translates that transcription factor output into a pro-apoptotic protein such as a caspase activator. The output is continuous and graded: low basal expression occurs in normal cells, while high expression (leading to cell death) occurs in cancer cells. The analog nature of the IANN allows partial activation at borderline signal levels rather than crashing to a binary output, giving the circuit proportional rather than all-or-nothing behavior.
Limitations:
Off-target activation may occur in normal cells with transiently elevated miR-21, for example during inflammation. There is also a delivery challenge: the IANN construct must reach every target cell. Weight tuning in vivo is not yet routine — circuit parameters must be designed computationally and validated empirically before deployment. Finally, the metabolic burden of maintaining the circuit may impair host cell fitness over time.
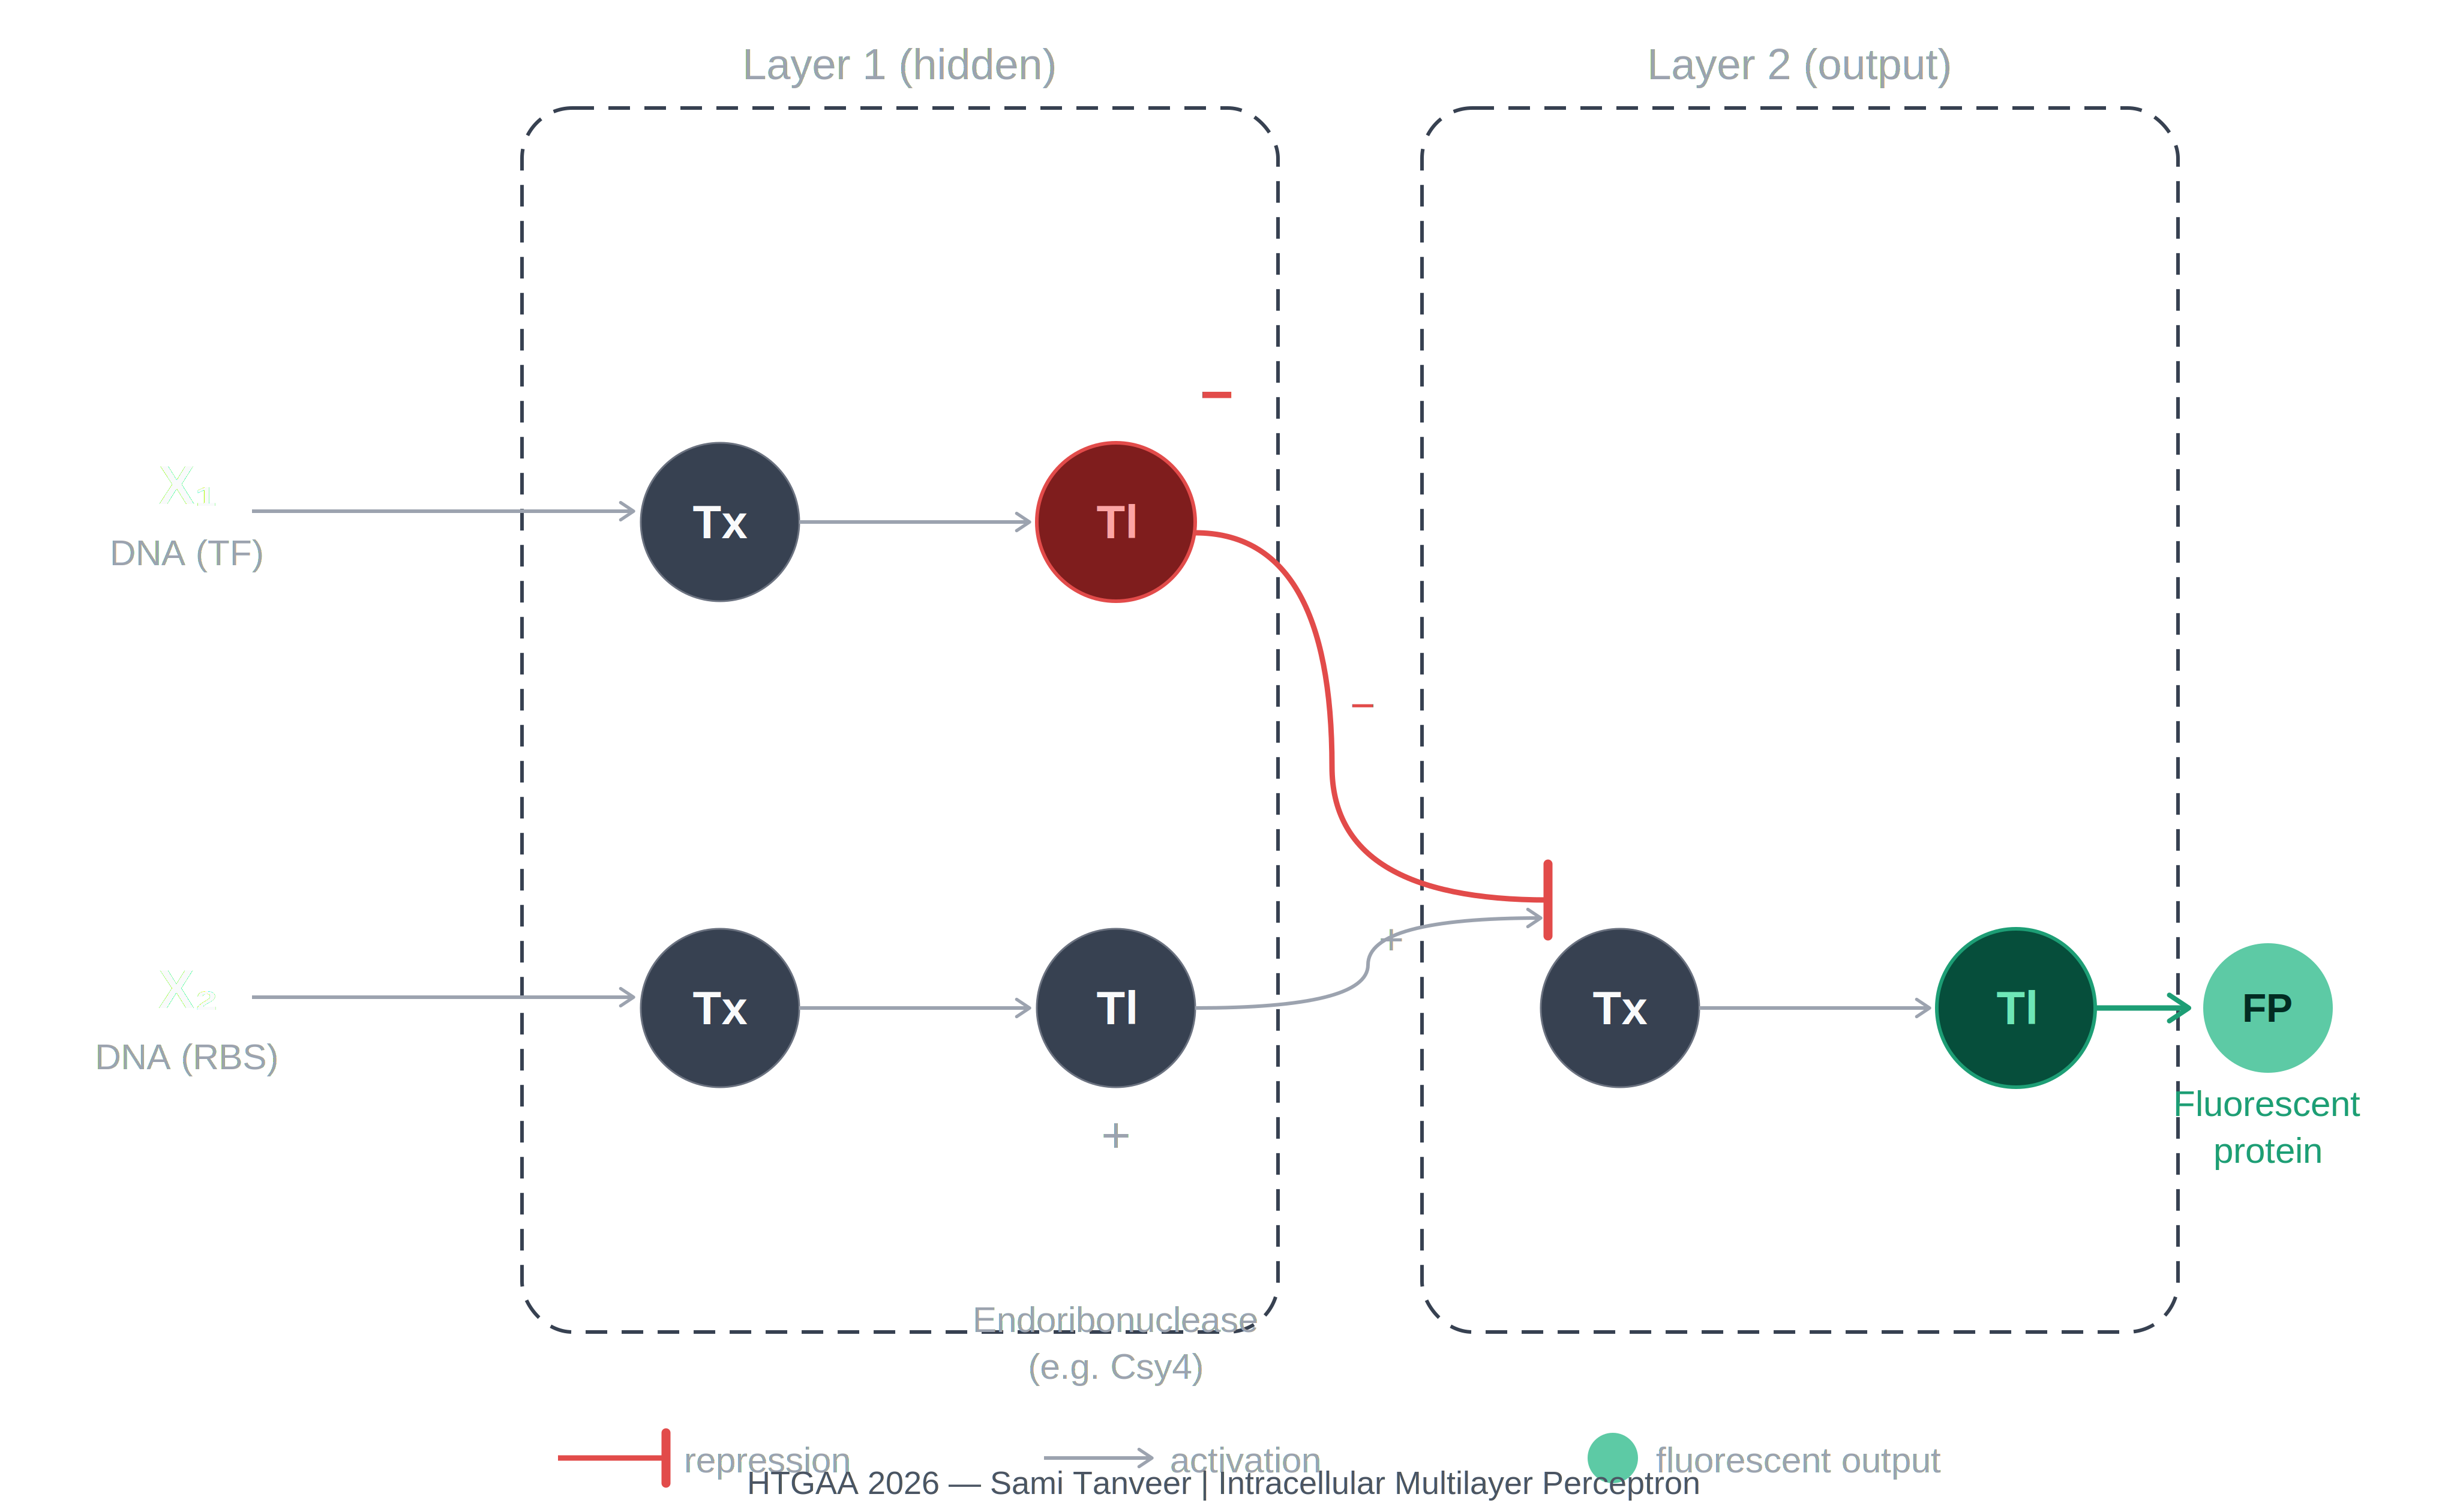
Q3. Multilayer perceptron diagram
The diagram depicts an intracellular two-layer perceptron extending the single-layer architecture shown in the assignment reference image (1774856540029_image.png).
Layer 1 — hidden layer:
X₁ (DNA encoding a transcription factor) undergoes Tx → Tl and produces Csy4 endoribonuclease, represented as the red inhibitory node. X₂ (DNA encoding a regulatory element) undergoes Tx → Tl and produces an activating signal represented as the gray positive node. Csy4 carries a repression signal (−) forward into Layer 2.
Layer 2 — output layer:
The layer receives the repression signal from Csy4 (−) and the activation signal from the X₂ branch (+). These are integrated at the Layer 2 Tx node. The downstream Tl step produces the fluorescent protein output, represented as the teal circle (FP). The fluorescent protein is expressed only when the repression from Csy4 is absent or outweighed by the activating input from X₂.
The key difference from the single-layer perceptron is the insertion of the endoribonuclease as a tunable hidden-layer node that integrates Layer 1 signals before passing a regulatory output to Layer 2, enabling more complex input-output computation than a single weighted integration step.
Part 2: Fungal Materials
Q1. Examples of existing fungal materials, their uses, advantages, and disadvantages over traditional counterparts
Mycelium — the vegetative, thread-like root network of fungi — is the basis for most current fungal biomaterials.
Mycelium composites (e.g., Ecovative Mylo, Bolt Threads): Used as packaging foam replacements and leather-like textiles. The mycelium is grown on agricultural waste substrates such as corn stalks or hemp hurds, then heat-killed to stop growth, producing a rigid or flexible material depending on processing. These are fully biodegradable, carbon-negative to produce, require low energy manufacturing, contain no petrochemicals, and can be grown into near-net shapes to reduce waste. Their disadvantages include lower mechanical strength and water resistance compared to synthetic foams or conventional leather, inconsistent properties between batches, and currently higher cost than conventional materials at scale.
Fungal-derived chitosan: Extracted from fungal cell walls of species such as Aspergillus and Rhizopus, used in wound dressings, food preservatives, and water treatment. It provides a renewable source that avoids the shellfish allergen concerns of crustacean-derived chitosan and has useful antimicrobial properties. However, fungal chitosan has lower molecular weight than crustacean-derived chitosan, which reduces viscosity and film-forming performance in some applications.
Mycelium biocomposites for construction: Experimental building insulation panels and structural bricks grown from mycelium combined with hemp or straw substrates. These are compostable at end of life, fire-resistant, and offer good acoustic and thermal insulation properties that can be grown locally from agricultural waste. They are not yet load-bearing at scale, are sensitive to moisture, and require sterile growth conditions during production.
Q2. What would you engineer fungi to do, and what are the advantages of synthetic biology in fungi over bacteria?
Engineering targets:
I would engineer filamentous fungi — specifically Aspergillus niger or Trichoderma reesei — to produce self-healing mycelium composites. The design would use stretch-sensitive promoters to detect mechanical damage and upregulate chitin synthase and cell wall repair genes, allowing the material to patch cracks autonomously. A second goal would be engineering mycelium to incorporate conductive nanoparticles during growth, producing biodegradable flexible electronics substrates that could replace conventional PCB materials.
Advantages of synthetic biology in fungi over bacteria:
Fungi perform eukaryotic post-translational processing including glycosylation, disulfide bonding, and complex protein folding that bacteria cannot, making them superior for producing functional complex proteins and enzymes. Filamentous fungi like Trichoderma are natural high-yield protein secretors — industrial strains already produce grams per liter of cellulase, a capacity bacteria cannot match without extensive engineering. Fungi also have large genomes with rich secondary metabolite pathways including polyketides, terpenes, and alkaloids, offering a broader toolkit for novel chemistry. Critically, mycelium naturally forms macroscale three-dimensional architectures, meaning engineering the material properties of a mycelium composite operates at the organism level rather than just the molecular level — something bacteria cannot replicate without significant external scaffolding. Finally, many fungi including Aspergillus and Saccharomyces hold Generally Recognized As Safe (GRAS) status, simplifying regulatory pathways for food and medical applications.
Part 3: First DNA Twist Order
Q1. Documentation guidelines review
Individual Final Project documentation guidelines reviewed. ✓
Draft Aim 1: Design and validate a toehold switch riboregulator detecting the Fr 8-9 (+G) HBB frameshift mutation using a CFPS platform, confirmed by sfGFP fluorescence with synthetic trigger RNA as positive control and wild-type HBB mRNA as negative control
Final project summary: submitted (see form document)
HTGAA industry council selections: Twist Biosciences, Ginkgo Bioworks, New England Biolabs, Thermo Fisher Scientific, SecureDNA
Submitted prior to the March 20 deadline for MIT/Harvard/Wellesley students. ✓
Q3. DNA Design — Insert sequence and backbone vector
Project context: My individual final project is a cell-free toehold switch biosensor for detecting the HBB Fr 8-9 (+G) frameshift mutation associated with β-thalassemia, designed for point-of-care use in low-resource settings in northern Pakistan.
Sequences designed (Benchling — HTGAA 2026 Beta Thalassemia Diagnostic project):
Three sequences were designed and deposited:
HBB_Fr8-9_plusG_trigger_30nt — the 30-nucleotide synthetic trigger RNA corresponding to the mutant HBB Fr 8-9 (+G) mRNA sequence, used as positive control
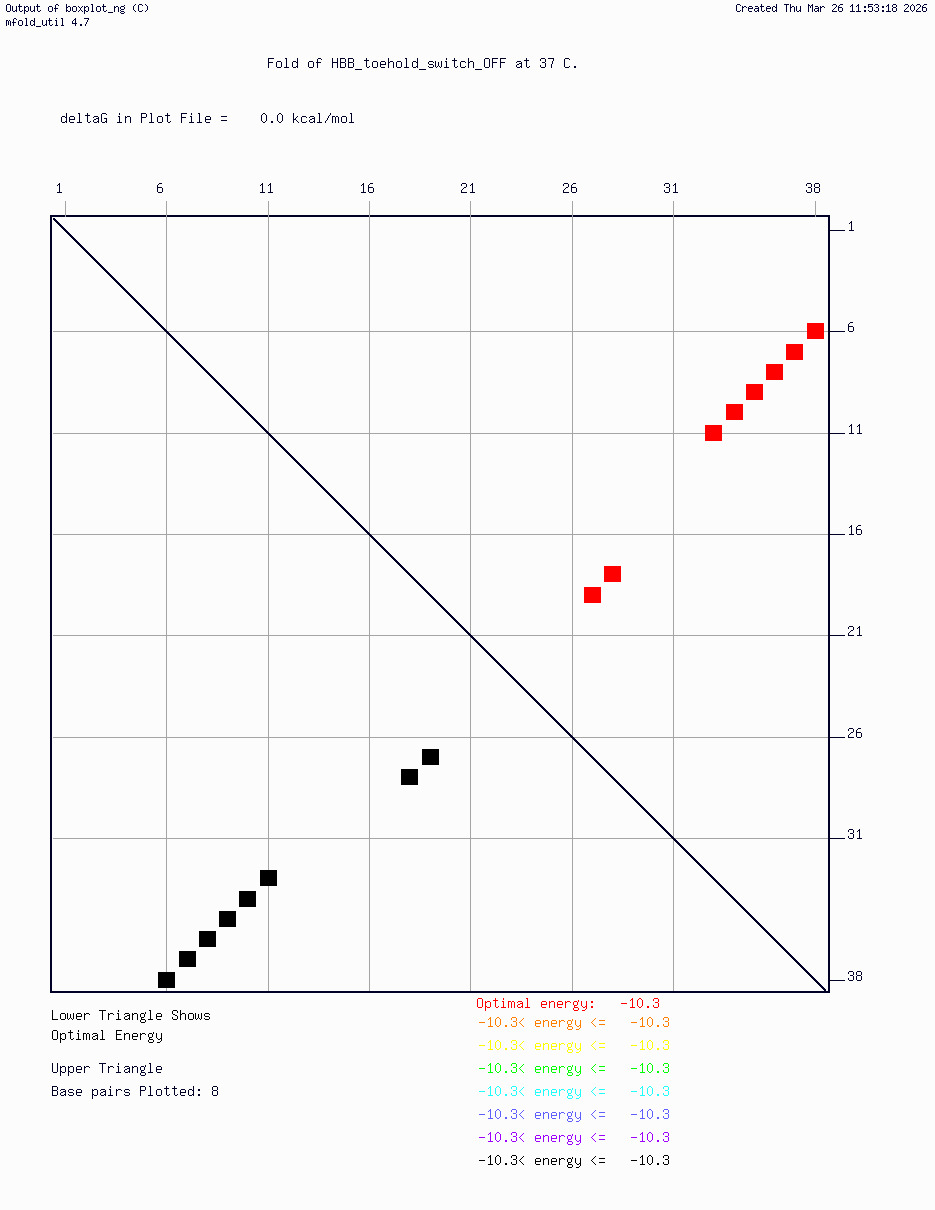
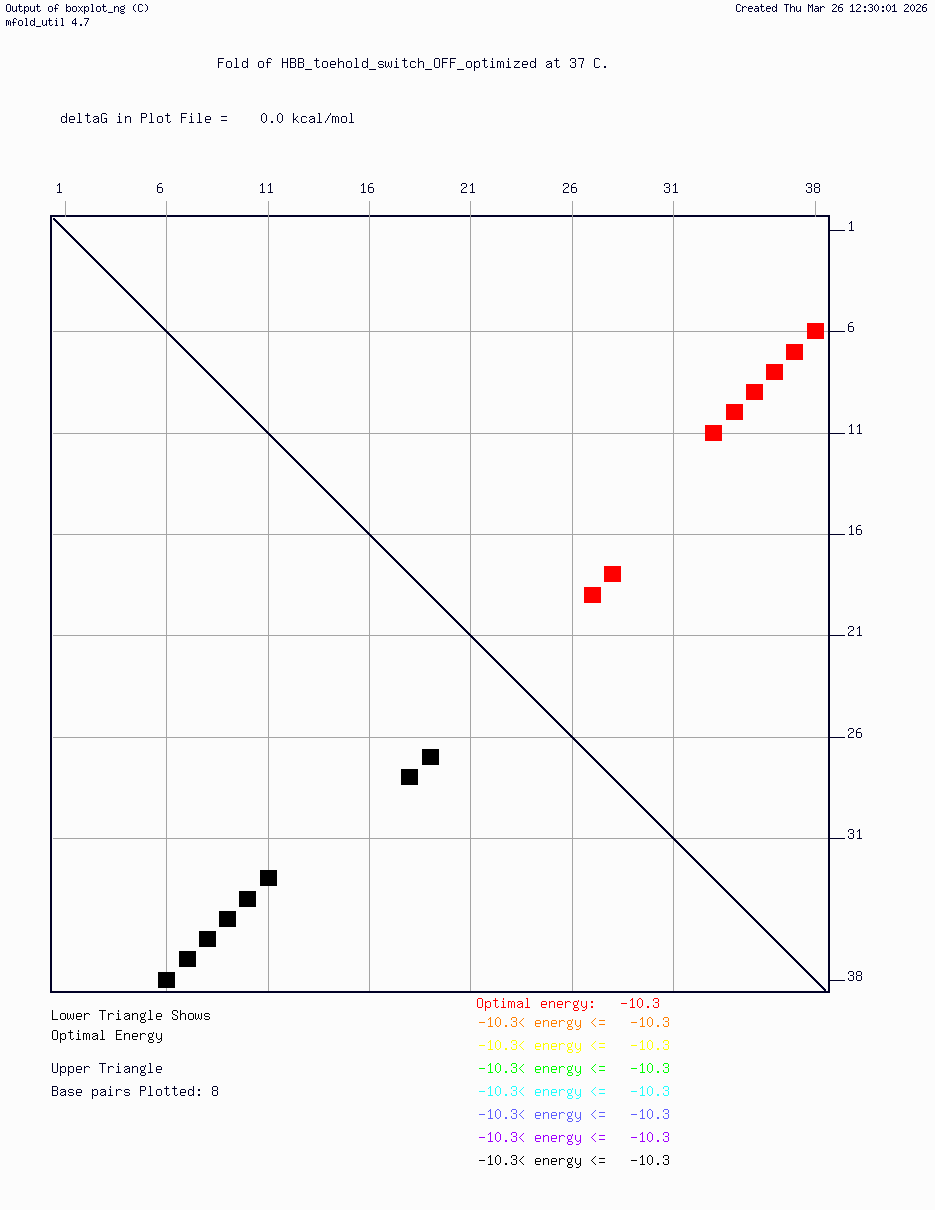
HBB_toehold_switch_sfGFP_construct — the full toehold switch construct (v1) comprising the trigger-binding toehold region, hairpin loop with embedded RBS, and sfGFP reporter
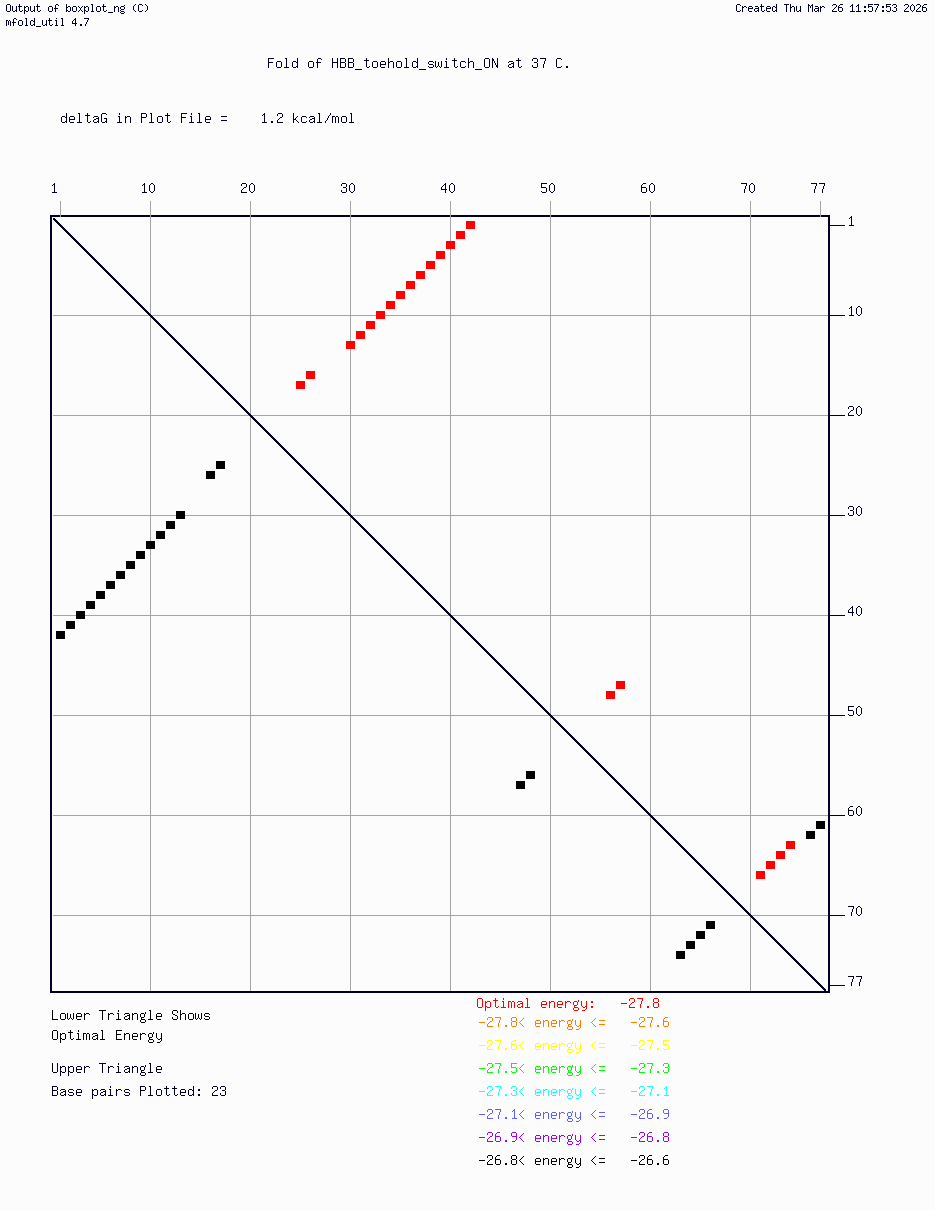
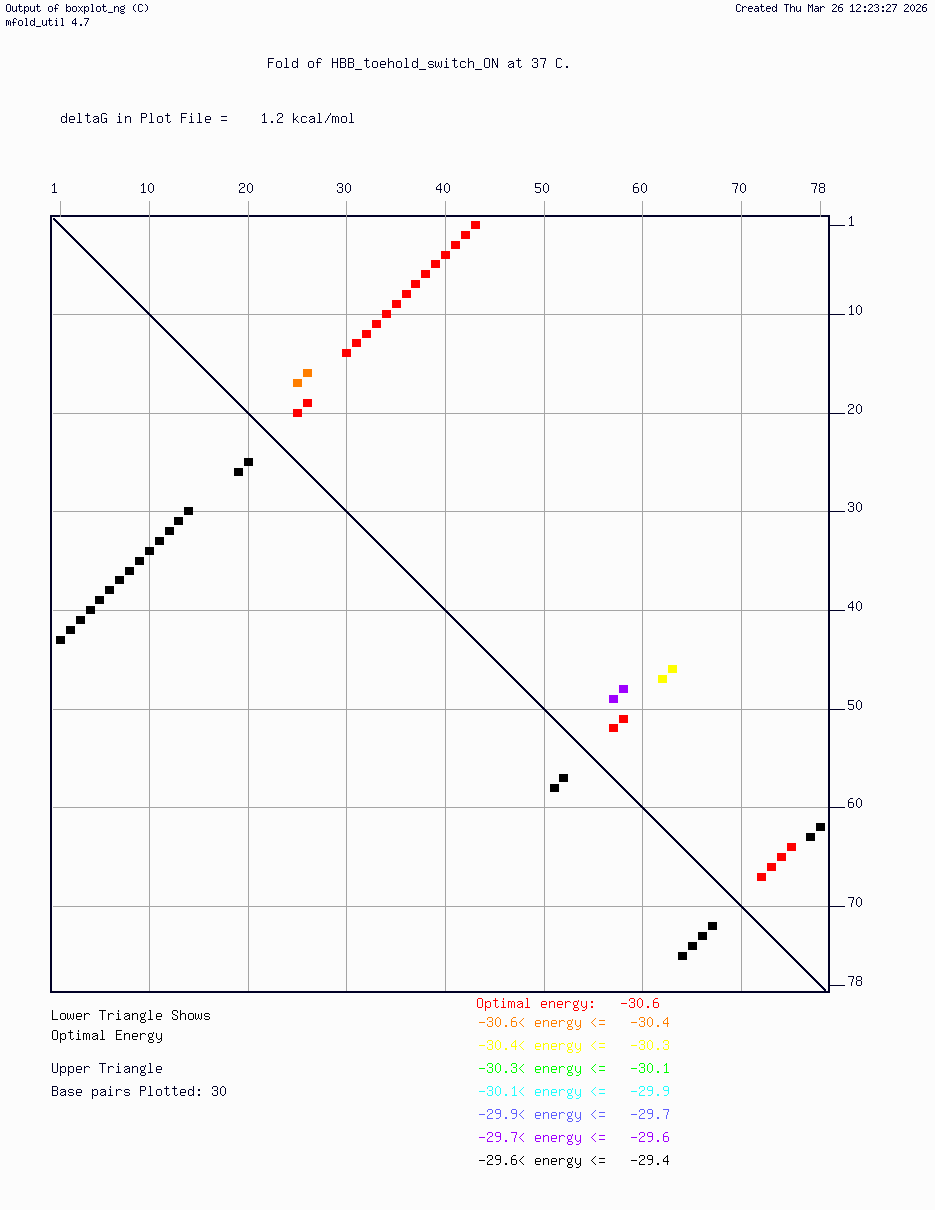
HBB_Fr8-9_plusG_toehold_sfGFP_Version2 — iterated v2 construct following secondary structure validation at 37°C using mfold/UNAFold, confirming hairpin formation in the absence of trigger and RBS exposure upon trigger binding
Computational validation:
Secondary structure modeling was performed at 37°C using UNAFold/mfold. Results confirmed correct hairpin formation in the absence of the trigger sequence and predicted RBS exposure upon trigger binding in silico. The v2 construct was selected for Twist submission based on improved predicted folding fidelity over v1.
Backbone vector:
The insert is to be synthesized in pTwist Amp High Copy, the same backbone used in the Week 2 GFP expression cassette (Promoter J23106 + RBS B0034 + insert + Terminator B0015). This is documented on the HTGAA website under the beta-thalassemia biosensor project page.
Expression system: Cell-free (CFPS)
DNA order delivery: Ginkgo Bioworks cloud laboratory
Sequences submitted to Twist Bioscience via the HTGAA shared submission pipeline. ✓


_1.png)
_1.png)
_1.png)
_1.png)
_1.png)
_1.png)
_1.png)