Week 06 HW -Genetic Circuits Part I: Assembly Technologies
‘Week 6 — Genetic Circuits Part I: Assembly Technologies’
Documentation
Homework: Genetic Circuits Part I: Assembly Technologies
Assignment: DNA Assembly
Answer these questions about the protocol in this week’s lab:
https://www.youtube.com/watch?v=c07_5BfIDTw&t=115s
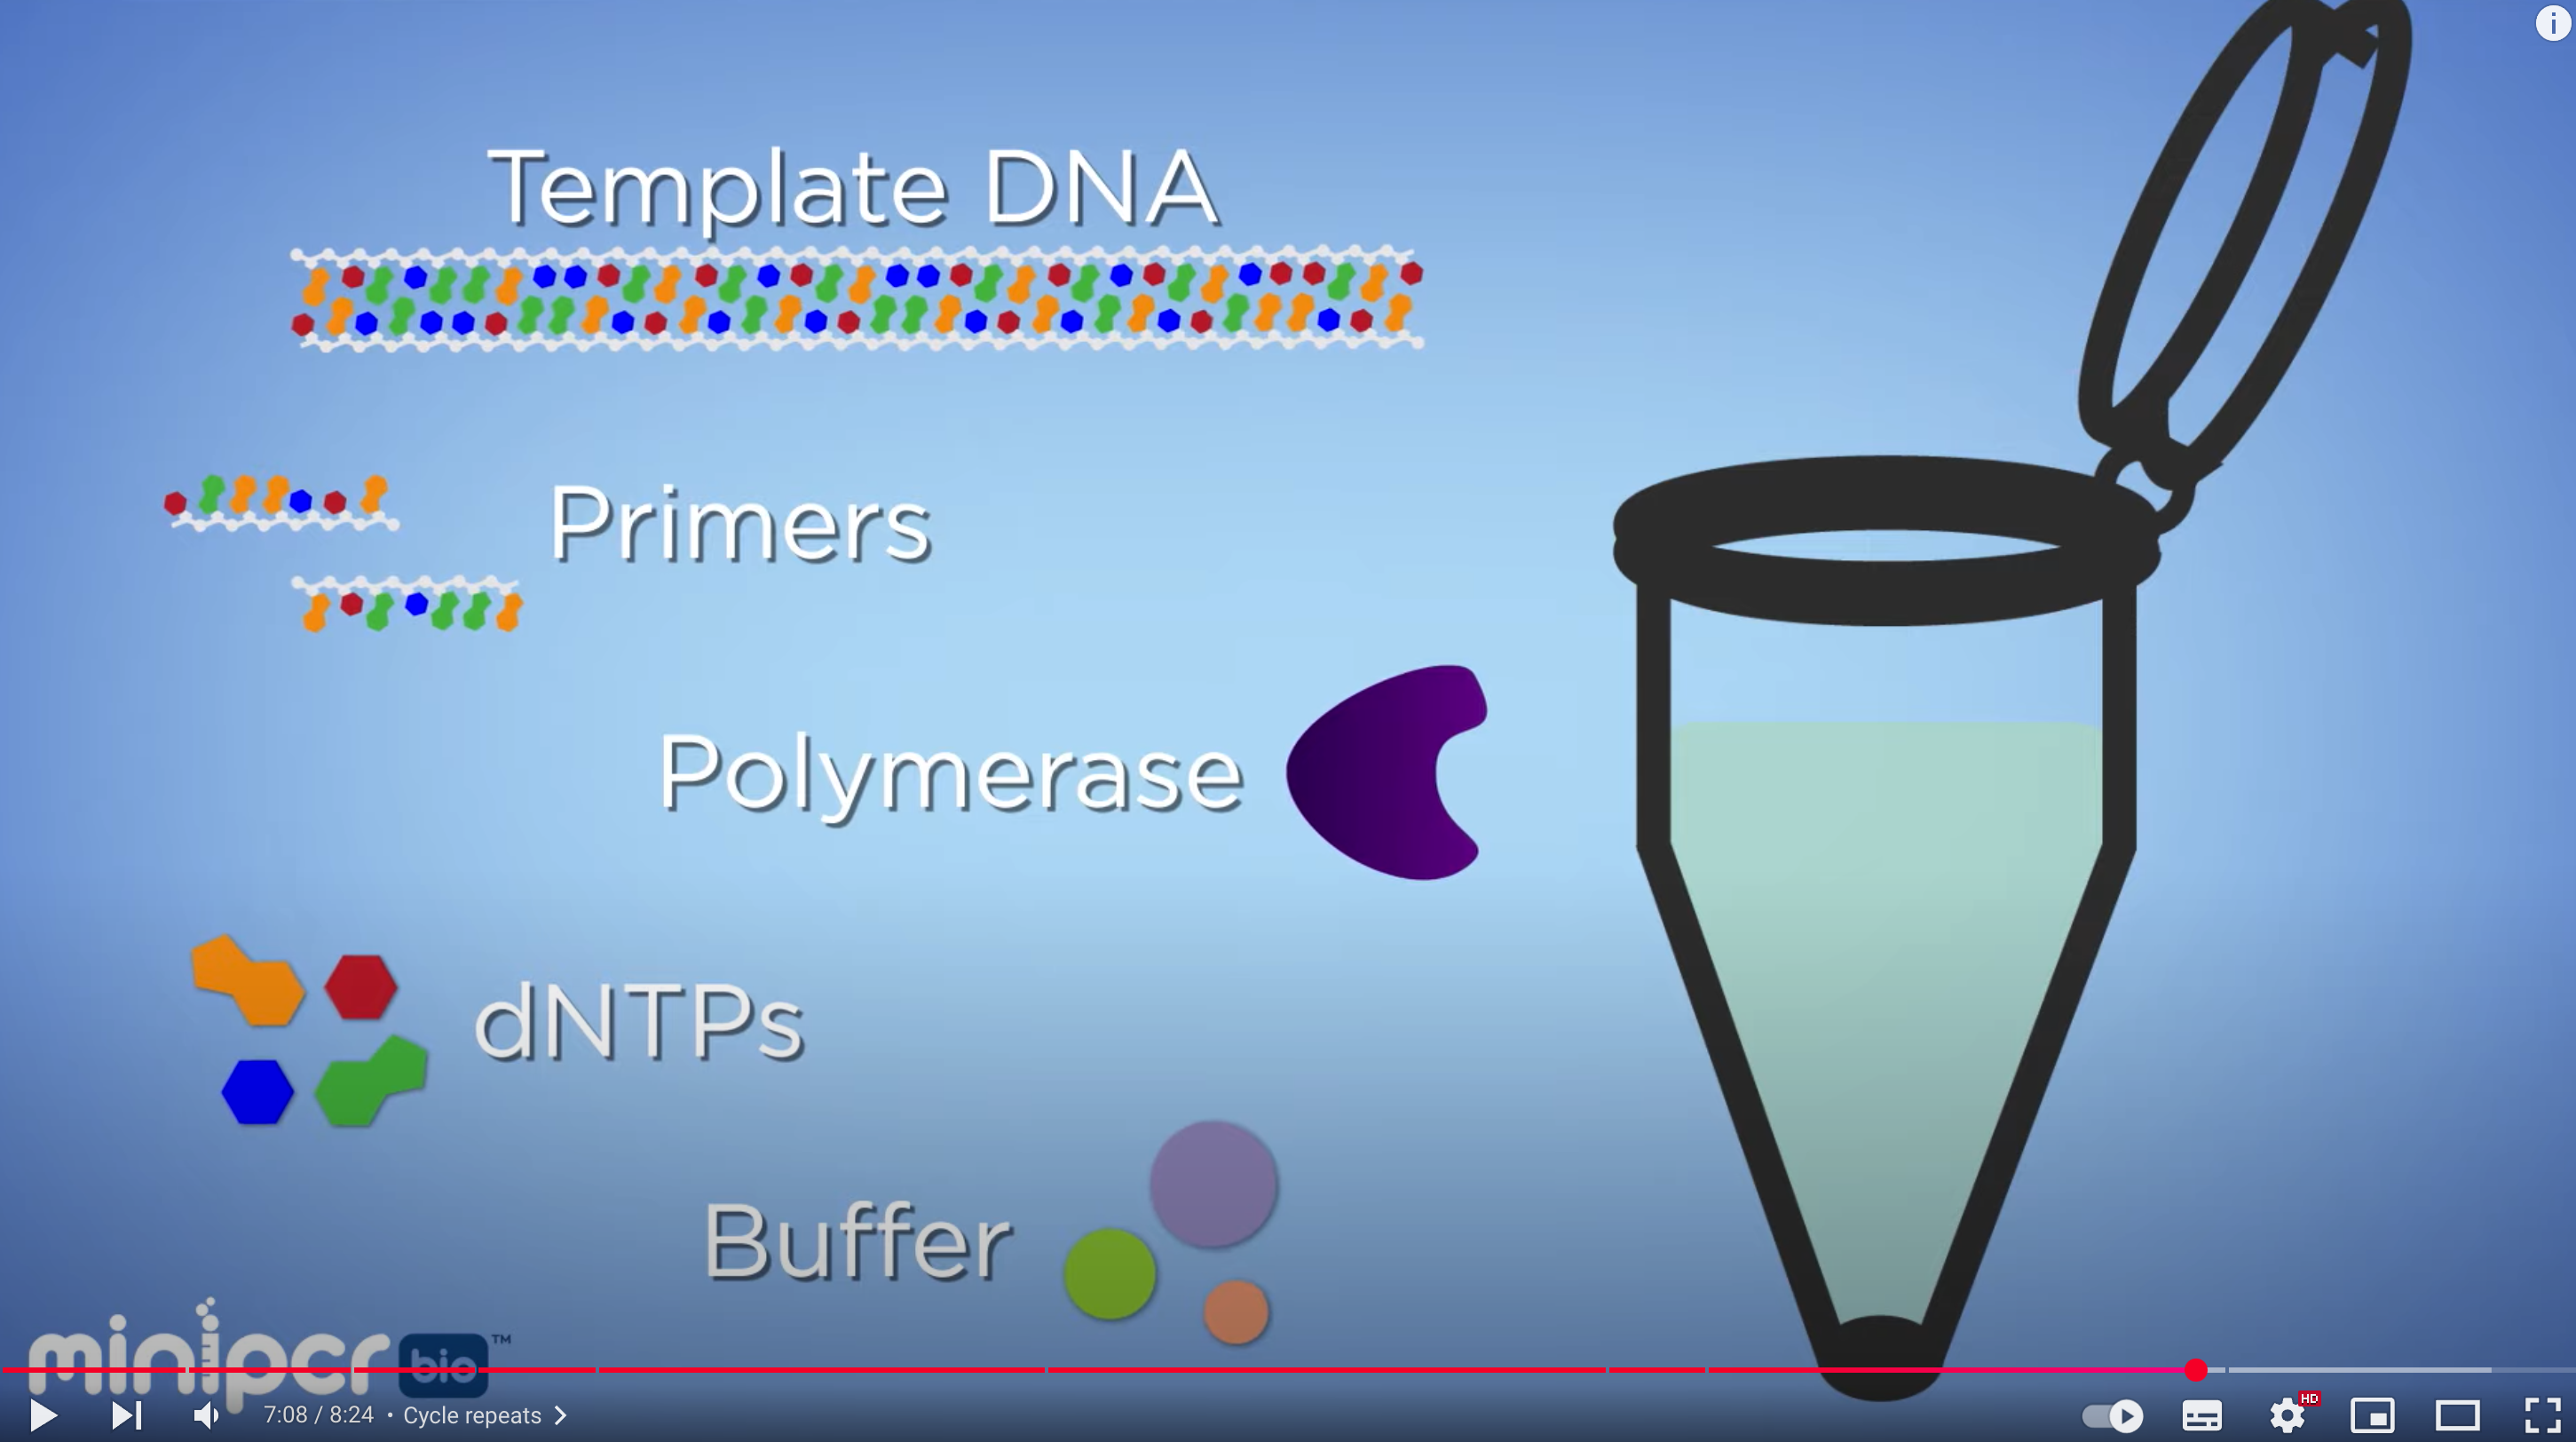
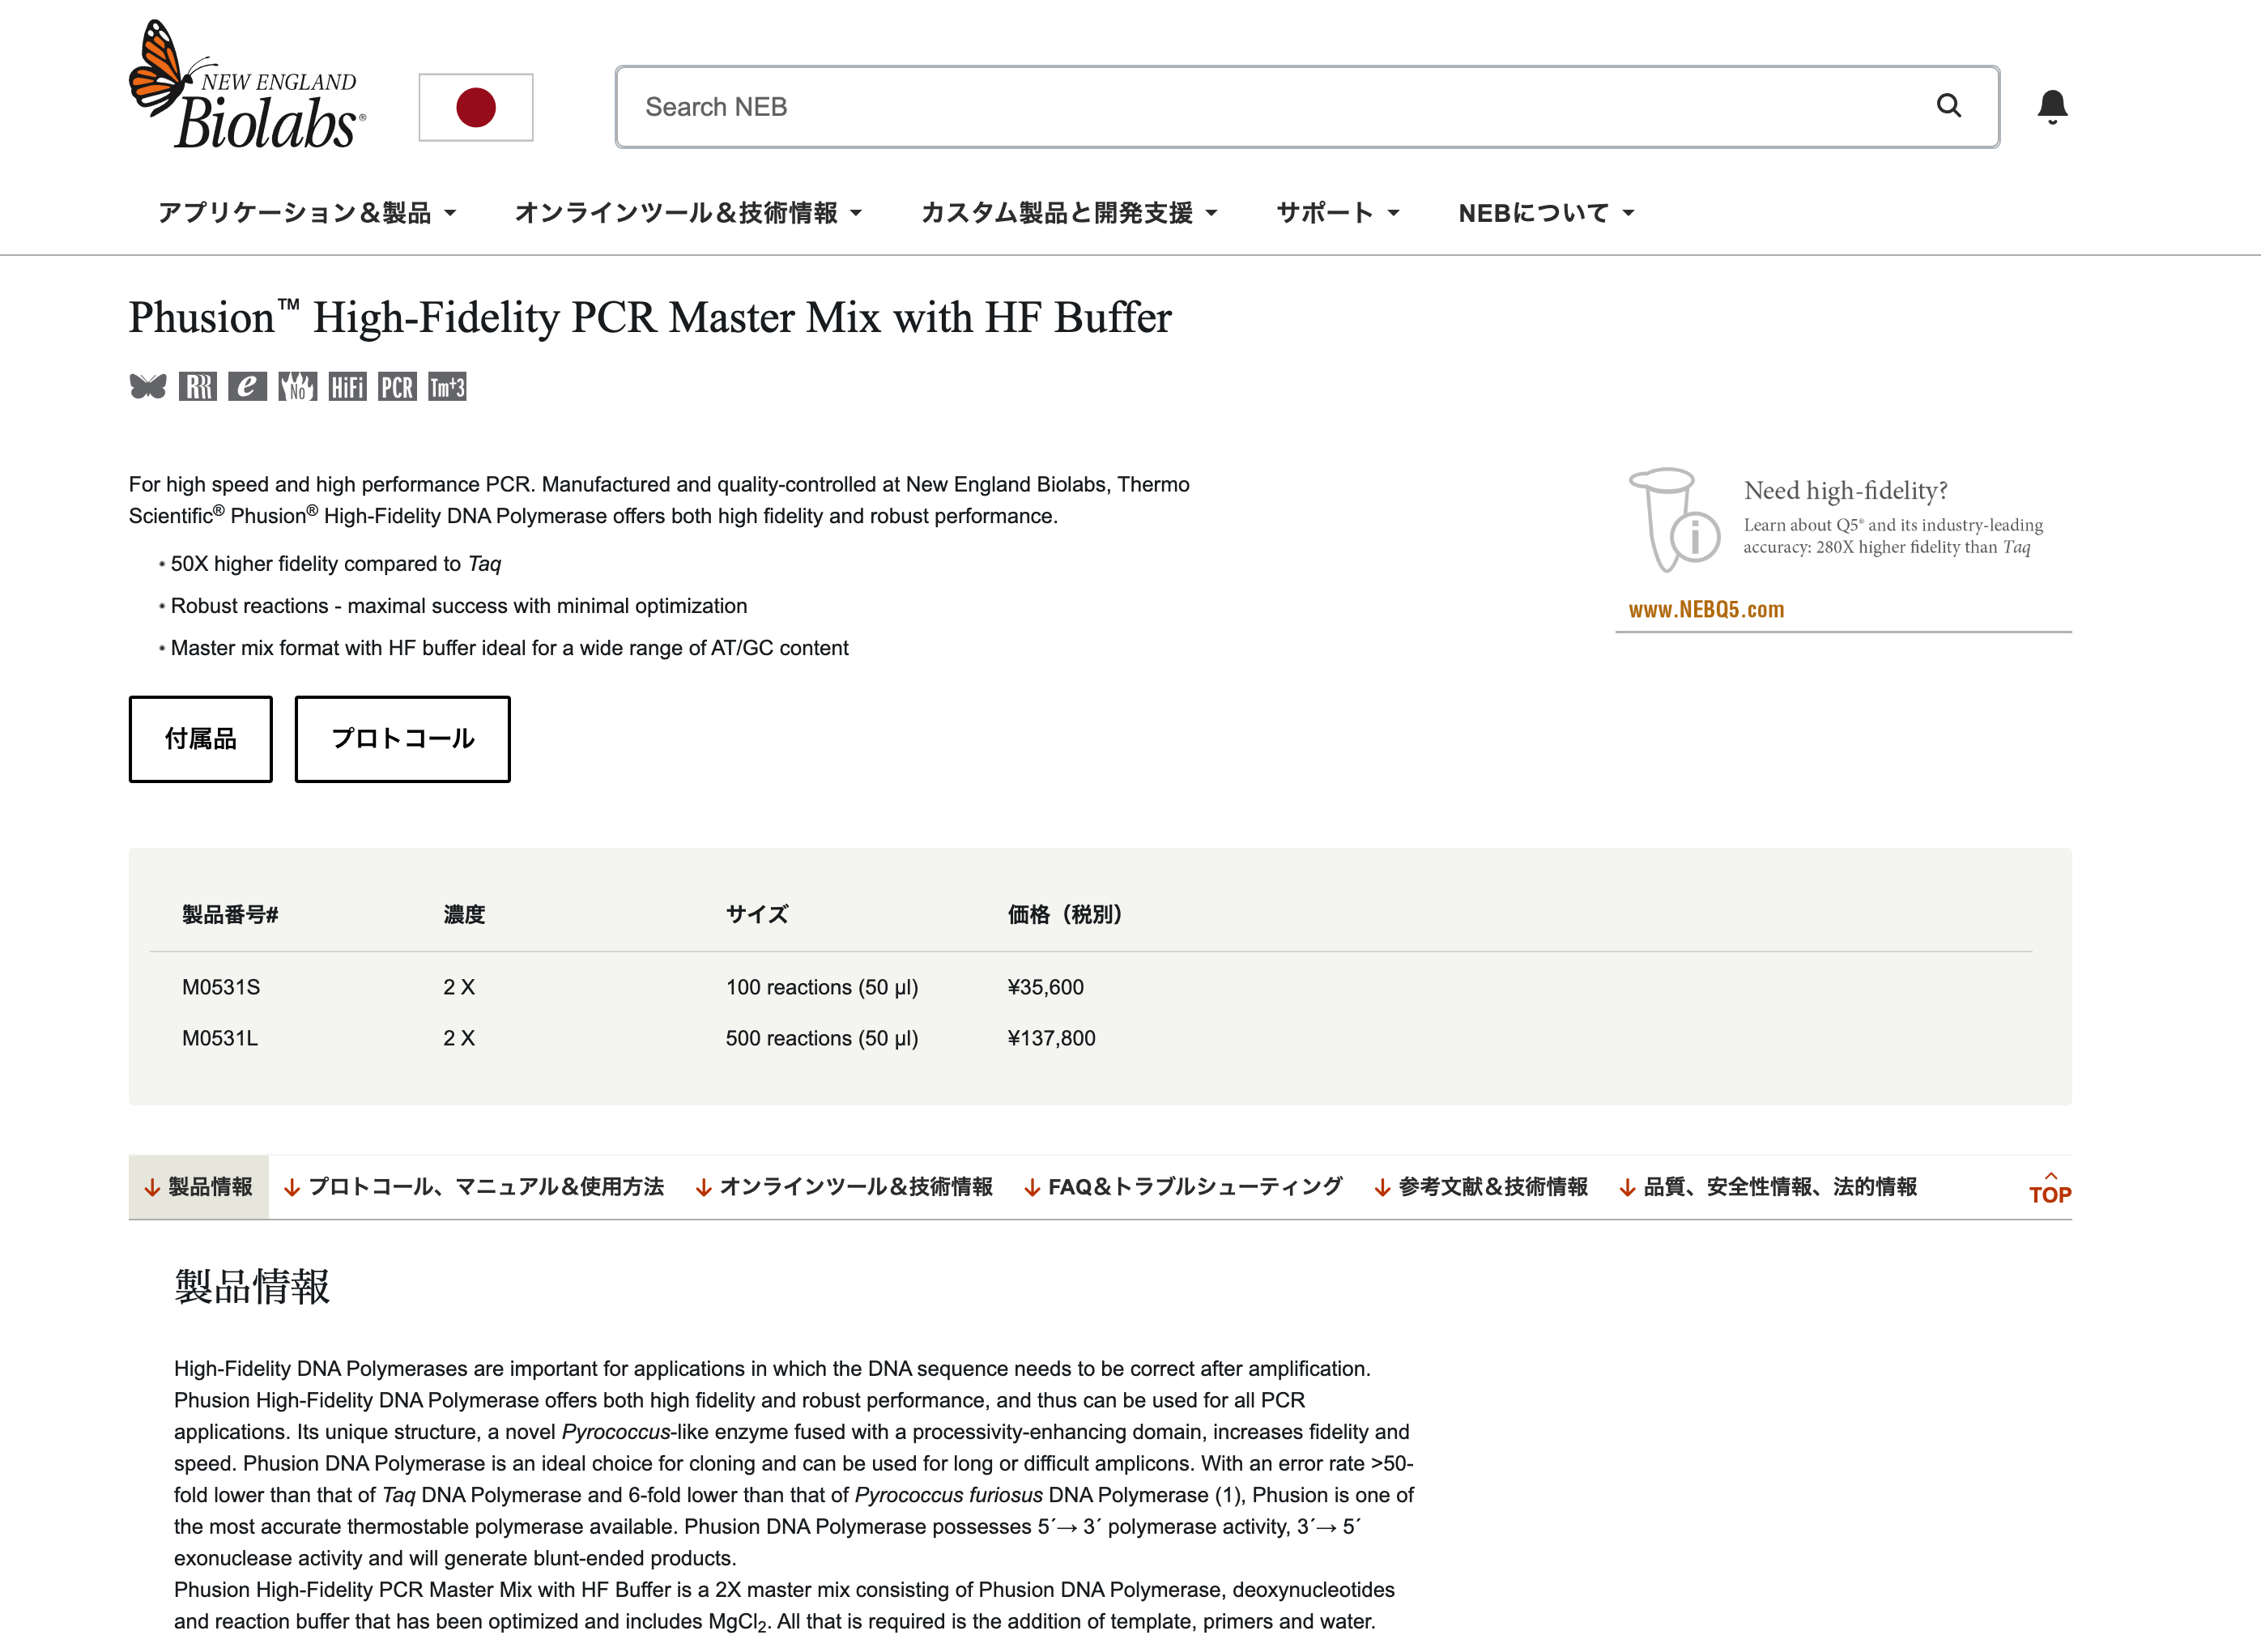

Phusion High-Fidelity DNA Polymerase
The enzyme that drives DNA synthesis with high fidelity. It has 3’→5’ exonuclease (proofreading) activity, which reduces the error rate during PCR.
dNTP(A, T, G, C)
These are the nucleotide building blocks used to synthesize new DNA strands during PCR.
HF Buffer(High-Fidelity Buffer)
This is an optimized reaction buffer that maintains the proper pH and ionic conditions for high-fidelity DNA amplification.
MgCl₂
Magnesium ions are an essential cofactor for DNA polymerase activity and are provided at an optimal concentration (1.5 mM in the 1X final reaction).
Together, these components provide the enzyme, substrates, and chemical environment needed for accurate DNA amplification.
https://www.nippongene.com/siyaku/product/pcr/cat_pcr.pdf
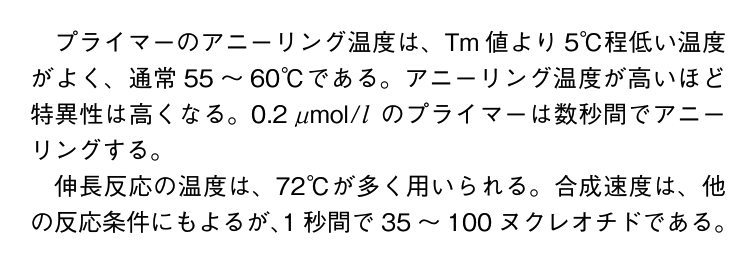
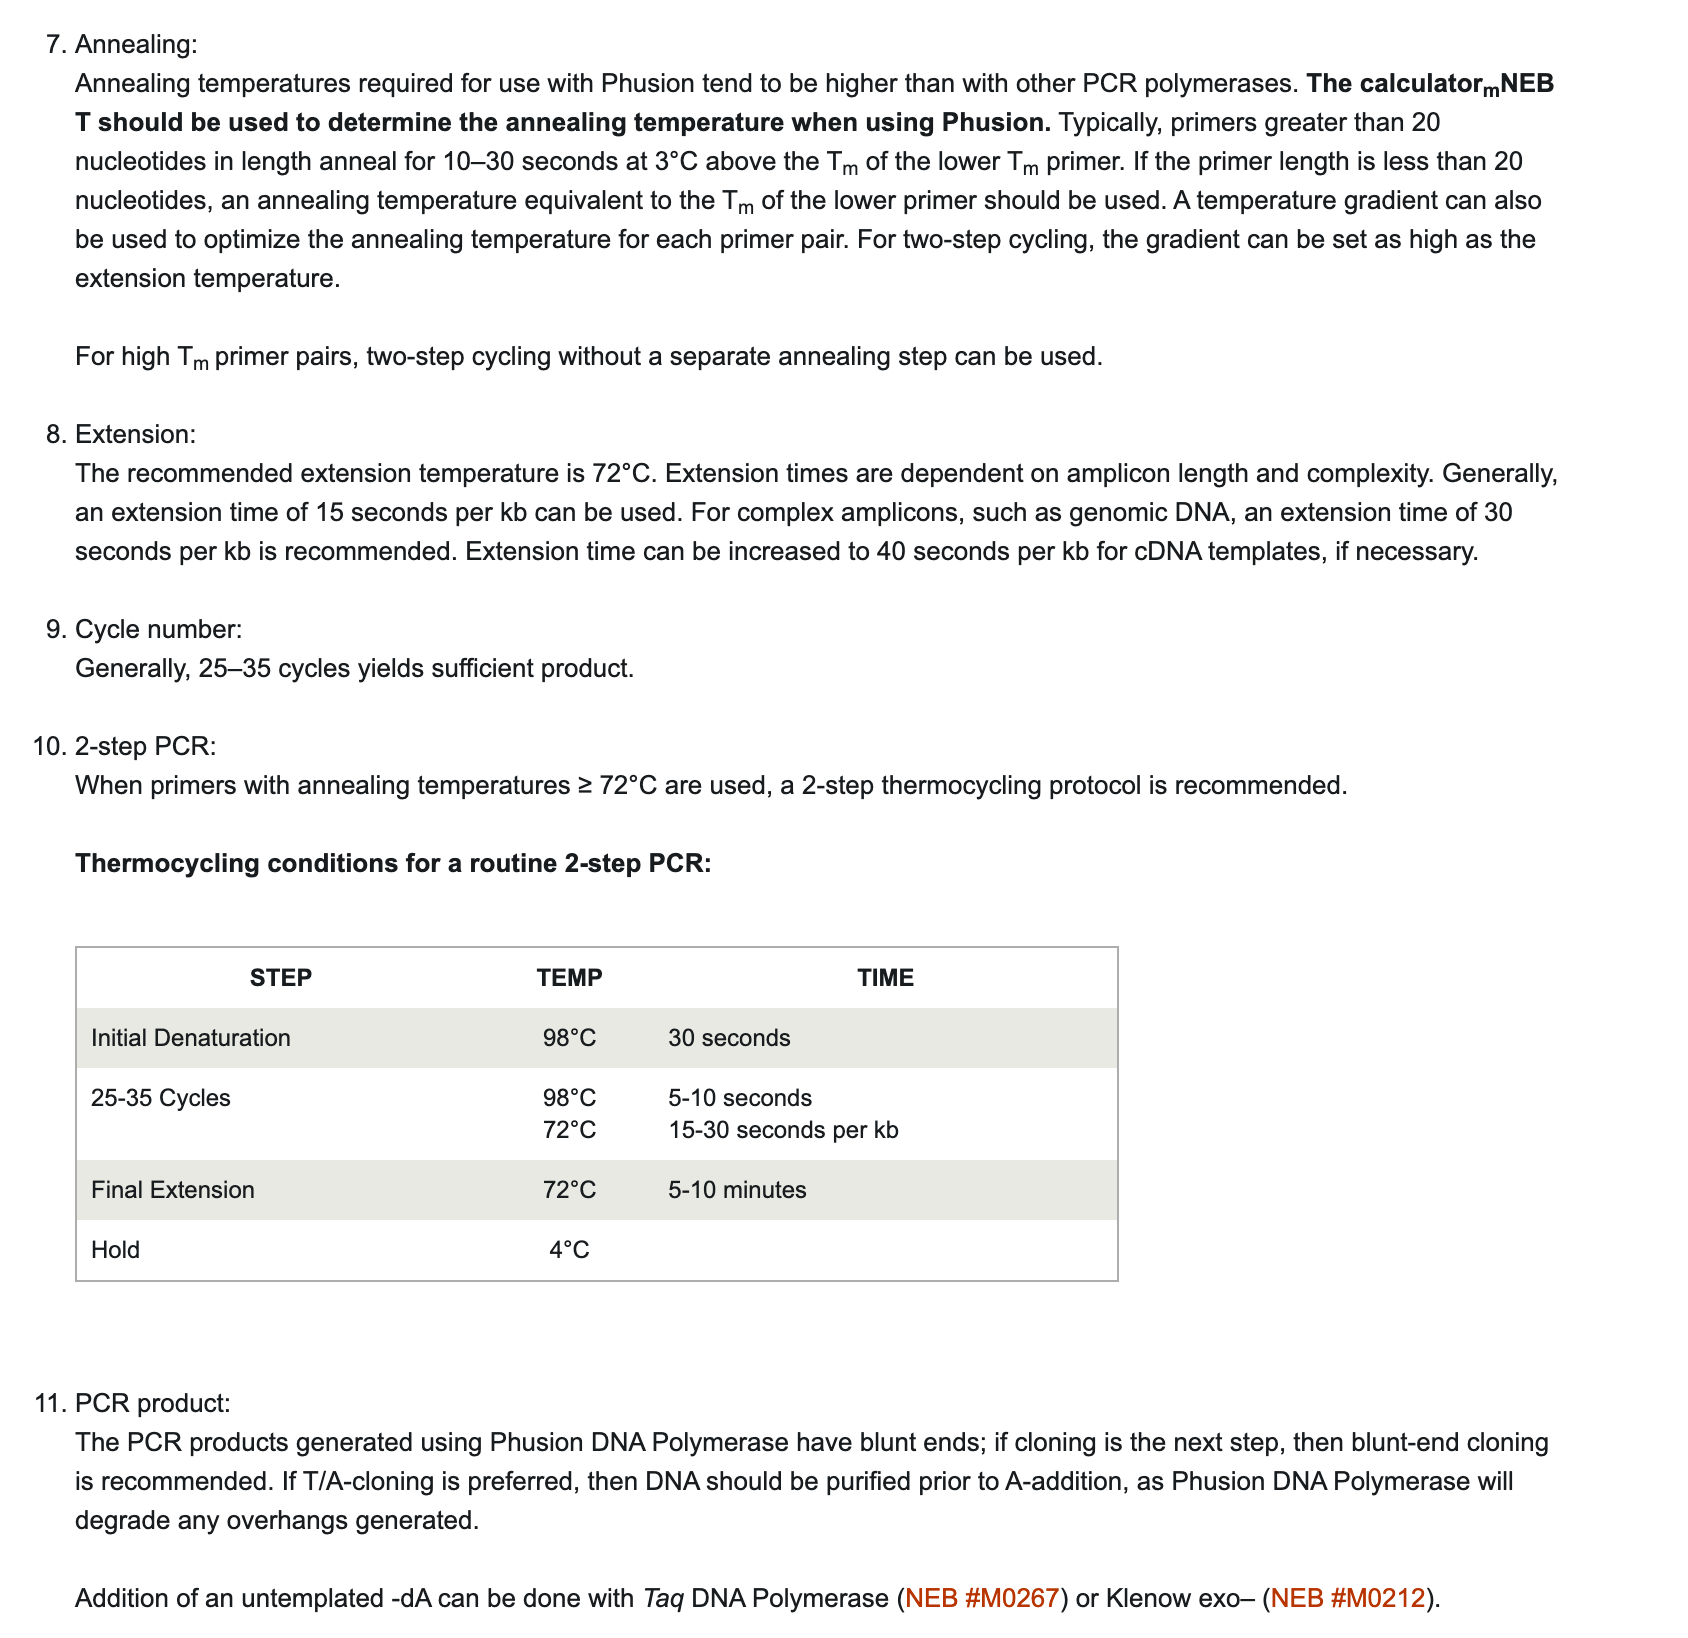
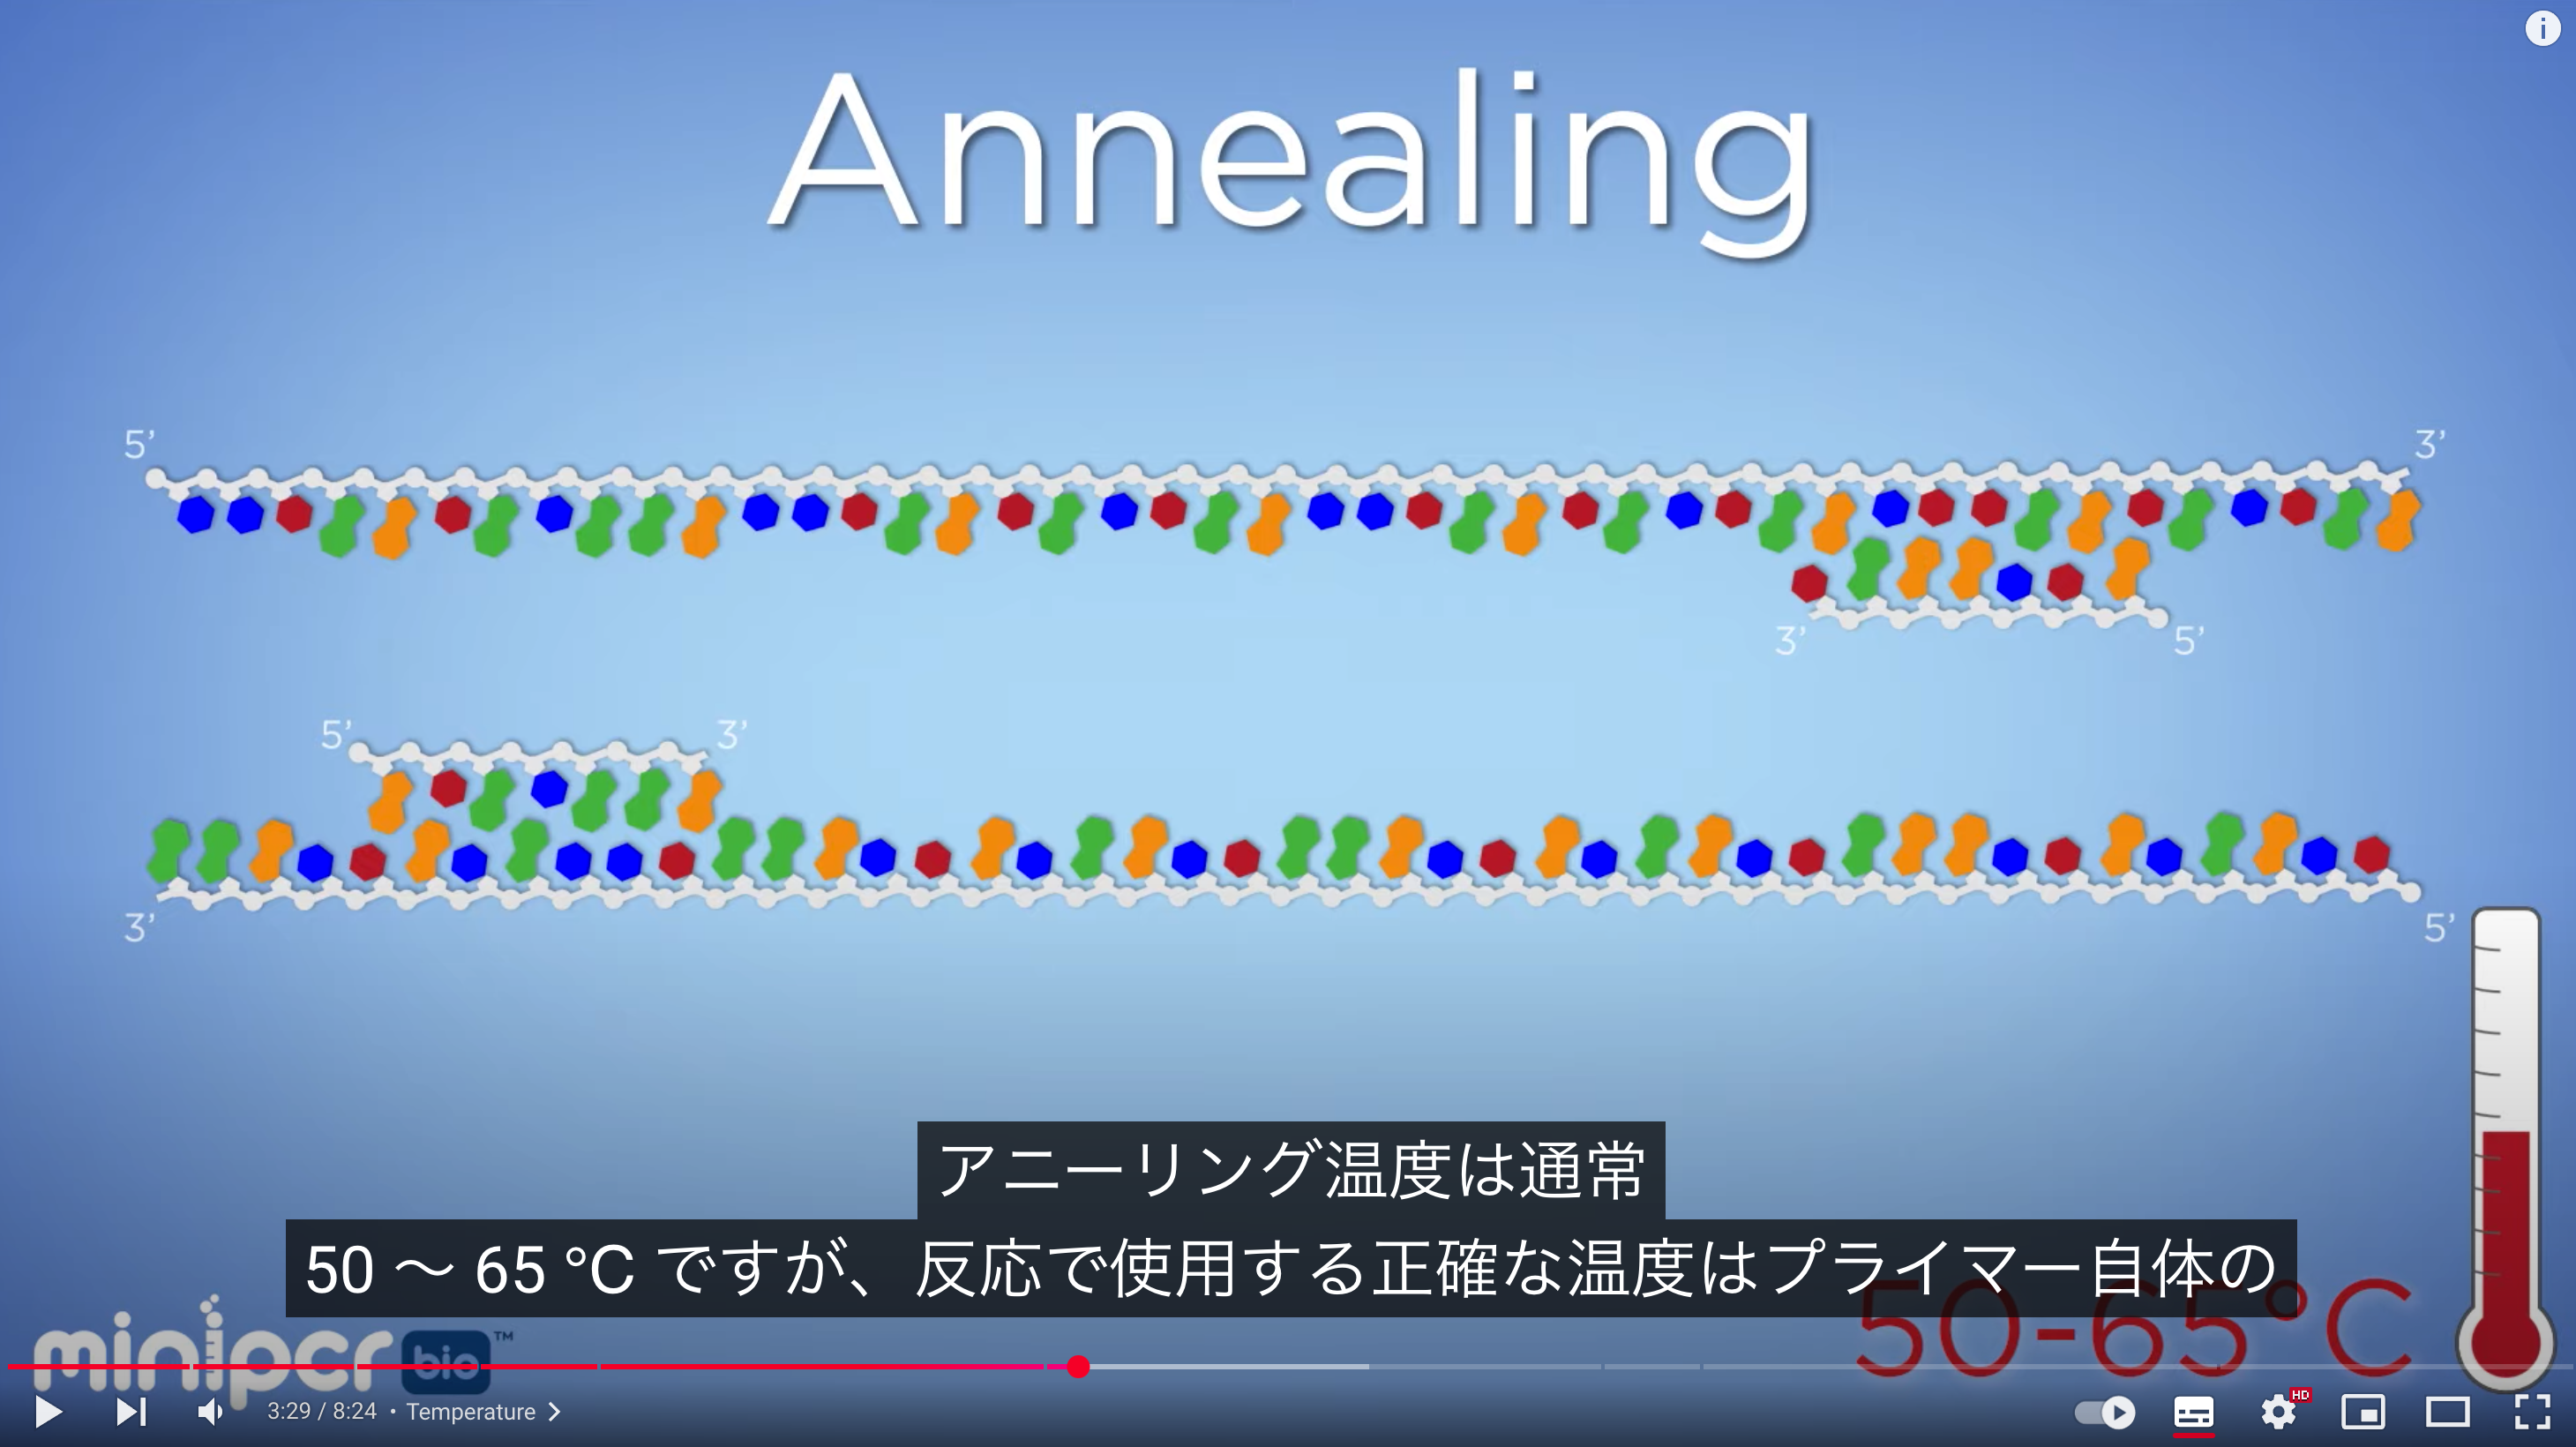
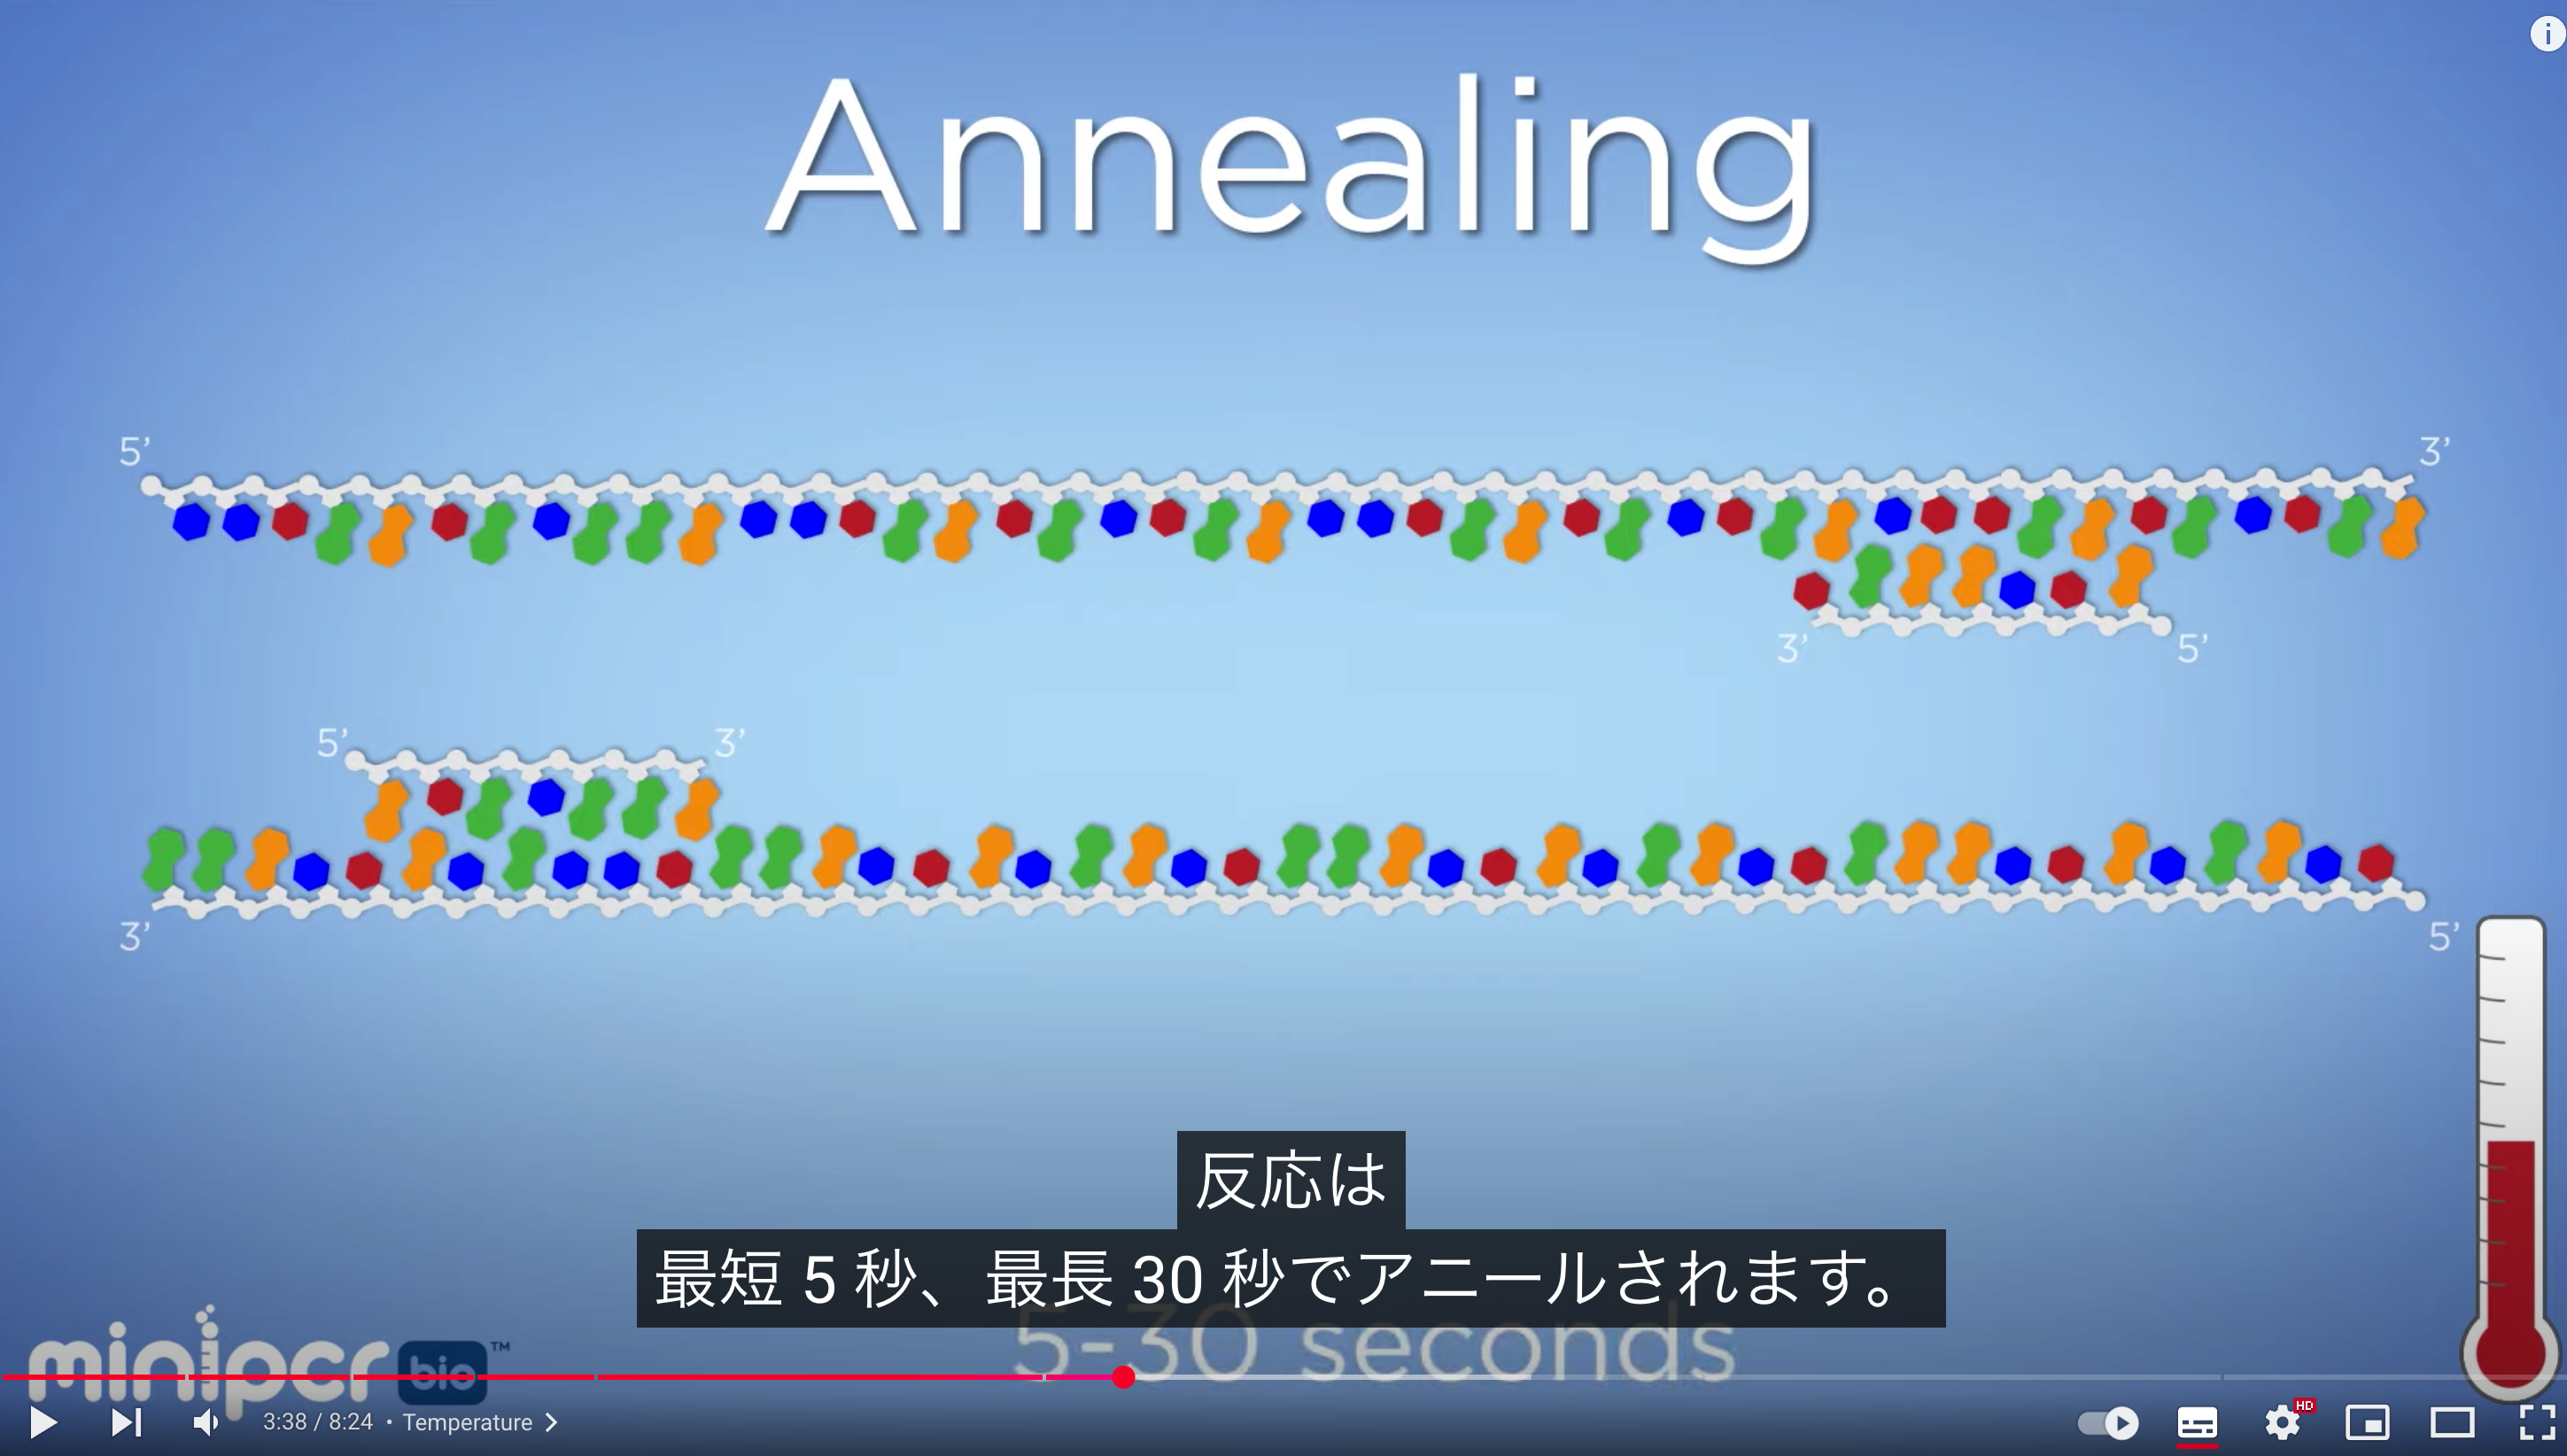
The primer annealing temperature should be set about 5°C lower than the Tm, typically around 55–60 (50- 65?)°C. Higher annealing temperatures increase specificity. At a primer concentration of 0.2 µmol/L, annealing occurs within a few seconds
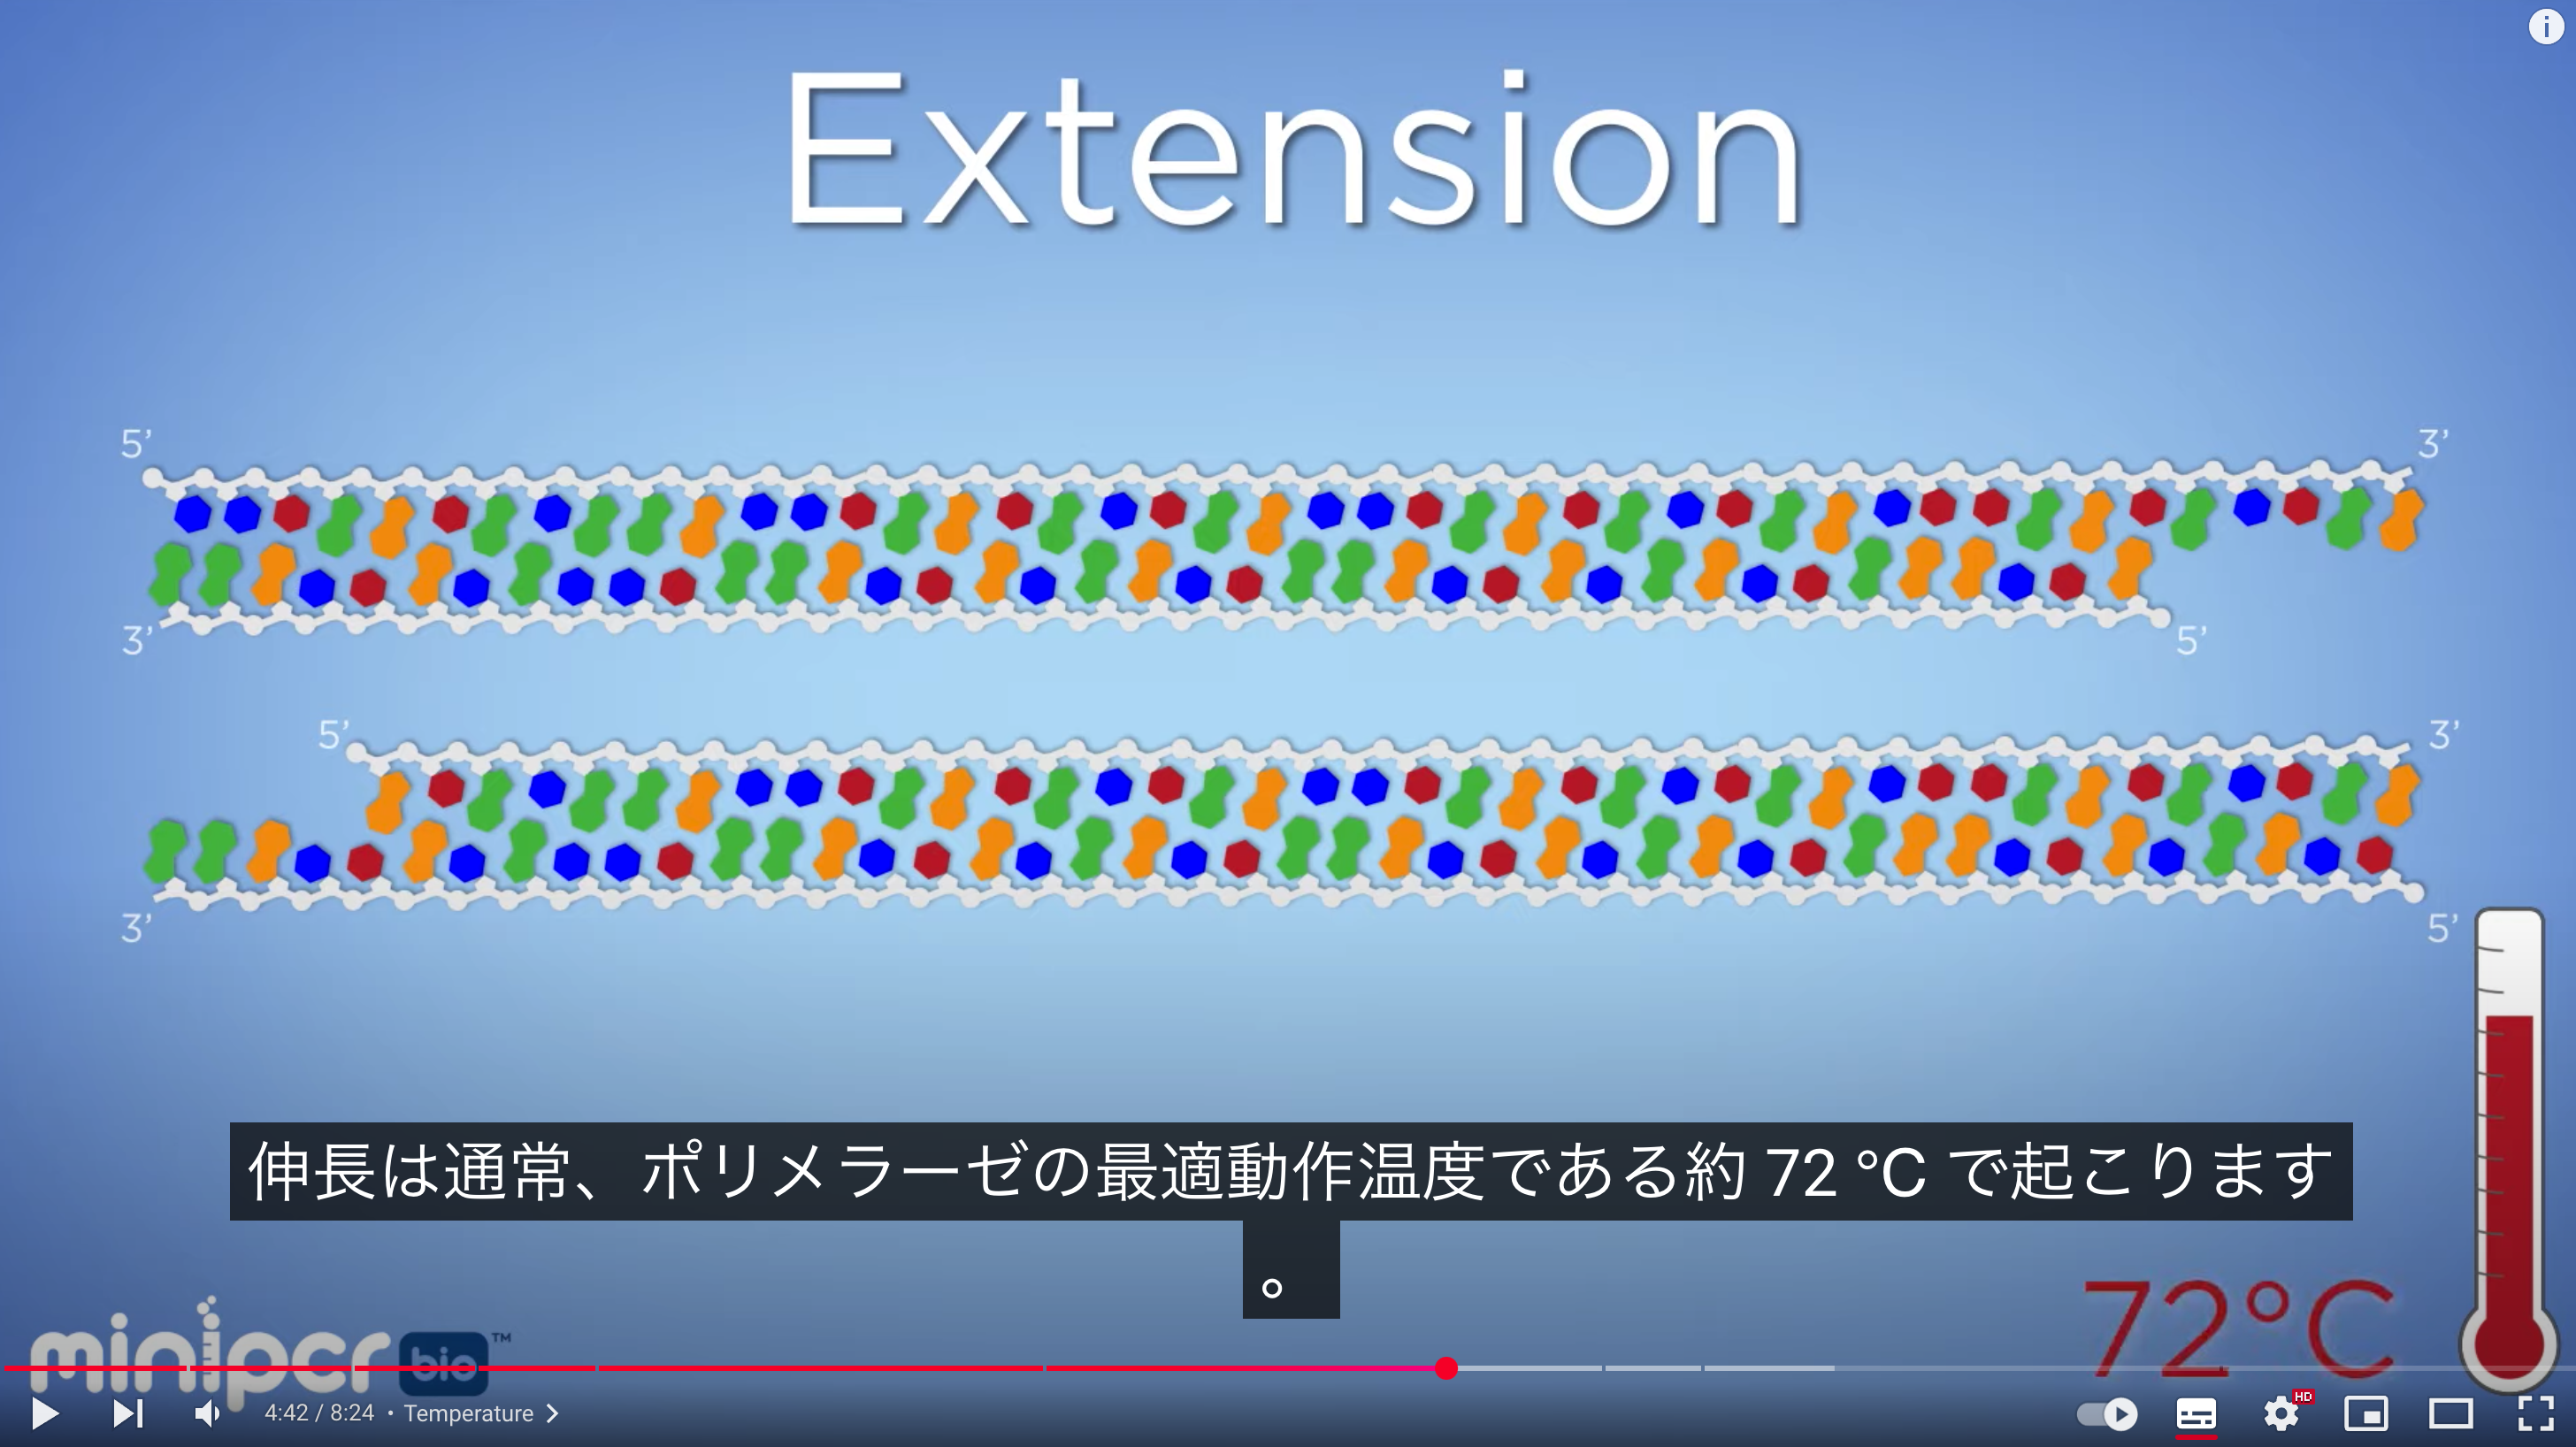
The extension reaction is commonly carried out at 72°C, and depending on other reaction conditions, the synthesis rate is approximately 35–100 nucleotides per second
PCR obtains a desired DNA fragment by using primers to flank and amplify a specific region, requiring primers, dNTPs, and polymerase
Restriction enzyme digestion involves enzymes (e.g., EcoRI) that recognize specific restriction sites and cut the DNA
If no such sites exist in the vector or DNA sequence, digestion is not possible
Thus, PCR is used when the target restriction site is absent, while restriction digestion is preferred if the vector already contains suitable restriction sites and high reproducibility is desired
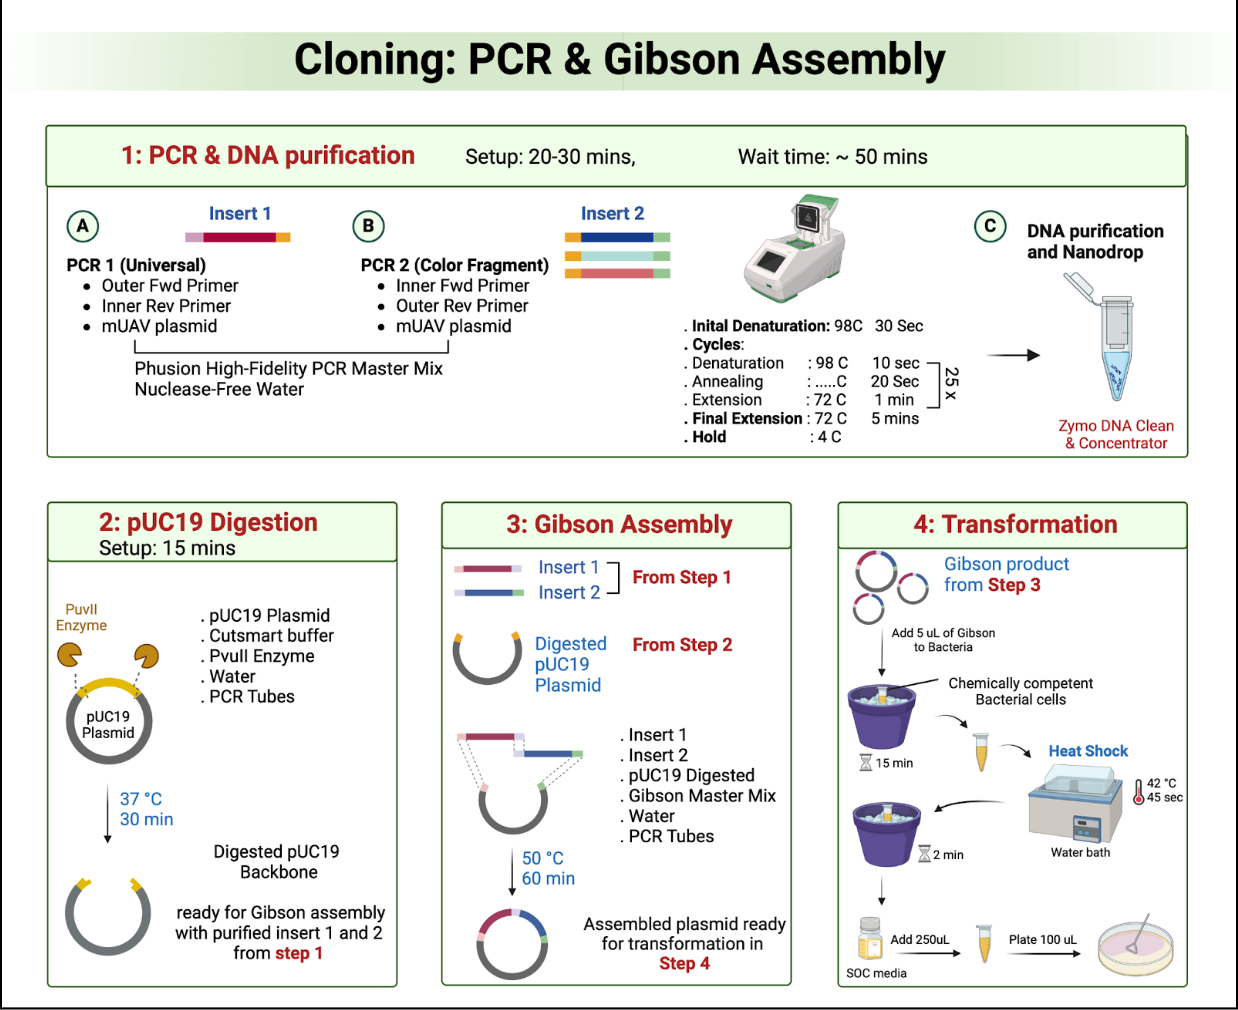
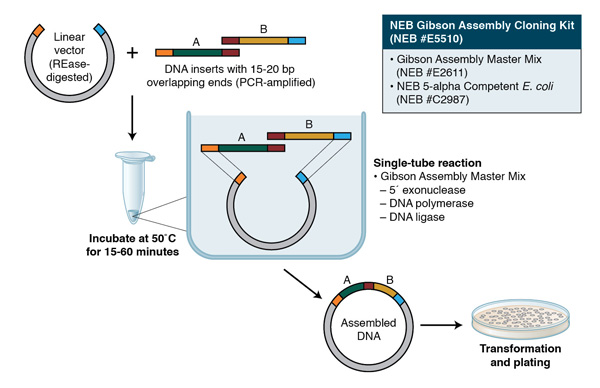
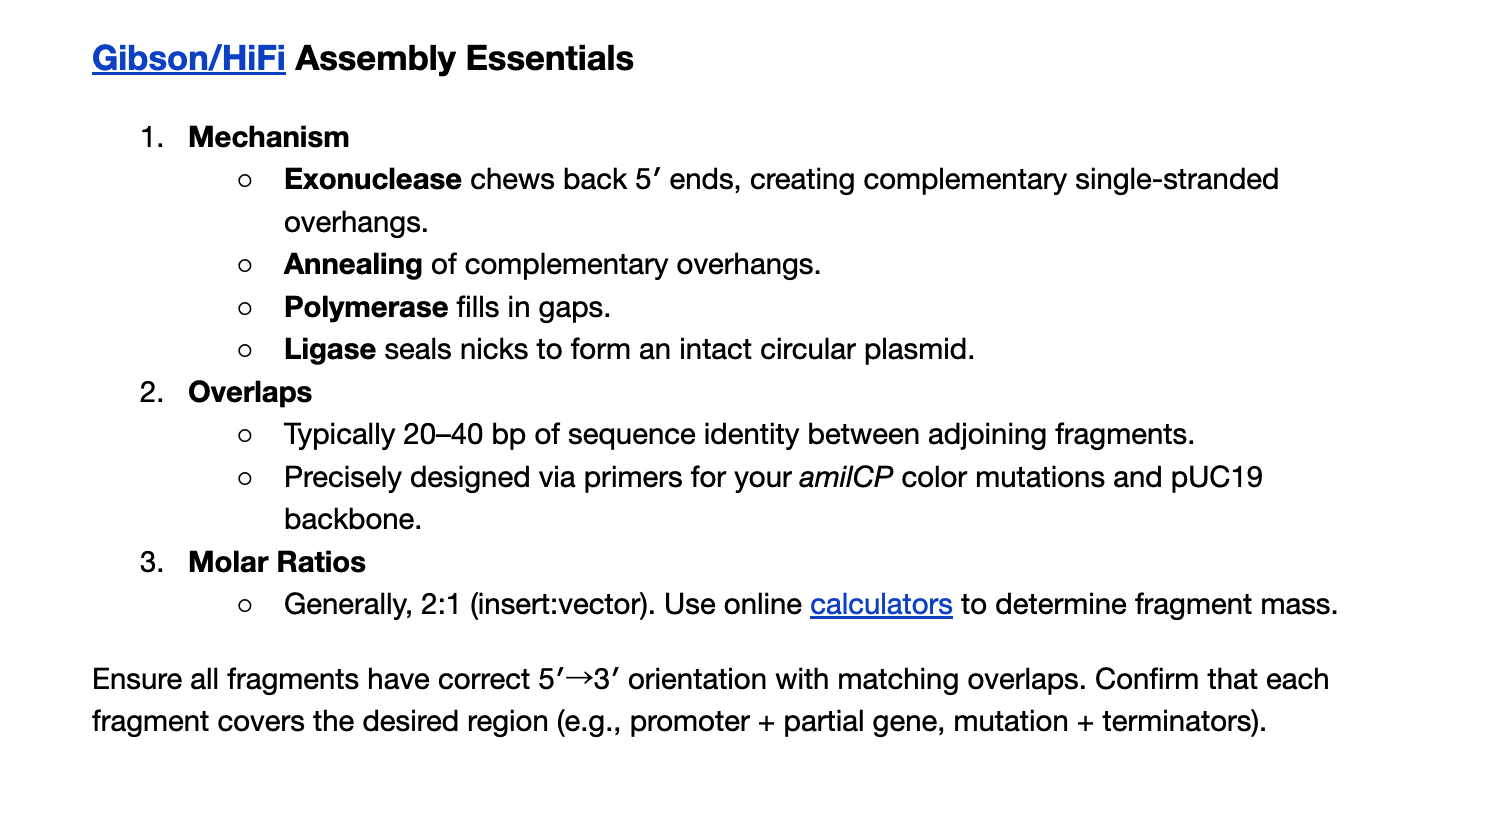
Overlap Design
Confirm that each fragment has the correct 20–40 bp overlaps required for Gibson Assembly
Fragment Size and Sequence Accuracy
Check via gel electrophoresis (for size) and, if necessary, sequencing (for the correctness of overlap regions or introduced mutations)
Orientation and Molar Ratios
Ensure each fragment is in the proper 5′→3′ orientation and use an appropriate insert-to-vector molar ratio (commonly 2:1) to maximize assembly efficiency
In order to introduce DNA into cells, it is necessary to temporarily increase the permeability of the cell membrane
Generally, there are two main methods for transforming E. coli: chemical transformation (e.g., the CaCl₂ method) and electroporation
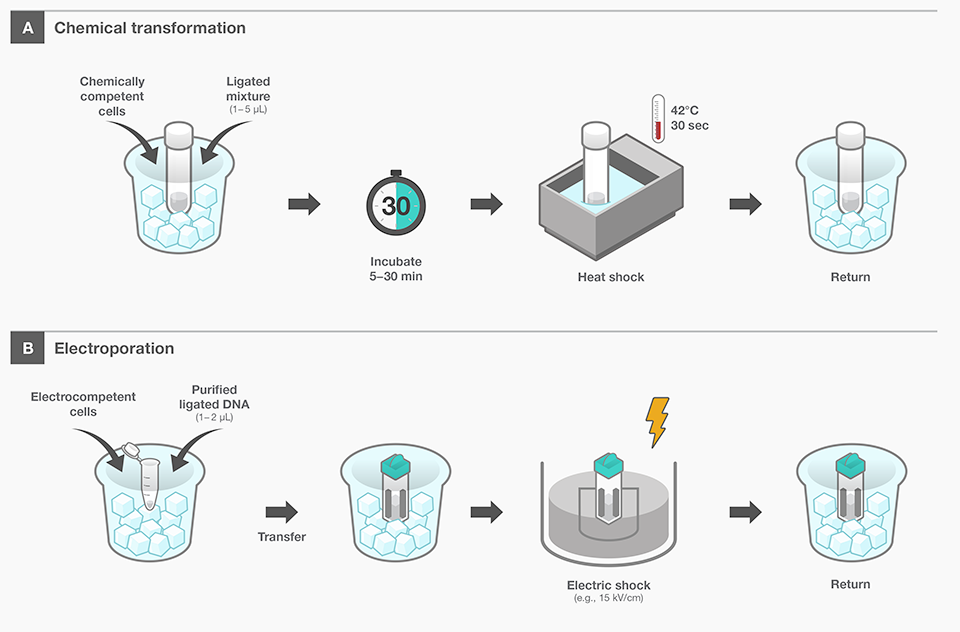
(A) Chemical Transformation
- Mix chemically competent E. coli cells (prepared with CaCl₂, etc.) with ligated DNA and incubate for a set period
- Briefly subject the mixture to a high temperature (e.g., 42°C) for heat shock, creating temporary pores in the cell membrane through which the DNA can enter
- Transfer the cells into a recovery medium afterward to allow them to recover
(B) Electroporation
- Add purified DNA to electrocompetent E. coli cells
- Apply a high-voltage pulse (e.g., ~15 kV/cm), which forms transient micro-pores in the cell membrane, enabling the DNA to enter
- Finally, move the cells to a recovery medium to allow them to recuperate
https://www.youtube.com/watch?v=NzQdLQ44I7w
https://www.youtube.com/watch?v=EpHeu44hitI
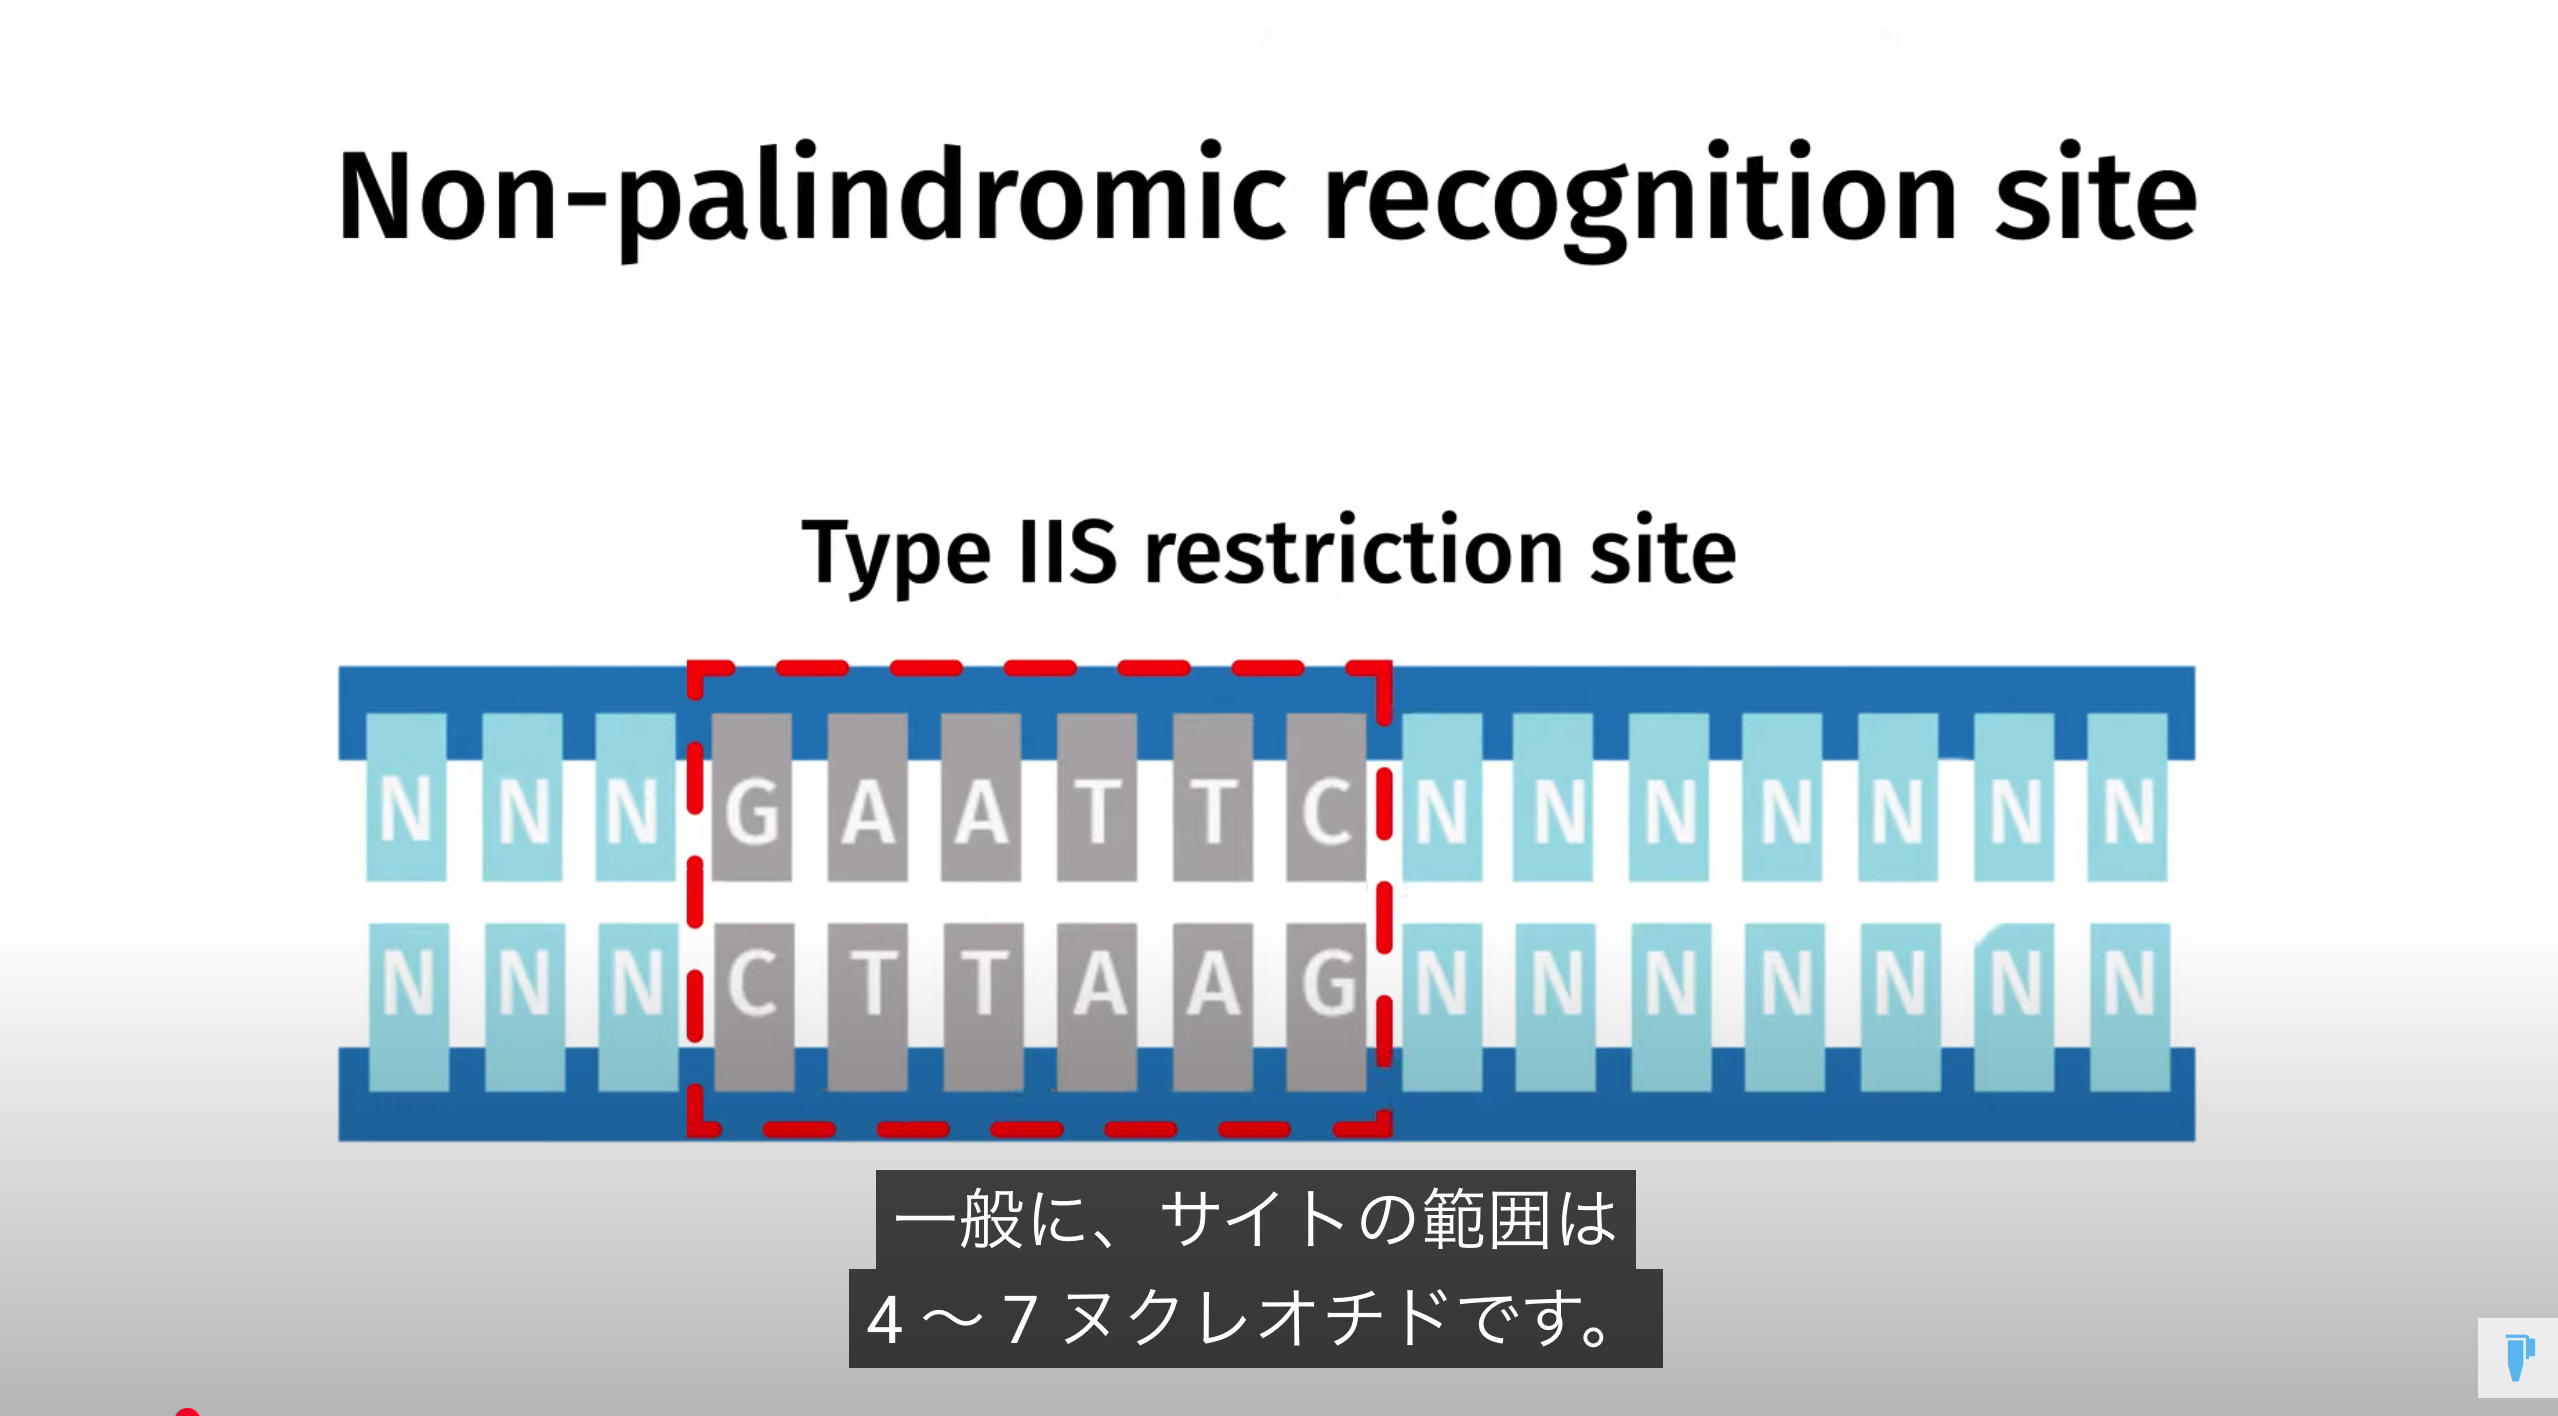
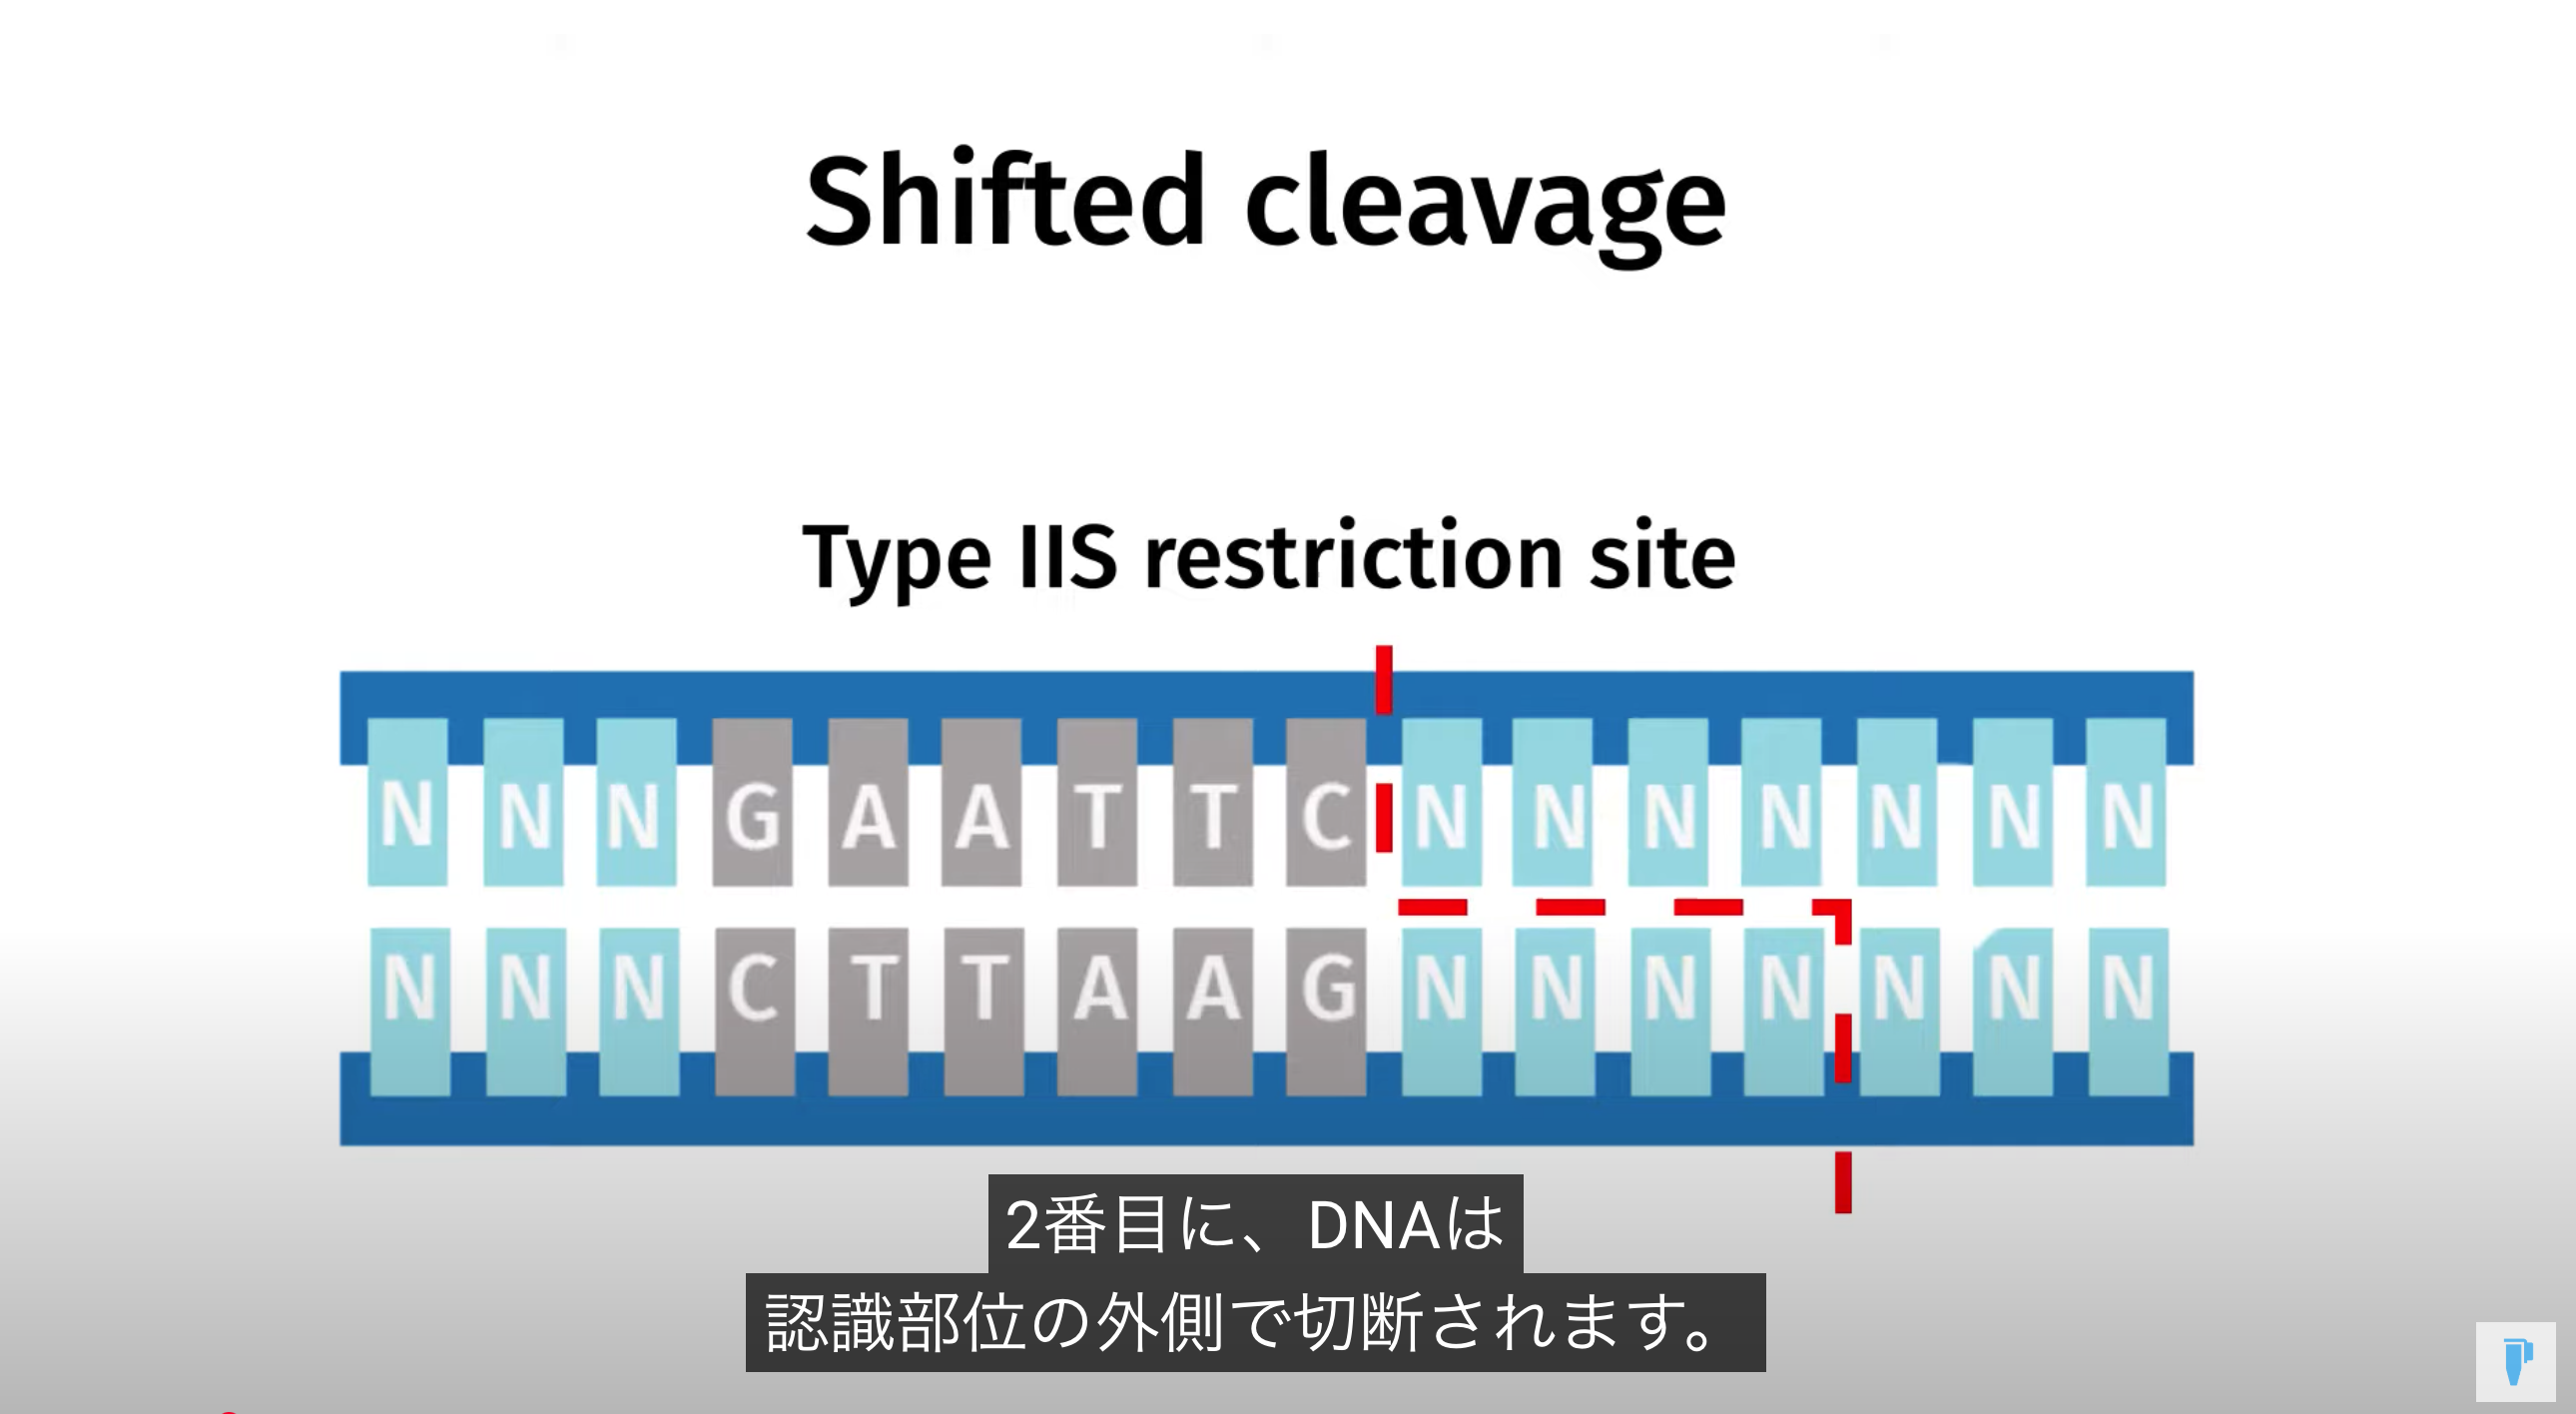
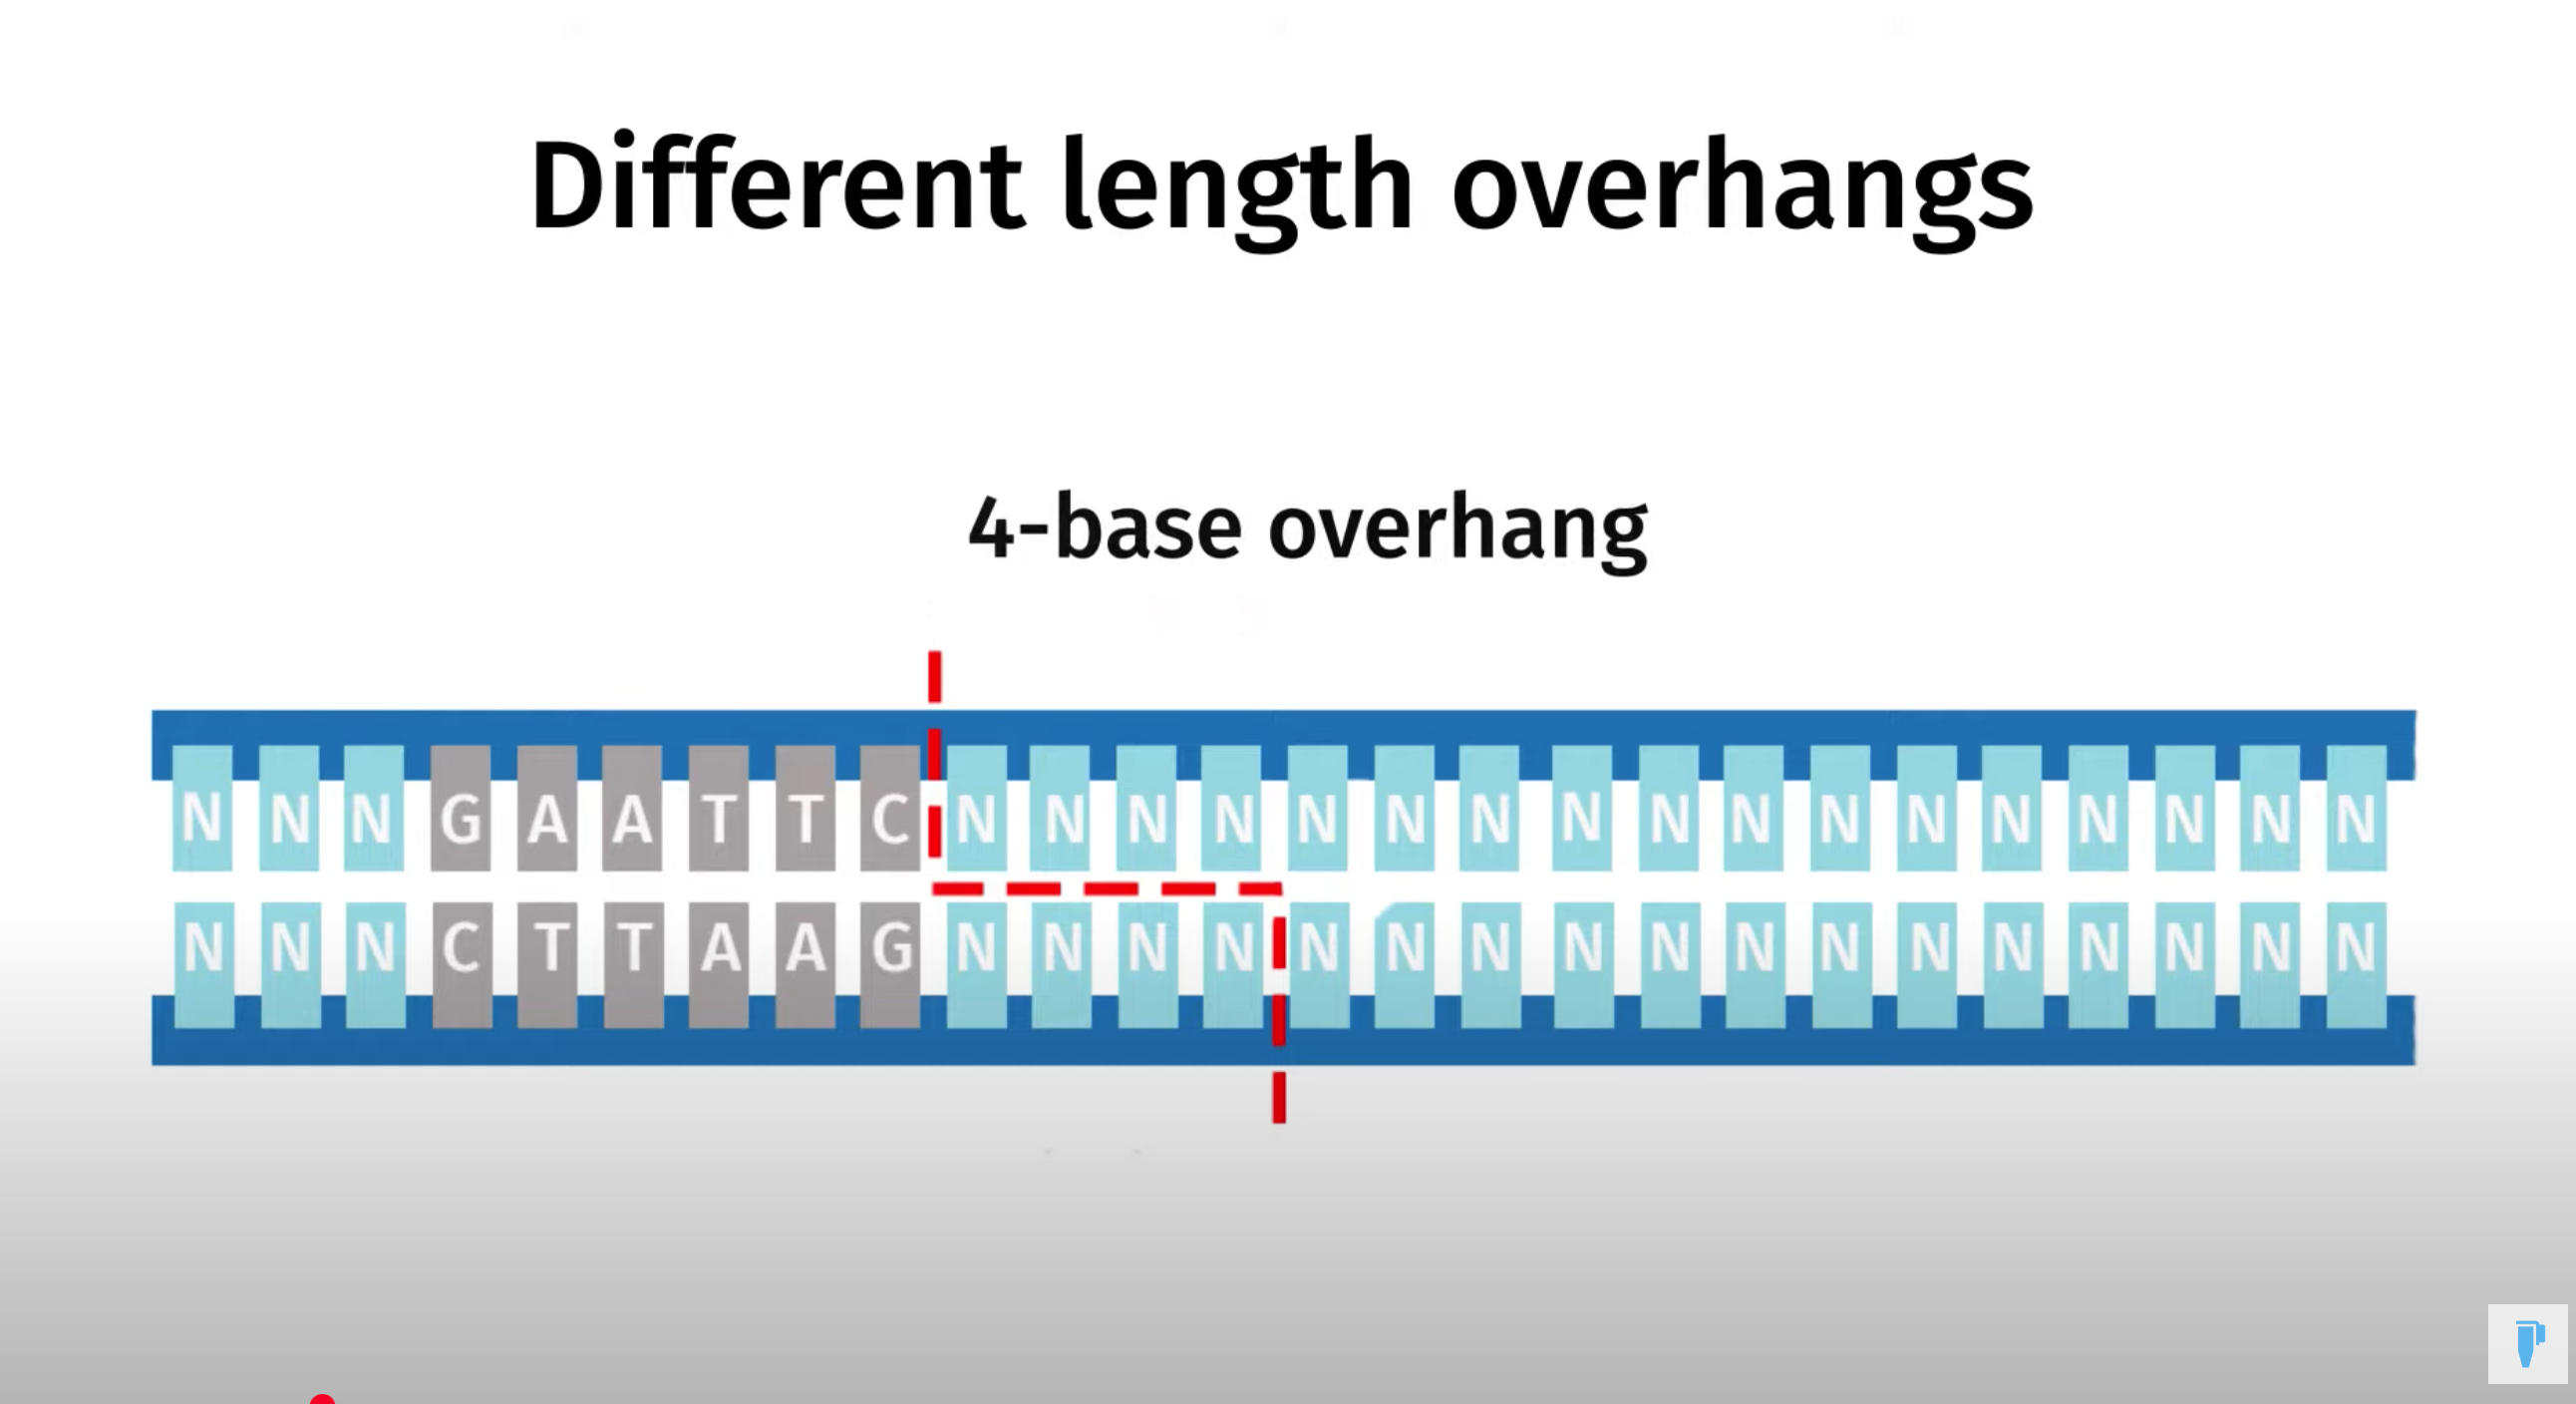
Golden Gate Assembly is a method that employs Type IIS restriction enzymes to cleave DNA and efficiently ligate multiple fragments using custom-designed overhangs
※ An overhang refers to the single-stranded extension of DNA that protrudes from one strand when the DNA is cleaved
Prepare each fragment so that it contains a Type IIS site—using primer design and PCR—ensuring the desired overhangs appear upon enzyme digestion
Next, combine all fragments in a single tube with the Type IIS restriction enzyme (e.g., BsaI) and T4 DNA ligase, enabling digestion and ligation to occur simultaneously
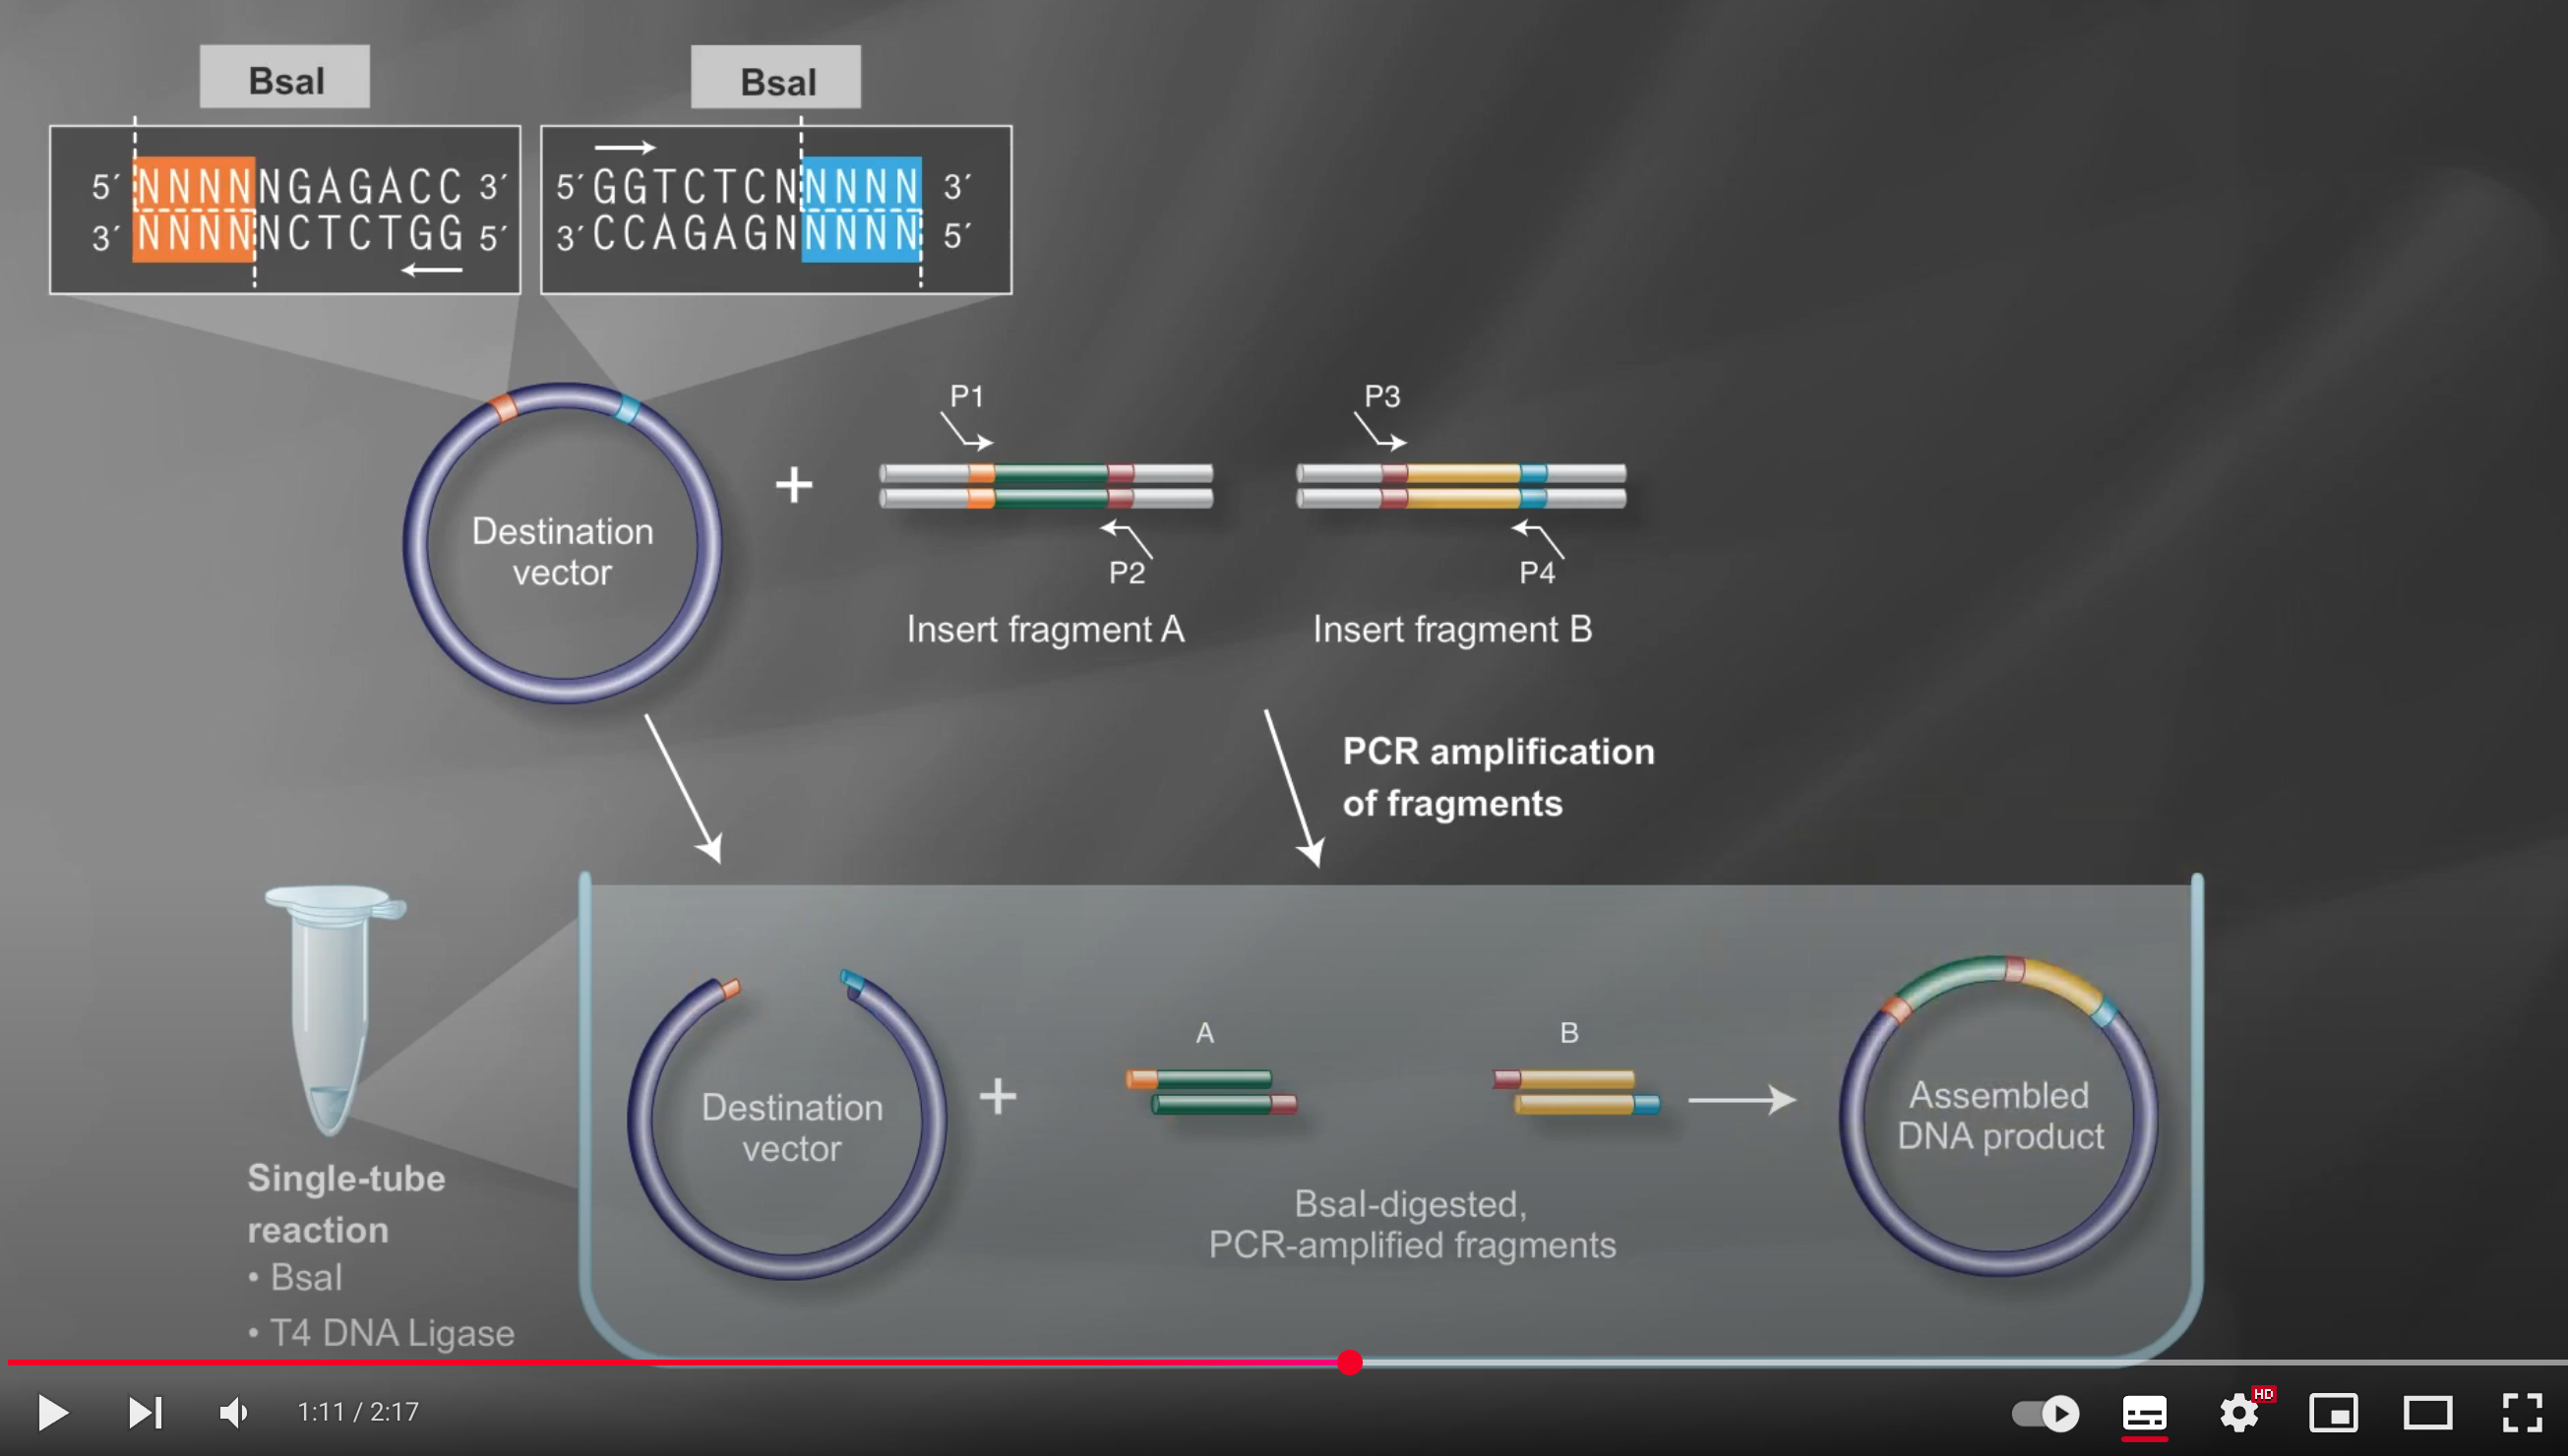
Under these reaction conditions, the enzyme repeatedly cuts the DNA to create transient overhangs, which then anneal, and the ligase seals the nicks
Incorrect assemblies are recut, so only the properly matching fragments remain ligated, resulting in an efficient multi-fragment assembly in the correct order
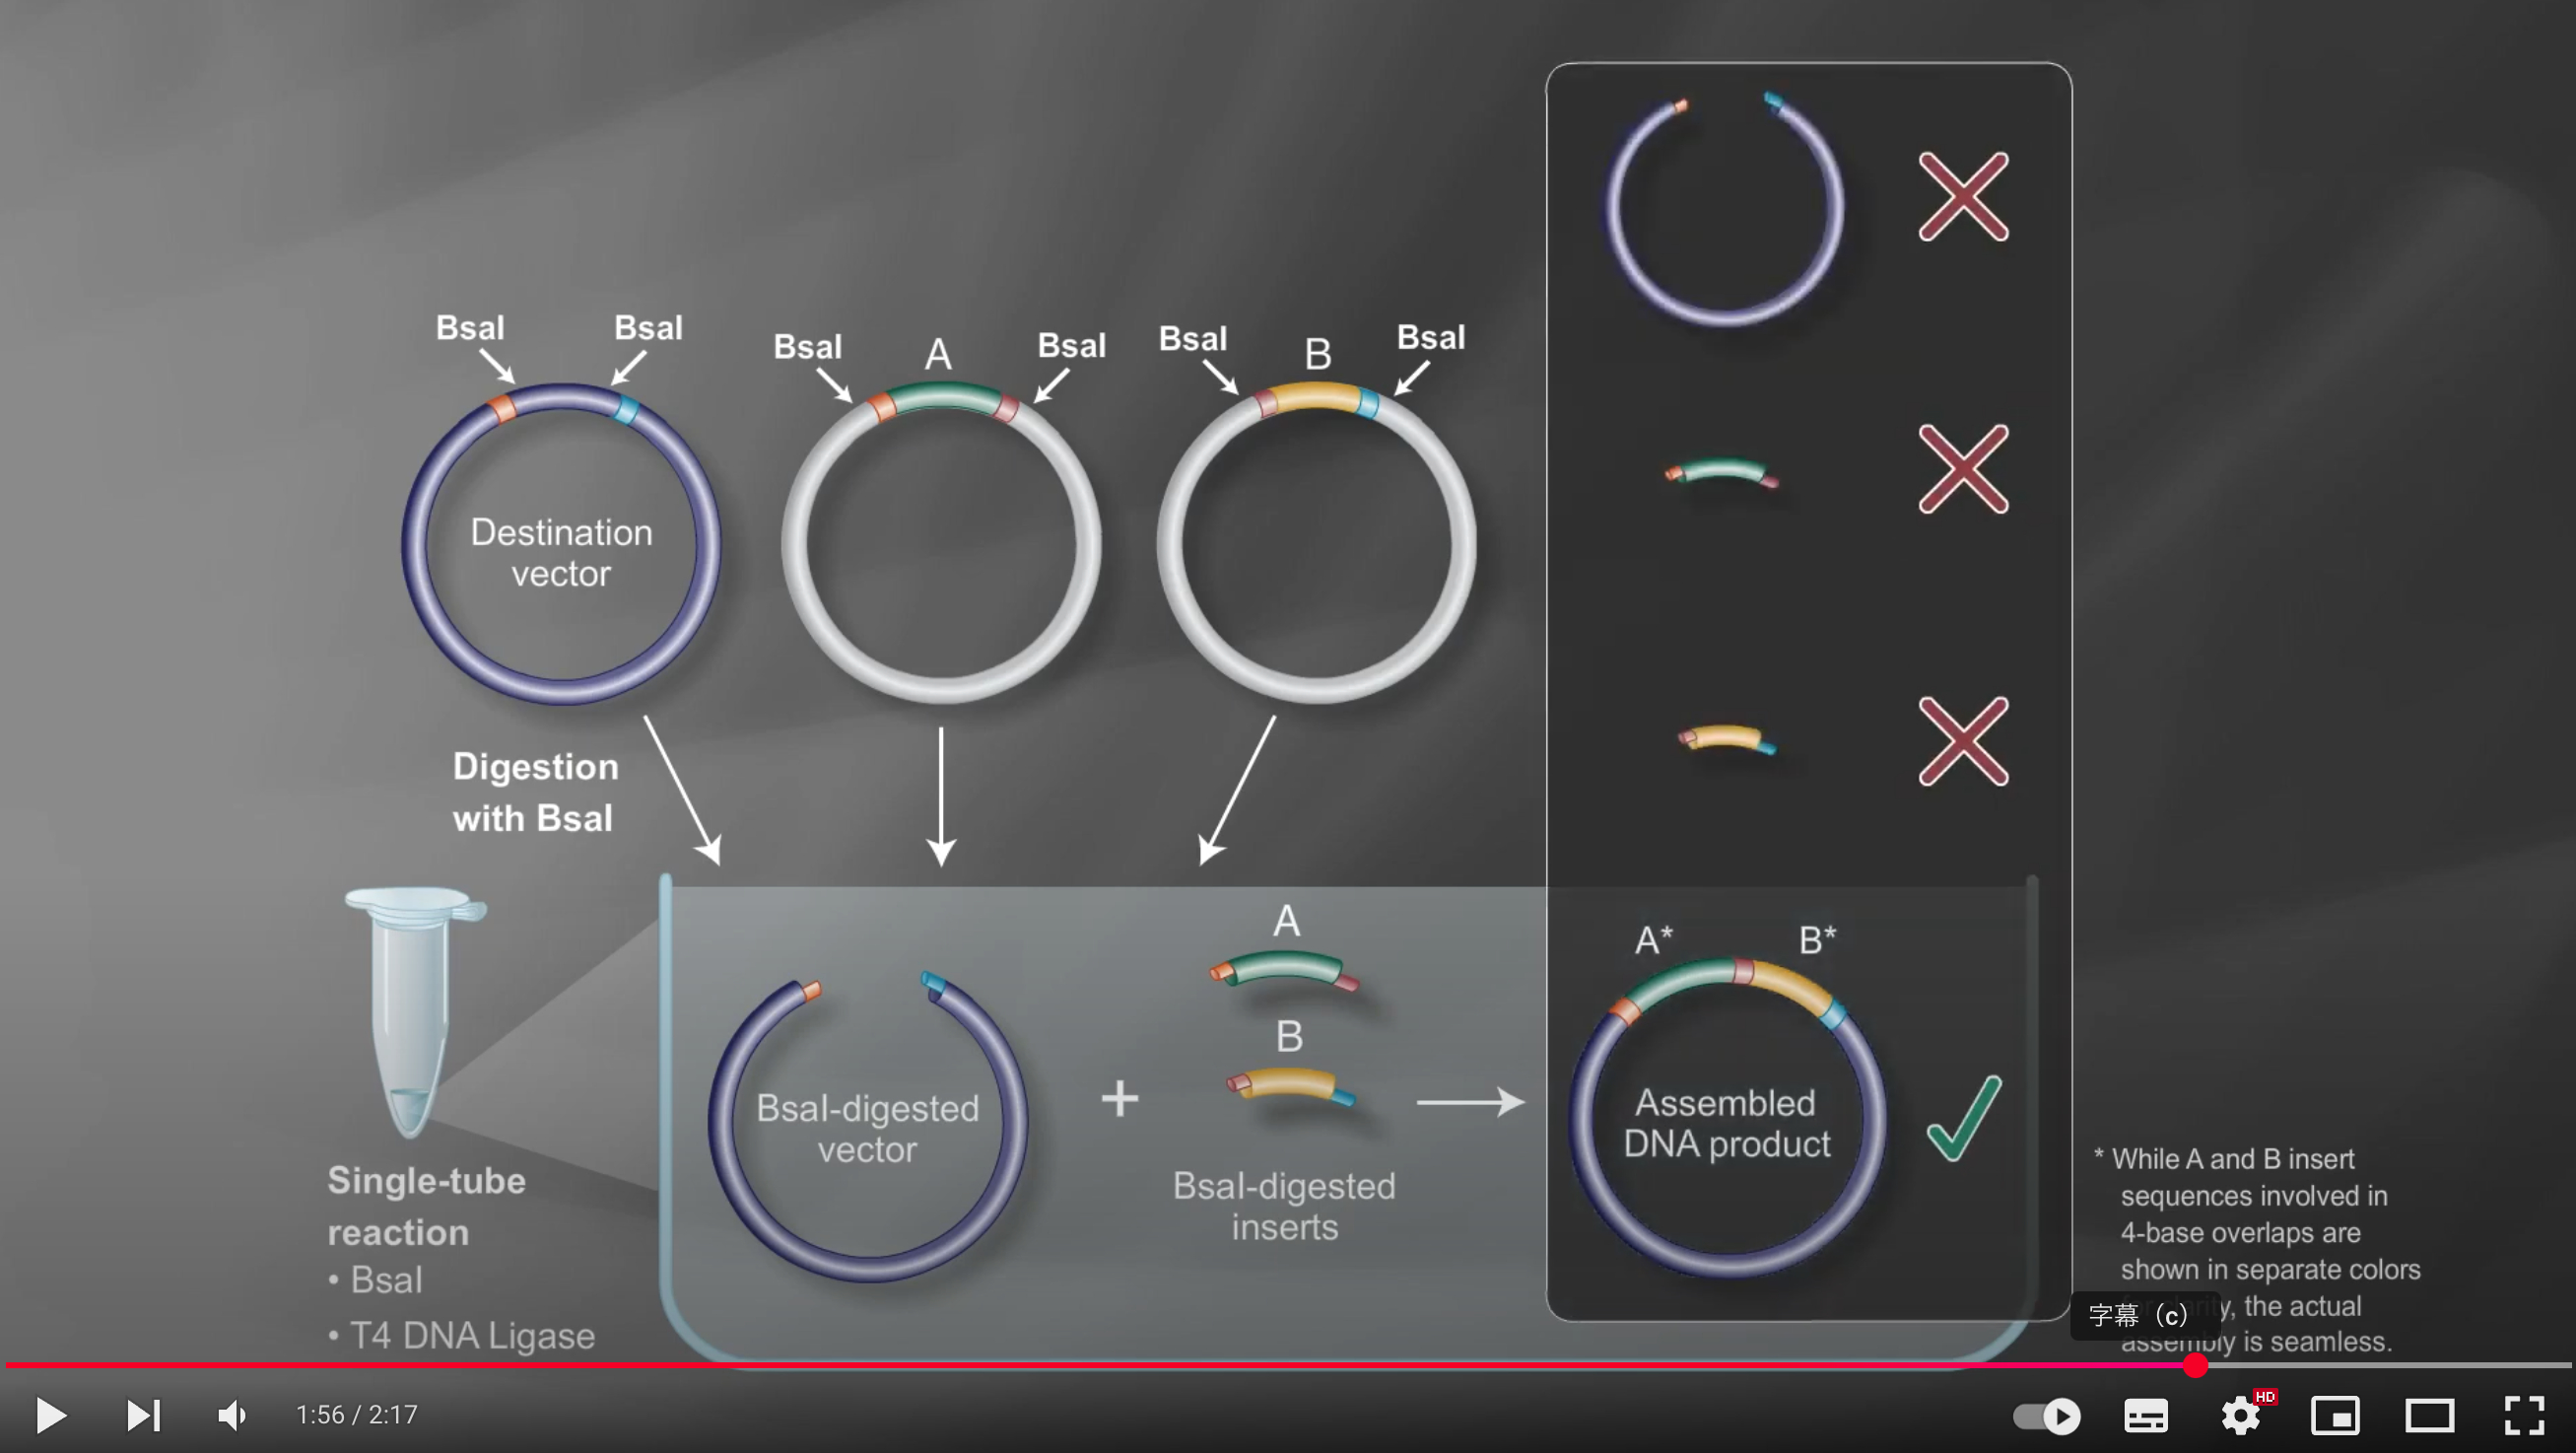
Because Type IIS enzymes cleave outside their recognition sequences, the final product is “scarless,” with no leftover restriction sites
After the reaction, transform the assembled plasmid into E. coli, and confirm the intended construct by sequencing if necessary
Assignment: Asimov Kernel
Create a Repository for your work
Create a blank Notebook entry to document the homework and save it to that Repository
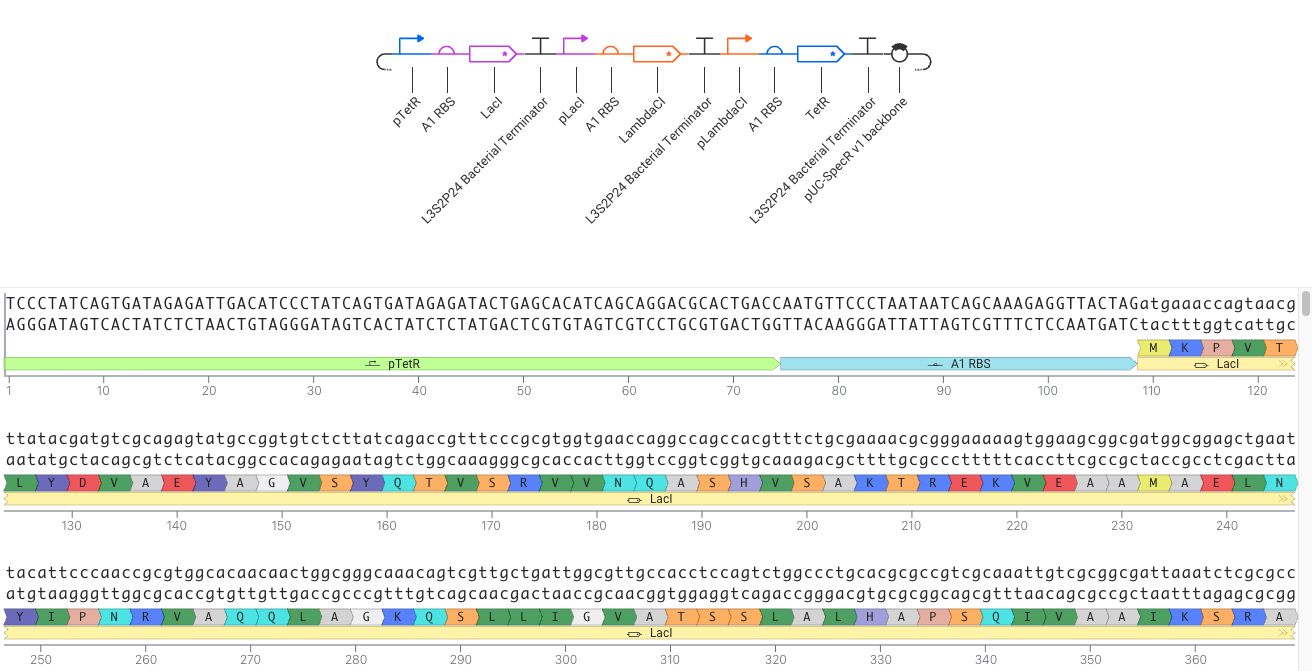
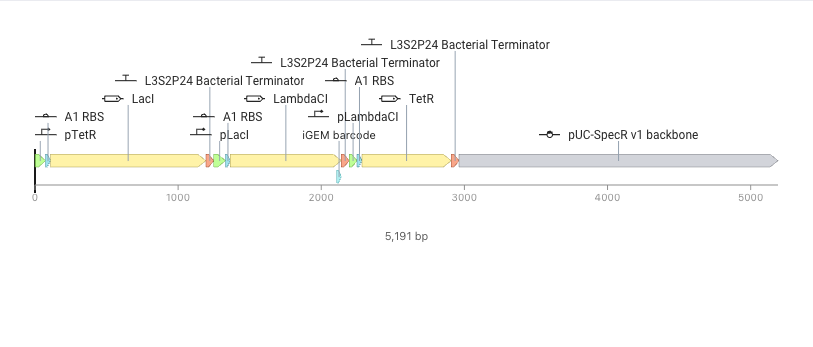
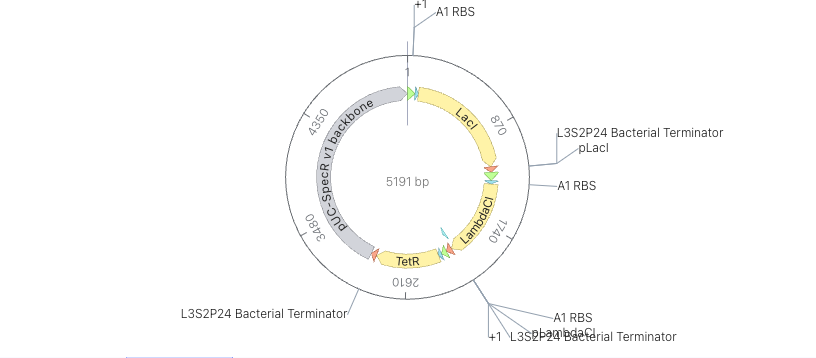
Explore the devices in the Bacterial Demos Repo to understand how the parts work together by running the Simulator on various examples, following the instructions for the simulator found in the “Info” panel (click the “i” icon on the right to open the Info panel)
Create a blank Construct and save it to your Repository
- Recreate the Repressilator in that empty Construct by using parts from the Characterized Bacterial Parts repository
- Search the parts using the Search function in the right menu
- Drag and drop the parts into the Construct
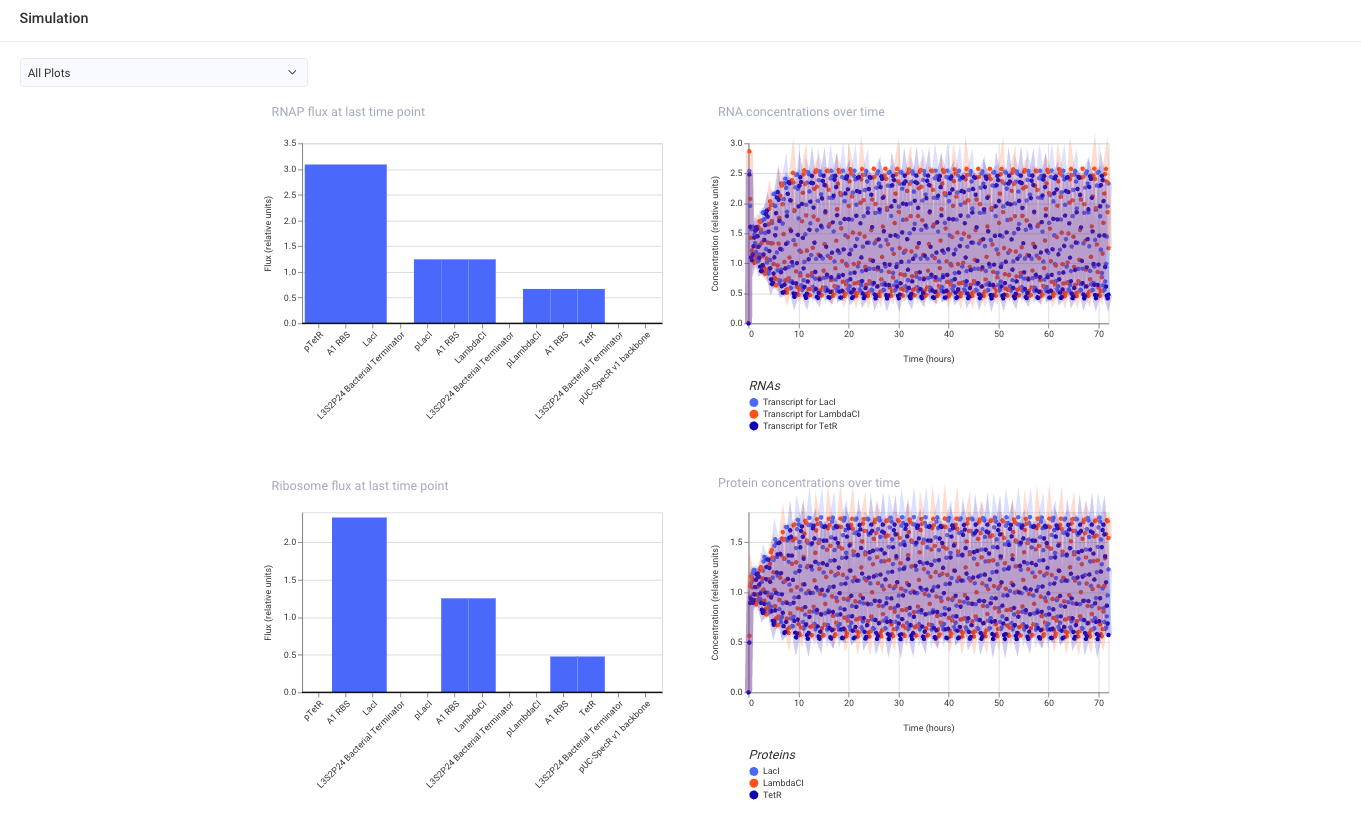
- Confirm it works as expected by running the Simulator (“play” button) and compare your results with the Repressilator Construct found in the Bacterial Demos repository
- Document all of this work in your Notebook entry - you can copy the glyph image and the simulator graphs, and paste them into your Notebook
- Build three of your own Constructs using the parts in the Characterized Bacterials Parts Repo (Characterized Bacterial Parts Repo にあるパーツを使って、自分で 3つの Construct を作りなさい。)
- Explain in the Notebook Entry how you think each of the Constructs should function (それぞれの Construct がどのように機能すると思うかを Notebook Entry に説明する)
- Run the simulator and share your results in the Notebook Entry (Simulator を実行し、その結果を Notebook Entry に共有する)
- If the results don’t match your expectations, speculate on why and see if you can adjust the simulator settings to get the expected outcome (結果が予想と違った場合は、その理由を考察する)
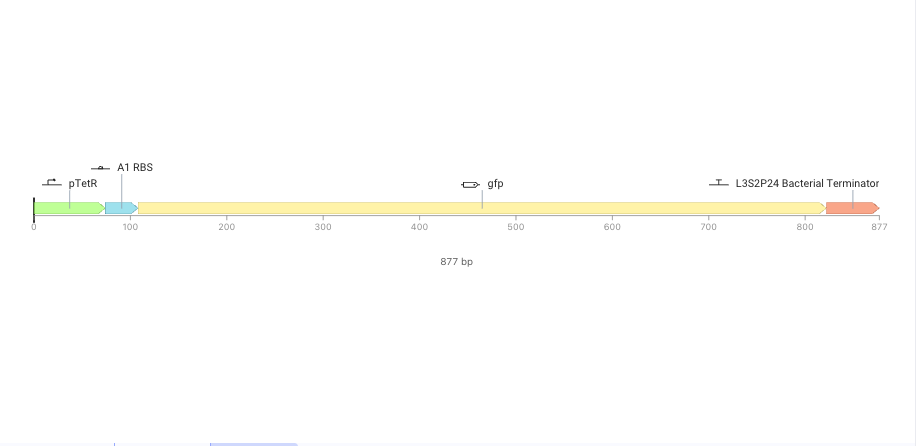
・1 Simple GFP Construct
I expected this construct to express GFP.
Promoter → RBS → GFP → Terminator
Specifically, I used:
pTetR → A1 RBS → gfp → L3S2P4 Bacterial Terminator
pTetR as the promoter : it was a characterized bacterial promoter available in the repository. I chose it instead of an unspecified promoter because I wanted to use a defined part that could be simulated in Kernel. I also noticed that pTetR is commonly used in bacterial circuit examples, so it seemed like a reasonable promoter for a simple first construct. Although pTetR can be regulated by TetR, in this construct I used it mainly as a promoter to drive gfp transcription.
(未指定 promoter より、characterized されていて、Kernel内の bacterial circuit 文脈で使いやすそうだったから。)
A1 RBS as the RBS : RBS is necessary before the coding sequence to recruit ribosomes and start translation.
(発現強度の最適化ではなく、まず translation を開始させる基本部品として使った。)
gfp : GFP is an easy reporter gene to understand. If the construct works, the expected output is GFP expression.
(出力がわかりやすい reporter だから)
L3S2P4 Bacterial Terminator as the Terminator : terminator is needed after the coding sequence to stop transcription. It was a characterized bacterial terminator available in the repository. I chose it instead of an unspecified terminator because I wanted a defined part to stop transcription after gfp.
(未指定 terminator ではなく、characterized された bacterial terminator として使えるから。)
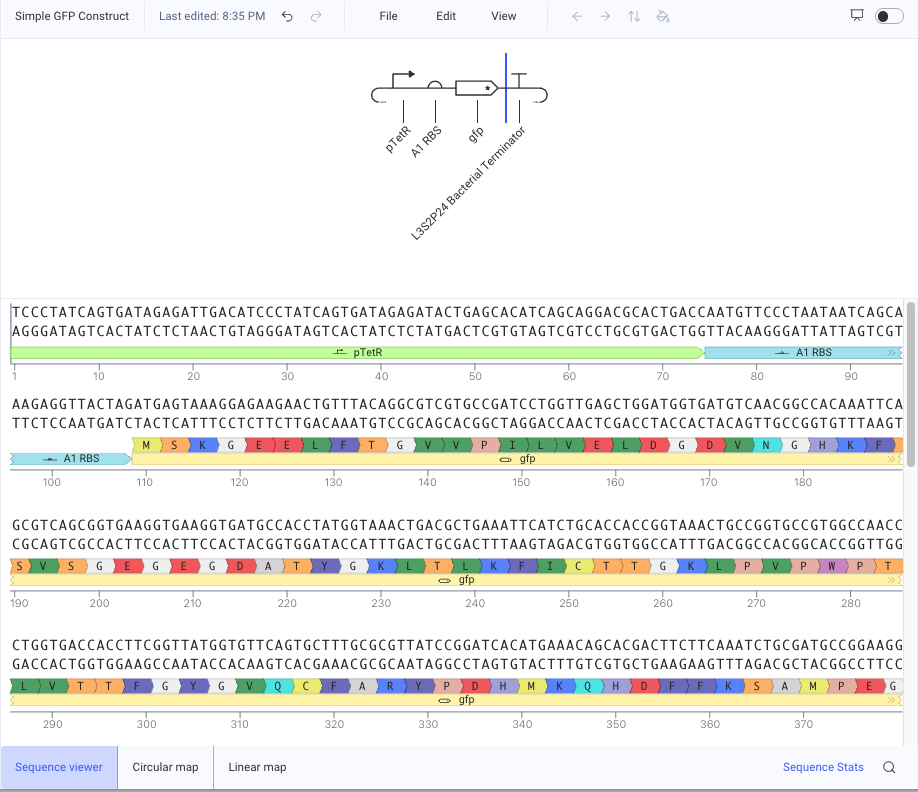

I ran the simulator with the default settings: E. coli chassis, 72 hours duration, 10 min timestep, and transient transfection.
I expected the construct to express GFP because pTetR should drive transcription of gfp, A1 RBS should support translation, and the L3S2P4 Bacterial Terminator should stop transcription after the coding sequence.
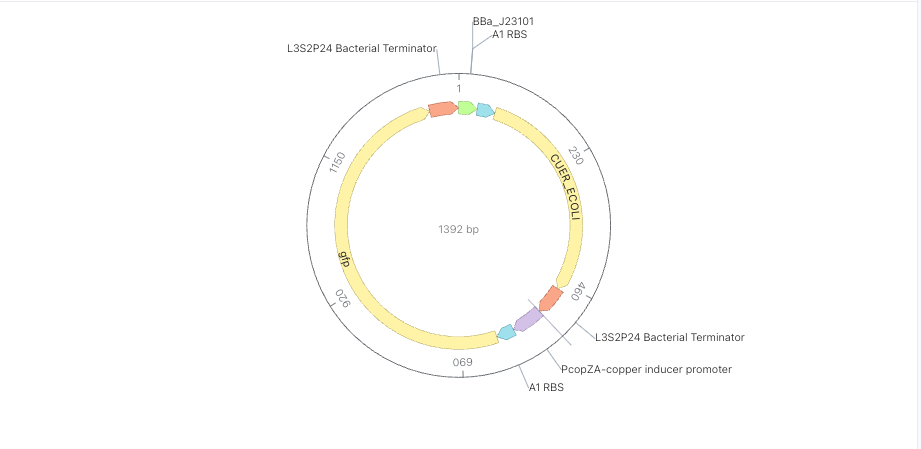
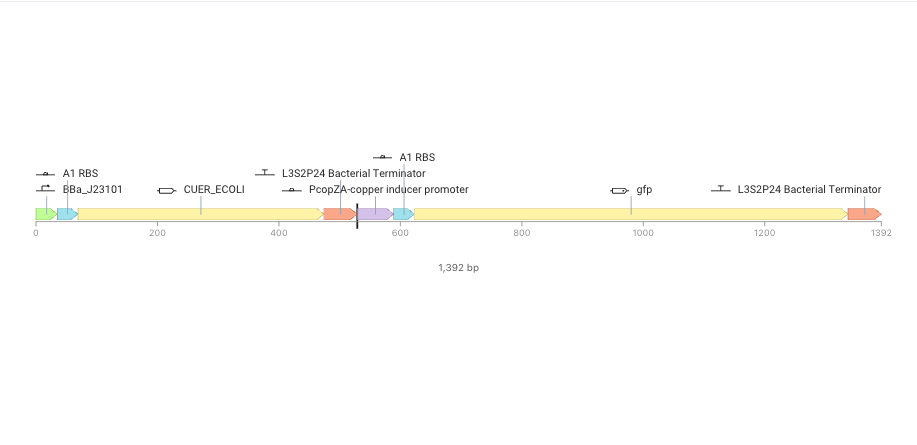
・2 Metal-responsive GFP Construct
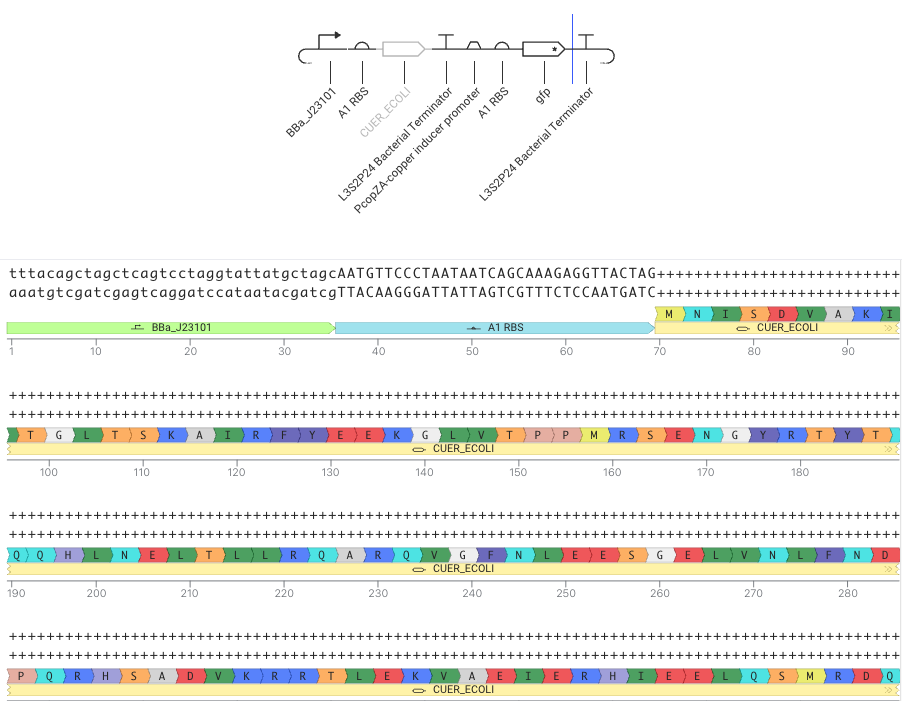
For Construct 2, I attempted to build a metal-responsive GFP construct related to my final project.
Place the two expression units within the same construct 2つの発現ユニットを同じConstruct内に入れる
構造 metal ion → sensor / regulator protein → promoter regulation → GFP expression
1st cassette:
Constitutive promoter → RBS → copper sensor/regulator → terminator
2nd cassette:
PcopZA-copper inducer promoter → RBS → gfp → terminator
1st cassette:
CUER_ECOLI という copper-related regulator を常に発現させる
Constitutive promoter → RBS → copper sensor/regulator → terminator
↓
BBa_J23101 → A1 RBS → CUER_ECOLI → L3S2P4 Bacterial Terminator
BBa_J23101 as Constitutive promoter :
(BBa_J23101 はよく使われる BioBrick の constitutive promoter なので、regulator protein を常に発現させるために選んだ。金属応答 promoter が働くには、先に copper sensor / regulator protein が存在している必要がある。そのため、regulator cassette には inducible promoter より constitutive promoter の方が適している。未指定 promoter ではなく、characterized bacterial part として説明しやすい J23101 を使った。)
A1 RBS as RBS
CUER_ECOLI as copper sensor/regulator
CueR = copper-responsive regulator
1st cassette
2nd cassette:
copper-responsive promoter によって gfp を制御する
PcopZA-copper inducer promoter → RBS → gfp → terminator
↓
PcopZA-copper inducer promoter → A1 RBS → gfp → L3S2P4 Bacterial Terminator
1st + 2nd cassette
Sumilation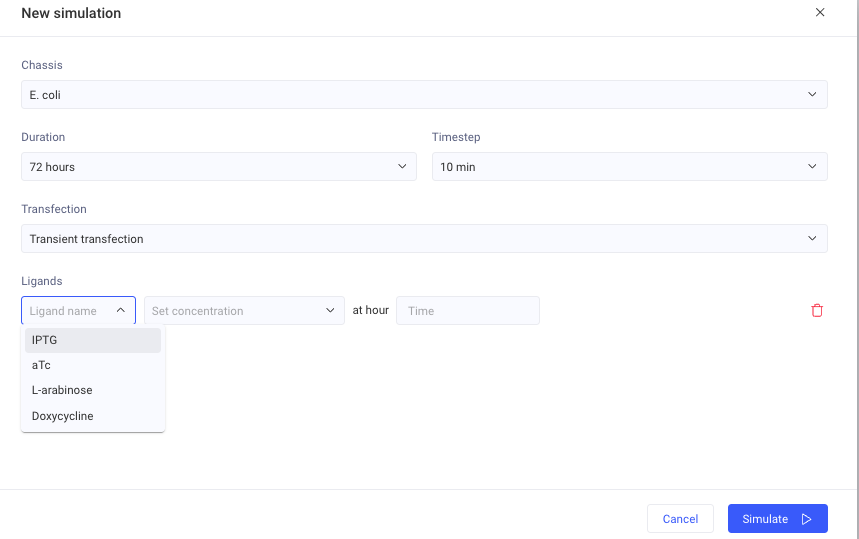
I wanted to test a copper-responsive GFP construct, but the simulator ligand options only included IPTG, aTc, L-arabinose, and Doxycycline.
I could not add copper as a ligand condition.
Therefore, I ran the simulation without a copper ligand.
If the result does not show the expected metal-dependent GFP response, one likely reason is that the required copper ligand condition is not available in the simulator settings.
本来は copper-responsive GFP construct として、copper / Cu²⁺ を ligand として入れたかった。
しかし simulator の ligand options には IPTG、aTc、L-arabinose、Doxycycline しかなく、copper を追加できなかった。
そのため、copper ligand なしで simulation を行った。
期待した metal-dependent GFP response が出ない場合、その理由の一つは、必要な copper ligand 条件が simulator settings に存在しないことだと考えられる。
Run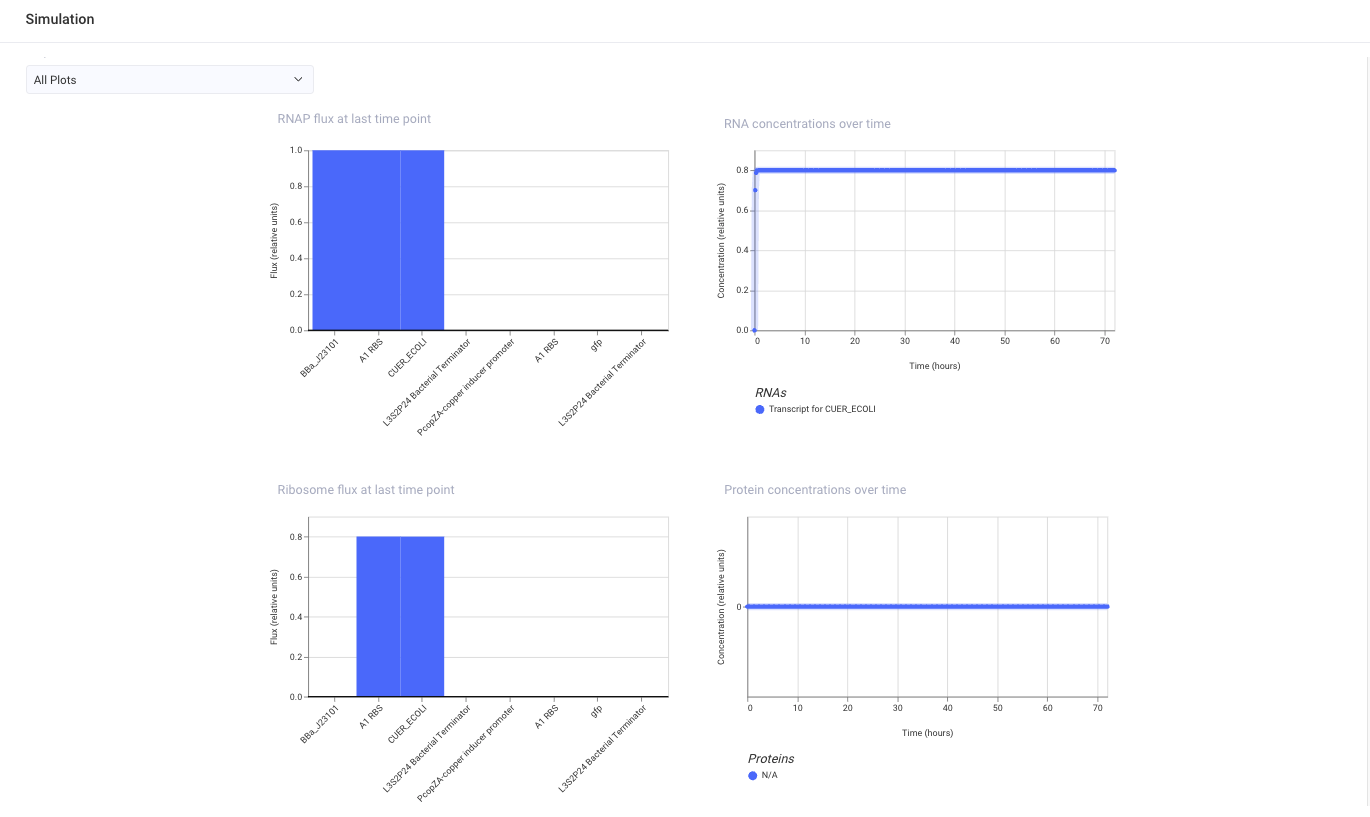
In the simulation, I observed RNA output for CUER_ECOLI, but I did not observe clear GFP protein expression.
One possible reason is that the simulator ligand options did not include copper / Cu²⁺, so I could not add the metal input needed for this circuit.
(Another possible reason is that CUER_ECOLI and PcopZA may not be modeled as a matched regulator-promoter pair in Kernel.)
Therefore, this construct did not behave as I originally expected, but it helped me understand that a metal-responsive genetic circuit requires not only a promoter and reporter gene, but also the correct regulator, ligand condition, and simulation model.
シミュレーションでは、CUER_ECOLI の RNA は見えたが、明確な GFP protein expression は見えなかった。
理由として、simulator の ligand options に copper / Cu²⁺ がなく、金属入力を加えられなかったことではないか?。
(また、CUER_ECOLI と PcopZA が Kernel 内で正しい regulator-promoter pair としてモデル化されていない可能性もある。)
この construct は期待通りには動かなかったが、metal-responsive genetic circuit には promoter と reporter gene だけでなく、正しい regulator、ligand condition、simulation model が必要だとわかった。
・3 Metallothionein Expression Construct
For Construct 3, I wanted to design a genetic circuit related to trace metal concentration in my final project.
Construct 3 では、Final Project に関係する「微量金属の濃縮」を直接シミュレーションするのではなく、濃縮に関わる可能性のある metallothionein を発現する遺伝子回路を設計することにした。
Kernel cannot directly simulate metal binding or metal concentration itself, but it can simulate the expression of a protein that may be involved in metal binding. Therefore, this construct represents the first biological step toward trace metal concentration: producing a protein that could bind metals.
Kernelでは金属結合や金属濃縮そのものは扱えないが、metallothionein のような金属結合タンパク質を作る回路は表現できる。
そのため、この construct は、微量金属を集めるための最初の生物学的ステップとして、金属結合タンパク質を発現させるモデルである。
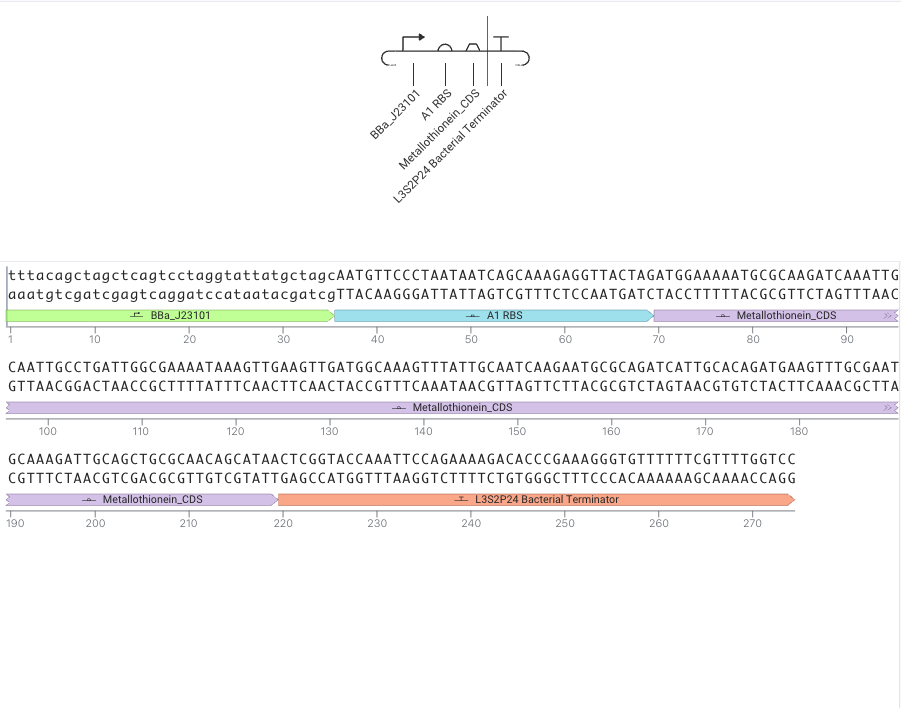
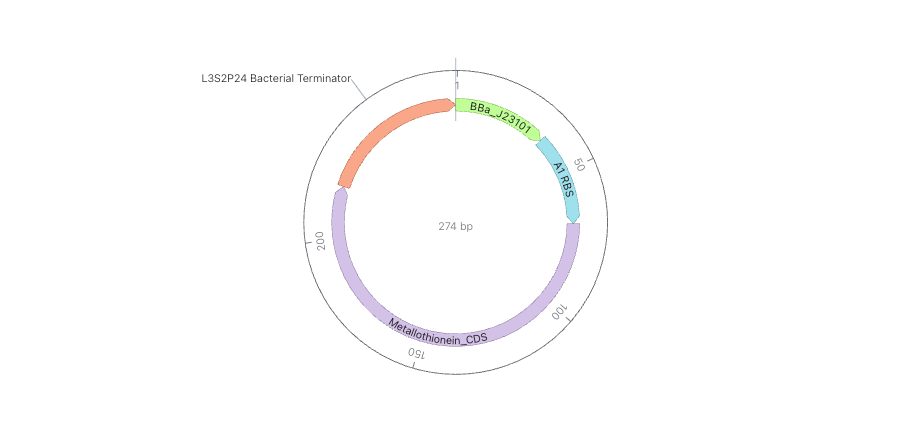
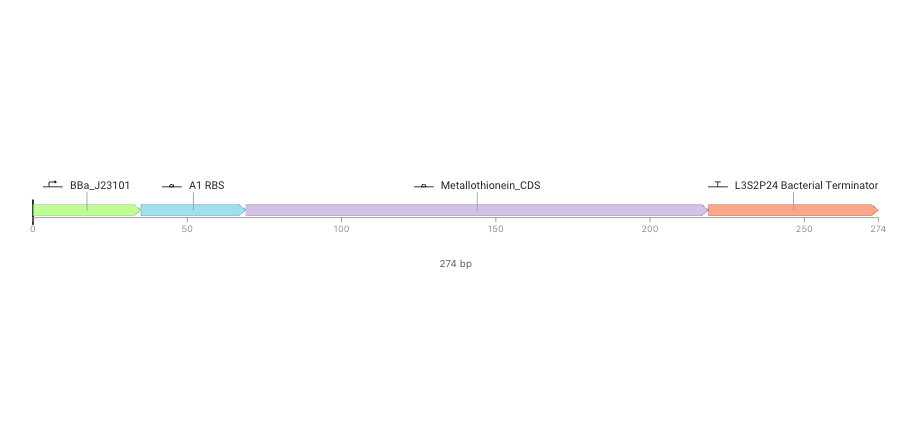
BBa_J23101 → A1 RBS → metallothionein → L3S2P4 Bacterial Terminator
BBa_J23101 as promoter:
A1 RBS as RBS
Metallothionein_CDS as metallothionein
CDS means coding sequence, and this part should encode the metallothionein protein.
Metallothionein is a metal-binding protein, so expressing this CDS is a first genetic-circuit step toward producing a protein that may bind trace metals.
(CDS は coding sequence の意味で、タンパク質をコードする領域である。
Metallothionein_CDS は metallothionein protein を作るための配列なので、金属結合タンパク質を発現させる construct の中心部分として使える。 )
L3S2P4 Bacterial Terminator as terminator
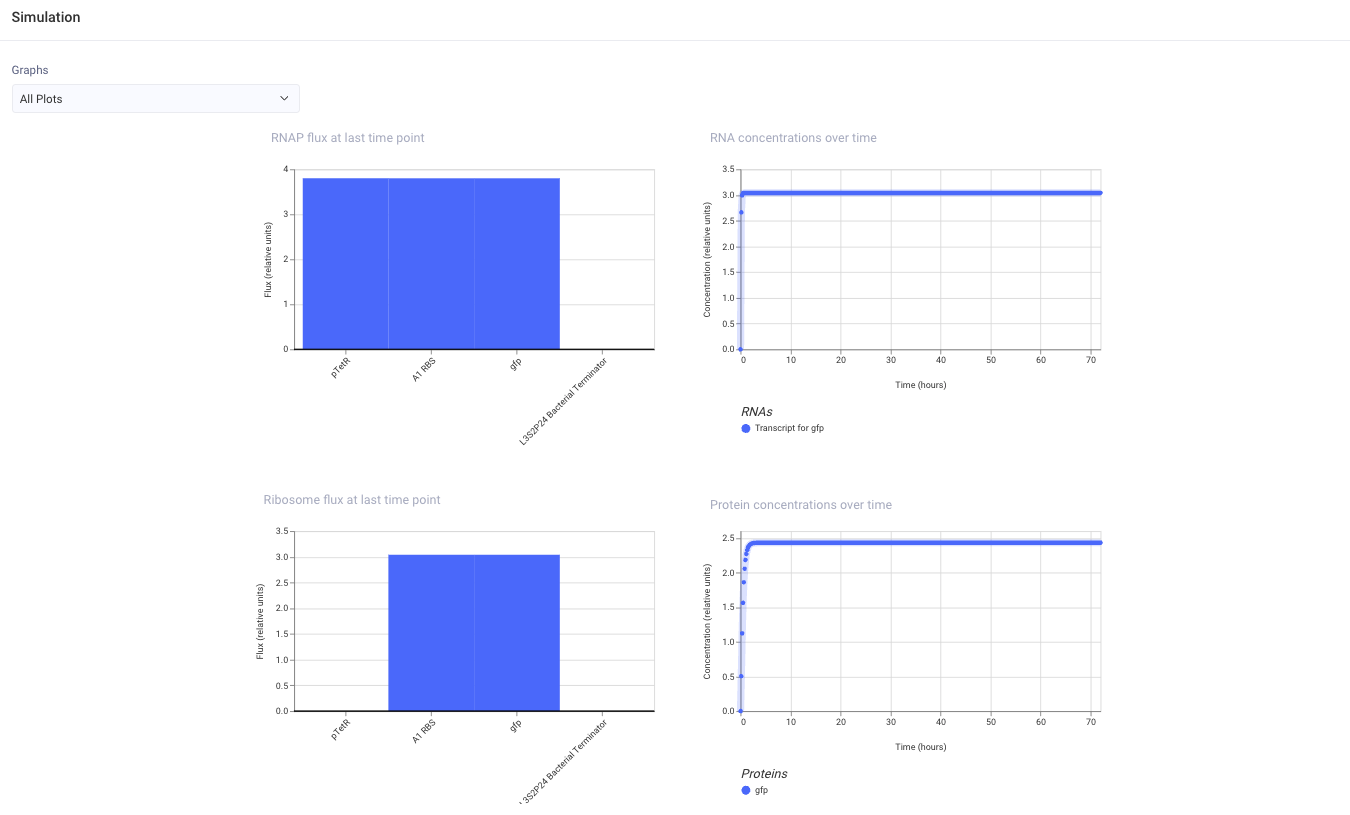
Sumilation
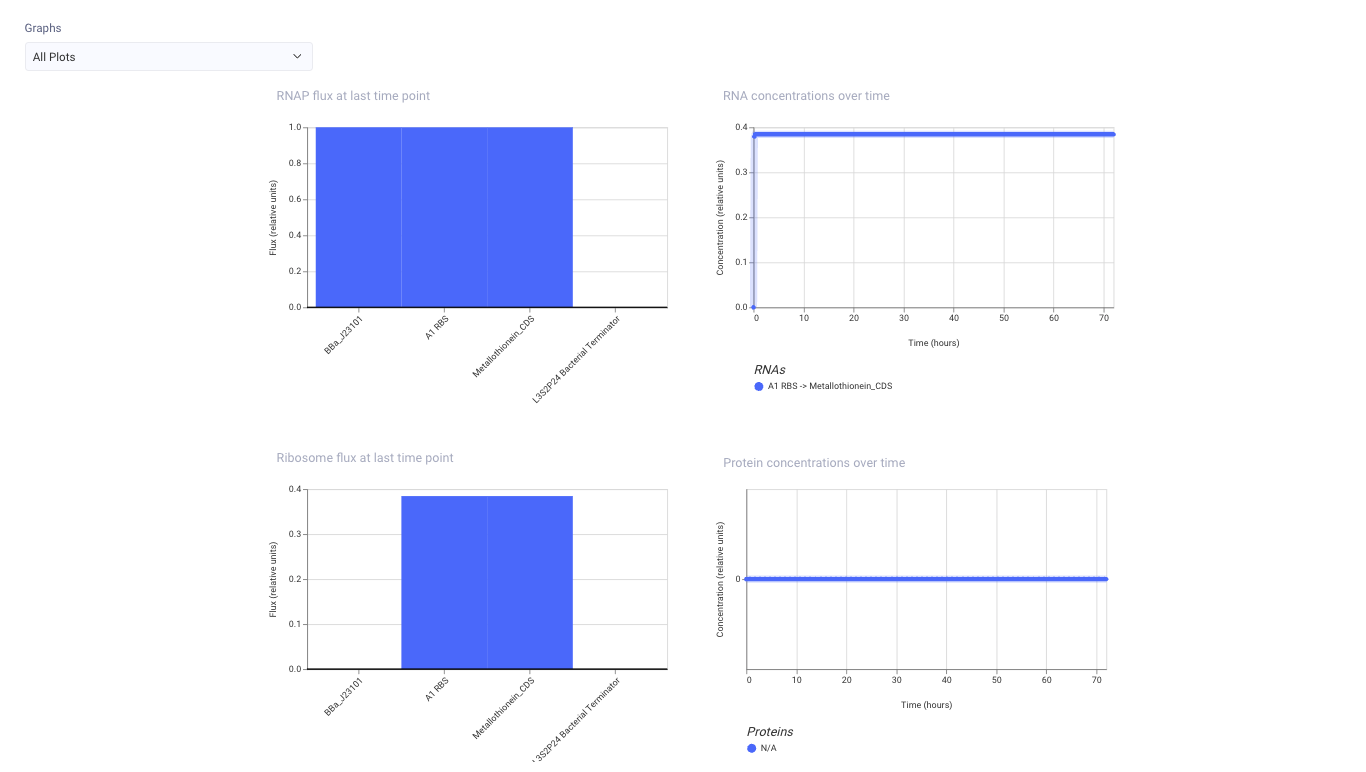
RNAP flux is visible
→ This suggests that transcription is occurring from the promoter.(promoter から transcription が起きていると考えられる)
RNA concentration is visible
→ This suggests that a transcript for A1 RBS → Metallothionein_CDS is being produced.(A1 RBS → Metallothionein_CDS の transcript が作られている)
Ribosome flux is visible
→ This suggests that translation may be occurring.(translation が起きている可能性がある)
Protein concentration is N/A / almost zero
→ This suggests that Kernel may not be modeling the concentration of the metallothionein protein properly.(Kernel上では metallothionein protein の濃度まではうまくモデル化されていない可能性がある)
I chose Metallothionein_CDS because metallothionein is a metal-binding protein. Kernel cannot directly simulate metal binding or metal concentration, but it can simulate the genetic circuit that would express a protein related to metal binding.
In the simulation, I observed RNAP flux, RNA concentration, and ribosome flux for the Metallothionein_CDS construct.
This suggests that the construct was transcribed and may be translated in the simulation.
However, the protein concentration plot showed N/A or no clear protein output. One possible reason is that Kernel may not have a complete protein model for this metallothionein part.
Metallothionein は金属結合タンパク質なので、微量金属の濃縮に関係する可能性がある。Kernelでは金属結合や濃縮そのものはシミュレーションできないが、金属結合に関わるタンパク質を発現させる遺伝子回路は表現できる。
シミュレーションでは、RNAP flux、RNA concentration、ribosome flux が見られたため、この construct は転写され、翻訳も起きている可能性がある。
一方で、protein concentration のグラフは N/A または明確な出力が見えなかった。 これは、Kernel内で metallothionein protein のモデルが十分に定義されていない可能性や、Kernelが金属結合・濃縮プロセスまでは扱えないためだと考えられる。