Week 6 HW: Genetic Circuits Part 1
Components of the Phusion High-Fidelity PCR Master Mix
Phusion HF PCR Master Mix is a pre-made 2× formulation that contains several key components:
- Phusion DNA Polymerase. A high-fidelity, thermostable polymerase fused to a processivity-enhancing domain. Its error rate is roughly 50× lower than Taq polymerase, which is critical when accurate amplification is required (as in this mutagenesis lab, where only intentional mismatches should be introduced).
- dNTPs. Deoxyribonucleotide triphosphates (dATP, dTTP, dGTP, dCTP); the raw building blocks that the polymerase uses to synthesize new DNA strands.
- MgCl&sub2;. Provides magnesium ions, an essential cofactor for polymerase activity that also influences primer annealing stringency.
- HF Buffer. Maintains optimal pH and salt conditions for the enzyme. The “HF” designation indicates an optimized formulation for high-fidelity amplification across a broad range of templates. Some versions also include detergents and stabilizers that help the enzyme tolerate common inhibitors.
The master mix format reduces pipetting steps and the chance of contamination: you only need to add template, primers, and water.
Factors that determine primer annealing temperature during PCR
The annealing temperature is typically set 2 to 5°C below the lower melting temperature ($T_m$) of the two primers in a pair. Several factors set the optimal temperature:
- Primer length. Longer primers generally have higher $T_m$ because more hydrogen bonds stabilize the duplex.
- GC content. G–C pairs form three hydrogen bonds vs. two for A–T pairs, so primers with higher GC content (ideally 40 to 60%) have higher $T_m$.
- Salt and cation concentration. Mg²+ and monovalent cations stabilize DNA duplexes; higher concentrations raise the effective $T_m$.
- Mismatches. The color forward primers in this lab carry intentional mismatches at the chromophore region. Mismatches destabilize binding and effectively lower $T_m$, which is why the insert fragment PCR uses a lower annealing temperature (53°C) than the backbone PCR (57°C).
- Primer concentration. Higher concentrations shift the equilibrium toward annealing.
- Secondary structure in primer or template. Hairpins and self-dimers compete with proper annealing. The protocol recommends checking for these and keeping Gibbs free energy above −10 kcal/mol.
PCR vs. restriction digest for making linear DNA
Both PCR and restriction enzyme digestion produce linear DNA fragments, but they work through fundamentally different mechanisms.
Protocol differences
Restriction digestion is simpler. You mix DNA with the enzyme(s) in the appropriate buffer, incubate (often 37°C for 1 hour), and the enzyme cuts at its recognition sequence. PCR requires designing primers, setting up a reaction with polymerase and dNTPs, and running a thermocycling program with denaturation, annealing, and extension steps. PCR takes about 90 minutes.
Output differences
Restriction enzymes cut at fixed, naturally occurring (or engineered) recognition sites, so you have no flexibility about exactly where the cut happens unless you have previously cloned in a new site. PCR lets you amplify any arbitrary region defined by your primer binding sites, giving complete control over fragment boundaries. PCR also amplifies: you go from a tiny amount of template to millions of copies. Restriction digestion only cuts what is already there, so you need more starting material.
Mutagenesis capability
A key advantage of PCR is that primers can introduce mutations. The color forward primers in this lab contain intentional mismatches at the chromophore site, so the amplified product carries the desired mutation. Restriction enzymes cannot introduce new sequence; they only cut existing sequence.
When to use each
| Method | Preferable when |
|---|---|
| Restriction digestion | Well-placed unique sites already exist in the plasmid; you want a simple and fast workflow; you need to avoid the risk of polymerase errors accumulating over many cycles. Standard for traditional cloning into multiple cloning sites. |
| PCR | You need to amplify from a small amount of template, define custom fragment boundaries, introduce mutations, or add overhangs for assembly methods like Gibson. |
In this lab, PCR is the right choice because we need to introduce chromophore mutations and add overlapping ends for Gibson assembly. Restriction digestion alone could not accomplish either.
Verifying readiness for Gibson cloning
Several verification steps are important:
- Overlapping ends. Gibson assembly requires 20 to 40 bp of complementary sequence between adjoining fragments. Confirm that your primer design creates these overlaps correctly: each primer’s 5′ overhang should be complementary to the end of the adjacent fragment.
- DpnI digestion. After PCR, treating with DpnI destroys the methylated parental template plasmid, ensuring only your newly synthesized, unmethylated PCR products go into the Gibson reaction. Without this step, background colonies from intact template would confound results.
- DNA purification. The Zymo Clean & Concentrator step removes primers, dNTPs, polymerase, and buffer salts that could interfere with the Gibson assembly enzymes.
- Concentration measurement. Use Nanodrop or Qubit to verify DNA concentration (above ~30 ng/μL) so that the proper 2:1 insert-to-vector molar ratio is achievable.
- Gel electrophoresis. A diagnostic gel confirms that fragments are the expected size. An unexpected band could indicate mispriming, non-specific amplification, or an incorrect primer design.
- Sequence verification. Confirm correct orientation (5′ to 3′) and that overlaps match between fragments to prevent assembly failures.
How plasmid DNA enters E. coli during transformation
This lab uses chemical (heat-shock) transformation with chemically competent DH5α cells. These cells have been pre-treated with calcium chloride, which neutralizes the negative charges on both the cell membrane and the DNA, reducing electrostatic repulsion and allowing DNA to associate with the cell surface.
| Step | What happens |
|---|---|
| Ice incubation (30 min) | DNA–cell complexes form at the membrane. |
| Heat shock at 42°C (45 s) | Thermal imbalance transiently opens pores in the membrane; the temperature jump also creates a concentration gradient that drives DNA into the cell by diffusion. |
| Return to ice (5 min) | Helps reseal the membrane and stabilize the cells. |
| Recovery in SOC at 37°C (1 h) | Cells repair their membranes, begin replicating, and start expressing antibiotic resistance from the plasmid. |
When plated on selective media containing chloramphenicol, only cells that successfully took up and are expressing the plasmid will survive and form colonies.
Another assembly method: Golden Gate
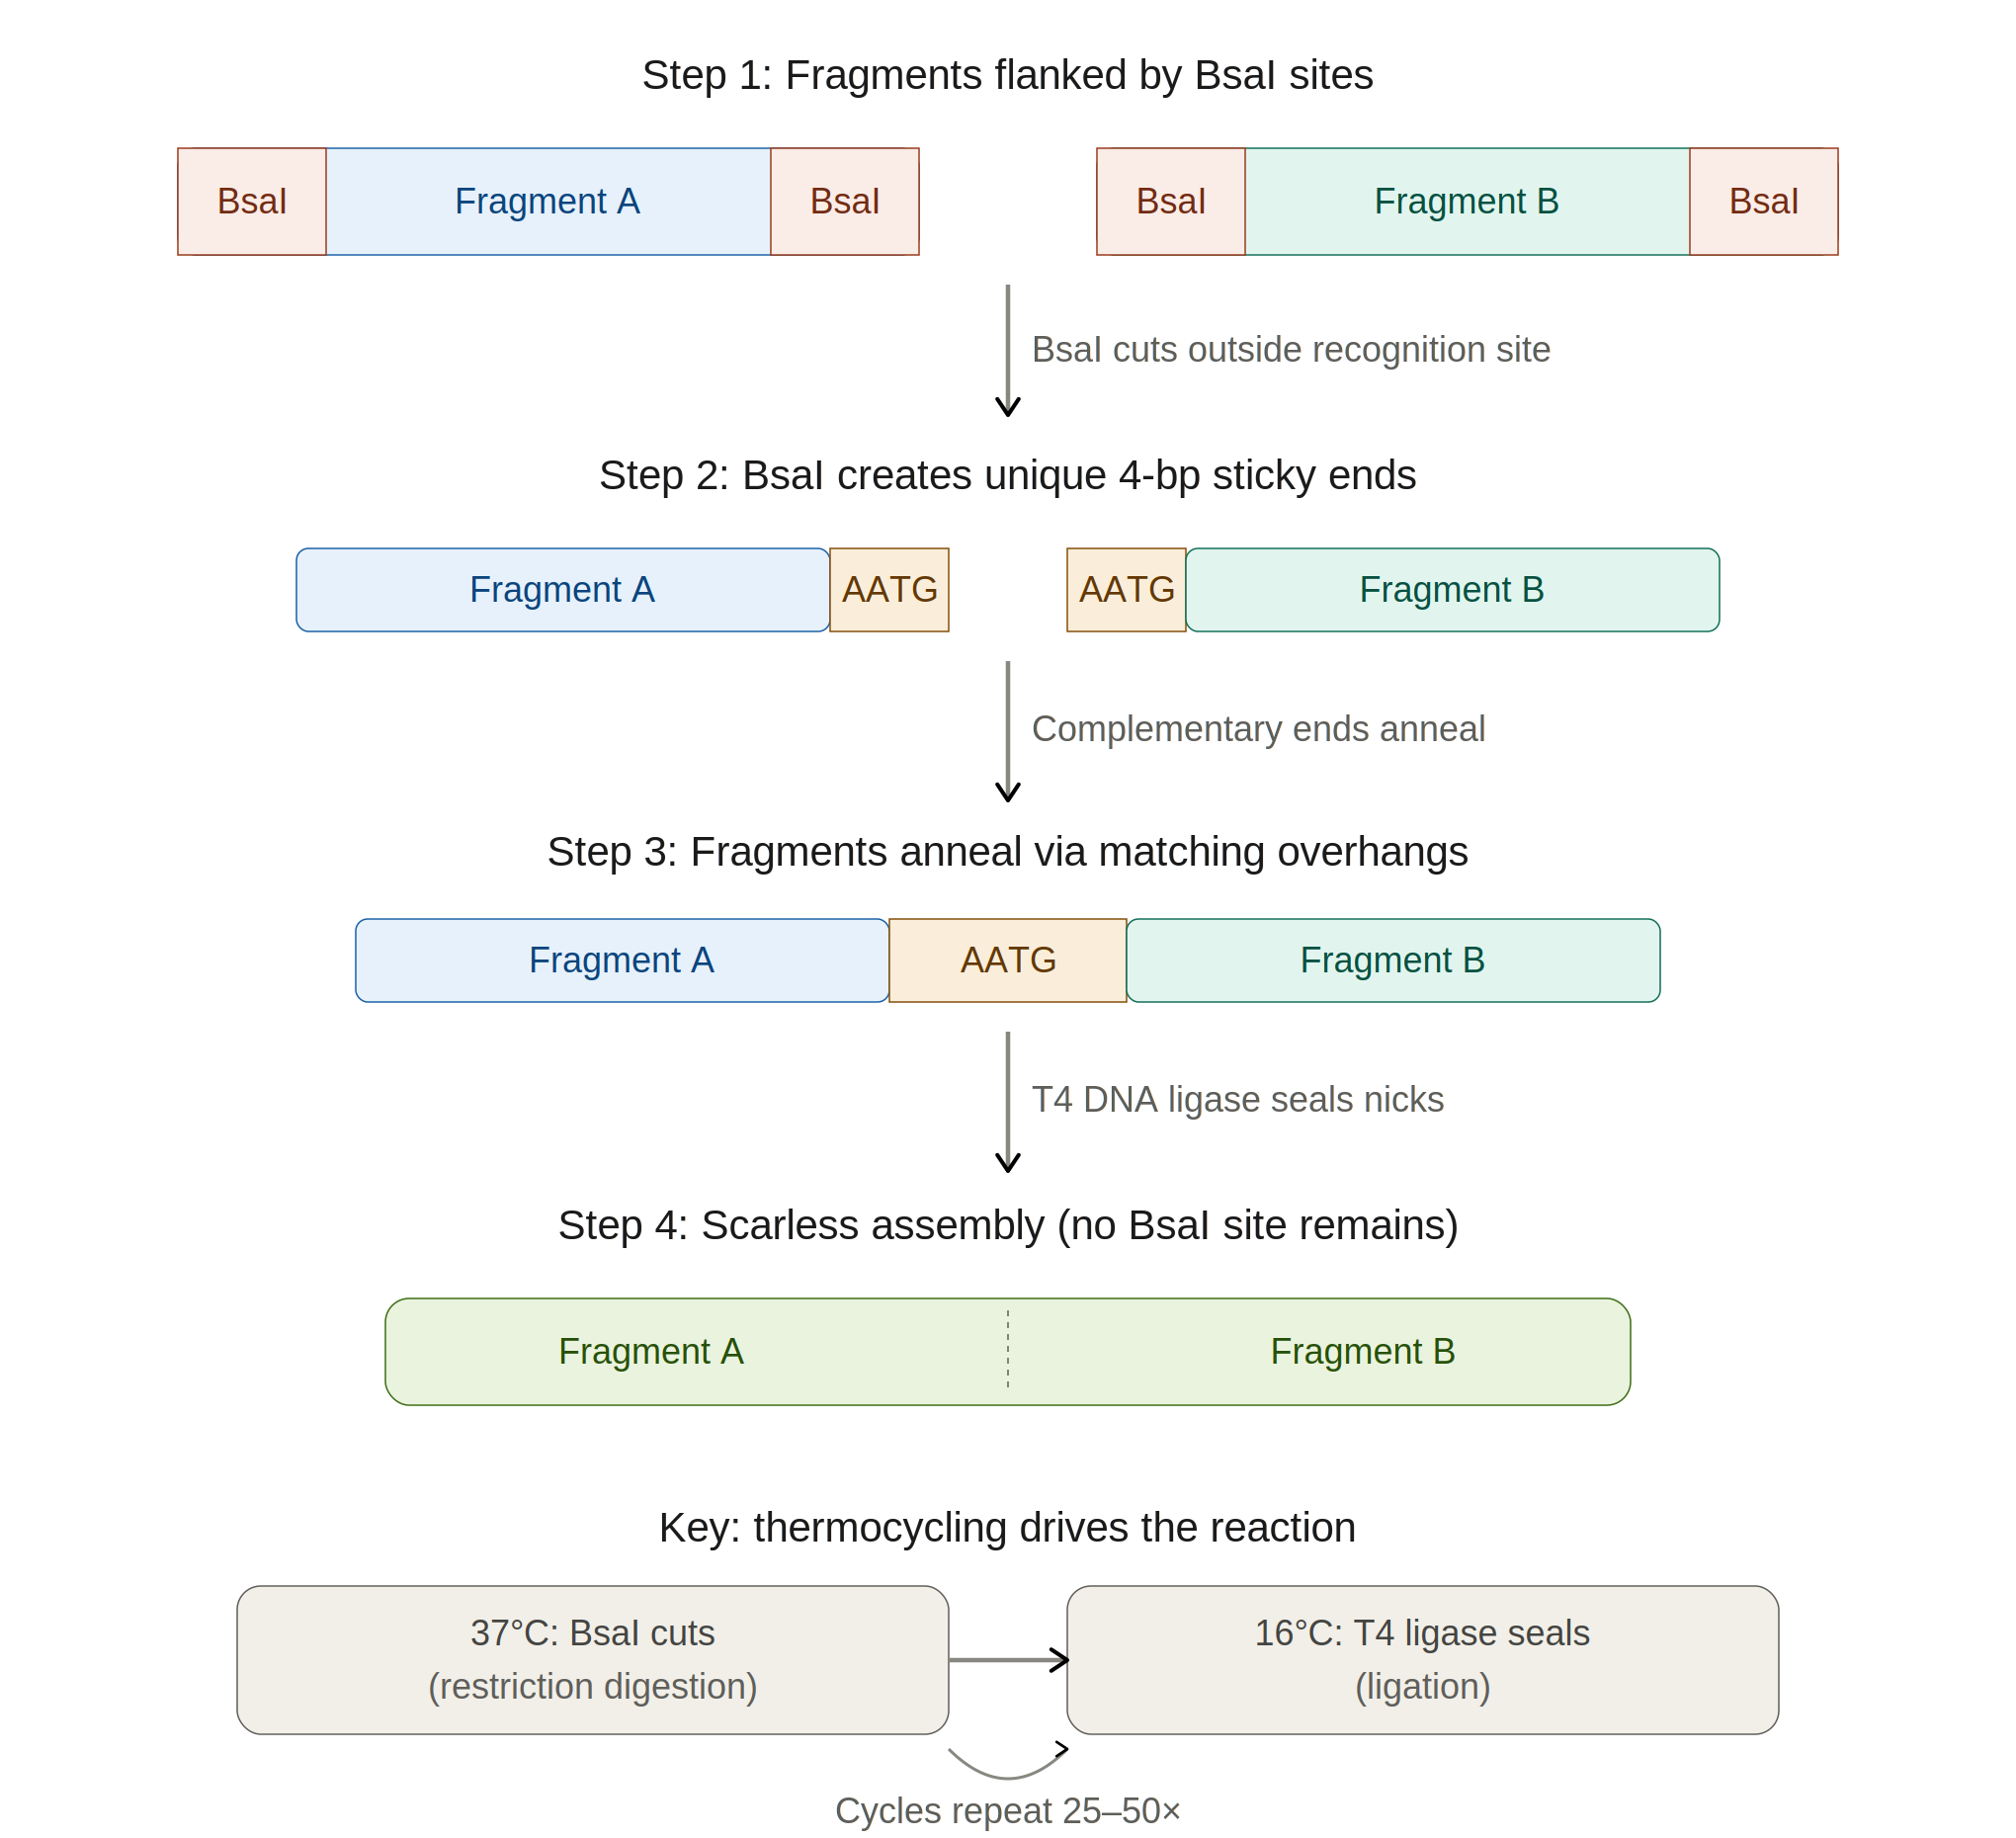
Golden Gate Assembly is a one-pot, one-step cloning method that uses Type IIS restriction enzymes (most commonly BsaI or BbsI) to create seamless, scarless assemblies of multiple DNA fragments. Unlike conventional restriction enzymes that cut within their recognition site, Type IIS enzymes cut at a defined distance outside their recognition sequence, so the recognition site can be positioned to be removed from the final product.
This allows the designer to specify custom 4-bp sticky-end overhangs at each junction, enabling ordered, directional assembly of many fragments simultaneously. The reaction is run as a thermocycling protocol alternating between the restriction enzyme’s optimal temperature (~37°C) and the ligase’s optimal temperature (~16°C), which drives the equilibrium toward the correctly assembled product, since correctly ligated junctions no longer contain the enzyme recognition site and cannot be re-cut. Golden Gate can efficiently assemble 10+ fragments in a single reaction, making it particularly powerful for combinatorial library construction or modular cloning systems like MoClo and PhytoBricks.
Compared to Gibson, which uses sequence homology overlaps and works best with 2 to 6 fragments, Golden Gate offers more precise control over junction sequences and higher efficiency with many fragments. It does require that the Type IIS recognition site not appear internally in any fragment.
How Golden Gate works (step by step)
Comparing Golden Gate to Gibson (from this lab)
| Gibson | Golden Gate | |
|---|---|---|
| Junction chemistry | 20–40 bp homologous overlaps | 4-bp custom sticky-end overhangs |
| Reaction format | Isothermal, 50°C | Thermocycling between 37°C and 16°C |
| Enzymes | Exonuclease + polymerase + ligase | Type IIS RE + ligase |
| Sweet spot | 2–3 fragments (like this chromophore lab) | 10+ fragments in defined order |
| Why it works | Overlaps drive assembly | Junctions remove the recognition site, blocking re-cutting |
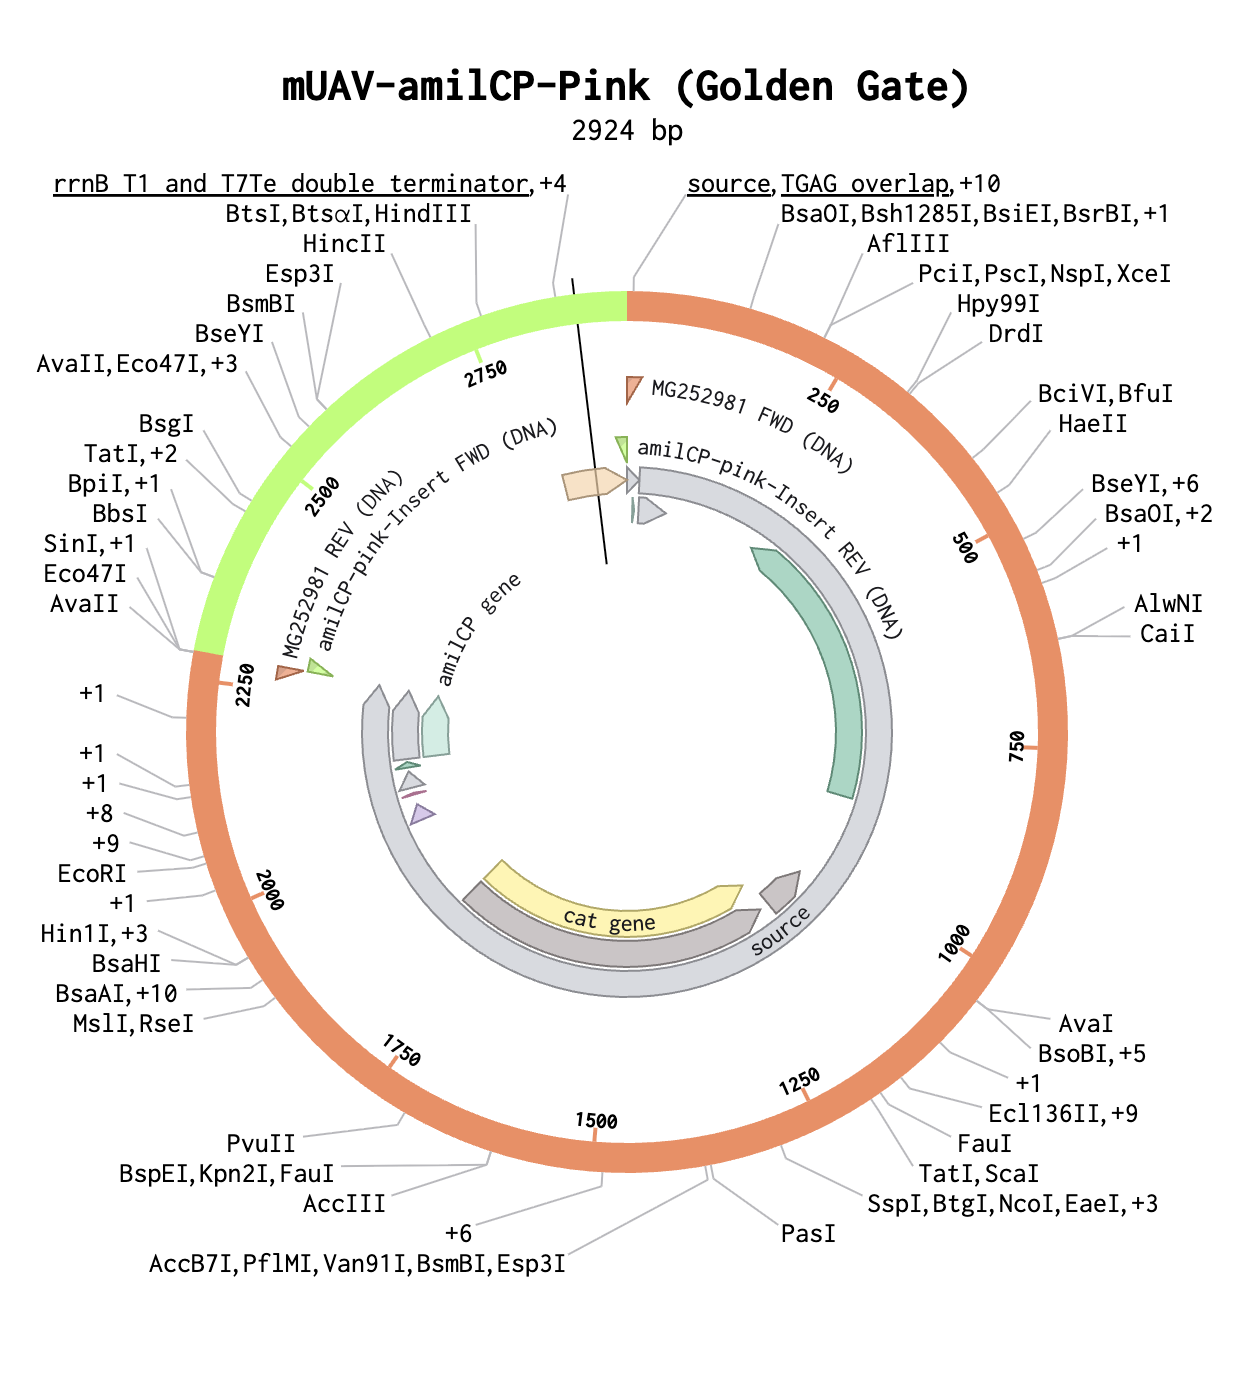
Modeling Golden Gate in Benchling
Below is the completed Golden Gate assembly with a pink insert.
Asimov Kernel
Create a repository and notebook
Explore the bacterial demos repo
I explored the devices in the Bacterial Demos repo to understand how the parts work together by running the Simulator on various examples and reading the “Info” panel for each.
Recreate the Repressilator
I recreated the Repressilator in a blank Construct using parts from the Characterized Bacterial Parts repository, then confirmed the simulation matched the reference Repressilator in the Bacterial Demos repo.
Build three custom constructs
For each construct I describe the intended function, run the simulator, and share the results. Where the results don’t match expectations, I speculate on why and adjust simulator settings to recover the expected outcome.
Construct 1.
Construct 2.
Construct 3.