Week 3 — Lab Automation
Assignment: Python Script for Opentrons Artwork — DUE BY YOUR LAB TIME! Your task this week is to Create a Python file to run on an Opentrons liquid handling robot.
Review this week’s recitation and this week’s lab for details on the Opentrons and programming it. Generate an artistic design using the GUI at opentrons-art.rcdonovan.com. Using the coordinates from the GUI, follow the instructions in the HTGAA26 Opentrons Colab to write your own Python script which draws your design using the Opentrons. You may use AI assistance for this coding — Google Gemini is integrated into Colab (see the stylized star bottom center); it will do a good job writing functional Python, while you probably need to take charge of the art concept. If you’re a proficient programmer and you’d rather code something mathematical or algorithmic instead of using your GUI coordinates, you may do that instead. Ask for help early! If you are having any trouble with scripting, contact your TAs as soon as possible for help. Do not wait until your scheduled robot time slot or you may not be able to complete this assignment!
If the Python component is proving too problematic even with AI and human assistance, download the full Python script from the GUI website and submit that: Use the download icon pointed to by the red arrow in this diagram. Use the download icon pointed to by the red arrow in this diagram.
If you use AI to help complete this homework or lab, document how you used AI and which models made contributions. Sign up for a robot time slot if you are at MIT/Harvard/Wellesley or at a Node offering Opentrons automation. The Python script you created will be run on the robot to produce your work of art! At MIT/Harvard? Lab times are on Thursday Feb.19 between 10AM and 6PM. At other Nodes? Please coordinate with your Node. Submit your Python file via this form.
Hello again, friend. I hope you’ve been enjoying what I’ve been doing week by week. In this first part of WH3, I’ll be showcasing the art that can be created using both Python code and Opentrons.
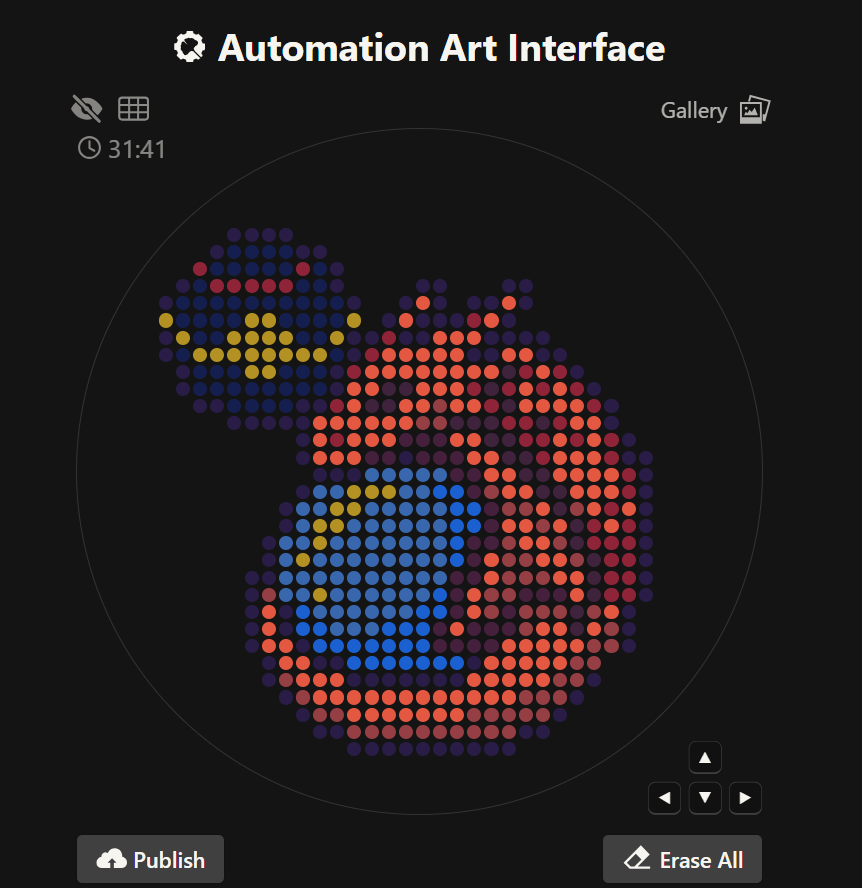
First, let’s start with the artwork I created in OpenTrons. I really enjoyed making this piece because it reminds me of pixel art. What I drew is the Pokémon Charizard sleeping with a Luxury Ball beside it. It’s a design I enjoyed creating. If you’d like to see it more clearly and check the coordinates and fonts I used, you can find it under the name SleepingCharizard.
I also tried to do it in Python code so a bot could recreate it in my Node lab. I wrote the code on Google Colab. I used an AI called ChatGPT for help with the code. I know there are better AIs to use, but all I needed were some coordinate points for my variables, so ChatGPT was sufficient for that part of the code. The first block of code is this:
In the second block the code was already predetermined:
The result I got from running the code is this:
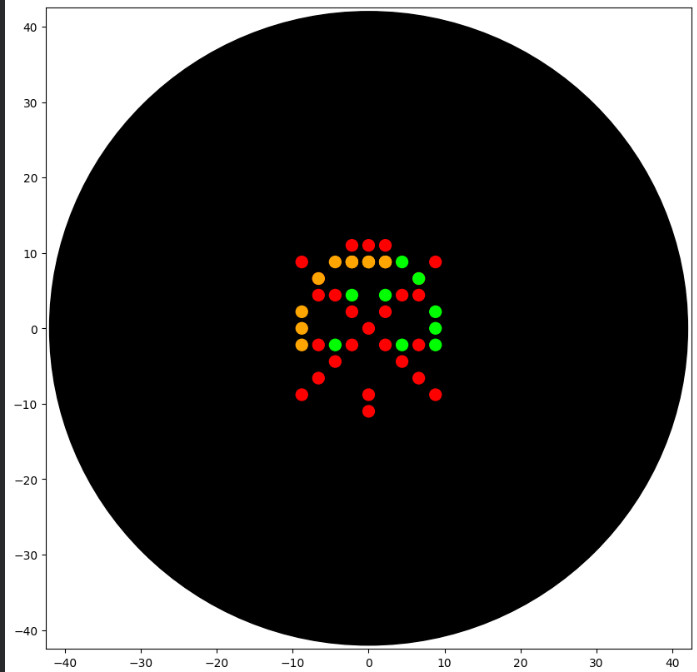
I’m not really sure what I wanted to do, because I wanted to try making something like a radiation mask or something similar. I don’t really see much of a resemblance, but I couldn’t try any further due to lack of time. I also wanted to do what I had done in Opentrons, but since the pipette only accepts 20µL, I couldn’t do it. I know that by using more variables it could be achieved, but I didn’t have the time. Here is the link to my Google Collab project.
The code is not yet running on the robot because my node’s labs will only be held this week 4.
Post-Lab Questions — DUE BY START OF FEB 24 LECTURE One of the great parts about having an automated robot is being able to precisely mix, deposit, and run reactions without much intervention, and design and deploy experiments remotely.
For this week, we’d like for you to do the following:
Find and describe a published paper that utilizes the Opentrons or an automation tool to achieve novel biological applications. Write a description about what you intend to do with automation tools for your final project. You may include example pseudocode, Python scripts, 3D printed holders, a plan for how to use Ginkgo Nebula, and more. You may reference this week’s recitation slide deck for lab automation details. While your description/project idea doesn’t need to be set in stone, we would like to see core details of what you would automate. This is due at the start of lecture and does not need to be tested on the Opentrons yet.
Example 1: You are creating a custom fabric, and want to deposit art onto specific parts that need to be intertwined in odd ways. You can design a 3D printed holder to attach this fabric to it, and be able to deposit bio art on top. Check out the Opentrons 3D Printing Directory.
Example 2: You are using the cloud laboratory to screen an array of biosensor constructs that you design, synthesize, and express using cell-free protein synthesis.
Echo transfer biosensor constructs and any required cofactors into specified wells. Bravo stamp in CPFS reagent master mix into all wells of a 96-well / 384-well plate. Multiflo dispense the CFPS lysate to all wells to start protein expression. PlateLoc seal the plate. Inheco incubate the plate at 37°C while the biosensor proteins are synthesized. XPeel remove the seal. PHERAstar measure fluorescence to compare biosensor responses.
1. Published Paper Using Opentrons / Lab Automation
A published paper that utilizes automation tools similar to Opentrons for novel biological applications is “Programming a Low-Cost, Open-Source Robot for High-Throughput Biology”. In this study, researchers implemented an open-source liquid-handling robot to automate repetitive laboratory tasks such as pipetting, reagent mixing, and plate preparation.
The automation system allowed the researchers to conduct high-throughput biological experiments with improved accuracy and reproducibility compared to manual lab work. By programming the robot using Python-based protocols, the team was able to standardize workflows including serial dilutions, reaction setup, and sample transfers across 96-well plates.
A key novel biological application demonstrated in the paper is the scaling of experimental workflows in synthetic biology and molecular biology. Automation reduced human error, increased experimental consistency, and enabled remote experiment execution. This is especially useful for screening large numbers of biological samples, which would otherwise be time-consuming and prone to variability if performed manually.
Overall, the paper shows that open-source automation tools like Opentrons can significantly enhance experimental precision, accessibility, and scalability in modern biological research, making them valuable for applications such as biosensor screening, protein expression experiments, and automated assay development.
2. Description of What I Intend to Automate for My Final Project
For my final project, I intend to use lab automation tools to systematically investigate radiation-protective biological mechanisms inspired by extremophiles, including melanized fungi discovered in high-radiation environments and protective proteins such as Dsup.
The core idea is to automate a comparative experimental workflow that evaluates how biological samples (e.g., protein systems or biomaterial coatings) respond to simulated stress conditions, including oxidative and radiation-like damage proxies.
What I Would Automate
The automation system (e.g., Opentrons OT-2 + cloud lab tools like Ginkgo Nebula) would be used to:
-Precisely prepare reagent mixtures
-Dispense samples into multi-well plates
-Run parallel stress-condition assays
-Standardize incubation and measurement steps
-Collect reproducible quantitative data
This is particularly useful because my node did not perform a physical laboratory experiment, so automation provides a conceptual framework for how the experimental design could be executed remotely and reproducibly.
3. Proposed Automated Workflow (Conceptual)
First, I would design a 3D-printed holder to stabilize specialized sample substrates (such as coated slides or biomaterial samples) so the robot can deposit reagents with spatial precision. This ensures consistent sample positioning and minimizes mechanical variation during automated pipetting.
Then, the automated workflow would proceed as follows:
Transfer prepared biomaterial or protein samples into a 96-well plate using calibrated pipetting protocols.
Dispense controlled concentrations of stress-inducing reagents (e.g., oxidative agents that simulate radiation-induced damage).
Add protective components inspired by extremophile systems (such as melanin analogs or Dsup-related protein constructs).
Seal and incubate the plate under standardized temperature conditions.
Measure fluorescence, absorbance, or structural stability metrics using automated plate readers.
Export and analyze the dataset to compare protective efficiency across conditions.
4. Example Pseudocode (Opentrons-Style Automation Script)
This script demonstrates how automation ensures precise volume control, repeatability, and scalable experimentation.
5. Role of Cloud Automation (Ginkgo Nebula)
Using a cloud laboratory platform like Ginkgo Nebula would allow remote experiment deployment without needing a physical lab setup. I could upload experimental designs, specify reagent combinations, and run high-throughput assays in parallel. This aligns with the project constraints, since the experimental work in my node was conceptual rather than physically executed.
Cloud automation would also:
Enable large-scale parameter screening
Reduce human error in pipetting and timing
Provide standardized datasets for analysis
Allow iterative experimental optimization based on previous results
6. Why Automation is Critical for This Project
Automation directly supports the scientific objectives by improving experimental precision, reproducibility, and scalability. In projects related to radiation tolerance, stress-response biology, or protective biomolecules, small inconsistencies in reagent handling or incubation can produce misleading results. Automated robotic systems eliminate much of this variability and allow controlled, repeatable experimental design.
Additionally, automation enables remote experimentation and systematic testing of multiple protective conditions, which is especially relevant when investigating biological mechanisms inspired by extremophiles and radiation-resistant systems. This makes the project more rigorous, technically feasible, and aligned with modern synthetic biology and bioengineering workflows.
Final Project Ideas — DUE BY START OF FEB 24 LECTURE As explained in this week’s recitation, add 1-3 slides in your Node’s section of this slide deck with 3 ideas you have for an Individual Final Project. Be sure to put your name, city, and country on your slide!
Slide 1 — Ideas For My Fianl Project
Individual Final Project Ideas – GammaShroom Automation Name: Sergio Cuiza City, Country: Cochabamba, Bolivia Node: SynBio USFQ
My project focuses on GammaShroom, a concept inspired by radiation-resistant fungi and extremophile biology, and how lab automation could optimize experimental design, reproducibility, and remote testing workflows even without direct wet-lab execution.
Slide 2 — Idea 1: Automated Growth Condition Screening for GammaShroom
My first project idea is to design an automated workflow to screen different growth conditions for a radiation-resistant fungal model (GammaShroom concept). Using an Opentrons liquid-handling robot, the system would prepare multiple media compositions, dispense samples into 96-well plates, and standardize experimental setups.
The automation would:
Precisely distribute media with different nutrient concentrations
Control replicates to reduce variability
Enable parallel condition testing
Improve reproducibility of extremophile growth experiments
Even if my node did not perform the wet lab, the protocol design could be deployed remotely in a cloud lab environment, allowing scalable experimentation without manual pipetting errors.
Slide 3— Idea 2: Automated Bio-Pigment Production Screening (Melanin & Radioprotection)
Many radiation-resistant fungi produce melanin-like pigments that may contribute to radiotolerance. My project proposes using automation to screen pigment production efficiency under different environmental conditions.
Automated workflow:
Robotically prepare multiple culture media compositions
Dispense fungal samples into microplates
Incubate under controlled conditions
Measure pigmentation changes using plate reader absorbance
This would connect directly to the GammaShroom concept by exploring the biological mechanisms that could explain radiation resistance in fungal systems.
Slide 4 — Idea 3: Custom 3D-Printed Holder for Non-Standard Fungal Samples
My third idea is to design a custom 3D-printed holder compatible with the Opentrons deck to stabilize unconventional sample containers used for fungal or bio-inspired materials like GammaShroom substrates.
The holder would:
Secure irregular culture containers
Allow precise reagent deposition
Maintain positional accuracy during automated pipetting
Enable consistent spatial experimental layouts
This hardware + automation integration is especially useful for bio-inspired projects where standard lab plates may not match the experimental material format.