Week 2 HW: DNA Read-Write-Edit - Post Lecture Learnings
Part 0: Basics of Gel Electrophoresis
Attend or watch all lecture and recitation videos. Optionally watch bootcamp.
Status: Completed.
Part 1: Benchling & In-silico Gel Art
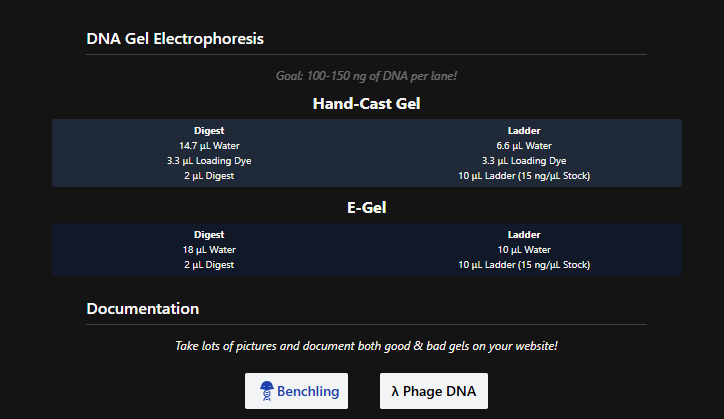
See this week’s lab protocol “Gel Art: Restriction Digests and Gel Electrophoresis” for details.
Overview:
1 Make a free account at benchling.com
2 Import the Lambda DNA.
3 Simulate Restriction Enzyme Digestion with the following Enzymes:
a EcoRI
b HindIII
c BamHI
d KpnI
e EcoRV
f SacI
g SalI
4 Create a pattern/image in the style of Paul Vanouse’s Latent Figure Protocol artworks.
5 You might find Ronan’s website a helpful tool for quickly iterating on designs!
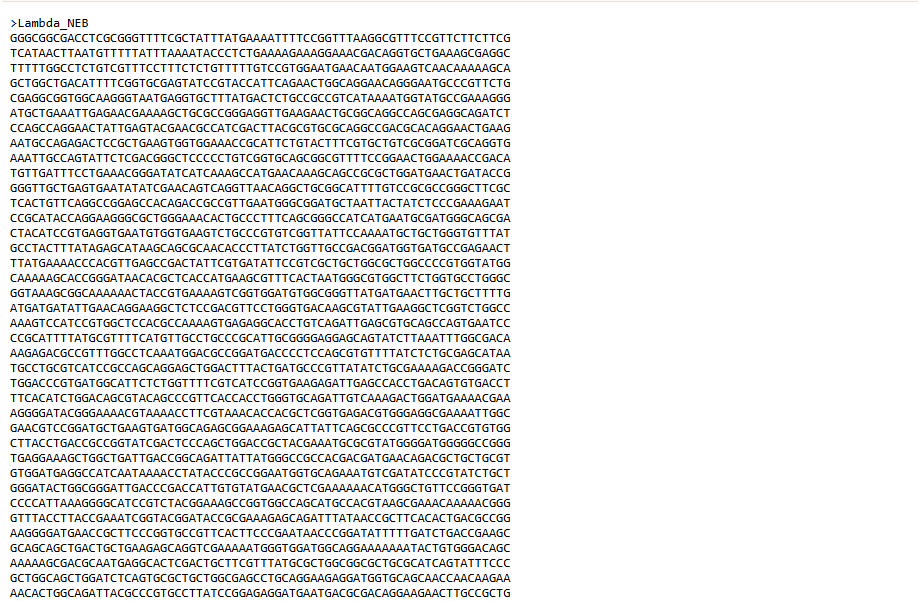
An account was created in Benchling, and the Lambda gene from Biolabs website was imported into it.

I simulated various restriction digestion patterns in it and played around with it for a while, exploring the available features.
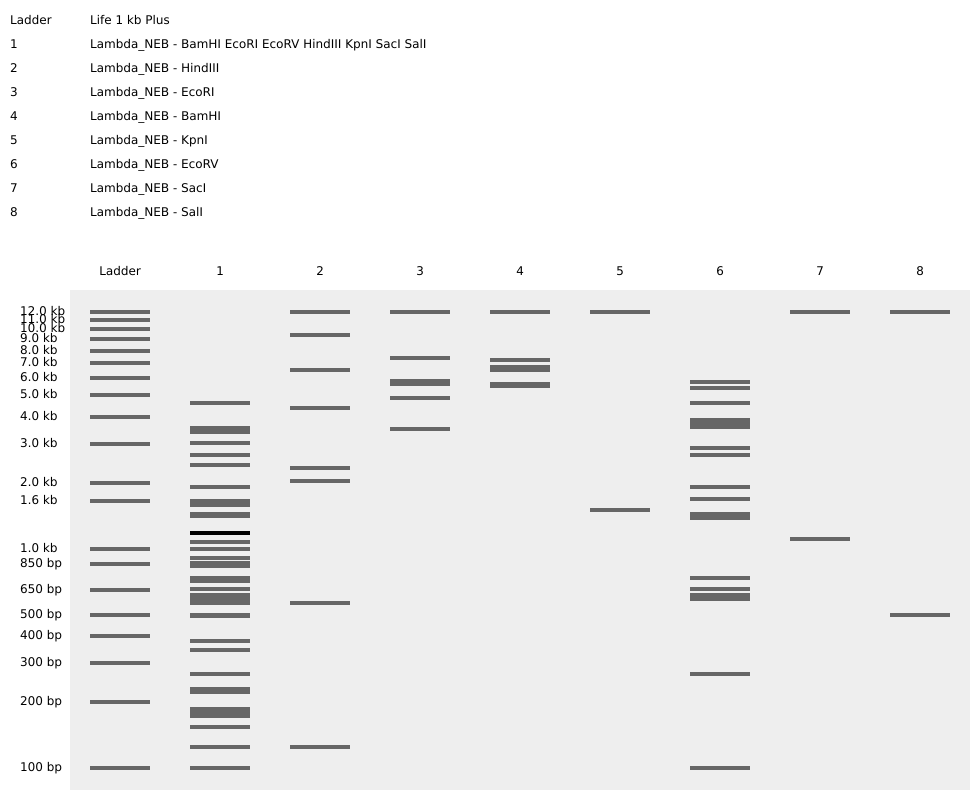
Then, I went on to Ronan’s website to create a design!
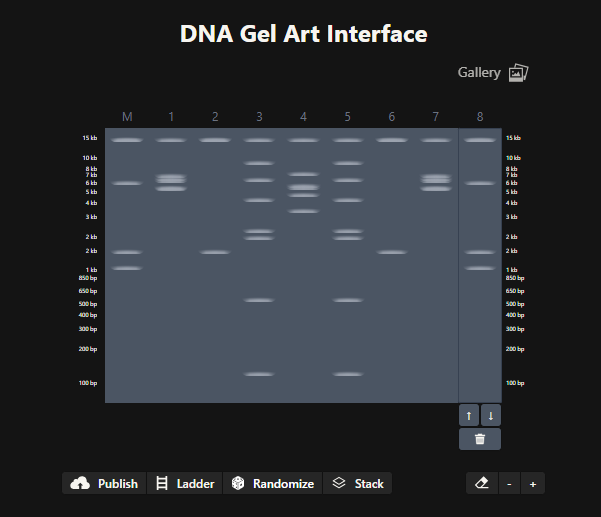

(I intended for it to look like a war robot from the games we play online. Hopefully, it looks like one to you too :))
Part 2: Gel Art - Restriction Digests and Gel Electrophoresis
In the wet-lab perform the lab experiment you designed in Part 1 and outlined in this week’s lab protocol “Gel Art: Restriction Digests and Gel Electrophoresis”.
Since I don’t have access to labs, I did not complete this component.
Part 3: DNA Design Challenge
3.1. Choose your protein.
In recitation, we discussed that you will pick a protein for your homework that you find interesting. Which protein have you chosen and why? Using one of the tools described in recitation (NCBI, UniProt, google), obtain the protein sequence for the protein you chose.
Example from our group homework, you may notice the particular format — The example below came from UniProt.
>sp|P03609|LYS_BPMS2 Lysis protein OS=Escherichia phage MS2 OX=12022 PE=2 SV=1 METRFPQQSQQTPASTNRRRPFKHEDYPCRRQQRSSTLYVLIFLAIFLSKFTNQLLLSLL EAVIRTVTTLQQLLT
I have chosen the Myc-Proto Oncogene Protein, as my protein of interest.
It’s a transcription factor that binds non-specifically to DNA, yet also recognizes a particular sequence of 5’ - CAC[GA]TG - 3’. [Molecular Weight (from gel runs): 62-67 kDa]
Upon binding, it activates the transcription of genes related to ribosome biogenesis (RPL23), angiogenesis (VEGFA), cell proliferation and telomere maintanence (TERT), amongst others.
I chose this protein for its important role in oncogenesis, tumor proliferation and immune evasion, controlling essential functions such as cell proliferation, metabolism and survival.
sp|P01106|MYC_HUMAN Myc proto-oncogene protein OS=Homo sapiens OX=9606 GN=MYC PE=1 SV=2 MDFFRVVENQQPPATMPLNVSFTNRNYDLDYDSVQPYFYCDEEENFYQQQQQSELQPPAP SEDIWKKFELLPTPPLSPSRRSGLCSPSYVAVTPFSLRGDNDGGGGSFSTADQLEMVTEL LGGDMVNQSFICDPDDETFIKNIIIQDCMWSGFSAAAKLVSEKLASYQAARKDSGSPNPA RGHSVCSTSSLYLQDLSAAASECIDPSVVFPYPLNDSSSPKSCASQDSSAFSPSSDSLLS STESSPQGSPEPLVLHEETPPTTSSDSEEEQEDEEEIDVVSVEKRQAPGKRSESGSPSAG GHSKPPHSPLVLKRCHVSTHQHNYAAPPSTRKDYPAAKRVKLDSVRVLRQISNNRKCTSP RSSDTEENVKRRTHNVLERQRRNELKRSFFALRDQIPELENNEKAPKVVILKKATAYILS VQAEEQKLISEEDLLRKRREQLKHKLEQLRNSCA
The above protein sequence has been obtained from the Uniprot database.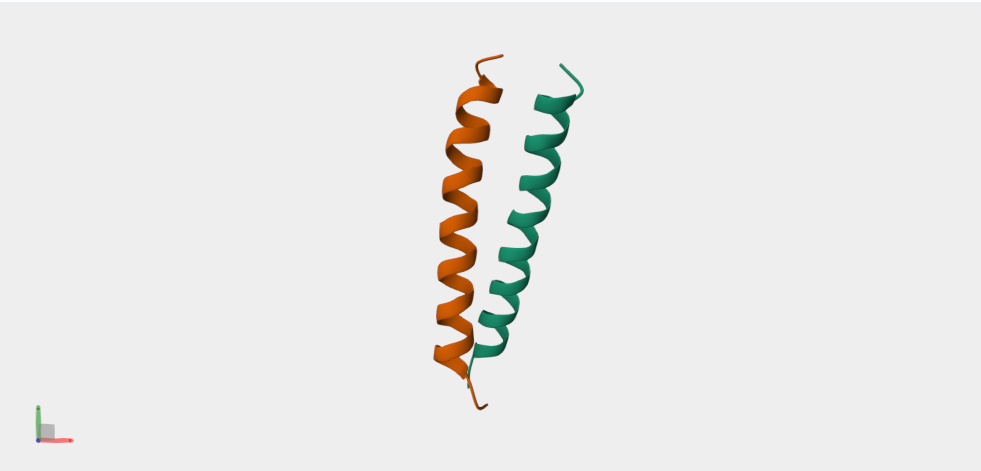
3.2. Reverse Translate: Protein (amino acid) sequence to DNA (nucleotide) sequence.
The Central Dogma discussed in class and recitation describes the process in which DNA sequence becomes transcribed and translated into protein. The Central Dogma gives us the framework to work backwards from a given protein sequence and infer the DNA sequence that the protein is derived from. Using one of the tools discussed in class, NCBI or online tools (google “reverse translation tools”), determine the nucleotide sequence that corresponds to the protein sequence you chose above.
Example: Get to the original sequence of phage MS2 L-protein from its genome phage MS2 genome - Nucleotide - NCBI
Lysis protein DNA sequence: atggaaacccgattccctcagcaatcgcagcaaactccggcatctactaatagacgccggccattcaaacatgaggattacccatgtcgaagacaacaaagaagttcaactctttatgtattgatcttcctcgcgatctttctctcgaaatttaccaatcaattgcttctgtcgctactggaagcggtgatccgcacagtgacgactttacagcaattgcttacttaa
I googled “Reverse Translation Tools” and obtained a lot of search results. From those, I chose the “Sequence Manipulation Suite” from “Bioinformatics.org” website and worked on it.
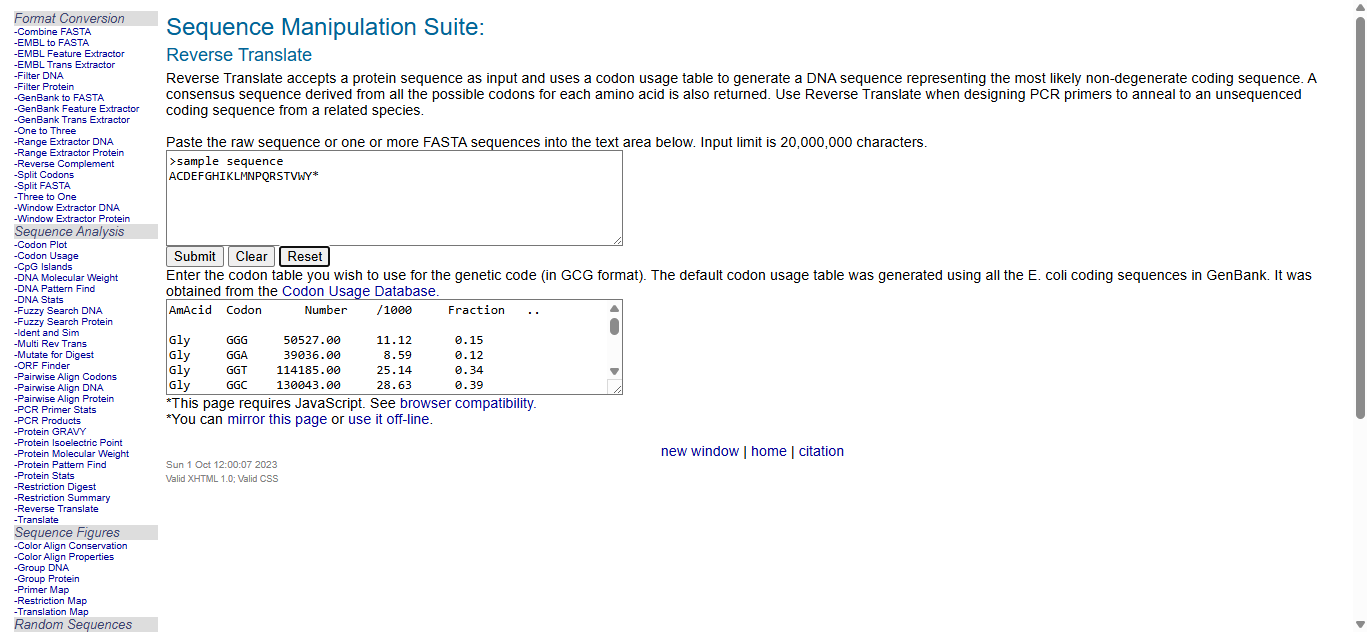
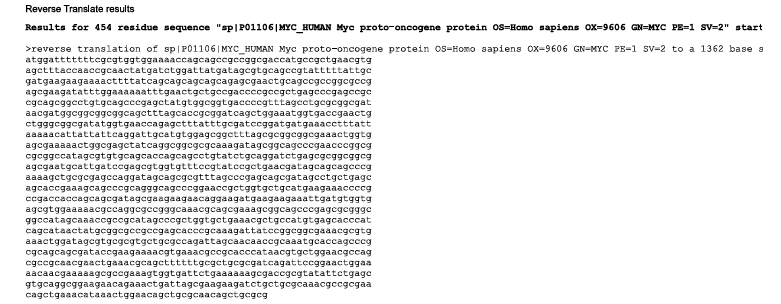

The second image depicts the most likely reverse translated codon sequence, whereas the third image represents the consensus reverse translated sequence.
In reverse translation, (converting a protein’s amino acid sequence back to a DNA nucleotide sequence during codon optimization), these terms (most likely & consensus codons) describe codon selection strategies.
Most likely codon sequences use the single most frequent codon for each amino acid in the target organism’s highly expressed genes. In this case, the target organism was E.coli. This will maximize overall Codon Adaptation Index (CAI) by always picking the “optimal” codon per position, prioritizing translation speed. (The CAI is an index to measure gene expression levels, which aids codon optimization for better protein production/yield in hosts like E. coli. Higher CAI (close to 1) indicates that codons match the organism’s highly expressed genes, thus improving tRNA availability and translation efficiency.)
Consensus codon sequences select codons based on a consensus pattern. They are often the most common nucleotide at each position across synonymous codons (e.g., majority base at wobble position), balancing frequency with natural variability. It’s less aggressive than “most likely” and avoids the extremes.
Note: When giving a FASTA file as input, the presence or absence of a header line plays an important role. Usually, the expected form of input is the ‘>’ symbol + header line + sequence. Most tools can recognize and ignore the header line, and proceed to parse the correct sequence. If given without the header, the tool might misparse the sequence leading to erroneus outputs.
(Information obtained from Perplexity AI using the given prompt: While conducting reverse translation, if I input the sequence with the header, I get a particular output whereas if I input it without the header I get another output…What is the reason? the format used is fasta in both cases)
3.3. Codon optimization.
Once a nucleotide sequence of your protein is determined, you need to codon optimize your sequence. You may, once again, utilize google for a “codon optimization tool”. In your own words, describe why you need to optimize codon usage. Which organism have you chosen to optimize the codon sequence for and why?
Example from Codon Optimization Tool | Twist Bioscience while avoiding Type IIs enzyme recognition sites BsaI, BsmBI, and BbsI
Lysis protein DNA sequence with Codon-Optimization ATGGAAACCCGCTTTCCGCAGCAGAGCCAGCAGACCCCGGCGAGCACCAACCGCCGCCGCCCGTTCAAACATGAAGATTATCCGTGCCGTCGTCAGCAGCGCAGCAGCACCCTGTATGTGCTGATTTTTCTGGCGATTTTTCTGAGCAAATTCACCAACCAGCTGCTGCTGAGCCTGCTGGAAGCGGTGATTCGCACAGTGACGACCCTGCAGCAGCTGCTGACCTAA
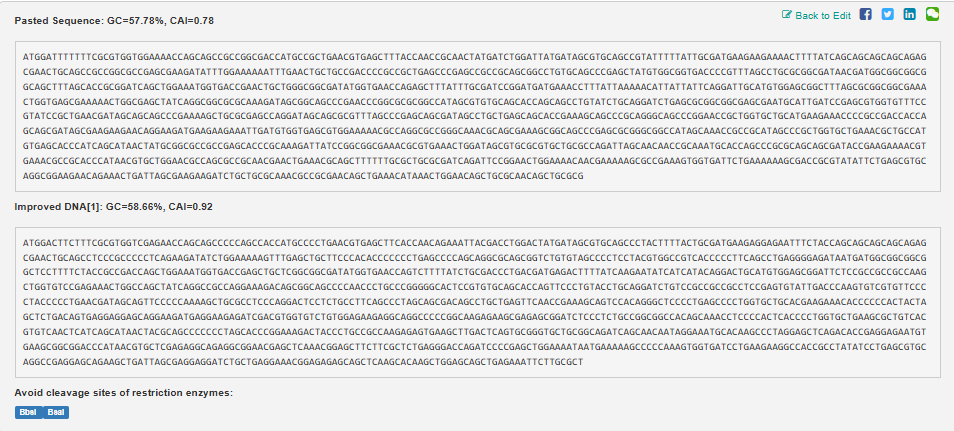
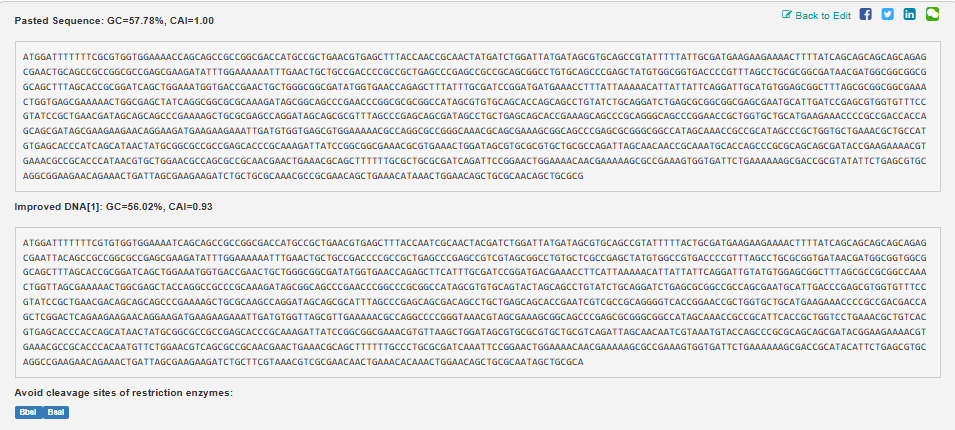

Unfortunately, in the tool I used, I wasn’t able to find the option to exclude the restriction enzyme sites of BsmBI.
Note: I discovered a website named “Optimizer”, which provides a lot of options to fine tune the process. I will try it out and update the results within next week.
3.4. You have a sequence! Now what?
(Yayy!)
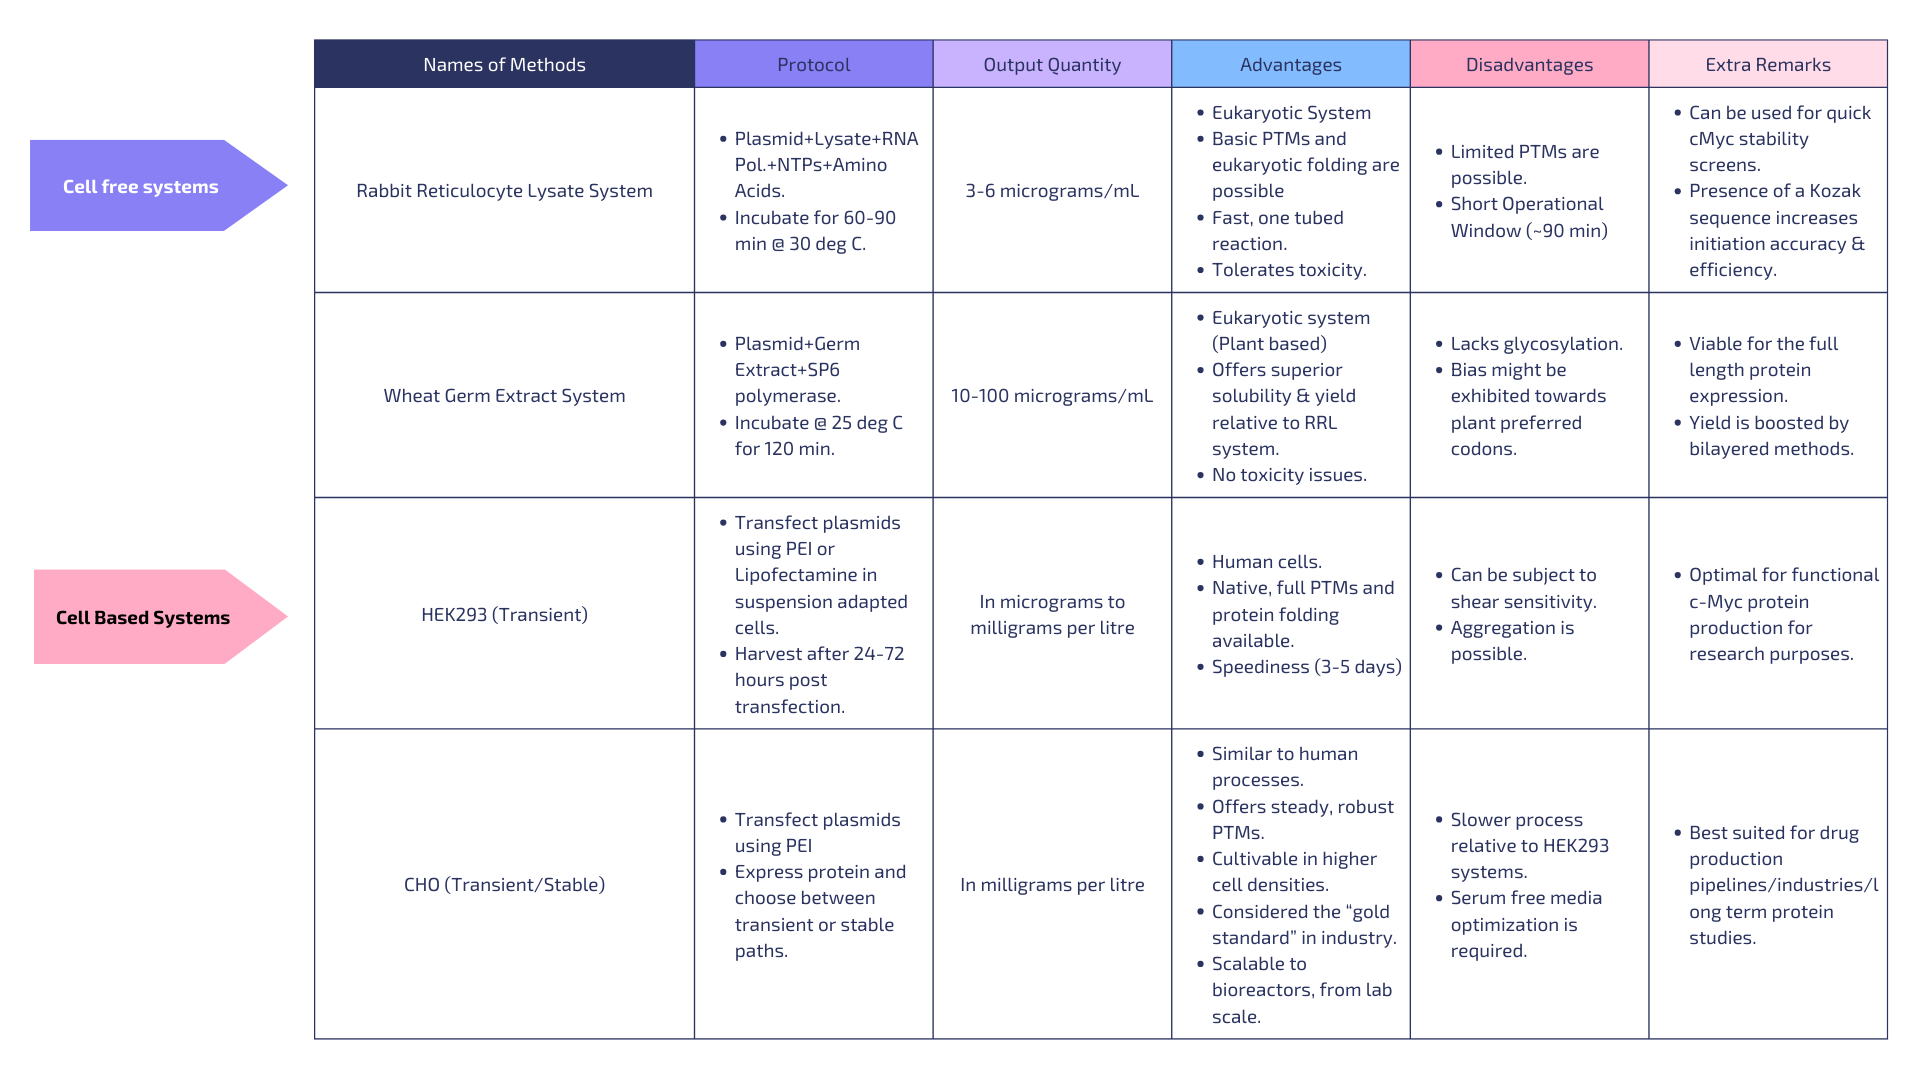
What technologies could be used to produce this protein from your DNA? Describe in your words the DNA sequence can be transcribed and translated into your protein. You may describe either cell-dependent or cell-free methods, or both.
There are various cell dependent and cell free systems that we can use to express our protein. I have listed 2 examples under each type.
Criteria of choosing:
Suitability for cMyc: Biased towards eukaryotic systems due to the presence of protein folding/PTMs & toxicity tolerance (since cMyc induces apoptosis). Speed: For speedy production of quality protein.
Yield/Scale: Prioritizing highest offerable yield in each type.
Part 4: Prepare a Twist DNA Synthesis Order
This is a practice exercise, not necessarily your real Twist order!
4.1. Create a Twist account and a Benchling account
4.2. Build Your DNA Insert Sequence
For example, let’s make a sequence that will make E. coli glow fluorescent green under UV light by constitutively (always) expressing sfGFP (a green fluorescent protein):
I am making a sequence that will make E.coli produce the c-Myc protein from humans!
In Benchling, select New DNA/RNA sequence
Done!
Give your insert sequence a name and select DNA with a Linear topology (this is a linear sequence that will be inserted into a circular backbone vector of our choosing).
Done!
Go through each piece of the given DNA sequences highlighted below (Promoter, RBS, Start Codon, Coding Sequence, His Tag, Stop Codon, Terminator) and paste the sequences into the Benchling file one after the other (replacing the coding sequence with your codon optimized DNA sequence of interest!). Each time you add a new piece of the sequence, make sure to annotate by right clicking over the sequence and creating an annotation that describes what each piece (e.g., Promoter, RBS, etc.) is (see image below).
Done!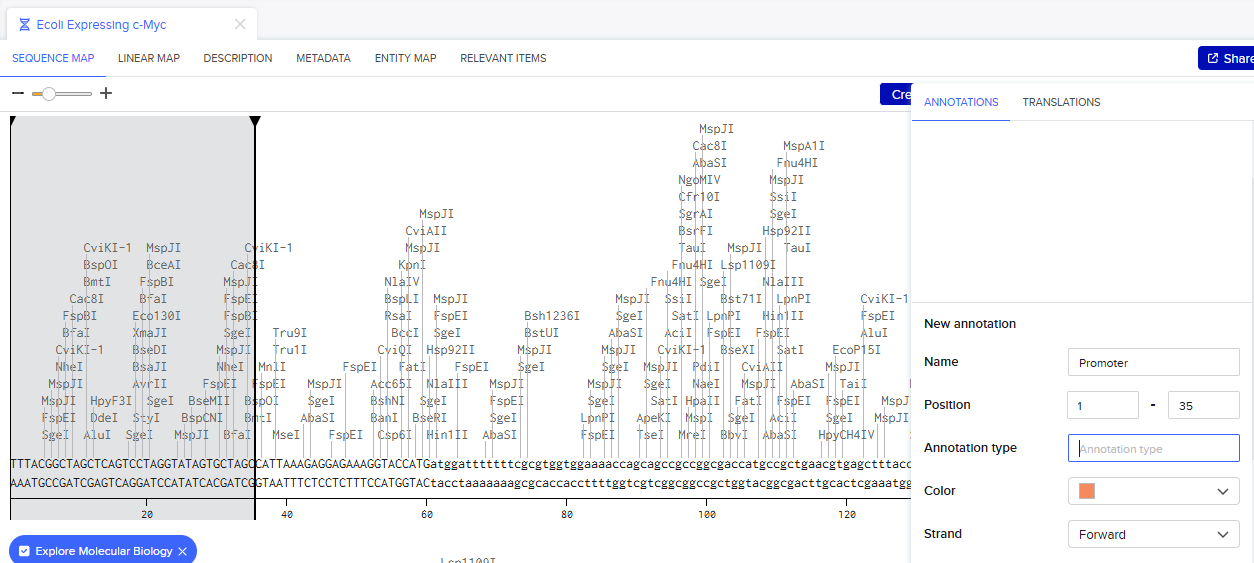
Promoter (e.g. BBa_J23106): TTTACGGCTAGCTCAGTCCTAGGTATAGTGCTAGC
RBS (e.g. BBa_B0034 with spacers for optimal expression): CATTAAAGAGGAGAAAGGTACC
Start Codon: ATG
Coding Sequence (your codon optimized DNA for a protein of interest, sfGFP for example):
AGCAAAGGAGAAGAACTTTTCACTGGAGTTGTCCCAATTCTTGTTGAATTAGATGGTGATGTTAATGGGCACAAATTTTCTGTCCGTGGAGAGGGTGAAGGTGATGCTACAAACGGAAAACTCACCCTTAAATTTATTTGCACTACTGGAAAACTACCTGTTCCGTGGCCAACACTTGTCACTACTCTGACCTATGGTGTTCAATGCTTTTCCCGTTATCCGGATCACATGAAACGGCATGACTTTTTCAAGAGTGCCATGCCCGAAGGTTATGTACAGGAACGCACTATATCTTTCAAAGATGACGGGACCTACAAGACGCGTGCTGAAGTCAAGTTTGAAGGTGATACCCTTGTTAATCGTATCGAGTTAAAGGGTATTGATTTTAAAGAAGATGGAAACATTCTTGGACACAAACTCGAGTACAACTTTAACTCACACAATGTATACATCACGGCAGACAAACAAAAGAATGGAATCAAAGCTAACTTCAAAATTCGCCACAACGTTGAAGATGGTTCCGTTCAACTAGCAGACCATTATCAACAAAATACTCCAATTGGCGATGGCCCTGTCCTTTTACCAGACAACCATTACCTGTCGACACAATCTGTCCTTTCGAAAGATCCCAACGAAAAGCGTGACCACATGGTCCTTCTTGAGTTTGTAACTGCTGCTGGGATTACACATGGCATGGATGAGCTCTACAAA 7x His Tag (Let’s add a 7×His tag at the C-terminus of the protein to enable protein purification from E. coli): CATCACCATCACCATCATCAC
Stop Codon: TAA
Terminator (e.g. BBa_B0015): CCAGGCATCAAATAAAACGAAAGGCTCAGTCGAAAGACTGGGCCTTTCGTTTTATCTGTTGTTTGTCGGTGAACGCTCTCTACTAGAGTCACACTGGCTCACCTTCGGGTGGGCCTTTCTGCGTTTATA
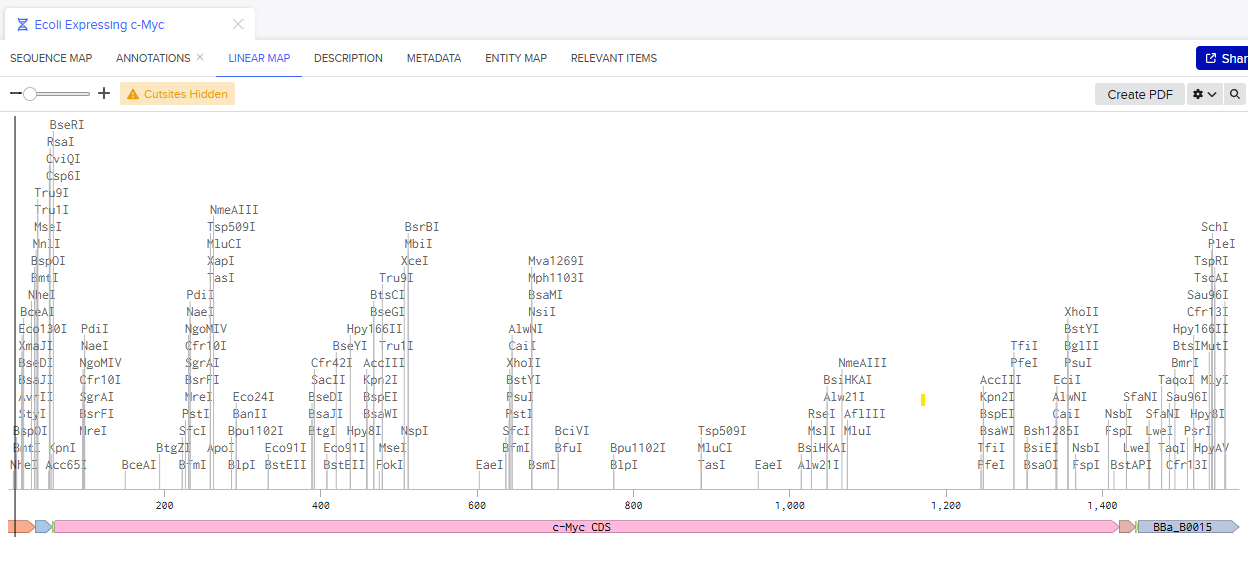
Once you’ve completed this, click on Linear Map to preview the entire sequence. If you intend to have a TA review a sequence in the future, this is a good way to verify that all sections are annotated!
Completed!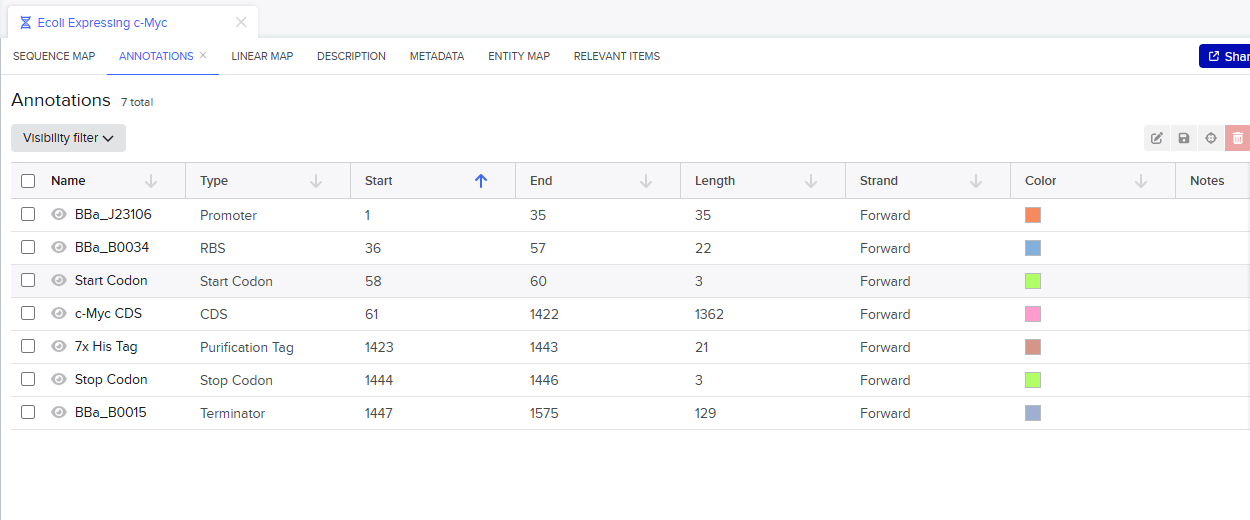
This is not required for this exercise, but to share your design with others, please ensure that link sharing is turned on!(Optional) Share your final sequence link with a TA for review!
Link for my Sequence: Here
This insert sequence you built is commonly referred to as an expression cassette in molecular biology (a sequence you can drop into any vector and it’ll perform its function). Go ahead and download the FASTA file for the sequence you made.

It’s helpful to visualize DNA designs using SBOL Canvas (Synthetic Biology Open Language) to convey your designs. Here’s an example of what you just annotated in Benchling:
4.3. On Twist, Select The “Genes” Option
4.4. Select “Clonal Genes” option
For this demonstration, we’ll choose Clonal Genes. You’ll select clonal genes or gene fragments depending on your final project.
Historically, HTGAA projects using clonal genes (circular DNA) have reached experimental results 1-2 weeks quicker because they can be transformed directly into E. coli without additional assembly.
Gene fragments (linear DNA) offer greater design flexibility but typically require an assembly or cloning step prior to transformation. An advantage is If designed with the appropriate exonuclease protection, gene fragments can be used directly in cell-free expression.
Done!
4.5. Import your sequence
You just took an amino acid sequence of interest and converted it into DNA, codon optimized it, and built an expression cassette around it! Choose the Nucleotide Sequence option and Upload Sequence File to upload your FASTA file.
Done!
4.6. Choose Your Vector
Since we’re ordering a clonal gene, you will need to refer to Twist’s Vector Catalog to choose your circular backbone. You can think of this as taking your linear expression cassette for your protein of interest, and completing the rest of the circle!
The backbone confers many special properties like antibiotic resistance, an origin of replication, and more. Discuss with your node to decide on appropriate antibiotic options. At MIT/Harvard, you can use Ampicillin, Chloramphenicol, or Kanamycin resistance.
Twist vectors do not contain restriction sites near the insert fragment, so make sure to flank your design with cut sites if you are intending to extract this DNA insert fragment later.
For this demonstration, choose a Twist cloning vectors like pTwist Amp High Copy.
Click into your sequence and select download construct (GenBank) to get the full plasmid sequence:
Go back to your Benchling account. Inside of a folder, click the import DNA/RNA sequence button and upload the GenBank file you just downloaded.
Completed!
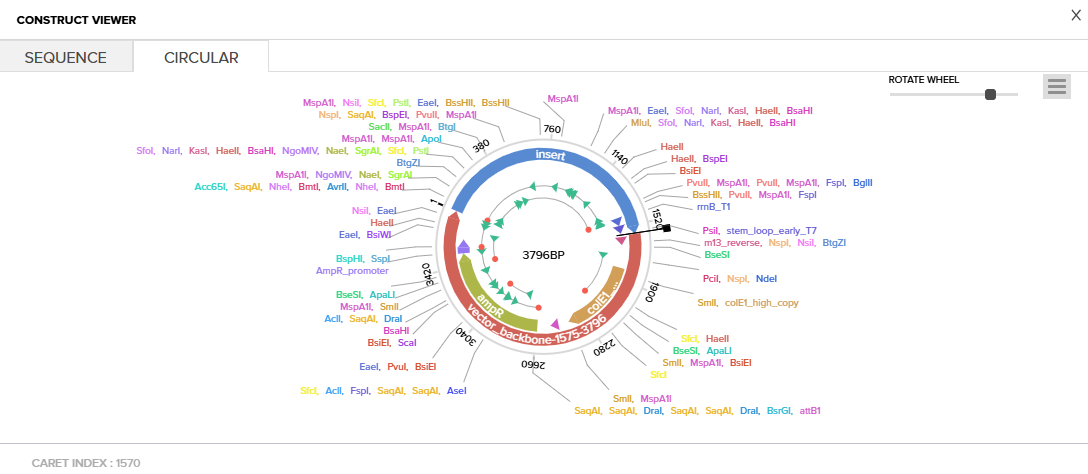
This is the plasmid you just built with your expression cassette included. Congratulations on building your first plasmid!
(Yayyyy! It was a very interesting and exciting experience. I had been curious about this for a while now and I got a very clear idea of what to expect when I do build a sequence.)
5.1 DNA Read
(i) What DNA would you want to sequence (e.g., read) and why? This could be DNA related to human health (e.g. genes related to disease research), environmental monitoring (e.g., sewage waste water, biodiversity analysis), and beyond (e.g. DNA data storage, biobank).
I would prioritize sequencing DNA related to disease research and biodiversity analysis (especially microbiomes):
DNA related to Disease Research: I would like to sequence human genes linked to complex diseases like cancer (cMyc pathways), tuberculosis (Mtb drug resistance genes like katG), and neurological disorders. It would help us in understanding disease mutations/genetic variants, which in turn can help to identify therapeutic targets and personalized treatments. This would also be directly relevant to my work in drug discovery against tuberculosis.
Microbiome DNA (focussing on gut, neural, psychological health): I would like to sequence 16S rRNA genes and whole metagenomes from human gut samples, environmental microbiomes, and sewage wastewater. The gut-brain axis fascinates me - gut dysbiosis affects mental health (e.g., serotonin production), neurological function (vagus nerve signaling), and disease susceptibility. Sequencing their genomes will reveal microbial diversity, functional genes, and host-microbe interactions which will be priceless for psychobiotic developments, prebiotic & dietary interventions and Fecal Microbial Transplantations.
Why These? Together they will accelerate precision medicine development and yield actionable data for further research.
(ii) In lecture, a variety of sequencing technologies were mentioned. What technology or technologies would you use to perform sequencing on your DNA and why?
Also answer the following questions:
(1) Is your method first-, second- or third-generation or other? How so?
(2) What is your input? How do you prepare your input (e.g. fragmentation, adapter ligation, PCR)? List the essential steps.
(3) What are the essential steps of your chosen sequencing technology, how does it decode the bases of your DNA sample (base calling)?
(4) What is the output of your chosen sequencing technology?
I would choose Sequencing by Synthesis (SBS) method for sequencing my DNA of interest. Here’s why:
Why SBS?:
- Gold standard accuracy: Offers Q30+ scores with >99.9% per base for precise variant calling in disease genes and OTU clustering in microbiomes.
- Massive Multiplexing: Can sequence millions of reads simultaneously (compared to Sanger sequencing’s 1 read), which is perfect for diverse samples.
(1) Generation: Second-Generation (Next-Gen Sequencing)
Why is it 2nd generation?: Because it uses sequencing by synthesis with bridge amplification on a flowcell, meaning millions of clusters are read in parallel cycles.
(2) Input & Library Preparation (Essential Steps):
Input: 1-100 ng gDNA (disease genes) or 10 ng metagenomic DNA
Workflow:
- (1) Fragmentation: Shear large gDNA to 200-500 bp via sonication or beads.
- (2) End repair & A-tailing: Repair jagged ends to blunt ends and add single 3’ adenine overhang (for sticky-end ligation).
- (3) Adapter ligation: Ligate Y-adapters with index primers.
- (4) PCR amplification: Proceed with 8-15 cycles to amplify library and add dual indexes for multiplexing.
- (5) Bead purification: Beads remove primers/dimers and keeps 200-800 bp fragments.
- (6) Quantify: Qubit fluorometer (dsDNA HS assay).
(3) Essential SBS Steps & Base Calling:
(1) Cluster Generation via Bridge Amplification on a Flowcell: The sequencing library first anneals to an oligo lawn on the flowcell surface. This will create bridge structures where the single-stranded DNA molecules can bend and hybridize to the complementary oligos. Exponential clonal amplification then occurs through repeated bridge formation and denaturation, producing approximately thousands of identical DNA molecules per cluster across millions of clusters on the flowcell.
(2) Linearization and First Read Primer Annealing: After cluster amplification, the clustered DNA is linearized to create single-stranded templates. The first read primer then anneals to the 5’ end of these clusters, preparing them for sequencing.
(3) Sequencing Cycle: All four reversible terminator dNTPs (A-fluorescent, C-fluorescent, G-fluorescent, T-fluorescent) are added simultaneously to the flowcell. DNA polymerase will incorporate only the single correct complementary base, which includes a 3’ reversible blocking group that prevents further extension. Laser excitation will then trigger fluorescence emission, which is captured by 4-color imaging. This signal is recorded, where each fluorescent color corresponds to a specific base. Finally, chemical cleavage removes the fluorescent dye and 3’ block, allowing the next sequencing cycle to proceed. Similarly, the DNA is sequenced, base by base. This is called as seqeuncing by synthesis.
(4) Index Read: The index primer anneals to read the sample index, enabling multiplexing and demultiplexing during analysis.
(5) Turnaround and Read: The template is then turned around using a second cleavage step, and the second read primer anneals for paired-end read.
Base Calling Process: The base calling algorithm now analyzes fluorescence intensities from the 4 channels (A/C/G/T) per cycle, calling the brightest channel as the base, while Phred scores quantify error probability (Q30=99.9% accuracy). Raw intensities are then converted to FASTQ files containing sequence with quality scores.
(4) Output
- Output Processing: Raw intensity files from sequencing cycles contain fluorescence data per base position, which is converted into FASTQ files with nucleotide sequences and Phred quality scores (Q-scores) indicating per-base accuracy, by demultiplexing/base calling pipelines.
- Read Statistics: Typical short-read NGS runs generate millions of reads with >90% bases at Q30 (99.9% accuracy), sufficient for amplicon sequencing or targeted variant analysis (with 100x coverage).
- File Sizes: Raw + processed data totals upto 1-10 GB per run depending on read depth/output (per-sample files ~50-500 MB post-demultiplexing).
5.2 DNA Write
(i) What DNA would you want to synthesize (e.g., write) and why? These could be individual genes, clusters of genes or genetic circuits, whole genomes, and beyond. As described in class thus far, applications could range from therapeutics and drug discovery (e.g., mRNA vaccines and therapies) to novel biomaterials (e.g. structural proteins), to sensors (e.g., genetic circuits for sensing and responding to inflammation, environmental stimuli, etc.), to art (DNA origamis). If possible, include the specific genetic sequence(s) of what you would like to synthesize! You will have the opportunity to actually have Twist synthesize these DNA constructs! :)
(ii) What technology or technologies would you use to perform this DNA synthesis and why?
Also answer the following questions:
(1) What are the essential steps of your chosen sequencing methods?
(2) What are the limitations of your sequencing method (if any) in terms of speed, accuracy, scalability?
(i) I would like to synthesize a Multi-input tumor sensing genetic circuit, that integrates multiple tumor microenvironment signals and responds by secreting therapeutic molecules, while also enabling clinical detection.
Circuit architecture:
- AND logic gate combining two tumor-specific promoters driving expression of a secreted therapeutic protein and a reporter gene for activation monitoring.
Functional components:
- Dual-input promoters: Activated only when both tumor signals present.
- Therapeutic transgene: Encoding anti-tumor protein (secreted format with signal peptide).
- Reporter cassette: (secretable enzyme) enables non-invasive monitoring of circuit activation.
- Terminator & degron tag: for controlled expression dynamics.
Rationale: Tumor-specific activation prevents off-target effects in healthy tissue with the therapeutic payload directly addressing tumor progression. The reporter will enable us to validate the circuit’s function in real-time.
Synthesis specifications: It should be codon-optimized for mammalian expression, including standard cloning scars for downstream assembly and validation.
(ii) Synthesis Technology: I would choose to perform Enzymatic DNA synthesis.
Why?:
- Enables longer constructs without assembly scars.
- Higher fidelity for complex circuits.
- Is a environmentally friendly process.
Advantages over chemical synthesis:
- No length limitation.
- Reduced error accumulation.
- Template-independent.
(1) Essential Steps of Enzymatic DNA Synthesis:
- Initiation: DNA primer binds to synthesis surface/array.
- Nucleotide addition: Template-independent polymerase (TdT) adds single reversible terminator nucleotide to 3’ end.
- Base identification: Fluorescence from incorporated nucleotide imaged to identify base identity.
- Block removal: Photocleavage or chemical cleavage removes 3’ block and fluorophore.
- Cycle repetition: Process repeats for each position in oligo sequence.
- Error correction: Enzymatic mismatch detection and cleavage removes error-containing strands.
- Oligo assembly: Short high-fidelity oligos (~200-500 bp) are assembled via methods such as Gibson Assembly into full gene/circuit.
- Final product: Linear double-stranded DNA ready for cloning.
(2) Limitations of Enzymatic DNA Synthesis:
- Turnaround time: It takes 2-4 weeks of total time compared to the 1-2 weeks for shorter chemical synthesis of DNA.
- Per-base error rate: ~0.2% per base results in 1-2 errors per kilobase (which is still superior relative to chemical methods for long sequence synthesis).
- Scalability/Cost: Large sequences can make projects expensive.
- Sequence bias: High/low GC-content regions synthesize less efficiently. (but it is still better compared to the outputs from the chemical methods of synthesis).
- Throughput: It produces fewer oligos simultaneously on chips, compared to chemical arrays because enzymes require more space and liquid handling, unlike the ultra-dense phosphoramidite coupling on silicon surfaces.
5.3 DNA Edit
(i) What DNA would you want to edit and why? In class, George shared a variety of ways to edit the genes and genomes of humans and other organisms. Such DNA editing technologies have profound implications for human health, development, and even human longevity and human augmentation. DNA editing is also already commonly leveraged for flora and fauna, for example in nature conservation efforts, (animal/plant restoration, de-extinction), or in agriculture (e.g. plant breeding, nitrogen fixation). What kinds of edits might you want to make to DNA (e.g., human genomes and beyond) and why?
(ii) What technology or technologies would you use to perform these DNA edits and why?
Also answer the following questions:
(1) How does your technology of choice edit DNA? What are the essential steps?
(2) What preparation do you need to do (e.g. design steps) and what is the input (e.g. DNA template, enzymes, plasmids, primers, guides, cells) for the editing?
(3) What are the limitations of your editing methods (if any) in terms of efficiency or precision?
(i) DNA to edit: I want to edit my multi-input tumor-sensing genetic circuit to optimize low-frequency codons, implement tumor-specific activation, add dual therapeutic/reporter outputs, include tissue-specific suppression, and incorporate a clinical kill switch for safety.
Circuit Design: The circuit will:
- Use an AND-gate combining hypoxia-responsive elements and oncogenic signaling promoters for autonomous tumor activation without external drugs.
- Produce a secreted reporter for blood-based monitoring.
- Produce an therapeutic for local tumor apoptosis.
- Will suppress expression in other tissues through miRNA binding sites, thus operating in a tissue specific manner.
- Will include an iCasp9 kill switch for chemical-inducible cell elimination.
Rationale: This design enables the tumor microenvironment itself to trigger therapeutic secretion while maintaining clinical safety through multi-layered control systems.
(ii) Editing Technology: I will use base editing with cytosine and adenine deaminases because it performs precise single-nucleotide changes without creating double-strand breaks (which occur while using CRISPR-Cas9 editing) that could potentially disrupt the circuit’s reading frame.
- This will maintain 100% circuit integrity while optimizing performance.
(1) Base Editing Mechanism: Base editing employs a catalytically dead Cas9 protein that is fused to a deaminase enzyme that travels to target locations via guide RNAs with NGG PAM sequences, where the deaminase converts C to U (which is fixed to T during replication) or A to I (which is fixed to G during replication), all without cutting the DNA backbone.
(2) Preparation & Inputs: I will prepare it by using codon analysis software to identify codons with usage frequency below 15% compared to mammalian optima, designing guide RNAs with on-target efficiency scores above ~0.7, and selecting synonymous mutations that preserve the full amino acid sequence. The required inputs include a base editor expression plasmid, a guide RNA array expressing all guides, the existing circuit plasmid backbone, and HEK293 cells for testing via PEI transfection.
(3) Limitations:
(a) Base editors can only modify bases located about 4–8 nucleotides upstream of the PAM site because the deaminase enzyme can only reach that small region.
(b) If multiple editable bases (C for Cytosine Base Editor or A for Adenine Base Editor) are present in that window, more than one may be changed unintentionally. This happens in about 25–40% of cases.
(c) Standard SpCas9-based editors need an NGG PAM next to the target site. Without it, the site cannot be edited.
(d) Because of PAM requirements, around 20% of potential target sites cannot be reached using standard editors.
(e) Each target site typically has 30–70% editing efficiency in mammalian cells, thus not all cells will carry the desired edit.
(f) Using many guide RNAs at once can cause cellular stress and reduce viability by about 20–30%.
(g) Base editors can change C→T or A→G, but they cannot directly create other types of base substitutions.
Thank You!