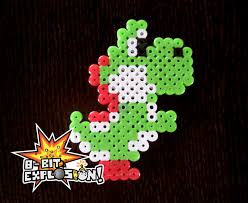
For the art portion of this week’s assignment, I decided to code Yoshi from Super Mario Brothers since the Designer Cells node only had the red and green colors. I used this photo as reference.
 From there, I started to code for the Opentron automation.
from opentrons import types

metadata = {    # see https://docs.opentrons.com/v2/tutorial.html#tutorial-metadata
    'author': 'Sydney',
    'protocolName': 'Yoshi',
    'description': 'Prints Yoshi',
    'source': 'HTGAA 2026 Opentrons Lab',
    'apiLevel': '2.20'
}

##############################################################################
###   Robot deck setup constants - don't change these
##############################################################################

TIP_RACK_DECK_SLOT = 9
COLORS_DECK_SLOT = 6
AGAR_DECK_SLOT = 5
PIPETTE_STARTING_TIP_WELL = 'A1'

well_colors = {
    'A1' : 'Red',
    'B1' : 'Green',
    'C1' : 'Orange'
}

sfgfp_points = [(0, 34),(2, 34),(4, 34),(6, 34),(0, 32),(2, 32),(4, 32),(6, 32),(-4, 30),(-2, 30),(0, 30),(2, 30),(-4, 28),(-2, 28),(0, 28),(2, 28),(-4, 26),(-2, 26),(12, 26),(14, 26),(16, 26),(18, 26),(20, 26),(22, 26),(-4, 24),(-2, 24),(12, 24),(14, 24),(16, 24),(18, 24),(20, 24),(22, 24),(-8, 22),(-6, 22),(-4, 22),(-2, 22),(8, 22),(10, 22),(12, 22),(14, 22),(16, 22),(18, 22),(24, 22),(26, 22),(-8, 20),(-6, 20),(-4, 20),(-2, 20),(8, 20),(10, 20),(12, 20),(14, 20),(16, 20),(18, 20),(24, 20),(26, 20),(-8, 18),(-6, 18),(-4, 18),(-2, 18),(0, 18),(2, 18),(4, 18),(6, 18),(8, 18),(10, 18),(12, 18),(14, 18),(16, 18),(18, 18),(20, 18),(22, 18),(24, 18),(26, 18),(-8, 16),(-6, 16),(-4, 16),(-2, 16),(0, 16),(2, 16),(4, 16),(6, 16),(8, 16),(10, 16),(12, 16),(14, 16),(16, 16),(18, 16),(20, 16),(22, 16),(24, 16),(26, 16),(-12, 14),(-10, 14),(-8, 14),(-6, 14),(8, 14),(10, 14),(12, 14),(14, 14),(16, 14),(18, 14),(20, 14),(22, 14),(24, 14),(26, 14),(-12, 12),(-10, 12),(-8, 12),(-6, 12),(8, 12),(10, 12),(12, 12),(14, 12),(16, 12),(18, 12),(20, 12),(22, 12),(24, 12),(26, 12),(-12, 10),(-10, 10),(8, 10),(10, 10),(12, 10),(14, 10),(16, 10),(18, 10),(20, 10),(22, 10),(24, 10),(26, 10),(-12, 8),(-10, 8),(8, 8),(10, 8),(12, 8),(14, 8),(16, 8),(18, 8),(20, 8),(22, 8),(24, 8),(26, 8),(12, 6),(14, 6),(16, 6),(18, 6),(20, 6),(22, 6),(12, 4),(14, 4),(16, 4),(18, 4),(20, 4),(22, 4),(8, 2),(10, 2),(8, 0),(10, 0),(-4, -2),(-2, -2),(0, -2),(2, -2),(4, -2),(6, -2),(-4, -4),(-2, -4),(0, -4),(2, -4),(4, -4),(6, -4),(-24, -6),(-22, -6),(-4, -6),(-2, -6),(0, -6),(2, -6),(4, -6),(6, -6),(12, -6),(14, -6),(16, -6),(18, -6),(-24, -8),(-22, -8),(-4, -8),(-2, -8),(0, -8),(2, -8),(4, -8),(6, -8),(12, -8),(14, -8),(16, -8),(18, -8),(-24, -10),(-22, -10),(-20, -10),(-18, -10),(-8, -10),(-6, -10),(-4, -10),(-2, -10),(0, -10),(2, -10),(4, -10),(6, -10),(8, -10),(10, -10),(12, -10),(14, -10),(16, -10),(18, -10),(-24, -12),(-22, -12),(-20, -12),(-18, -12),(-8, -12),(-6, -12),(-4, -12),(-2, -12),(0, -12),(2, -12),(4, -12),(6, -12),(8, -12),(10, -12),(12, -12),(14, -12),(16, -12),(18, -12),(-20, -14),(-18, -14),(-16, -14),(-14, -14),(-12, -14),(-10, -14),(-8, -14),(-6, -14),(-4, -14),(-2, -14),(0, -14),(-20, -16),(-18, -16),(-16, -16),(-14, -16),(-12, -16),(-10, -16),(-8, -16),(-6, -16),(-4, -16),(-2, -16),(0, -16),(-16, -18),(-14, -18),(-12, -18),(-10, -18),(-8, -18),(-6, -18),(-4, -18),(-2, -18),(0, -18),(-16, -20),(-14, -20),(-12, -20),(-10, -20),(-8, -20),(-6, -20),(-4, -20),(-8, -22),(-6, -22),(-4, -22),(-2, -22),(0, -22),(2, -22),(4, -22),(-8, -24),(-6, -24),(-4, -24),(-2, -24),(0, -24),(2, -24),(4, -24)]
mrfp1_points = [(6, 30),(6, 28),(4, 26),(6, 26),(4, 24),(6, 24),(4, 22),(6, 22),(20, 22),(22, 22),(0, 20),(2, 20),(4, 20),(6, 20),(20, 20),(22, 20),(-12, 18),(-10, 18),(-12, 16),(-10, 16),(-16, 14),(-14, 14),(-4, 14),(-2, 14),(0, 14),(2, 14),(6, 14),(-16, 12),(-14, 12),(-4, 12),(6, 12),(-16, 10),(-14, 10),(-8, 10),(-6, 10),(6, 10),(-16, 8),(-14, 8),(-8, 8),(6, 8),(-12, 6),(-10, 6),(10, 6),(-12, 4),(-10, 4),(8, 4),(10, 4),(-12, 2),(-10, 2),(-8, 2),(-6, 2),(-12, 0),(-10, 0),(-8, 0),(-6, 0),(-2, 0),(0, 0),(2, 0),(4, 0),(6, 0),(-8, -2),(-6, -2),(10, -2),(-8, -4),(-6, -4),(10, -4),(-16, -6),(-14, -6),(-12, -6),(-10, -6),(-6, -6),(10, -6),(-16, -8),(-14, -8),(-12, -8),(-10, -8),(-6, -8),(10, -8),(-16, -12),(-14, -12),(-12, -12),(-10, -12),(-24, -14),(10, -14),(-24, -16),(-22, -16),(10, -16),(-20, -18),(8, -18),(-20, -20),(-18, -20),(6, -20),(8, -20),(-16, -22),(-16, -24),(-14, -24),(-12, -24),(-10, -24),(-8, -26),(-6, -26),(-4, -26),(-2, -26),(0, -26),(-8, -28),(-6, -28),(-4, -28),(-2, -28),(0, -28),(-8, -30),(-6, -30),(-4, -30),(-2, -30),(0, -30),(2, -30),(4, -30),(-8, -32),(-6, -32),(-4, -32),(-2, -32),(0, -32),(2, -32),(4, -32)]


def run(protocol):
  ##############################################################################
  ###   Load labware, modules and pipettes
  ##############################################################################

  # Tips
  tips_20ul = protocol.load_labware('opentrons_96_tiprack_20ul', TIP_RACK_DECK_SLOT, 'Opentrons 20uL Tips')

  # Pipettes
  pipette_20ul = protocol.load_instrument("p20_single_gen2", "right", [tips_20ul])

  # Modules
  temperature_module = protocol.load_module('temperature module gen2', COLORS_DECK_SLOT)

  # Temperature Module Plate
  temperature_plate = temperature_module.load_labware('opentrons_96_aluminumblock_generic_pcr_strip_200ul',
                                                      'Cold Plate')
  # Choose where to take the colors from
  color_plate = temperature_plate

  # Agar Plate
  agar_plate = protocol.load_labware('htgaa_agar_plate', AGAR_DECK_SLOT, 'Agar Plate')  ## TA MUST CALIBRATE EACH PLATE!
  # Get the top-center of the plate, make sure the plate was calibrated before running this
  center_location = agar_plate['A1'].top()

  pipette_20ul.starting_tip = tips_20ul.well(PIPETTE_STARTING_TIP_WELL)

  ##############################################################################
  ###   Patterning
  ##############################################################################

  ###
  ### Helper functions for this lab
  ###

  # pass this e.g. 'Red' and get back a Location which can be passed to aspirate()
  def location_of_color(color_string):
    for well,color in well_colors.items():
      if color.lower() == color_string.lower():
        return color_plate[well]
    raise ValueError(f"No well found with color {color_string}")

  # For this lab, instead of calling pipette.dispense(1, loc) use this: dispense_and_detach(pipette, 1, loc)
  def dispense_and_detach(pipette, volume, location):
      """
      Move laterally 5mm above the plate (to avoid smearing a drop); then drop down to the plate,
      dispense, move back up 5mm to detach drop, and stay high to be ready for next lateral move.
      5mm because a 4uL drop is 2mm diameter; and a 2deg tilt in the agar pour is >3mm difference across a plate.
      """
      assert(isinstance(volume, (int, float)))
      above_location = location.move(types.Point(z=location.point.z + 5))  # 5mm above
      pipette.move_to(above_location)       # Go to 5mm above the dispensing location
      pipette.dispense(volume, location)    # Go straight downwards and dispense
      pipette.move_to(above_location)       # Go straight up to detach drop and stay high

  ###
  ### YOUR CODE HERE to create your design
  ###


  # -----------------------------
  # Printing parameters
  # -----------------------------
  VOL_PER_DOT = 0.50

  # Keep aspirates comfortably below 20uL for accuracy/safety
  MAX_ASPIRATE_UL = 18.0
  MAX_BATCH_DOTS = int(MAX_ASPIRATE_UL // VOL_PER_DOT)  # 18.0 // 0.75 = 36

  # Choose where on Z you actually want to dispense.
  # Start conservative: 0 means "at agar_plate['A1'].top() plane".
  # If your drops need to touch the agar more, try -0.5 or -1.0 after testing.
  DISPENSE_DZ = 2

  def point_location_from_center(dx, dy, dz=DISPENSE_DZ):
      # Offsets are in mm
      return center_location.move(types.Point(x=dx, y=dy, z=dz))

  def print_points(points, color_name):
      pipette_20ul.pick_up_tip()

      i = 0
      while i < len(points):
          batch = points[i:i + MAX_BATCH_DOTS]
          batch_volume = len(batch) * VOL_PER_DOT

          # Pull enough dye for this batch
          pipette_20ul.aspirate(batch_volume, location_of_color(color_name))

          # Dispense each dot
          for (dx, dy) in batch:
              loc = point_location_from_center(dx, dy)
              dispense_and_detach(pipette_20ul, VOL_PER_DOT, loc)

          i += MAX_BATCH_DOTS

      pipette_20ul.drop_tip()

  # -----------------------------
  # Print your two datasets
  # -----------------------------
  print_points(sfgfp_points, "Green")
  print_points(mrfp1_points, "Red")

  # Don't forget to end with a drop_tip()
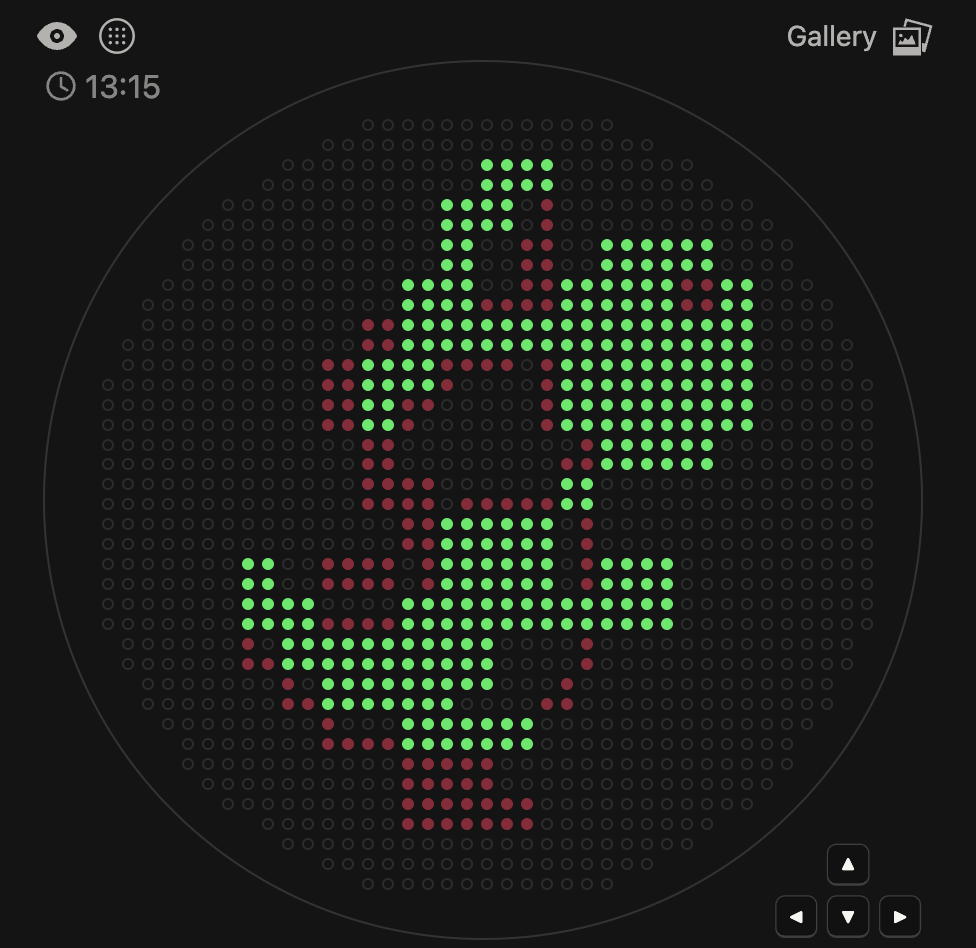
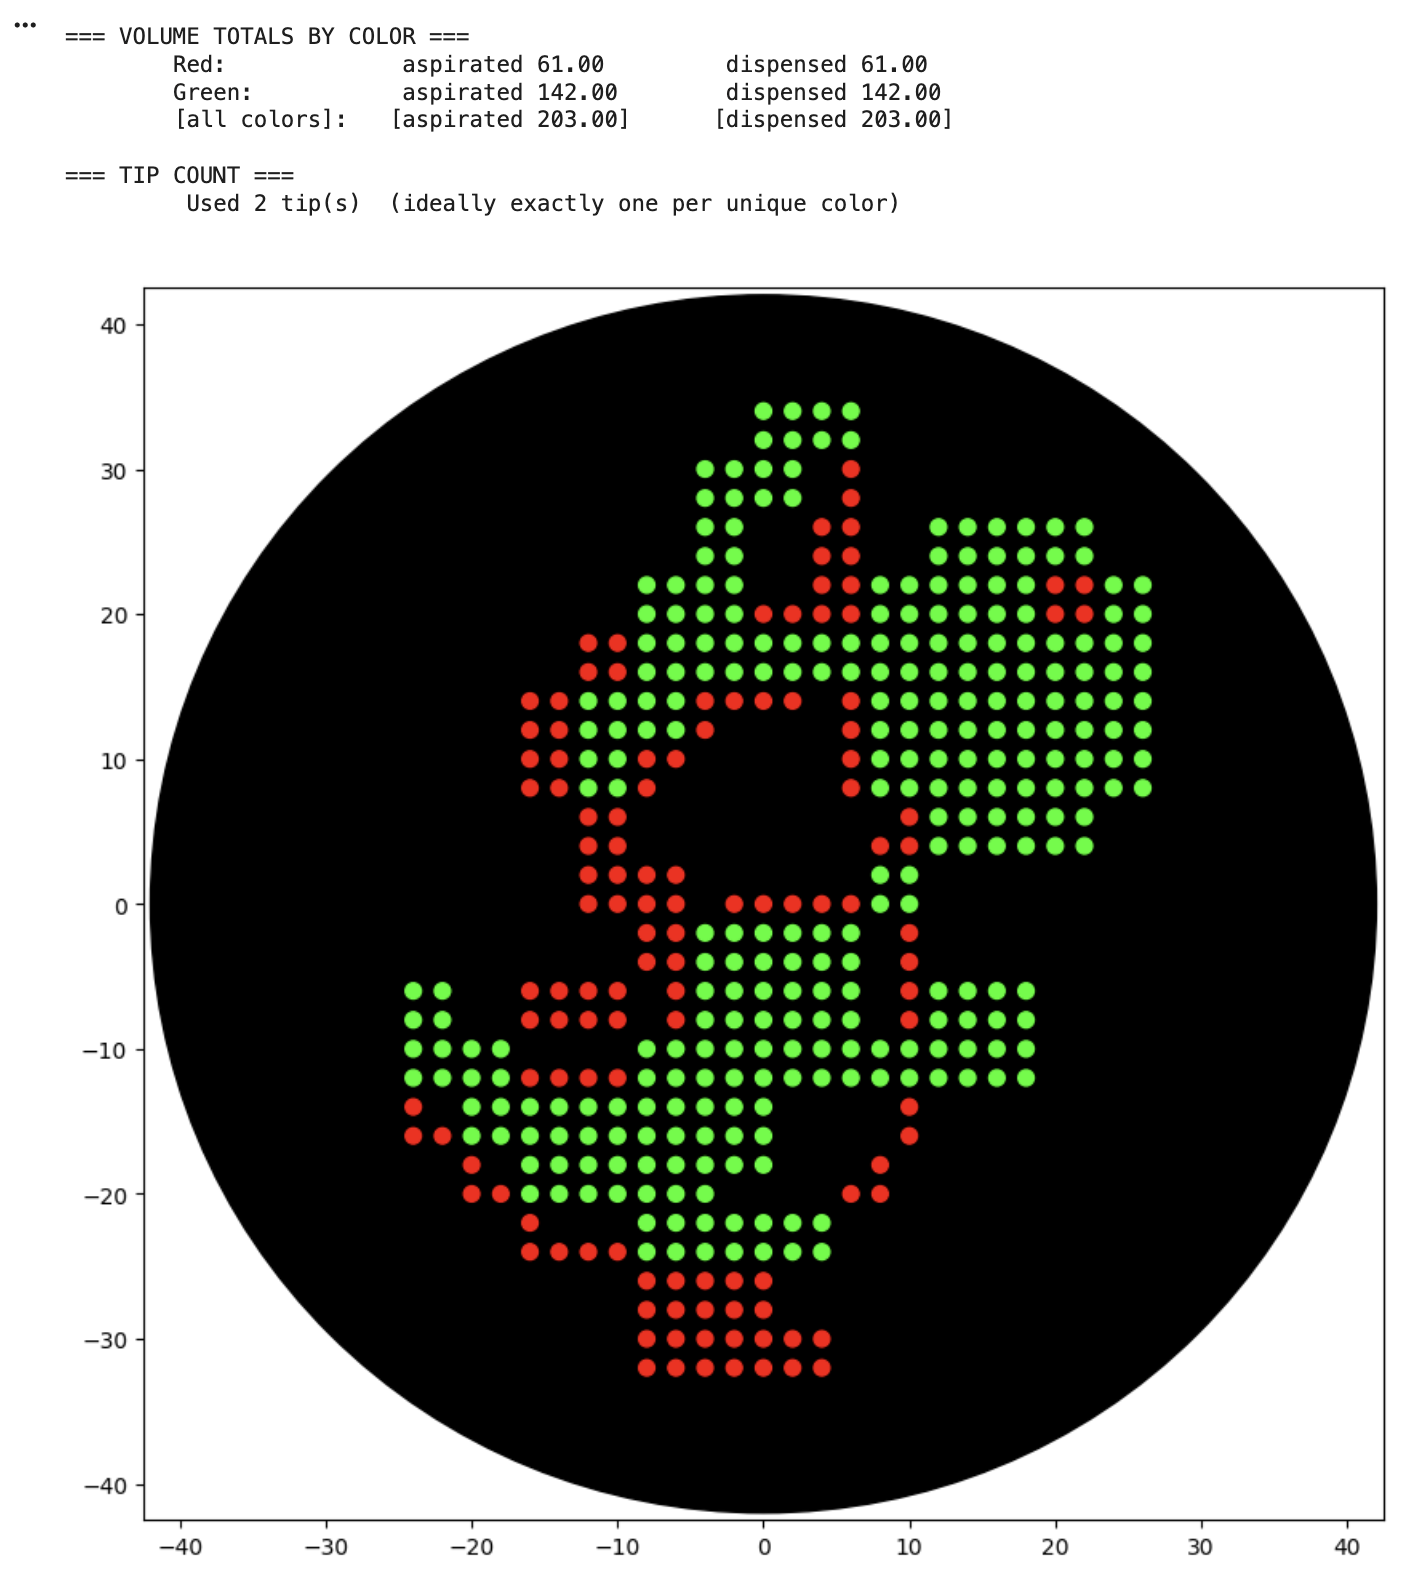
This code successfully resulted in the following image.
Cell-based assays, typically used for drug screening, are limited in application due to their reliance on rigid substrates, which can distort results. Planar hydrogels have shown to be a promosing solution, but achieving uniform thin hydrogel layers also remains a technical limitation. In this paper, Torchia et al. explore the use of Opentrons in order to uniformly produce hydrogels for drug testing. Their methodology, HYDRA (HYDrogels by Robotic liquid-handling Automation) provides a scalable and automated solution to generate uniform micrometic planar hydrogels directly within the standardized plates. This protocol preserved canonical drug responsiveness while providing reproducible, biomimetic substrate for high-content pharmacological imaging.
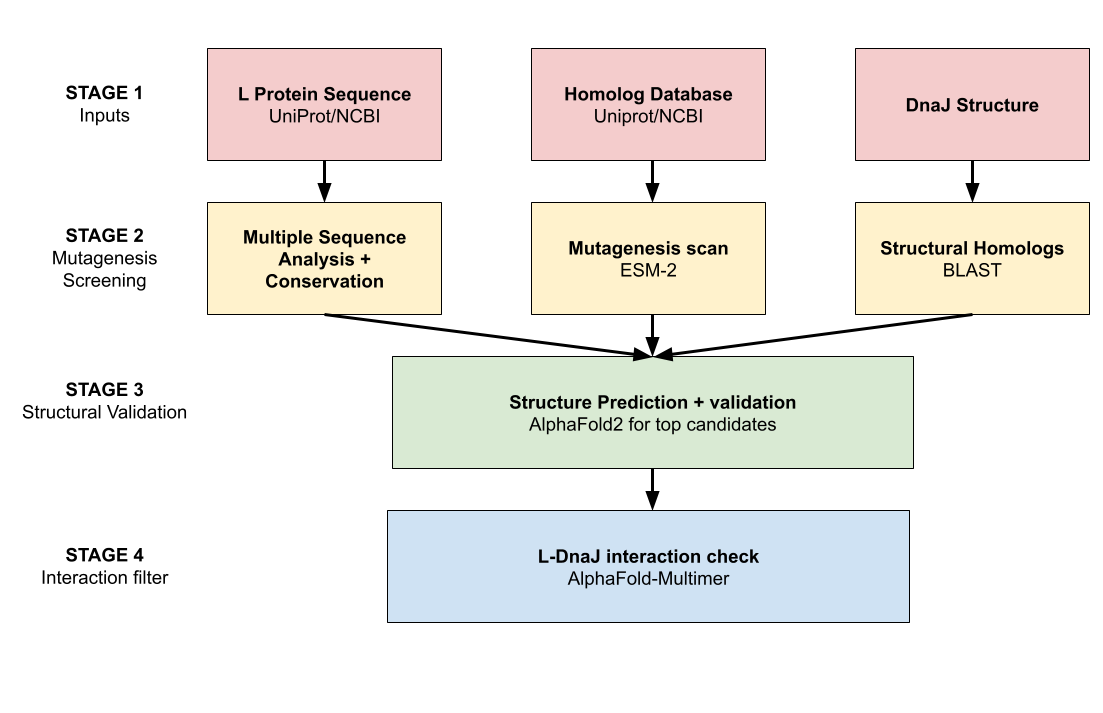
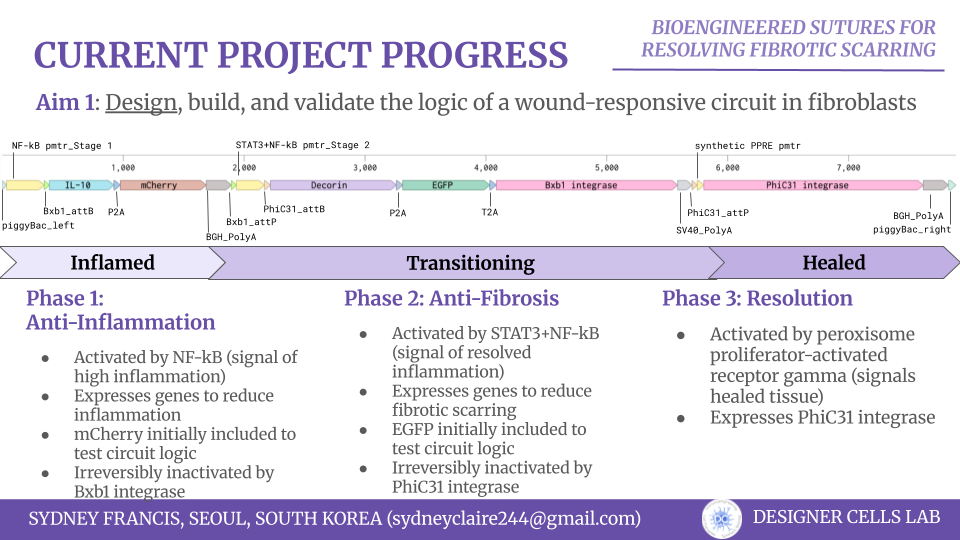
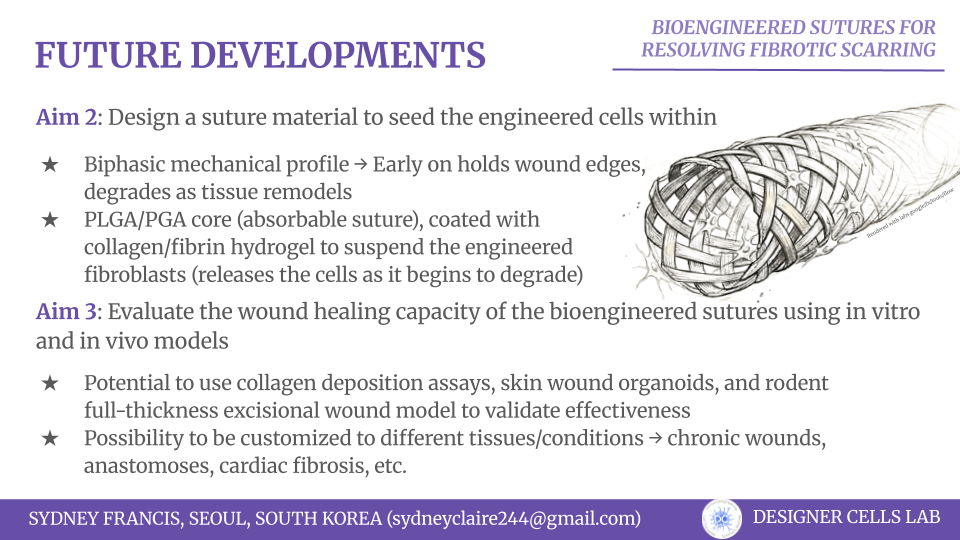
For my own project, I envision using the Opentron in order to aid in the transformation processes. For each of my final project ideas, they require high-throughput screening of candidates, which could be automated using the Opentron system.


