Week 3 HW: Lab Automation
Assignment: Python Script for Opentrons Artwork — DUE BY YOUR LAB TIME! Your task this week is to Create a Python file to run on an Opentrons liquid handling robot.
Post-Lab Questions — DUE BY START OF FEB 24 LECTURE
To create the design, I employed several tests:
Part 1.
I initially performed some tests by modifying the color in the first example provided in Google Colab.
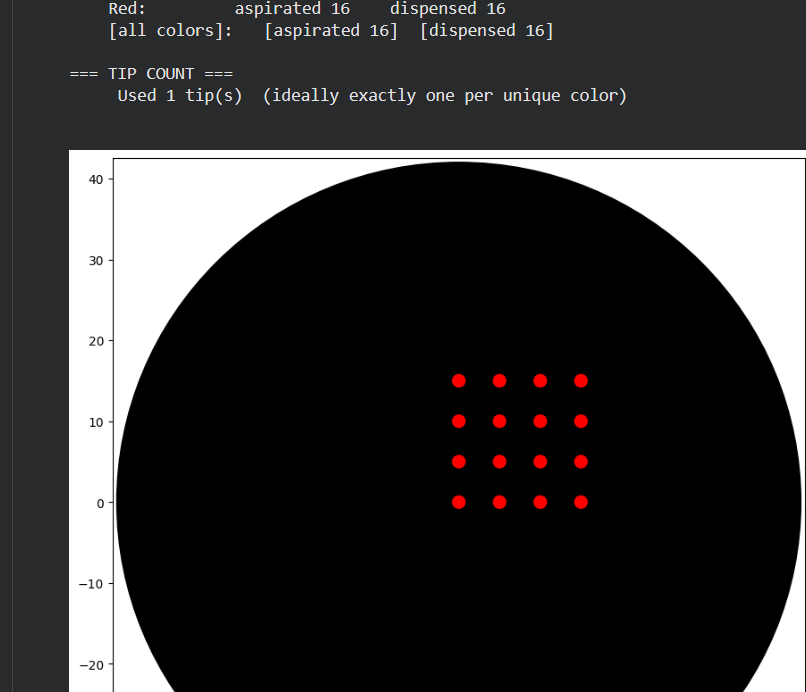
Part 2.
Then I tried to design a florwer based on the images generated on: https://opentrons-art.rcdonovan.com/.

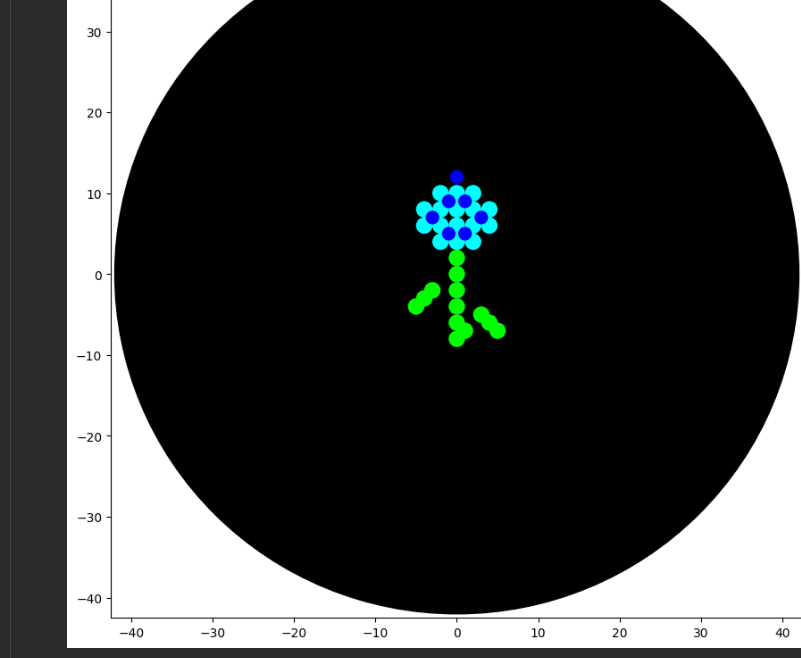
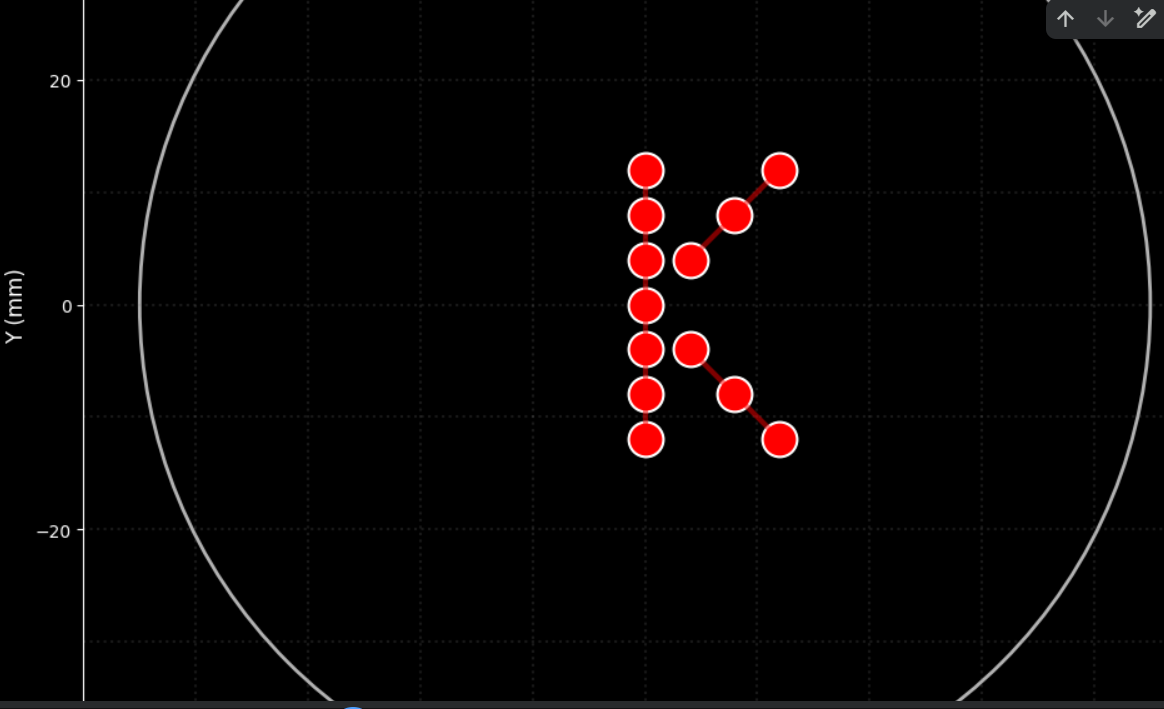
3. From there , I generated these images with assistance from ChatGPT and DeepSeek, ultimately achieving this design. Below are the codes I used.
from opentrons import types import matplotlib.pyplot as plt import numpy as np from IPython.display import clear_output import time
metadata = { ‘protocolName’: ‘HTGAA Opentrons Lab - Letter K in Red’, ‘author’: ‘HTGAA’, ‘source’: ‘HTGAA 2022’, ‘apiLevel’: ‘2.20’ }
##############################################################################
Robot deck setup constants - don’t change these
##############################################################################
TIP_RACK_DECK_SLOT = 9 COLORS_DECK_SLOT = 6 AGAR_DECK_SLOT = 5 PIPETTE_STARTING_TIP_WELL = ‘A1’
well_colors = { ‘A1’ : ‘Red’, ‘B1’ : ‘Yellow’, ‘C1’ : ‘Green’, ‘D1’ : ‘Cyan’, ‘E1’ : ‘Blue’ }
Class to simulate the Opentrons environment
class OpentronsMock: def init(self, well_colors): self.well_colors = well_colors self.dots = [] # List to store drawn points self.current_position = (0, 0, 0) self.tip_attached = False self.labware = {} # Dictionary to store labware self.modules = {} # Dictionary to store modules self.instruments = {} # Dictionary to store instruments
def load_labware(self, name, slot, label=None):
    labware = MockLabware(name, slot, label, self)
    self.labware[slot] = labware
    return labware

def load_instrument(self, name, mount, tip_racks):
    instrument = MockPipette(name, mount, tip_racks, self)
    self.instruments[mount] = instrument
    return instrument

def load_module(self, name, slot):
    module = MockModule(name, slot, self)
    self.modules[slot] = module
    return module

def visualize(self):
    """Visualize the points drawn on the agar plate with black background"""
    # Configure style with black background
    plt.style.use('dark_background')

    fig, ax = plt.subplots(figsize=(10, 10), facecolor='black')
    ax.set_facecolor('black')

    # Draw the agar plate outline (90mm diameter circle)
    circle = plt.Circle((0, 0), 45, fill=False, color='white', linewidth=2, alpha=0.7)
    ax.add_patch(circle)

    # Draw a faint grid for reference
    for i in range(-40, 41, 10):
        ax.axhline(y=i, color='gray', linestyle=':', alpha=0.2)
        ax.axvline(x=i, color='gray', linestyle=':', alpha=0.2)

    # Draw the plate center
    ax.plot(0, 0, 'w+', markersize=10, linewidth=2, label='Center', alpha=0.7)

    # Draw the points
    if self.dots:
        x_coords = [dot[0] for dot in self.dots]
        y_coords = [dot[1] for dot in self.dots]
        colors = [dot[2] for dot in self.dots]

        # Color mapping (adjusted for black background)
        color_map = {'Red': 'red', 'Yellow': 'yellow', 'Green': 'lime',
                    'Cyan': 'cyan', 'Blue': 'dodgerblue'}

        for x, y, color in zip(x_coords, y_coords, colors):
            ax.plot(x, y, 'o', color=color_map.get(color, 'white'),
                   markersize=20, markeredgecolor='white', markeredgewidth=1.5)

    # Connect the points to show the K shape
    if len(self.dots) >= 13:  # If we have all points
        # Sort points to draw the K lines
        # Vertical points (sorted by y)
        vertical = sorted([(x, y) for x, y, _ in self.dots if x == 0], key=lambda p: p[1])
        if len(vertical) >= 7:
            v_x, v_y = zip(*vertical)
            ax.plot(v_x, v_y, 'red', alpha=0.5, linewidth=3, linestyle='-')

        # Lower diagonal points
        diagonal_lower = [(x, y) for x, y, _ in self.dots if x > 0 and y < 0]
        if diagonal_lower:
            d_x, d_y = zip(*sorted(diagonal_lower, key=lambda p: p[0]))
            ax.plot(d_x, d_y, 'red', alpha=0.5, linewidth=3, linestyle='-')

        # Upper diagonal points
        diagonal_upper = [(x, y) for x, y, _ in self.dots if x > 0 and y > 0]
        if diagonal_upper:
            d_x, d_y = zip(*sorted(diagonal_upper, key=lambda p: p[0]))
            ax.plot(d_x, d_y, 'red', alpha=0.5, linewidth=3, linestyle='-')

    # Configure the plot
    ax.set_xlim(-50, 50)
    ax.set_ylim(-50, 50)
    ax.set_aspect('equal')

    # Customize axes for black background
    ax.spines['bottom'].set_color('white')
    ax.spines['top'].set_color('white')
    ax.spines['left'].set_color('white')
    ax.spines['right'].set_color('white')
    ax.tick_params(colors='white')
    ax.xaxis.label.set_color('white')
    ax.yaxis.label.set_color('white')
    ax.title.set_color('white')

    ax.set_title('Agar Plate Visualization - Letter K in Red',
                fontsize=16, fontweight='bold', color='white')
    ax.set_xlabel('X (mm)', fontsize=12, color='white')
    ax.set_ylabel('Y (mm)', fontsize=12, color='white')

    # Add legend with light colors
    from matplotlib.patches import Patch
    legend_elements = [
        Patch(facecolor='red', edgecolor='white', label='Red drops'),
        plt.Line2D([0], [0], color='red', alpha=0.5, linewidth=3, label='K connections'),
        plt.Line2D([0], [0], marker='+', color='white', linestyle='None',
                  markersize=10, markeredgewidth=2, label='Center')
    ]
    legend = ax.legend(handles=legend_elements, loc='upper right', facecolor='black',
                      edgecolor='white', labelcolor='white')
    for text in legend.get_texts():
        text.set_color('white')

    plt.tight_layout()
    plt.show()

    # Print information
    print(f"\n{'='*50}")
    print("📊 EXPERIMENT SUMMARY")
    print(f"{'='*50}")
    print(f"🎨 Color used: Red")
    print(f"🔴 Total drops deposited: {len(self.dots)}")
    print(f"📏 Shape: Letter K")
    print(f"📐 Drop spacing: 4 mm")
    print(f"📏 Dimensions: 24 mm high x 12 mm wide")

    # Show point coordinates
    print(f"\n📍 POINT COORDINATES (x, y) in mm:")
    print(f"{'-'*40}")
    for i, (x, y, color) in enumerate(self.dots, 1):
        print(f"   Point {i:2d}: ({x:+5.1f}, {y:+5.1f})")
class MockLabware: def init(self, name, slot, label, mock_env): self.name = name self.slot = slot self.label = label self.mock_env = mock_env self.wells_dict = {}
    # Create simulated wells
    if 'agar_plate' in name:
        # For agar plate, we only need A1
        self.wells_dict['A1'] = MockWell('A1', slot, mock_env)
    else:
        # For other plates, create some wells
        for well_name in ['A1', 'B1', 'C1', 'D1', 'E1']:
            self.wells_dict[well_name] = MockWell(well_name, slot, mock_env)

def wells(self):
    return list(self.wells_dict.values())

def __getitem__(self, well_name):
    """Make the object subscriptable"""
    if well_name in self.wells_dict:
        return self.wells_dict[well_name]
    else:
        # If it doesn't exist, create a new one
        self.wells_dict[well_name] = MockWell(well_name, self.slot, self.mock_env)
        return self.wells_dict[well_name]
class MockWell: def init(self, name, slot, mock_env): self.name = name self.slot = slot self.mock_env = mock_env
def top(self):
    return MockLocation(0, 0, 0, self.mock_env)
class MockLocation: def init(self, x, y, z, mock_env): self.point = types.Point(x, y, z) self.mock_env = mock_env
def move(self, point):
    new_x = self.point.x + point.x
    new_y = self.point.y + point.y
    new_z = self.point.z + point.z
    return MockLocation(new_x, new_y, new_z, self.mock_env)
class MockModule: def init(self, name, slot, mock_env): self.name = name self.slot = slot self.mock_env = mock_env
def load_labware(self, name, label):
    labware = MockLabware(name, self.slot, label, self.mock_env)
    return labware
class MockPipette: def init(self, name, mount, tip_racks, mock_env): self.name = name self.mount = mount self.tip_racks = tip_racks self.mock_env = mock_env self.current_volume = 0
def pick_up_tip(self):
    self.mock_env.tip_attached = True
    print("🔄 Tip picked up")

def drop_tip(self):
    self.mock_env.tip_attached = False
    print("🔄 Tip discarded")

def aspirate(self, volume, location):
    self.current_volume = volume
    if hasattr(location, 'name'):
        print(f"💧 Aspirating {volume}uL from {location.name}")
    else:
        print(f"💧 Aspirating {volume}uL")

def dispense(self, volume, location):
    self.current_volume -= volume
    # Register the point for visualization
    if hasattr(location, 'point'):
        self.mock_env.dots.append((location.point.x, location.point.y, 'Red'))
        print(f"💧 Dispensing {volume}uL at ({location.point.x:+5.1f}, {location.point.y:+5.1f})")

def move_to(self, location):
    if hasattr(location, 'point'):
        self.mock_env.current_position = (location.point.x, location.point.y, location.point.z)
def run(protocol): ############################################################################## ### Load labware, modules and pipettes ##############################################################################
# Tips
tips_20ul = protocol.load_labware('opentrons_96_tiprack_20ul', TIP_RACK_DECK_SLOT, 'Opentrons 20uL Tips')

# Pipettes
pipette_20ul = protocol.load_instrument("p20_single_gen2", "right", [tips_20ul])

# Modules
temperature_module = protocol.load_module('temperature module gen2', COLORS_DECK_SLOT)

# Temperature Module Plate
temperature_plate = temperature_module.load_labware('opentrons_96_aluminumblock_generic_pcr_strip_200ul',
                                                    'Cold Plate')
# Choose where to take the colors from
color_plate = temperature_plate

# Agar Plate
agar_plate = protocol.load_labware('htgaa_agar_plate', AGAR_DECK_SLOT, 'Agar Plate')

# Get the top-center of the plate
center_location = agar_plate['A1'].top()

##############################################################################
###   Patterning
##############################################################################

###
### Helper functions for this lab
###

def location_of_color(color_string):
    for well, color in well_colors.items():
        if color.lower() == color_string.lower():
            return color_plate[well].top()
    raise ValueError(f"No well found with color {color_string}")

def dispense_and_detach(pipette, volume, location):
    """
    Move laterally 5mm above the plate; then drop down to the plate,
    dispense, move back up 5mm to detach drop.
    """
    assert(isinstance(volume, (int, float)))
    if hasattr(location, 'point'):
        above_location = location.move(types.Point(z=location.point.z + 5))
        pipette.move_to(above_location)
        pipette.dispense(volume, location)
        pipette.move_to(above_location)

###
### YOUR CODE HERE to create your design
###

###
### Code to create the letter K in red
###

print("\n" + "="*50)
print("🚀 STARTING PROTOCOL: Letter K in Red")
print("="*50 + "\n")

# Aspirate red color
pipette_20ul.pick_up_tip()

# Calculate required volume (13 points x 1uL = 13uL)
pipette_20ul.aspirate(13, location_of_color('Red'))

# Define points to form the letter K
# Letter size (spacing between points in mm)
spacing = 4

# Points for the vertical line (7 points)
vertical_points = []
for i in range(-3, 4):
    vertical_points.append((0, i * spacing))

# Points for the upper diagonal (3 points)
diagonal_upper = []
for i in range(1, 4):
    diagonal_upper.append((i * spacing, i * spacing))

# Points for the lower diagonal (3 points)
diagonal_lower = []
for i in range(1, 4):
    diagonal_lower.append((i * spacing, -i * spacing))

print("🎨 Drawing letter K...")

# Draw the vertical line
print("\n📏 Vertical line (7 points):")
print("   " + "─" * 35)
for i, (x, y) in enumerate(vertical_points):
    adjusted_location = center_location.move(types.Point(x=x, y=y))
    dispense_and_detach(pipette_20ul, 1, adjusted_location)
    print(f"   Point {i+1:2d}: ({x:+5.1f}, {y:+5.1f})")

# Draw the lower diagonal
print("\n📐 Lower diagonal (3 points):")
print("   " + "─" * 35)
for i, (x, y) in enumerate(diagonal_lower):
    adjusted_location = center_location.move(types.Point(x=x, y=y))
    dispense_and_detach(pipette_20ul, 1, adjusted_location)
    print(f"   Point {i+1:2d}: ({x:+5.1f}, {y:+5.1f})")

# Draw the upper diagonal
print("\n📐 Upper diagonal (3 points):")
print("   " + "─" * 35)
for i, (x, y) in enumerate(diagonal_upper):
    adjusted_location = center_location.move(types.Point(x=x, y=y))
    dispense_and_detach(pipette_20ul, 1, adjusted_location)
    print(f"   Point {i+1:2d}: ({x:+5.1f}, {y:+5.1f})")

# Clean up
pipette_20ul.drop_tip()

print("\n" + "="*50)
print("✅ PROTOCOL COMPLETED!")
print("="*50)
print(f"🎯 Total drops: {len(vertical_points) + len(diagonal_lower) + len(diagonal_upper)}")
print(f"🎨 Color: Red")
print(f"📏 Shape: Letter 'K'")
Create the simulation environment
print("🦾 Initializing Opentrons simulation environment…") protocol = OpentronsMock(well_colors)
Execute the protocol
run(protocol)
Visualize the results
print("\n" + “="*50) print("📊 GENERATING VISUALIZATION WITH BLACK BACKGROUND”) print("="*50) protocol.visualize()
My script: https://colab.research.google.com/drive/1rqh-nW1sT1y1mbWqTG84T_RVmF2-BDl_#scrollTo=bpfBlyR0VVJq
Post-Lab Questions — DUE BY START OF FEB 24 LECTURE
One of the great parts about having an automated robot is being able to precisely mix, deposit, and run reactions without much intervention, and design and deploy experiments remotely.
For this week, we’d like for you to do the following:
Find and describe a published paper that utilizes the Opentrons or an automation tool to achieve novel biological applications. Write a description about what you intend to do with automation tools for your final project. You may include example pseudocode, Python scripts, 3D printed holders, a plan for how to use Ginkgo Nebula, and more. You may reference this week’s recitation slide deck for lab automation details.
The article “Automated High-Throughtput Flow Cytometry for High-Content”
Describe the development of a fully integrated automated designed to enhance antibody discovery thorugh high-throughput cytometric analysis.
In this study, the researchers integrated robotic liquid handling with automated flow cytometry. The platform automated sample preparation, dilution steps, incubation procedures, and data acquisition.
Automated Tasks
Plate Initialization
Dispense 100 µL of cell suspension into each well of a 96-well plate.
Ensure uniform cell density (e.g., 1 × 10⁵ cells per well).
Serial Dilution of Antibodies
Perform 1:3 or 1:5 serial dilutions across designated wells.
Transfer precise microliter volumes (e.g., 20 µL) to generate standardized concentration gradients.
Antibody Incubation Setup
Add diluted antibody solutions to corresponding wells.
Mix gently using programmed pipette mixing cycles.
Incubate for a defined period (e.g., 30 minutes at room temperature).
Wash Steps
Aspirate supernatant without disturbing the cell pellet.
Add wash buffer (e.g., PBS + 1% BSA).
Repeat wash cycle two to three times.
Secondary Antibody Addition (if required)
Dispense fluorescently labeled secondary antibody.
Incubate under controlled timing conditions.
Final Preparation for Flow Cytometry
Resuspend cells in analysis buffer.
Transfer samples to cytometry-compatible plates or tubes.
| Advantage | Description | Impact on Antibody Development |
|---|---|---|
| Increased Throughput | Automation allows simultaneous processing of large numbers of samples. | Accelerates screening of extensive antibody libraries. |
| Improved Reproducibility | Robotic liquid handling reduces variability caused by manual pipetting and handling. | Produces more consistent and reliable experimental results. |
| Reduced Human Error | Automated workflows minimize mistakes in dilution, incubation, and sample transfer steps. | Enhances data accuracy and experimental reliability. |
| Time Efficiency | Integration of preparation and analysis reduces hands-on time. | Speeds up early-stage drug discovery processes. |
| Standardization | Automated protocols ensure uniform execution of experimental procedures. | Facilitates comparison between experiments and batches. |
| High-Content Data Acquisition | Automated cytometry enables multiparametric analysis of each sample. | Provides richer datasets for better candidate selection. |
| Scalability | The platform can be adapted for large-scale screening campaigns. | Supports industrial-level therapeutic antibody development. |
Aplication example:
This application focuses on the high-throughput screening of single-domain antibodies (VHH nanobodies) derived from South American camelids, such as llamas and alpacas. These antibodies are smaller and structurally simpler than conventional IgG molecules, making them highly suitable for recombinant expression and screening workflows. Using Opentrons automation, the robot can perform serial dilutions of VHH candidates, dispense them into 96-well plates containing target cells expressing the antigen of interest, and execute standardized wash and incubation steps prior to flow cytometry analysis. Because nanobody screening requires precise concentration gradients to evaluate binding affinity, automated liquid handling significantly improves reproducibility and quantitative reliability. REFERENCES:
- The table was generated with the assistance of ChatGPT (OpenAI) to summarize the key advantages described in the referenced article.
- Wang Y, Yoshihara T, King S, Le T, Leroy P, Zhao X, Chan CK, Yan ZH, Menon S. Automated High-Throughput Flow Cytometry for High-Content Screening in Antibody Development. SLAS Discov. 2018 Aug;23(7):656-666. doi: 10.1177/2472555218776607. Epub 2018 Jun 13. PMID: 29898633.