Week 6 HW: Genetic Circuits Part I
Part 1. Questions
1. Phusion High-Fidelity PCR Master Mix Components
- Phusion DNA Polymerase — high-fidelity polymerase with 3′→5′ proofreading exonuclease activity; ~50× lower error rate than Taq
- dNTPs — nucleotide building blocks (dATP, dCTP, dGTP, dTTP) incorporated during strand synthesis
- HF Buffer + Mg²⁺ — provides optimal pH and ionic conditions; Mg²⁺ is an essential cofactor for polymerase activity
- Stabilizers — maintain enzyme activity during storage and reaction setup
2. Factors That Determine Primer Annealing Temperature
- GC content — G·C pairs have 3 H-bonds vs. 2 for A·T, raising T_m
- Primer length — longer primers = higher T_m
- Salt/Mg²⁺ concentration — stabilizes duplexes, increases T_m
- Primer secondary structure — hairpins or self-dimers reduce effective T_m
- Polymerase used — Phusion tolerates higher T_a than Taq; use NEB Tm Calculator for Phusion
Rule of thumb: T_a ≈ T_m of the lower-melting primer (for Phusion)
3. PCR vs. Restriction Enzyme Digest
| PCR | Restriction Enzyme Digest | |
|---|---|---|
| Mechanism | Exponential amplification using primers | Site-specific endonuclease cuts at recognition sequences |
| End type | Blunt (Phusion) or defined by primer design | Blunt or sticky ends depending on enzyme |
| Adds sequence? | Yes — overhangs encoded in primers | No — cuts only at existing sites |
| Template needed | Any DNA, even low quantity | Usually purified plasmid/DNA |
| Time | ~1–2 hr | ~1–4 hr |
| Error risk | Possible polymerase errors | No amplification errors |
Prefer PCR when you need to add custom overhangs/sequences, there are no convenient RE sites, or when starting from complex template (genomic DNA).
Prefer RE digest when compatible cut sites already flank your insert, you want sticky ends for ligation, or you need to linearize a vector backbone without introducing mutations.
4. Ensuring Fragments Are Appropriate for Gibson Cloning
Gibson Assembly requires 20–40 bp of overlapping sequence between adjacent fragments. To ensure compatibility:
- Design PCR primers with 20–40 bp 5′ tails homologous to the adjacent fragment
- Verify overlaps in silico using Benchling or Asimov Kernel — confirm correct orientation and reading frame
- Check overlap uniqueness — overlaps that appear elsewhere in the construct cause mis-assembly
- For RE-digested fragments — PCR-amplify and add overlaps via primers before Gibson assembly
5. How Plasmid DNA Enters E. coli During Transformation
Chemical transformation (heat shock method):
- Cells are made competent by treatment with ice-cold CaCl₂, which destabilizes the outer membrane and allows DNA to associate with the cell surface
- Plasmid DNA is added and incubated on ice
- A brief heat shock at 42°C (~45 sec) creates a thermal imbalance that drives DNA through the membrane (likely via transient pores)
- Cells recover in SOC media, then are plated on selective antibiotic plates — only transformants survive
6. Alternative Assembly Method: Golden Gate Assembly
Golden Gate Assembly uses Type IIS restriction enzymes (e.g., BsaI), which cut outside their recognition sequence, generating custom 4-bp overhangs. Because the recognition site is destroyed upon cutting, the enzyme continuously re-cuts incorrect assemblies — driving the reaction toward the correctly assembled, scarless product. Each fragment is designed so that digestion produces unique 4-bp overhangs complementary only to its intended neighbor in the assembly. Digestion and ligation happen simultaneously in one pot by cycling between 37°C (cutting) and 16°C (ligation). The final product contains no scar, no extra bases, and no remaining restriction site at the junctions. This makes it ideal for assembling many fragments in parallel, such as in pathway engineering or combinatorial library construction.
Part 2. Asimov Kernel — Genetic Constructs
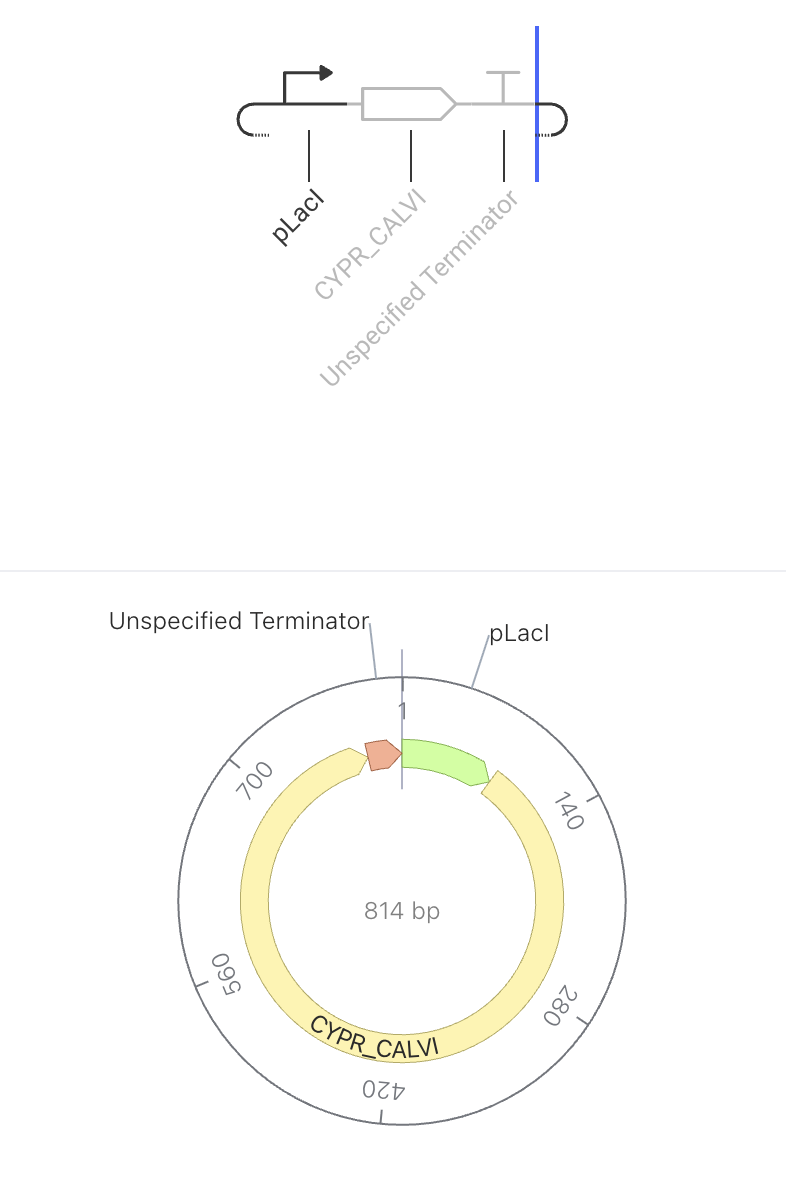
Construct 1: Rhodopsin Light-Sensitive Protein
new ideas from week 7 lec: modify it to make it like an activation function
How It Should Function
The promoter turns on, the rhodopsin protein gets made, and the terminator stops it. No feedback, no regulation — just expression. The pLacI promoter drives constitutive expression of CYPR_CALVI, a light-sensitive rhodopsin protein. When the promoter is active, the cell continuously produces the rhodopsin protein. Because there is no feedback or regulation, protein levels are expected to rise steadily in the simulator. Rhodopsins are membrane proteins that respond to light, making them useful for optogenetic applications — controlling cell behavior using light.
Construct Image
Construct 2: Negative Feedback Loop
How It Should Function
This circuit makes a glowing protein (GFP) AND a repressor at the same time. The repressor builds up and eventually turns the whole circuit off. The pLacI promoter drives simultaneous expression of both GFPL_DISST (green fluorescent protein) and LacI repressor. As more LacI accumulates in the cell, it begins to bind to and repress the pLacI promoter — slowing down production of both GFP and itself. This negative feedback loop acts as an auto-regulator: GFP levels rise initially, then stabilize or decline as LacI repression kicks in. The expected simulator output is a rise-then-plateau curve for GFP concentration.
Construct Image

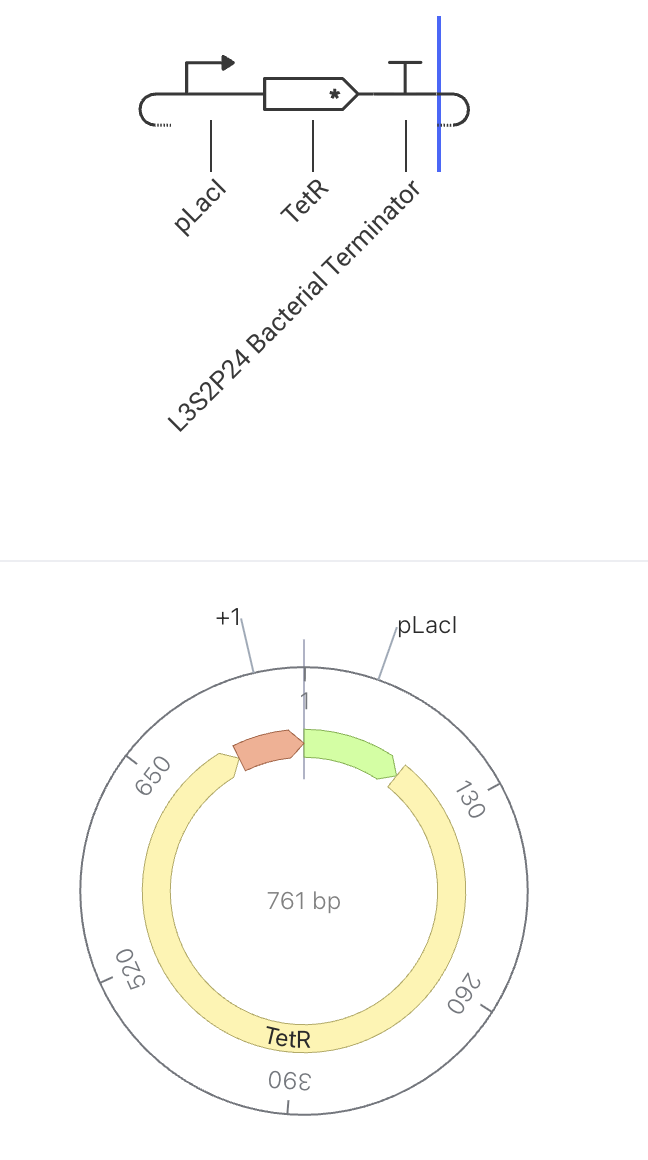
Construct 3: Toggle Switch
How It Should Function
This construct makes a repressor (TetR) that silences the other half of the switch. The two halves silence each other, so the cell can only be in one state at a time. This construct is one half of a classic bistable toggle switch. When pLacI is active, TetR is produced, which represses the pTet promoter in a paired construct. That paired construct produces LacI, which would repress pLacI. Because each side silences the other, the system locks into one of two stable states.
- State 1 (TetR wins): pLacI ON → TetR high → pTet OFF → LacI low → pLacI stays ON
- State 2 (LacI wins): pTet ON → LacI high → pLacI OFF → TetR low → pTet stays ON
Construct Image