Week 1 Lab: Introduction to Pipetting and Dilutions
Overview
This first HTGAA lab introduces the foundational techniques of pipetting and serial dilutions — critical skills for precise liquid handling in biological and chemical experiments. Two protocols were covered: mixing food coloring solutions to build volume intuition, and performing a serial dilution of a mystery substance (MS) to achieve a target concentration.
Pre-Lab
Key Definitions
| Term | Definition |
|---|---|
| Mole (mol) | A unit representing 6.022 × 10²³ particles (atoms, molecules, etc.) |
| Molarity (M) | Concentration defined as moles of solute per liter of solution (mol/L) |
| Conversions | 1 L = 1,000 mL = 1,000,000 µL • 1 M = 1,000 mM = 1,000,000 µM |
Dilution Formula
The core equation for all dilution calculations:
C₁V₁ = C₂V₂
| Symbol | Meaning |
|---|---|
| C₁ | Initial (stock) concentration |
| V₁ | Volume of stock to transfer |
| C₂ | Desired final concentration |
| V₂ | Total final volume |
Rearranged to find the transfer volume: V₁ = (C₂ × V₂) / C₁
Volume of water to add: V_water = V₂ − V₁
Dilution Practice 1
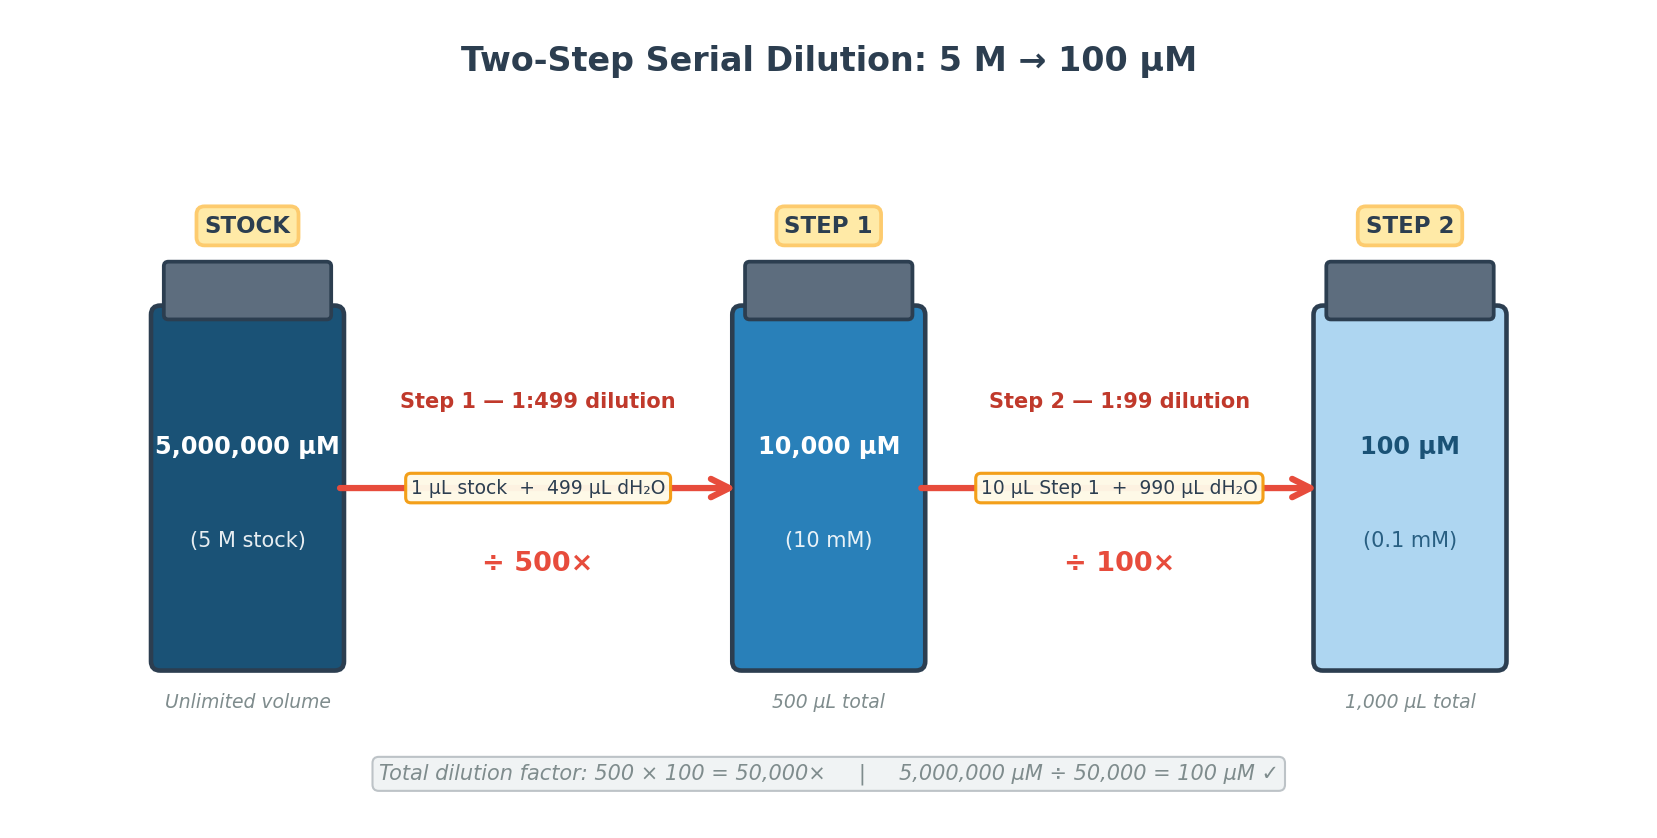
Scenario: Stock [MS] = 5 M. Goal: reach 100 µM using two sequential steps.
Step 1 — 5 M → 10,000 µM (1:499 dilution, 500× dilution factor)
Using C₁V₁ = C₂V₂ with V₂ = 500 µL:
V₁ = (10,000 µM × 500 µL) / 5,000,000 µM = 1 µL of 5 M stock
V_water = 500 − 1 = 499 µL of dH₂O
Result: 500 µL at 10,000 µM (10 mM)
Step 2 — 10,000 µM → 100 µM (1:99 dilution, 100× dilution factor)
Using C₁V₁ = C₂V₂ with V₂ = 1000 µL:
V₁ = (100 µM × 1000 µL) / 10,000 µM = 10 µL of Step 1 solution
V_water = 1000 − 10 = 990 µL of dH₂O
Result: 1000 µL at 100 µM — total dilution factor = 500 × 100 = 50,000×
Dilution Practice 2
Part a — Stock concentration in g/mL
Given: stock = 5 M, molar mass = 532 g/mol
5 mol/L × 532 g/mol = 2,660 g/L = 2.66 g/mL
Part b — Serial dilution plan from 5 M to 100 µM
Total required dilution factor: 5,000,000 µM ÷ 100 µM = 50,000×
A single dilution step is impractical — transferring 1 µL into 50 mL introduces unacceptable pipetting error at the microliter scale. A two-step serial dilution distributes the dilution factor into two manageable operations:
| Step | Dilution | From → To | V_stock | V_water | Total | Tube | Pipette |
|---|---|---|---|---|---|---|---|
| 1 | 1:499 (500×) | 5 M → 10,000 µM | 1 µL | 499 µL | 500 µL | 1.5 mL Eppendorf | P20 (1 µL) + P1000 (499 µL) |
| 2 | 1:99 (100×) | 10,000 µM → 100 µM | 10 µL | 990 µL | 1000 µL | 1.5 mL Eppendorf | P20 (10 µL) + P1000 (990 µL) |
Two dilution steps total. Eppendorf tubes are used at each step because they hold up to 1.5 mL and snap closed securely. The P20 pipette handles small transfers (1–10 µL) with precision; the P1000 adds the bulk water volumes.
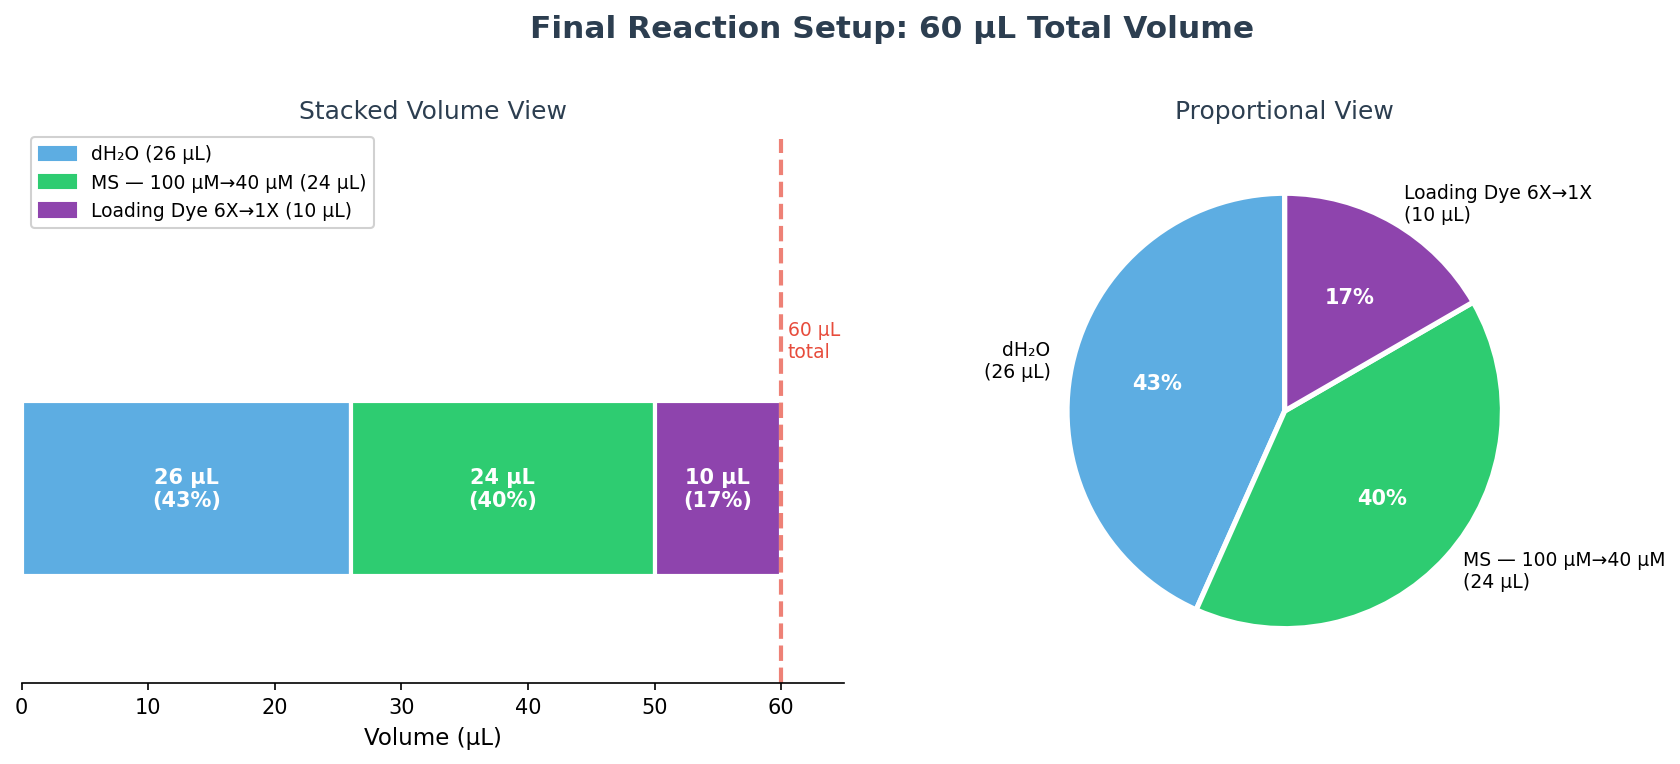
Part c — Final reaction table (60 µL total)
Using C₁V₁ = C₂V₂ for each component:
- Loading dye: V₁ = (1X × 60 µL) / 6X = 10 µL
- MS: V₁ = (40 µM × 60 µL) / 100 µM = 24 µL
- dH₂O: 60 − 10 − 24 = 26 µL
| Reagent | Stock Concentration | Desired Concentration | Volume to Add |
|---|---|---|---|
| Loading dye | 6X | 1X | 10 µL |
| MS | 100 µM | 40 µM | 24 µL |
| dH₂O | n/a | n/a | 26 µL |
| Total | — | — | 60 µL |
Why prepare 100 µM if 40 µM is the target?
Serial dilutions work most reliably when each step uses a round dilution factor (e.g., 1:500, 1:100) that keeps every transfer volume within the accurate range of an appropriate pipette. Diluting 5 M directly to 40 µM would require a 125,000× dilution — no two-step combination with round factors produces this cleanly. By creating a 100 µM intermediate stock first, the dilution ladder stays simple (1:499 → 1:99), and the final 40 µM is achieved precisely in the reaction setup using the P20. A secondary benefit: the 100 µM stock can be re-used for additional experiments without repeating the full dilution from scratch.
Lab Documentation
Materials
| Equipment | Volume Range | Use in This Lab |
|---|---|---|
| P20 pipette | 1–20 µL | MS stock transfers (1 µL, 10 µL), loading dye |
| P200 pipette | 20–200 µL | Color solutions, portions of water addition |
| P1000 pipette | 100–1000 µL | Bulk water addition during serial dilution |
| 1.5 mL Eppendorf tubes | Up to 1.5 mL | Both serial dilution steps |
| PCR tube strips | ~200 µL each | Final reaction |
| Tube holder | — | Stability during pipetting |
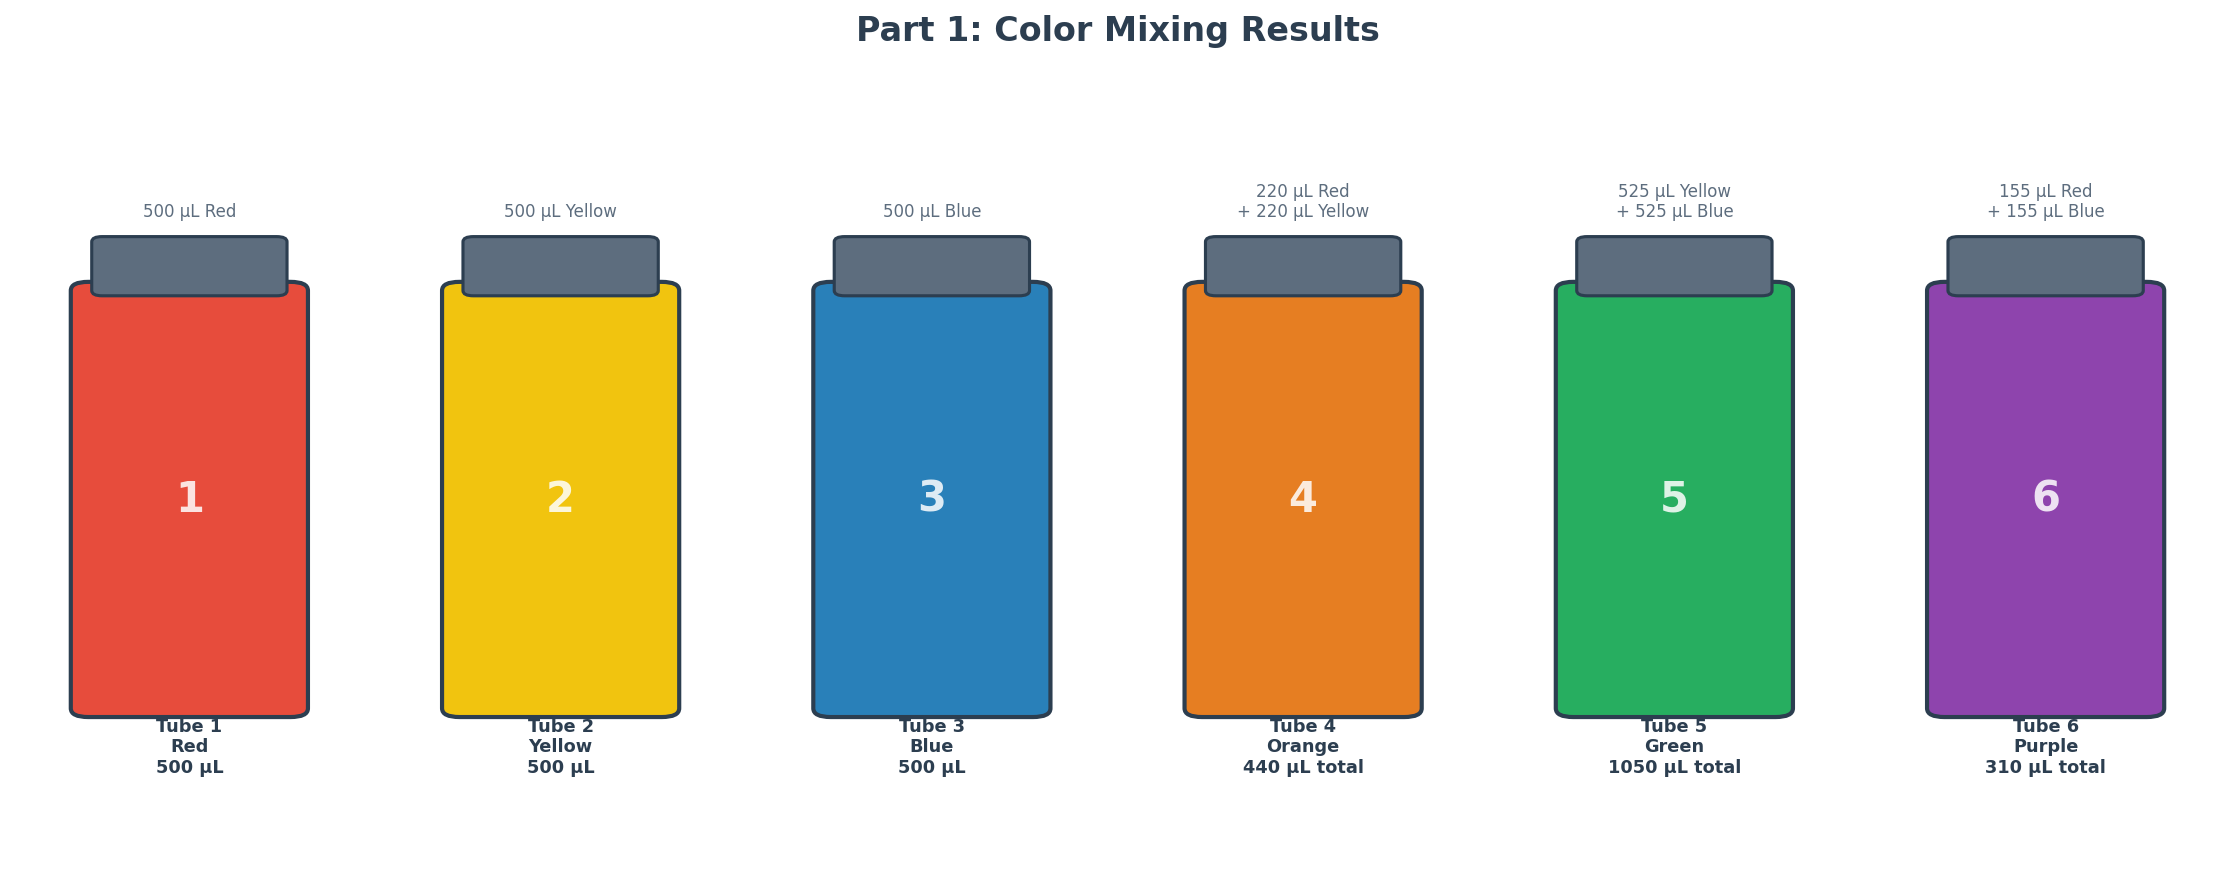
Part 1: Mixing Colors
Six numbered Eppendorf tubes were prepared using red, yellow, and blue food coloring solutions to explore color mixing and build volume intuition at different scales.
| Tube | Solution(s) | Volume(s) | Expected Color |
|---|---|---|---|
| 1 | Red | 500 µL | Red |
| 2 | Yellow | 500 µL | Yellow |
| 3 | Blue | 500 µL | Blue |
| 4 | Red + Yellow | 220 µL + 220 µL | Orange |
| 5 | Yellow + Blue | 525 µL + 525 µL | Green |
| 6 | Red + Blue | 155 µL + 155 µL | Purple |
For Tube 4, the 220 µL of each color was added in two steps: 200 µL first (P200), then 20 µL (P20), with a tip change between colors to prevent cross-contamination. Mixing was done by pipetting up and down 3–4 times after each addition.
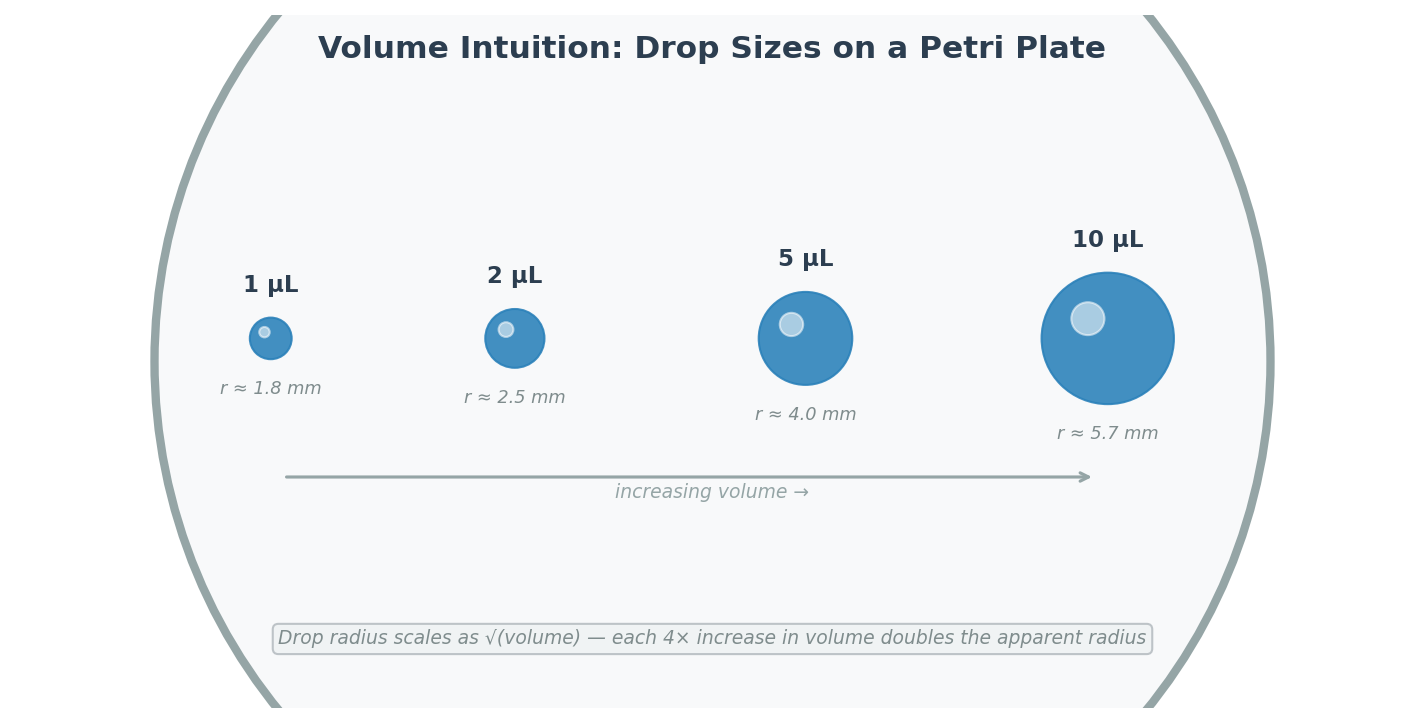
Small volumes of each solution were spotted onto a petri plate in increasing amounts (1 µL, 2 µL, 5 µL, 10 µL) to develop an intuitive sense of scale. At 1 µL, the drop is barely visible; at 10 µL, the drop is clearly a visible dome.
Part 2: Serial Dilution
The two-step protocol was followed to prepare a 100 µM working stock of MS from the 5 M stock, then combined into the final 60 µL reaction:
Step 1 (500× dilution): Using the P20, 1 µL of 5 M MS stock was transferred into a labeled Eppendorf tube. 499 µL of dH₂O was added with the P1000. The solution was mixed by pipetting up and down 4 times. The tube was labeled “10 mM MS”.
Step 2 (100× dilution): Using the P20, 10 µL of the 10 mM intermediate was transferred into a fresh Eppendorf tube. 990 µL of dH₂O was added with the P1000, mixed 4 times, and the tube was labeled “100 µM MS”.
Final Reaction Assembly (60 µL total):
| Order added | Reagent | Volume |
|---|---|---|
| 1 | dH₂O | 26 µL |
| 2 | MS (100 µM stock) | 24 µL |
| 3 | Loading dye (6X) | 10 µL |
| Total | — | 60 µL |
Water was added first to reduce viscosity effects, then MS, then the concentrated loading dye last. The final reaction contains 40 µM MS and 1X loading dye in a bright purple solution.
Bonus — Gel Loading: 20 µL from the final reaction was pipetted into a pre-prepared agarose gel well. The tip was held just above the well opening (not inserted deeply) and the plunger depressed slowly and steadily to avoid puncturing the gel while ensuring the dense, dye-loaded solution sank into the well.